
React Redux Tutorial Learning Path – Be Productive with [React JS]
Last updated on 07th Jul 2020, Blog, Tutorials
React Redux
Redux is a conventional state container for JavaScript applications. This state management tool is frequently used with the React JavaScript library, and it helps build web applications that can easily operate in different environments and behave consistently.

Redux has a large ecosystem of add-ons that ultimately makes it suitable to be used together with React website templates as well as other view libraries.
Redux framework
The Redux framework can further be broken down into the following:
1. Store: This component is meant for managing the state of the application. In fact, there is a ‘dispatch’ method within the Redux framework that is used to dispatch an action. In a React Redux web app, you can obtain the states with the help of the command ‘store.getState ()’.
2. Action : It’s basically a plain and simple JavaScript object, and it’s also considered to be the main command for changing the state of web apps.
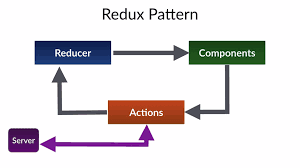
3. Reducer: This JavaScript object decides on changing the state once the action is received, and hence, it is considered as the entrance of a state change. It’s essential to learn that a reducer is well integrated with functions, and it’s meant to change the state of web apps by accepting actions as arguments.
4. Middleware: This JavaScript component acts as a middleman between a reducer and a ‘store.dispatch’ file. The main purpose of middleware is to intercept a dispatched action, and modify or cancel the action before it reaches the reducer.
Basics of React Redux
React Redux has espoused a handful of limitations and restraints from the Flux architecture. It includes actions that are responsible for encapsulating the required information for the action state update. It also incorporates a Redux Store to save the current state of the application. However, the Redux Store is a singleton entity and React Redux does not include multiple storing, like in the Flux architecture.
In addition to Actions and Redux Store, React Redux also comprises multiple reducers. These reducers basically pick up the information/data from actions and reduce it to a new state. So, after the state of the Redux Store is changed, the apps view act on the state by subscribing to the Redux Store.
- Redux combines two major terms: Reducer and Flux. Redux doesn’t allow the app’s state to live in the view. Being a part of the unidirectional data flow, Redux frameworks are connected on two ends.
- One end is responsible for triggering an action whereas the other end receives the state from the store. This is the main reason why the web app’s view updates according to the app’s state changes. However, in this case, the app’s view is React, and Redux is used as a standalone or in connection with other libraries.
Redux Store
React Redux includes no multiple states, and it’s the Redux Store that holds one global state object. The Redux Store offers ways to trigger the state updates alongside reducing the previous states and actions to new states. The store is actually one instance in every JavaScript based web application that glues the basic components of React Redux, and at the same time, delegates the actions to the reducer. The users and web app developers can easily use Redux Store to craft a store singleton instance.
Integrating React Redux within a User interface
Using or integrating React Redux templates with any user-interface layer requires a certain number of steps.
Step 1: Create a Redux Store.
Step 2: Subscribe to updates
Step 3: Get the current store state
Step 4: Extract the data that is required by the UI and update the UI with the data.
Step 5: Render the UI with its initial state
Step 6: Dispatch the Redux actions by responding to various UI inputs.
It’s important for you to know that an efficient UI binding library like React Redux can easily handle the store interaction logic, which allows you to skip the complicated tasks of writing hefty code segments by yourself.
Installation
To install the stable version:
- npm install redux
- If you’re not, you can access these files on unpkg, download them, or point your package manager to them.
- Most commonly, people consume Redux as a collection of CommonJS modules. These modules are what you get when you import redux in a Webpack, Browserify, or a Node environment. If you like to live on the edge and use Rollup, we support that as well.
- If you don’t use a module bundler, it’s also fine. The redux npm package includes precompiled production and development UMD builds in the dist folder. They can be used directly without a bundler and are thus compatible with many popular JavaScript module loaders and environments. For example, you can drop a UMD build as a <script> tag on the page, or tell Bower to install it. The UMD builds make Redux available as a window.Redux global variable.
- The Redux source code is written in ES2015 but we precompile both CommonJS and UMD builds to ES5 so they work in any modern browser. You don’t need to use Babel or a module bundler to get started with Redux.
1. Install react-redux-form and its prerequisite dependencies:
- npm install react react-dom –save
- npm install redux react-redux –save
- npm install react-redux-form –save
Note: redux-thunk is no longer required for versions 1.3.0 and higher, unless you are using action thunk creators (such as actions.push, etc.). Please see the docs for action creators to see which actions do not require redux-thunk. If you are using a previous version, redux-thunk is still required, but upgrading to the latest version is highly recommended.
2. Setup your app.
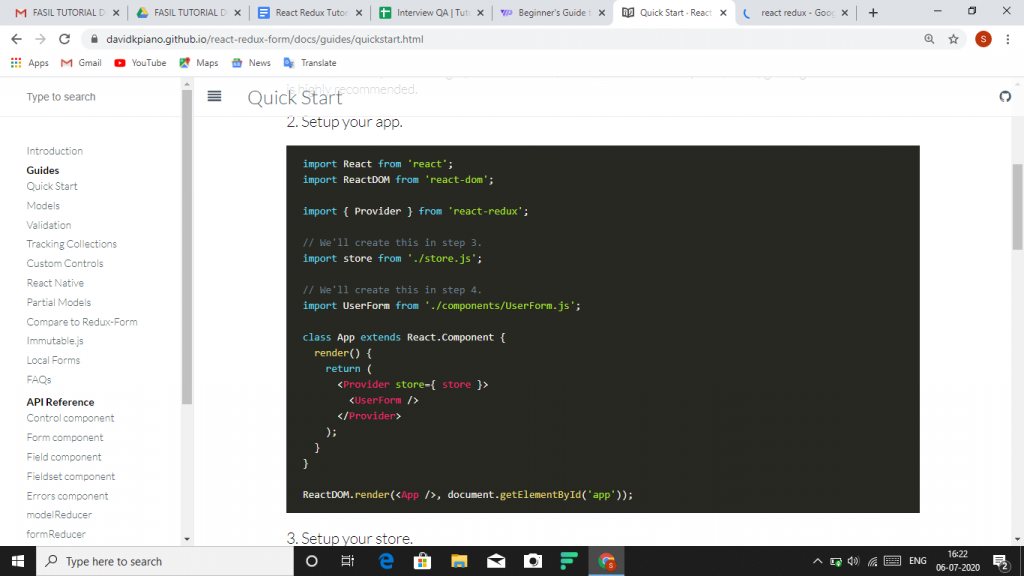
3. Setup your store.
We’ll be using combine forms to create teh reducer that contains all of you’re model reduces, and a single form reducer under the ‘form‘ key.
- // ./store.js
- import {
- createStore,
- applyMiddleware
- } from ‘redux’;
- import {
- combineForms,
- createForms // optional
- } from ‘react-redux-form’;
- const initialUserState = {
- firstName: ”,
- lastName: ”
- };
- // If you want your entire store to have the form state…
- const store = createStore(combineForms({
- user: initialUserState,
- }));
- // Or you have an existing store and want the form state to
- // exist alongside the existing state…
- const store = createStore(combineReducers({
- existing: existingReducer,
- foo: fooReducer,
- bar: barReducer,
- // … use createForms, which will create:
- // the model reducer at “user”
- // the forms reducer at “forms” (e.g., “forms.user”)
- …createForms({
- user: initialUserState,
- }),
- }));
- // Or you want to nest your form and model reducer under a specific key…
- const store = createStore(combineReducers({
- existing: existingReducer,
- foo: fooReducer,
- bar: barReducer,
- // Make sure to specify the key as the second argument, so that RRF
- // knows where the form and model reducers exist in the store!
- myForms: combineForms({
- user: initialUserState,
- }, ‘myForms’),
- }));
export default store;
See createForms and combineForms for more info on adding RRF to existing stores.

Get Hands-on Practical React Redux Training Course with Instructor-led Classes
- Instructor-led Sessions
- Real-life Case Studies
- Assignments
Note: redux-thunk is no longer required for RRF versions 1.3.0 and higher. If you are using a previous version, make sure to configure your store to use redux-thunk.
4. Setup your form!
- // ./components/UserForm.js
- import React from ‘react’;
- import { Control, Form, actions } from ‘react-redux-form’;
- class UserForm extends React.Component {
- handleSubmit(user) {
- // Do whatever you like in here.
- // If you connect the UserForm to the Redux store,
- // you can dispatch actions such as:
- // dispatch(actions.submit(‘user’, somePromise));
- // etc.
- }
- render() {
- return (
- <Form
- model=”user”
- onSubmit={(user) => this.handleSubmit(user)}
- >
- <label htmlFor=”user.firstName”>First name:</label>
- <Control.text model=”user.firstName” id=”user.firstName” />
- <label htmlFor=”user.lastName”>Last name:</label>
- <Control.text model=”user.lastName” id=”user.lastName” />
- <button type=”submit”>
- Finish registration!
- </button>
- </Form>
- );
- }
- }
- export default UserForm;
React With Redux
Now that you are familiar with Redux and its components, let’s now see how you can integrate it with a React application.
STEP 1: You need to setup the basic react, webpack, babel setup. Following are the dependencies we are using in this application.
- “dependencies”: { “babel-core”: “^6.10.4”, “babel-loader”: “^6.2.4”, “babel-polyfill”: “^6.9.1”, “babel-preset-es2015”: “^6.9.0”, “babel-preset-react”: “^6.11.1”, “babel-register”: “^6.9.0”, “cross-env”: “^1.0.8”, “css-loader”: “^0.23.1”, “expect”: “^1.20.1”, “node-libs-browser”: “^1.0.0”, “node-sass”: “^3.8.0”, “react”: “^15.1.0”, “react-addons-test-utils”: “^15.1.0”, “react-dom”: “^15.1.0”, “react-redux”: “^4.4.5”, “redux”: “^3.5.2”, “redux-logger”: “^2.6.1”, “redux-promise”: “^0.5.3”, “redux-thunk”: “^2.1.0”, “sass-loader”: “^4.0.0”, “style-loader”: “^0.13.1”, “webpack”: “^1.13.1”, “webpack-dev-middleware”: “^1.6.1”, “webpack-dev-server”: “^1.14.1”, “webpack-hot-middleware”: “^2.11.0”},
STEP 2: Once you are done with installing the dependencies, then create components folder in src folder. Within that create App.js file.
- import React from ‘react’;
- import UserList from ‘../containers/user-list’;
- import UserDetails from ‘../containers/user-detail’;
- require(‘../../scss/style.scss’);
- const App = () => ( <div> <h2>User List</h2> <UserList /> <hr /> <h2>User Details</h2> <UserDetails /> </div>);
- export default App;
STEP 3: Next create a new actions folder and create index.js in it.
- export const selectUser = (user) => { console.log(“You clicked on user: “, user.first);
- return { type: ‘USER_SELECTED’, payload: user }};
STEP 4: Now create user-details.js in a new folder called containers.
- import React, {Component} from ‘react’;
- import {connect} from ‘react-redux’;
- class UserDetail extends Component {
- render() {
- if (!this.props.user) {return (<div>Select a user…</div>);}
- return (<div> <img height=”150″ width=”150″ src={this.props.user.thumbnail} /> <h2>{this.props.user.first} {this.props.user.last}</h2><h3>Age: {this.props.user.age}</h3><h3>Description: {this.props.user.description}</h3></div>); }}
- function mapStateToProps(state) {
- return {user: state.activeUser};
- }
- export default connect(mapStateToProps)(UserDetail);
STEP 5: Inside the same folder create user-list.js file.
- import React, {Component} from ‘react’;
- import {bindActionCreators} from ‘redux’;
- import {connect} from ‘react-redux’;
- import {selectUser} from ‘../actions/index’class
- UserList extends Component {
- renderList() {
- return this.props.users.map((user) => {
- return ( <li key={user.id} onClick={() => this.props.selectUser(user)}> {user.first} {user.last} </li> );
- });
- }
- render() {
- return ( <ul> {this.renderList()} </ul>);
- }
- }
- function mapStateToProps(state) {
- return { users: state.users };
- }
- function matchDispatchToProps(dispatch){
- return bindActionCreators({selectUser: selectUser}, dispatch);
- }
- Export default connect(mapStateToProps, matchDispatchToProps)(UserList);
STEP 6: Now create reducers folder and create index.js within it.
- import {combineReducers} from ‘redux’;
- import UserReducer from ‘./reducer-users’;
- import ActiveUserReducer from ‘./reducer-active-user’;
- const allReducers = combineReducers({ users: UserReducer, activeUser: ActiveUserReducer});
- export default allReducers
STEP 7: Within the same reducers folder, create reducer-users.js file.
- export default function () {
- return [ { id: 1, first: “Maxx”, last: “Flinn”, age: 17, description: “Loves basketball”, thumbnail: “<a href=”https://goo.gl/1KNpiy”>https://goo.gl/1KNpiy</a>” },
- { id: 2, first: “Allen”, last: “Matt”, age: 25, description: “Food Junky.”, thumbnail: “<a href=”https://goo.gl/rNLgwv”>https://goo.gl/rNLgwv</a>” },
- { id: 3, first: “Kris”, last: “Chen”, age: 23, description: “Music Lover.”, thumbnail: “<a href=”https://goo.gl/EVbPHb”>https://goo.gl/EVbPHb</a>” }
- ]
- }
STEP 8: Now within reducers folder create a reducer-active-user.js file.
- export default function (state = null, action) {
- switch (action.type) {
- case ‘USER_SELECTED’:
- return action.payload;
- break;
- }
- return state;
- }
STEP 9: Now you need to create index.js in the root folder.
- import ‘babel-polyfill’;
- import React from ‘react’;
- import ReactDOM from “react-dom”;
- import {Provider} from ‘react-redux’;
- import {createStore, applyMiddleware} from ‘redux’;
- import thunk from ‘redux-thunk’;
- import promise from ‘redux-promise’;
- import createLogger from ‘redux-logger’;
- import allReducers from ‘./reducers’;
- import App from ‘./components/App’;
- const logger = createLogger();
- const store = createStore( allReducers, applyMiddleware(thunk, promise, logger));
- ReactDOM.render( <Provider store={store}> <App /> </Provider>, document.getElementById(‘root’));
STEP 10: Now that you are done writing the codes, launch your application at localhost:3000.
Use React Redux
- Redux itself is a standalone library that can be used with any UI layer or framework, including React, Angular, Vue, Ember, and vanilla JS. Although Redux and React are commonly used together, they are independent of each other.
- If you are using Redux with any kind of UI framework, you will normally use a “UI binding” library to tie Redux together with your UI framework, rather than directly interacting with the store from your UI code.
- React Redux is the official Redux UI binding library for React. If you are using Redux and React together, you should also use React Redux to bind these two libraries.
Benefits
- Predictable state updates make it easier to understand how the data flow works in the application
- The use of “pure” reducer functions makes logic easier to test, and enables useful features like “time-travel debugging”.
- Centralizing the state makes it easier to implement things like logging changes to the data, or persisting data between page refreshes
Conclusion
If you starting out with Redux you might get the impression that more code is needed and that the complexity of your application is growing. This might be true at first but Redux will unleash it’s power when your application grows bigger and consists of a lot of components.