
Last updated on 24th Feb 2025| 5589
- Introduction to Docker Push
- Prerequisites for Pushing Images
- Tagging Docker Images
- What is Docker Image Tagging?
- How to Tag an Image
- Why Tagging is Important
- Pushing Images to Docker Hub and Private Registries
- Verifying and Managing Pushed Images
- Conclusion
Introduction to Docker Push
The docker push command is an essential part of the Docker ecosystem, enabling developers to upload their locally built or pulled Docker images to a registry. Docker images serve as the foundation for containers, and after creating or customizing an image locally, the next step is often to share it or deploy it in a different environment. The docker push command facilitates this by transferring the image to a Docker registry, such as Docker Hub or a private registry. Docker registries are repositories where Docker images are stored. Docker Training is the most popular public registry, but many organizations also use private registries for secure or controlled image storage and sharing. The docker push command is critical for deploying applications at scale, distributing software across different systems, or collaborating with others by sharing images. It allows teams to work together by ensuring everyone uses the same versions of images in various environments.
Prerequisites for Pushing Images:
Before using the docker push command to upload an image to a registry several prerequisites need to be met. These are the key factors to consider:
Docker Image Creation or Pulling:To push an image to a registry you must first have a Docker image on your local machine. You can create an image by writing a Dockerfile or pull an image from a registry using the docker pull command. Only locally stored images can be pushed to a registry. .
Registry Authentication:If you plan to push an image to Docker Hub or a private registry, you must first authenticate with the registry. This is done using the Docker Containers on AWS. For Docker Hub, you’ll authenticate using your username and password. For private registries, you’ll need the appropriate credentials. Example:
- #docker login
The image must be tagged before it can be pushed. Tags identify the image version and repository location. Without a tag Docker won’t know where to store the image. We’ll discuss tagging in more detail in the next section.
Docker Daemon Running:To push an image, the Docker daemon must be running. The Docker daemon is the background service that handles Docker commands, including pushing and pulling images. Ensure Docker is set up and running before executing the docker push command.
Access Permissions:If you’re working with a private registry ensure that your account has the necessary permissions to push images to the repository. For Docker on Ubuntu, this requires write access to the repository. For private registries ensure you have the appropriate access rights.
Learn how to manage and deploy cloud services by joining this Docker Training Course today.
Tagging Docker Images
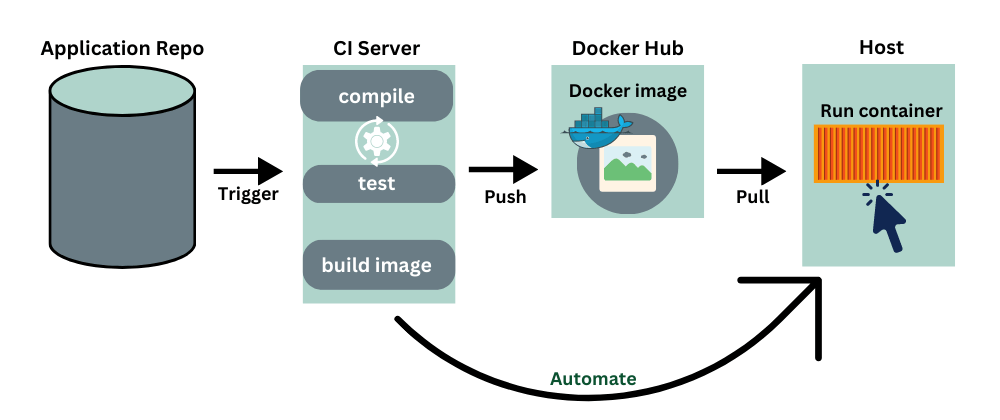
Tagging is a critical step when pushing Docker images, as it allows developers to assign a label or identifier to an image, which helps in versioning and managing different iterations of the same image. Docker uses tags to differentiate between various versions of an image, such as development, staging, or production. Docker Training is crucial for tracking changes, ensuring consistency across environments, and enabling rollback to previous versions if needed. Proper tagging also plays a significant role in automating Continuous Integration/Continuous Deployment (CI/CD) pipelines, as it ensures that the correct version of an image is deployed or tested in the right environment.
What is Docker Image Tagging?
A tag is a label assigned to a Master Docker Entrypoint that provides versioning information. Docker tags follow the format:
- #repository-name:tag
repository-name: The name of the repository where the image will be stored (e.g., ubuntu, nginx, myapp).
tag: The version or identifier for the image (e.g., latest, v1.0, stable, or a specific version like 20.04).
By default if you don’t specify a tag, Docker will assign the latest tag. However, its always a good practice to use specific tags to avoid confusion and ensure you know which version of an image you’re working with.
Unlock your potential in Docker with this Docker Training Course .
How to Tag an Image
To tag an image, use the docker tag command. The syntax is as follows:
- #docker tag [SOURCE_IMAGE] [REPOSITORY_NAME]:[TAG]
For example, if you have an image named myapp and you want to tag it as version v1.0 for Docker Hub:
- #docker tag myapp username/myapp:v1.0
This tags the myapp image with the name username/myapp:v1.0, where username is your Docker Hub username and v1.0 is the version tag.
Looking to master Cloud Computing? Sign up for ACTE’s Cloud Computing Master Program Training Course and begin your journey today!
Why Tagging is Important
- Version Control: Tags help track image versions allowing easy rollback to previous versions if needed.
- Clarity: Proper tagging makes it clear which image version you’re working with reducing confusion.
- Continuous Delivery: Tags help automate the CI/CD pipeline, ensuring the correct version is deployed.
Pushing Images to Docker Hub and Private Registries
Once your image is tagged, it is ready to be pushed to a Docker registry. Below is the process for pushing images to Docker Hub ( Docker Redis ) and private registries.
Pushing Images to Docker Hub:Login to Docker Hub: Authenticate using the docker login command to gain access to your Docker Hub account. If you don’t have an account, create one at Docker Hub. Example:
- docker login
Tag the Image: Make sure your image is tagged with your Docker Hub username and version.
Push the Image: Use the docker push command to upload the image to Docker Hub:
- # docker push username/myapp:v1.0
Replace username with your Docker Hub username and myapp:v1.0 with the tagged image name.
Verify the Push: Once the image is successfully uploaded, log in to Docker Hub and check your repositories to see the image listed.
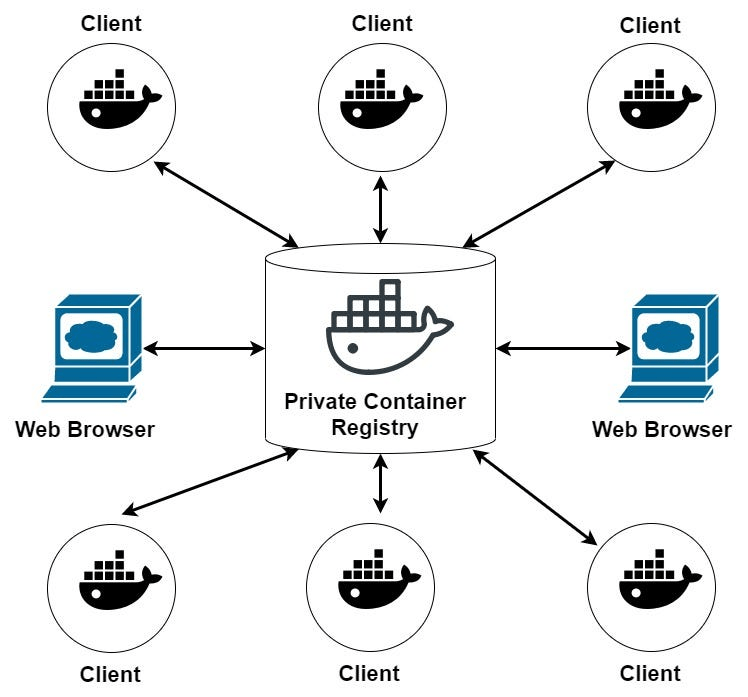
Pushing Images to Private Registries: If you’re pushing to a private registry, the process is nearly the same but requires an additional step to specify the registry URL.

Login to the Private Registry: Authenticate using the docker login command, specifying the private registry URL:
Example:- # docker login myprivateregistry.com
Tag the Image: Tag the image with the private registry’s URL and the desired version. Example:
- docker tag myapp myprivateregistry.com/myapp:v1.0
Push the Image: Upload the image to the private registry using the docker push command:
- # docker push myprivateregistry.com/myapp:v1.0
Verify the Push: Use the API or check your private registry dashboard to confirm that the image has been pushed.
Boost your chances in Docker interviews by checking out our blog on Docker Interview Questions and Answers!
Verifying and Managing Pushed Images
After pushing them its critical to ensure that everything went according to plan and to handle the photo well.
Verifying Pushed Images: To confirm that an image has been successfully pushed:
Check Docker Hub or Private Registry : Log into your registry (Docker Hub or private registry) and look for your image in the repository.
Use Docker CLI : You can also use the docker search command to Creating and Understanding Docker Images is available on Docker Hub:
- # docker search myapp
Pull the Image : To verify the image can be pulled, try pulling it from the registry:
- # docker pull username/myapp:v1.0
Removing Images from the Registry : If you no longer need an image you can delete it from Docker Hub or a private registry. This can usually be done via the registry web interface or API.
Automating Image Management : To guarantee seamless operation in CI CD systems image management tasks tagging, pushing, and cleaning up obsolete picture can be automated.
Conclusion
In conclusion, the docker push command is an essential and powerful tool in the Docker ecosystem enabling developers to share and distribute Docker images seamlessly across different environments. By pushing images to a registry teams can collaborate efficiently ensuring that the same version of an image is accessible to everyone involved in the development, testing and deployment processes. Ensuring that your images are properly tagged, authenticated and pushed to the appropriate registry guarantees smooth operations and consistency in various environments in Docker Training Course . Furthermore proper verification of pushed images and ongoing management, including cleaning up outdated versions and ensuring security, significantly enhances the efficiency, reliability and scalability of your development and deployment pipelines. By mastering the docker push command and the practices around it you contribute to better application lifecycle management, improved automation and ultimately, more robust, reliable software deployments.