
Last updated on 07th Jul 2020| 3667
What is approval process in Salesforce?
Approval Process in Salesforce are the automated process where every organization uses to approve records. In Salesforce Approval process there are number of steps involved to approve a record in that object or the one records which satisfies the rule criteria.Approval Process is a very amazing feature in Salesforce to automate the business process. An approval process is a set of the steps necessary for a particular record to be approved or rejected by approve or set of approves.
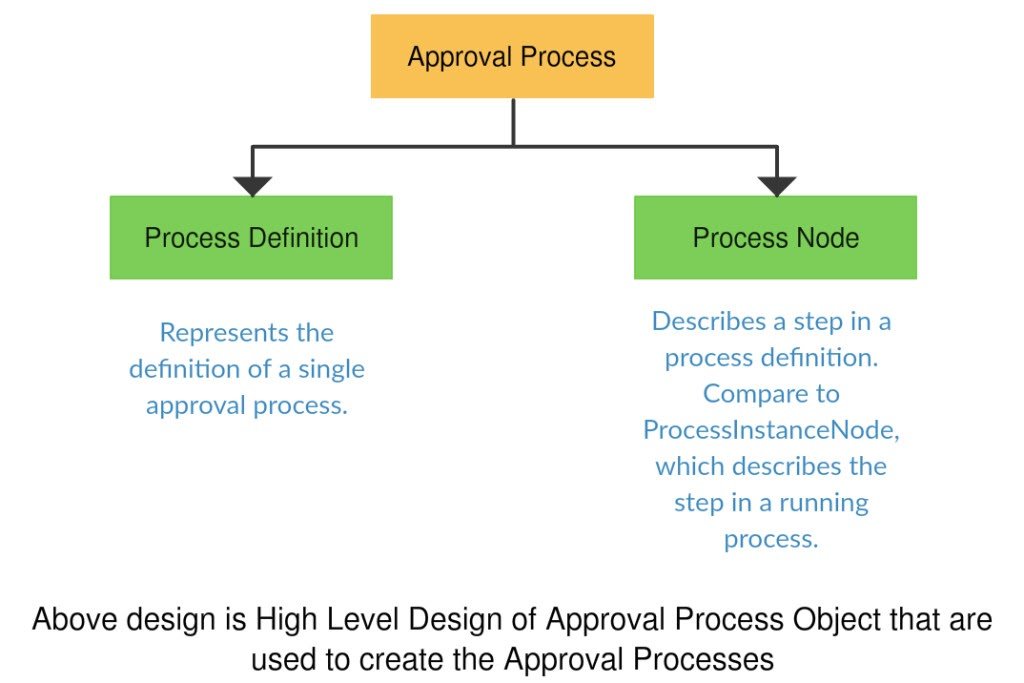
A step can apply to all records included in the process, or just records that meet certain administrator-defined criteria. An approval process also specifies the actions to take when a record is approved, rejected, recalled, or first submitted for approval. Process Definition and Process Node objects act as a template and store the master configurations for Approval Process itself.
Common steps for approval in salesforce are:
- Setup -> Create -> Workflow and Approval -> Approval Process
- Select object for the approval process to be written
- Click on Create New Approval Process
- Select Standard Setup Wizard from drop-down
- Enter the Process name, Unique Name and description for your process
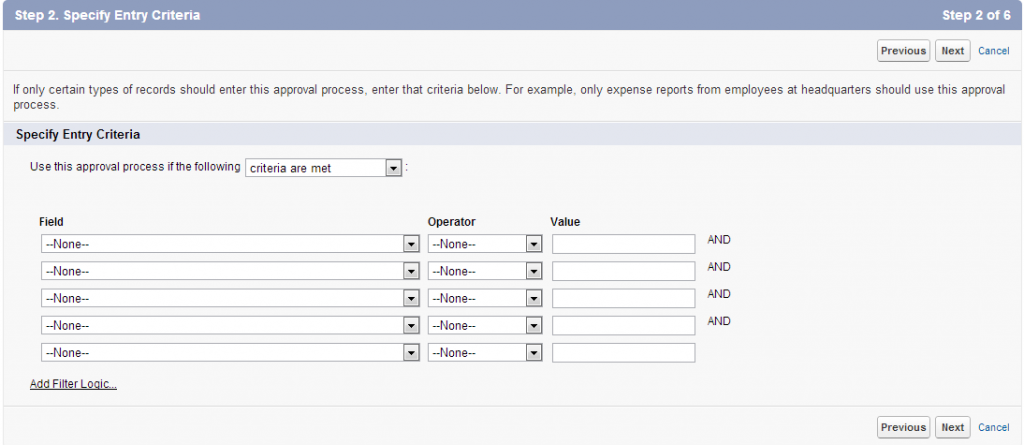
- Specify Entry criteria
This must be defined if you want to work with specific criteria on the field
For example, if you want to apply such criteria that online bill payment can happen only for the bill amount greater than 10,000.
Field is selected as Bill Amount; Operator is greater than values will be 10000.
- Select formula evaluates true to check the syntax of formula and as well as to allow the formula to set criteria.
- You can assign an approval request to different users while writing the approval steps.
- To define initial submission action follow the path below:
New Field Update/Email/Task -> Conditions -> Save
- To define approval steps
- Manager Step -> New Approval Steps -> Enter name -> Repeat for all records -> Select approver manager and save
- CEO Step -> Approval Steps -> Enter name -> Set the criteria -> Save
- For the final approval process, you can use any of the following ways like New Field Update/ Email / Task as per the condition and click on save
- To define Rejection New Field -> Write rejection condition -> Save
Note: To create a default approval process select Jump Start Wizard.
Single-step Approval
If record matches all the auto-filter criteria approve the record.
Multi-steps Approval
The multi-steps approval process in salesforce is necessary when any of the following scenarios happen
- If record does not fit for any of the auto approval criteria already defined
- If record fits for partial auto approval criteria then send it for approval to the appropriate approver
- If record fits the final approval criteria then send it to the approver
Approval Process in Salesforce is an automated process that automates how Salesforce records are approved in your org. Approval Process in Salesforce is a combination of steps for a record to be approved/rejected either by a user, queue or public groups. An approval process also specifies the actions to take when a record is approved, rejected, recalled, or first submitted for approval.
- For example, when an employee creates a time-off request, have Salesforce automatically sends an approval request to the employee’s manager.
- Simple or multi-step approval processes to automate and enforce the approval of virtually anything in your company.
- Navigate setup -> Create -> Workflow & Approvals -> Approval Processes.
- Select Object for the new approval process.
- Click on Create New Approval Process and choose Use Standard Setup Wizard from the drop-down button.
Note: If you want to create a basic approval process with default settings. Click on Use Jump Start Wizard.
Steps to create an Approval Process:
Go to Setup | Build | Create | Workflow & Approvals | Approval Process.
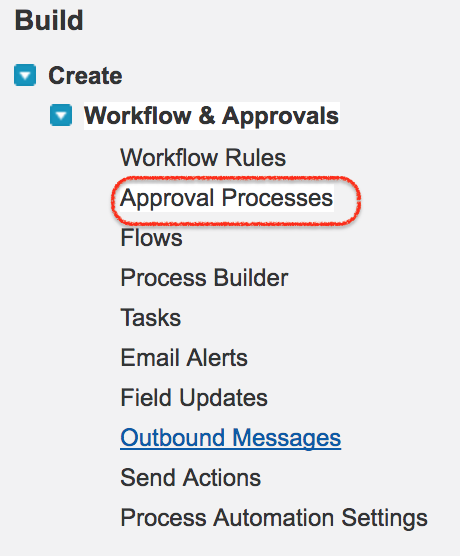
Click on Approval Processes as shown above.
Step 1 : Enter Name and Description for new Approval Process.
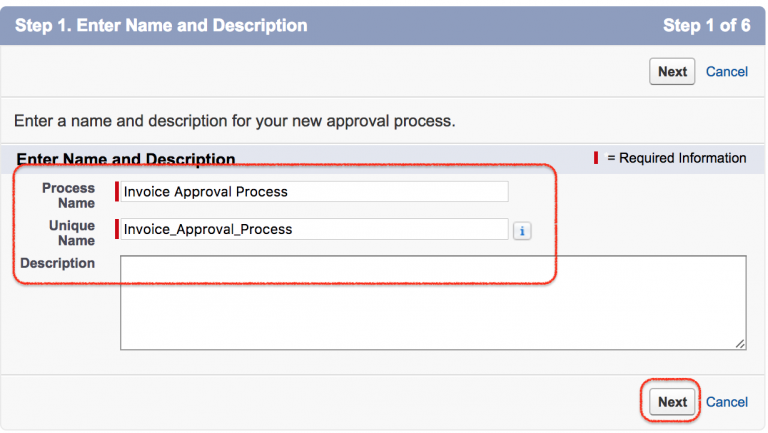
- Enter name and description.
- Click on Next Button.
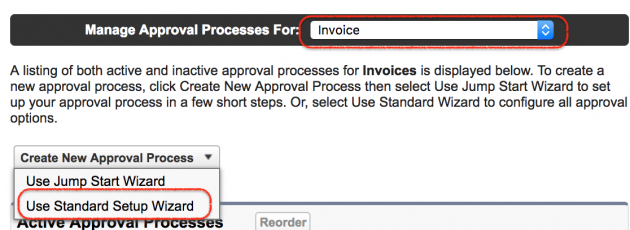
Step 2 : we have to select the Object. Select Invoice As shown above. To create new approval process we have two process
- Jump Start : Involves few to create new Salesforce Approval Process.
- Standard Setup Wizard : It Involves all configuration options while creating new Salesforce Approval Process.
Step 3 : Specifying Rule Criteria.
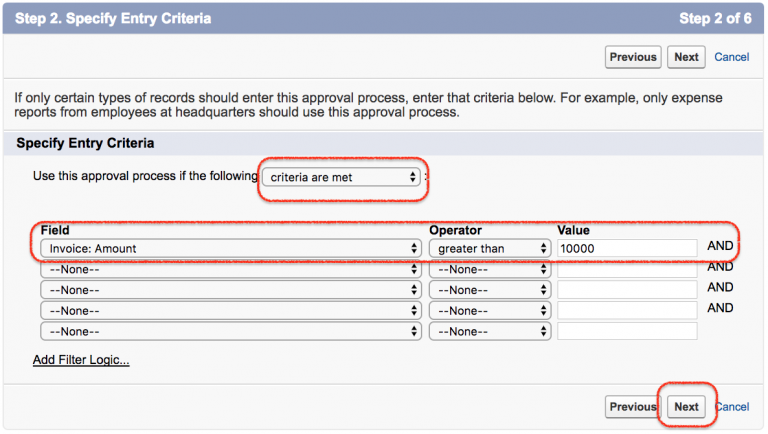
In this Step we have to specify the rule criteria which are the record that are eligible for approval process. As per our requirement we have defined where invoice amount in greater that 10000 the record must be sent to approval process. We can also group multiple entry criteria.
Step 4 : Specifying Approver Field and Record Edibility Properties.
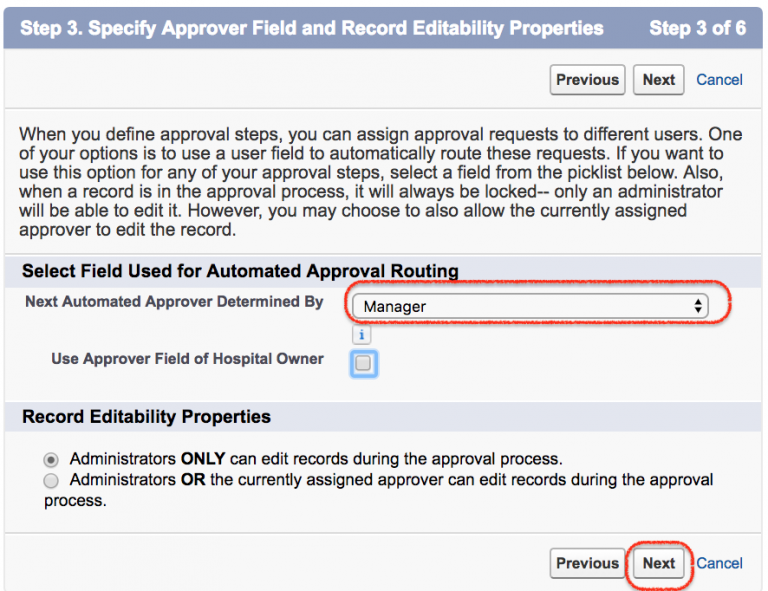
It is about the approver. Select Manager as the approver and click on Next Button.

Get Salesforce Certification Courses with Industry Standard Modules From Expert Trainers
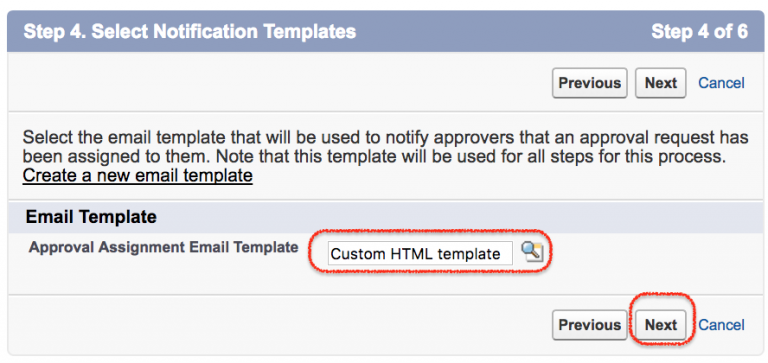
Weekday / Weekend BatchesSee Batch DetailsBefore creating approval process we have to create Email template. An email will be sent to the approver. Select the email template and click on Next button.
Step 5 : Selecting Fields that be displayed on Approver page layout.
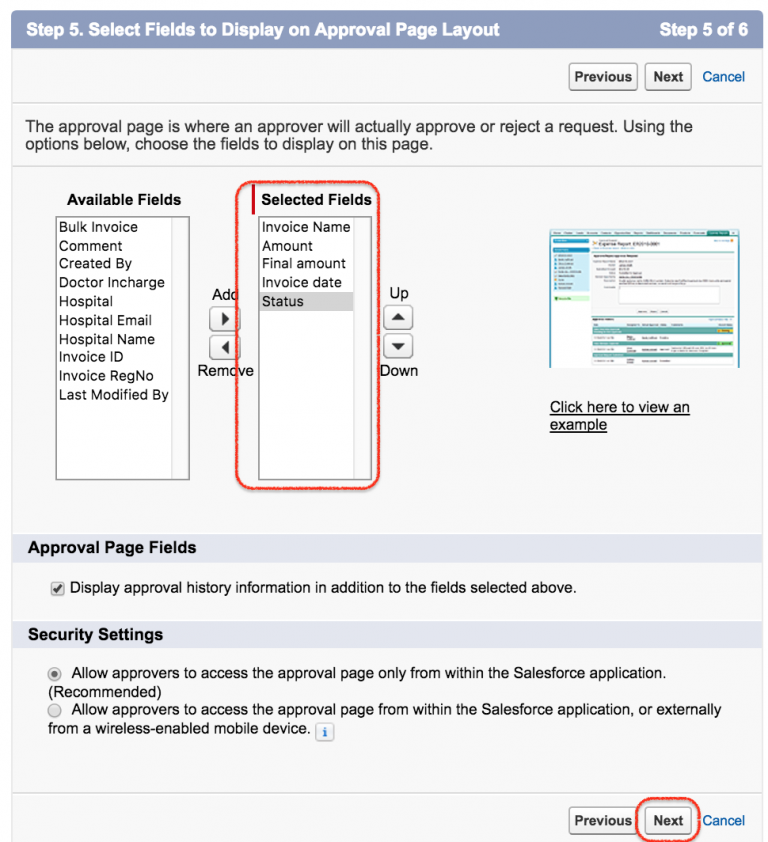
In this step we have to select the fields from available fields to selected fields. Selected fields will be displayed on the approver page layouts. Click on Next button.
Step 6 : Specify Initial Submitter.
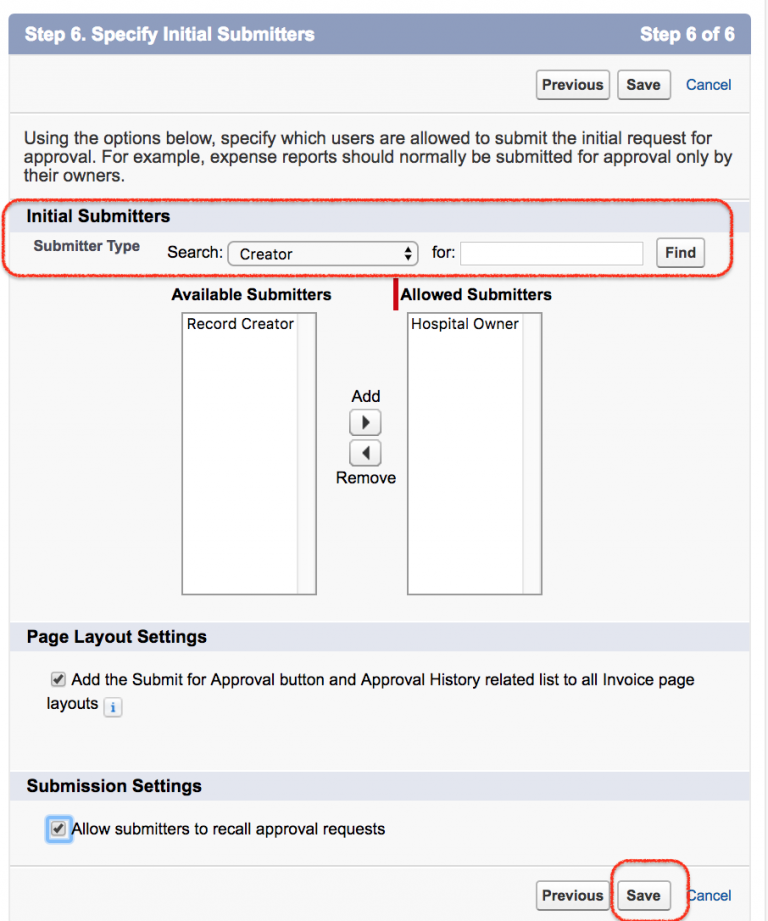
In this step we have to define who are eligible to submit the record for approver like Owner, group, Creator or User. Select the submitter type, select page layout, Submission setting and click on Save button.
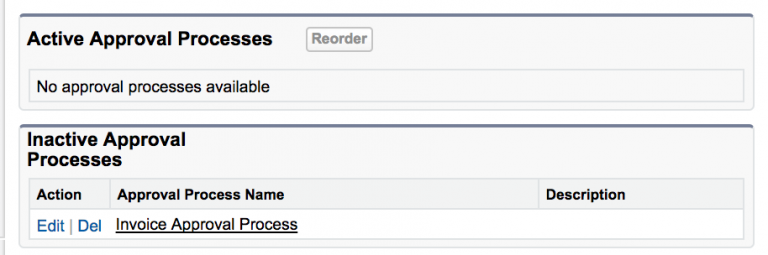
As shown above we have two sections Active Approval Processes and Inactive Approval Processes. The approval Process which we created is not activate so it is available in inactive approval processes. Click on Approval Process name.
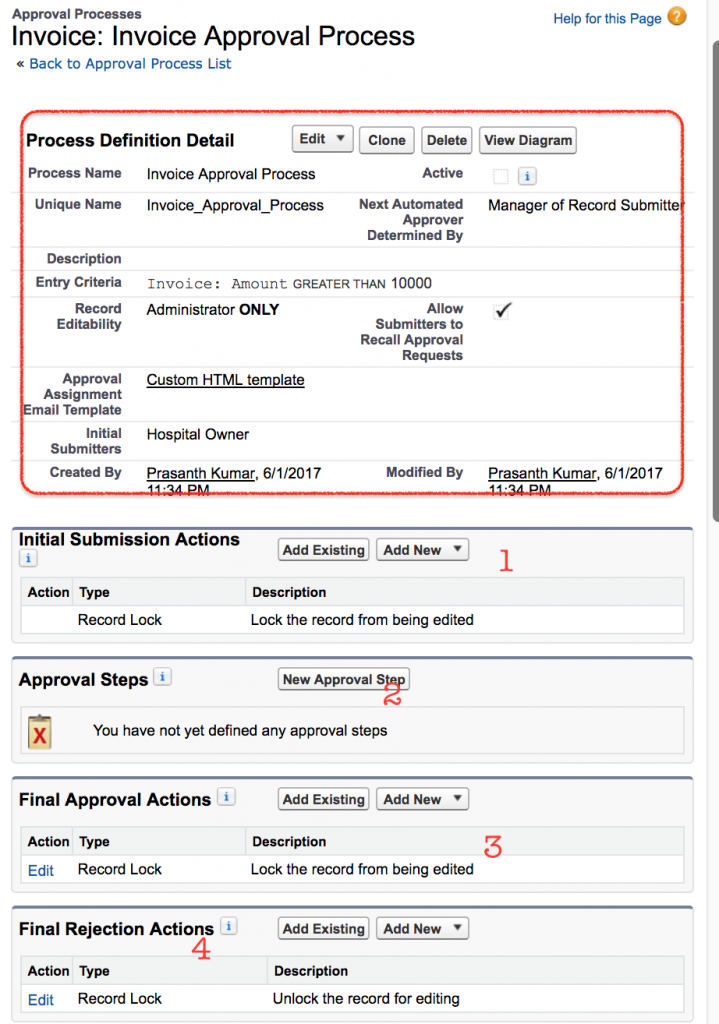
This give the whole details about the approval process. What is the name, Entry criteria, Status, Email Template, Initial Submission actions and So on. Once the Initial Submission action is done the records gets locked by default.
Step 7: Salesforce approval process Example
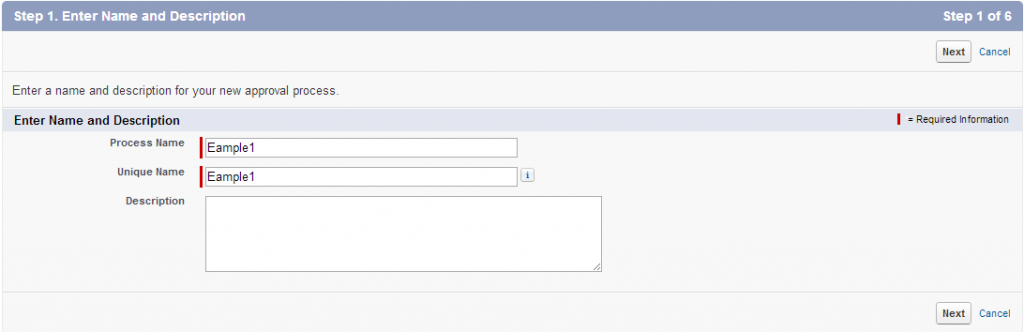
- Enter name, Unique name and Description(Optional).
- Select criteria are met if you want to set a filter criteria that a record must meet to enter this approval process. For example, if only employees from headquarters should use this approval process to submit expense reports, enter the following filter criteria: “Current User: Office Location Equals Headquarters.”
- Enter filter criteria for records that you want to be included in this approval process. Leave the filter blank if you want all records submitted to be included in the approval process.
Select formula evaluates to true if you want a formula to determine what records enter the approval process.
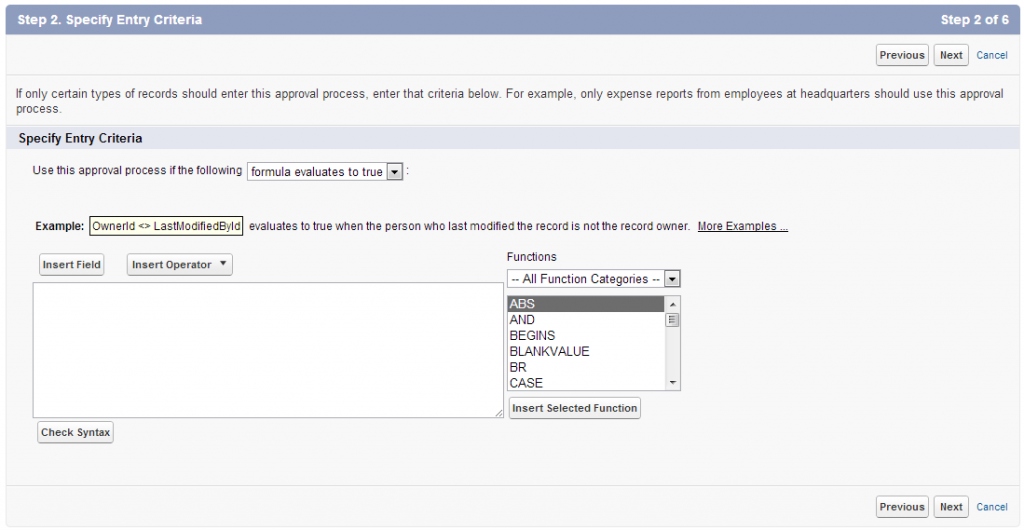
When you define approval steps, you can assign approval requests to different users. One of your options is to use a user field to automatically route these requests. If you want to use this option for any of your approval steps, select a field from the pick list below. Also, when a record is in the approval process, it will always be locked– only an administrator will be able to edit it. However, you may choose to also allow the currently assigned approver to edit the record.

Enroll in Salesforce Training to Build Your Skills & Take Your Career to Next Level
- Instructor-led Sessions
- Real-life Case Studies
- Assignments
Define initial submission actions:
New field update / email / task -> Conditions -> save.
Define approval steps:
- Manager step ->click on new approval step button -> provide the name -> all record should enter this step -> select approver manually and save.
- Manager step -> click on new approval step button -> provide the name -> all record should enter this step -> select approver manually and save.
- CEO step -> click on new approver step button -> provide the name -> enter criteria and save.
Final approval steps:
New field update / Task / Email according to the field provide the condition and save .
Final Rejection actions:
New field -> provide the conditions and save.
- Once the salesforce approval process is activated no more steps can be added.
- Initial submission default actions cannot be edited but final approval & rejection default actions can be edited.
- Responses to “Salesforce approval process”
Software Systems That Support Creating Approval Processes
- There are a variety of software tools that you can use to design and build custom approval processes and workflows using the elements defined in the previous section. The most common tools include Sharepoint, Salesforce, and Microsoft Office programs such as Microsoft Flow. Regardless of which system you choose, look for a program that supports the following functionality (note that some of these items are named differently in certain products, so make sure you understand the utility of the feature):
- Create Discrete Steps: An approval process is only effective if there are clear, defined, and repeatable steps. Choose a program that allows you to write discrete steps that users can easily follow and repeat an infinite number of times.
- Templates and/or Built-In Workflows: Pre-built templates are helpful if you’ll be creating multiple workflows for a variety of specific use cases. This way, you won’t have to start from scratch every time, or hard-code any parameters.
- Customization: Although built-in workflows can help you get started, you may want to retain some flexibility. Choose a program with customization options so you can tailor your process; if it doesn’t fit your needs, there’s no benefit.
- Edit Capabilities: Once you build your workflow and start using it, you might need to make changes to the procedures you initially put in place. Systems that allow editing will save of time.
- Mobile Features: Solutions that offer mobile capabilities enable your team to submit work, receive notifications, make requests, and approve work from their phone or tablet.
- Signature Collection: If you’re approving sensitive or highly important documents and information, you may require a signature. Some programs offer signature collection so that you can verify approvals.
- Feedback Collection: Perhaps you want to create a workflow that elicits feedback, rather than approves work. In this case, look for a program with qualitative collection capabilities. This might be a template option within a larger system (as in Sharepoint, for example).
- Notification Templates: You might also want to send notifications in a specific way, such as an in-app notification, email, or push notification on another device. If you want to control the way a user receives notifications, choose a platform with this function.
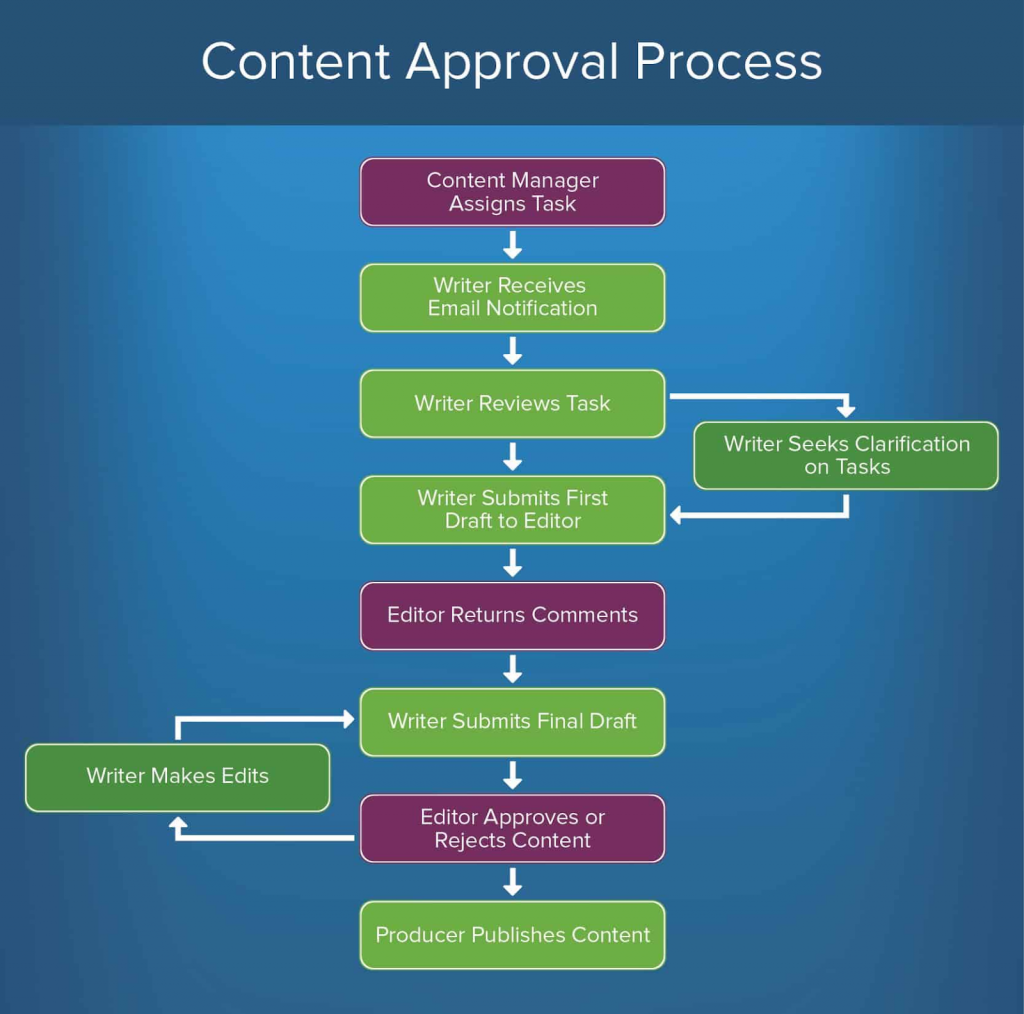
Create a Content or Document Approval Process :
Content approvals are ubiquitous across all industries and types of organizations. They include any creative asset, written work such as an article or social media copy, or any other documentation that needs approval prior to publication.
To create a content approval process, follow this outline of steps:
1. Content Manager Assigns Tasks: The editor creates a schedule of tasks and assigns specific work items to each content producer (in this example, a writer).
2. Writer Receives Email Notification: Institute a standardized way to notify writers of their tasks. Email notifications are easy to use and provide a record of assignment.
3. Writer Reviews Tasks: The writer reviews the assignment and, if necessary, seeks clarification on tasks from the editor.
4. Writer Submits First Draft to Editor: This is the initial submission step where the writer submits the first draft of their work for editor reviews.
5. Editor Returns Comments: In most content approval processes, there will be at least one round of edits. So, build in a step where the editor makes edits and returns the submission to the writer to make additional changes if needed.
6. Writer Submits Final Draft: Once the the necessary edits are made, they return the content to the editor for a second review.
7. Editor Approves or Rejects Content: Here the editor has the option to either approve or reject the content.
- Approve: The content is formally approved.
- Reject: The writer must make more edits. This cycle of edits can continue until the editor is satisfied and the content is officially approved.
8. Producer Publishes Content: Once all edits are finalized, the content is published.
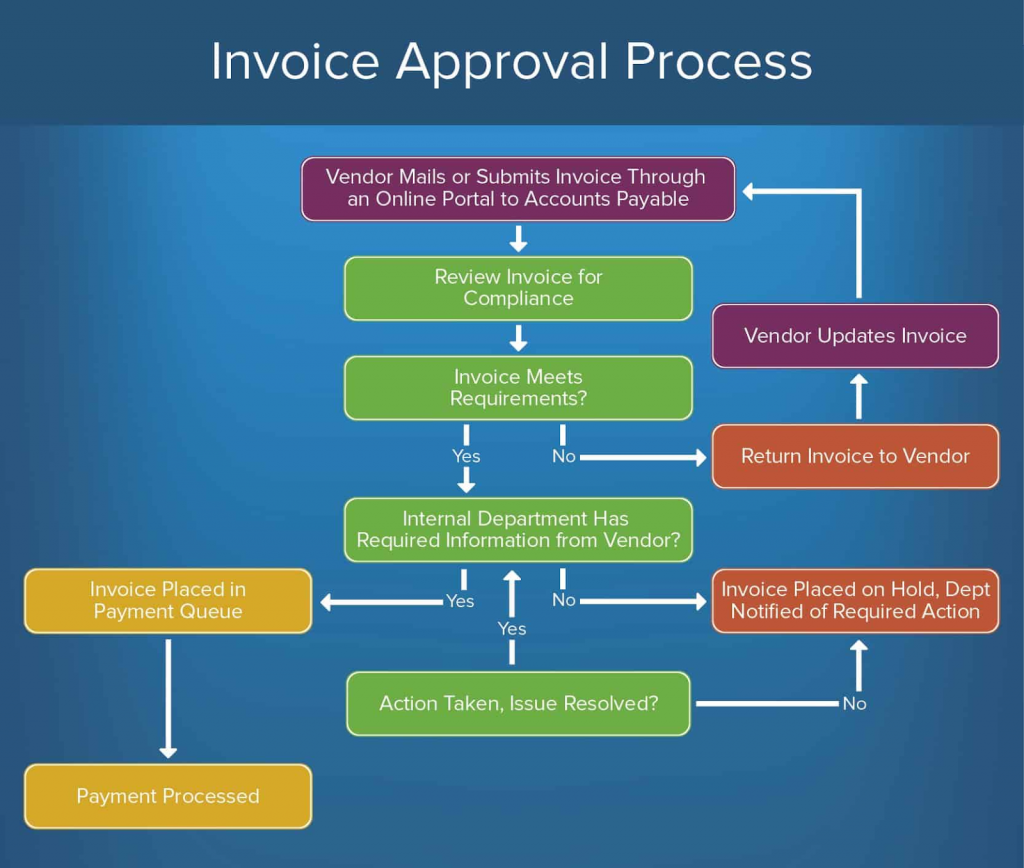
Create an Invoice Approval Process :
Invoice submission is another common practice that a standardized approval process can improve. On a monthly basis, you might receive invoices from vendors, contractors, or even internal employees seeking reimbursement, so creating a repeatable, reliable approval process will help ensure that everyone is correctly paid on time.
To create an invoice approval process, follow this outline of steps:
1. Vendor Mails or Submits Invoice Through an Online Portal to Accounts Payable: The vendor submits their invoice to the correct department or single approver (typically accounting or accounts payable). If using an online portal, the invoice is automatically routed to the correct person or department.
2. Review Invoice for Compliance: This is the initial review made by the approving body. Compliance will differ based on the specific organization, but in general, the invoice should be checked for accuracy and include any necessary support documentation. There are two options here:
3. Invoice Meets Requirements: The invoice can move on to the next stage in the approval process.
4. Invoice Does Not Meet Requirements: The invoice is returned to the vendor, who will update and resubmit the invoice.
5. Internal Department Has Required Information from Vendor: In order for an invoice to be processed and payment sent, the approving body often must include supporting information or documentation about how and why they approved the invoice. So, build a step into your process to verify that the required support documentation is included.
6. Support Material Included: The invoice is placed in the payment queue, processed, and sent to the submitter.
7. Support Material Not Included: The invoice is placed on hold until the approving body compiles all necessary documentation. Once this happens, the invoice returns to the final review stage and if approved, is placed in the payment queue and then processed.
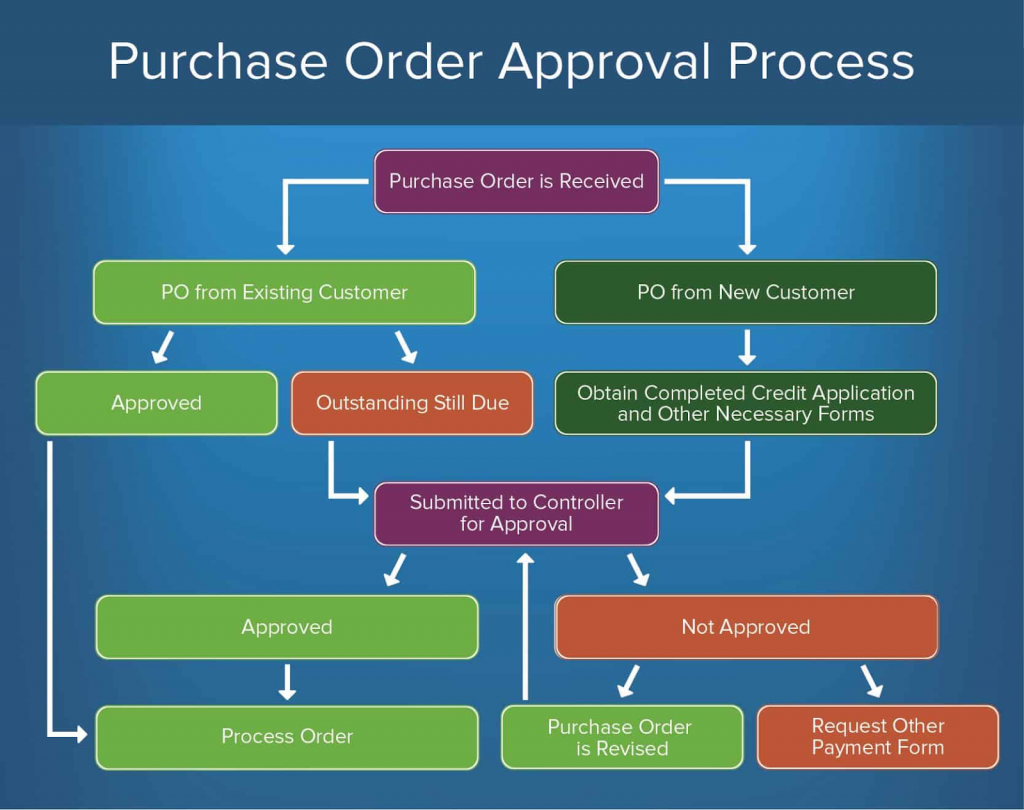
Create a Purchase Order Approval Process :
A purchase order (PO) is a document sent from a buyer to a seller to request a certain amount of goods or services at an agreed upon price. Creating an approval process for purchase orders can help you monitor the pace of incoming requests, manage inventory and resources, and provide a log of your external business.
To create a purchase order approval process, follow this outline of steps:
1. Purchase Order Is Received: The buyer formally submits the initial request for goods or services from the seller. Again, consider creating an online submission portal. From here, the route of approval may differ depending on if the PO is from an existing or new customer. Here are both possible scenarios:
2. PO from Existing Customer: If the PO is from an existing customer, it is processed one of two ways:
- Approved: If everything is correct and the customer has no outstanding balance, the PO is approved and the order is processed.
- Outstanding Still Due: If the customer has an outstanding balance, it is sent to another party for review and approval (Step 2 below).
3. PO from New Customer: The new customer may have to complete a credit application to ensure that they are equipped to pay for the goods or services requested in the PO.
4. Submitted to Controller for Approval: The approving body reviews the PO and any supporting documents (credit application, payment history, etc.) and either approves or rejects the PO.
- Approved: The purchase order has been approved and the order is processed.
- Not Approved: The purchase order has failed to meet requirements and is rejected. The buyer will sometimes request another payment form, or the seller might revise the PO and resubmit it to the controller for approval.
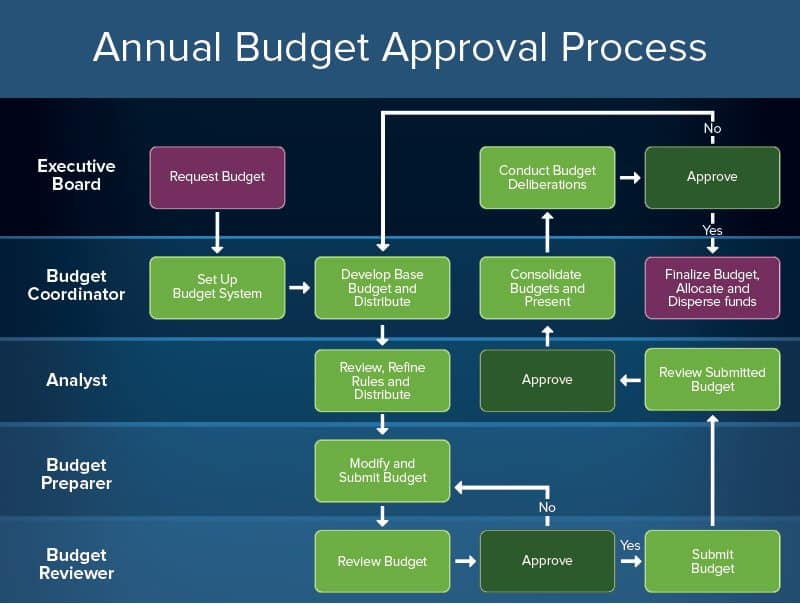
Create an Annual Projected Budget Approval Process :
Most companies have to propose an annual or quarterly budget before they can formally adopt projects and allocate funds. Since most – if not all – of an organization’s operations depend on having a pre-approved budget, it’s essential to have an approval process in place.
To create a budget approval process, follow these steps:
1.Request Budget: The executive board submits their proposed budget.
2. Set Up Budget System: If you don’t already have a system in place to manage and allocate budget, you can build this into your approval process. Complete this step early, as it will inform the rest of your budget review and fund allocation process.
3. Develop Base Budget and Distribute: The budget coordinator defines the base annual budget from which you will measure the proposed budgetary needs.
4. Review, Refine Rules, and Distribute: This is the initial review, usually performed by an analyst.
5. Modify and Submit Budget: Internal budget preparers modify the proposed budget based on the reviewer’s (analyst’s) feedback and resubmits it. In some cases, the original submitter (in this case, the executive board) can also be responsible for modifying and resubmitting the budget.
6. Review Budget: A designated budget reviewer now reviews the most recent draft of the budget.
- Approved: If approved, the budget reviewer submits the final version of the budget back to the analyst for another round of reviews.
- Rejected: The budget goes back to the budget preparer for another round of edits, and is then resubmitted to the budget reviewer. This process may require multiple attempts before the budget is approved.
7. Review Submitted Budget: The analyst performs another review on the submitted budget, which has now been approved by the budget reviewer.
8. Consolidate Budgets and Present: Now that the budget has been approved by all analyst and review levels, the budget coordinator compiles the information and presents it to the executive board for final sign off.
9. Conduct Budget Deliberations: The executive board reviews the changes made by the approving bodies, and either approves or rejects the budget.
- Approved: The budget is now officially approved and is adopted into the organization’s yearly planning. Funds are allocated.
- Rejected: The executive board resubmits their proposed budget (perhaps with modifications) to the budget coordinator; the cycle begins again at Step 3.
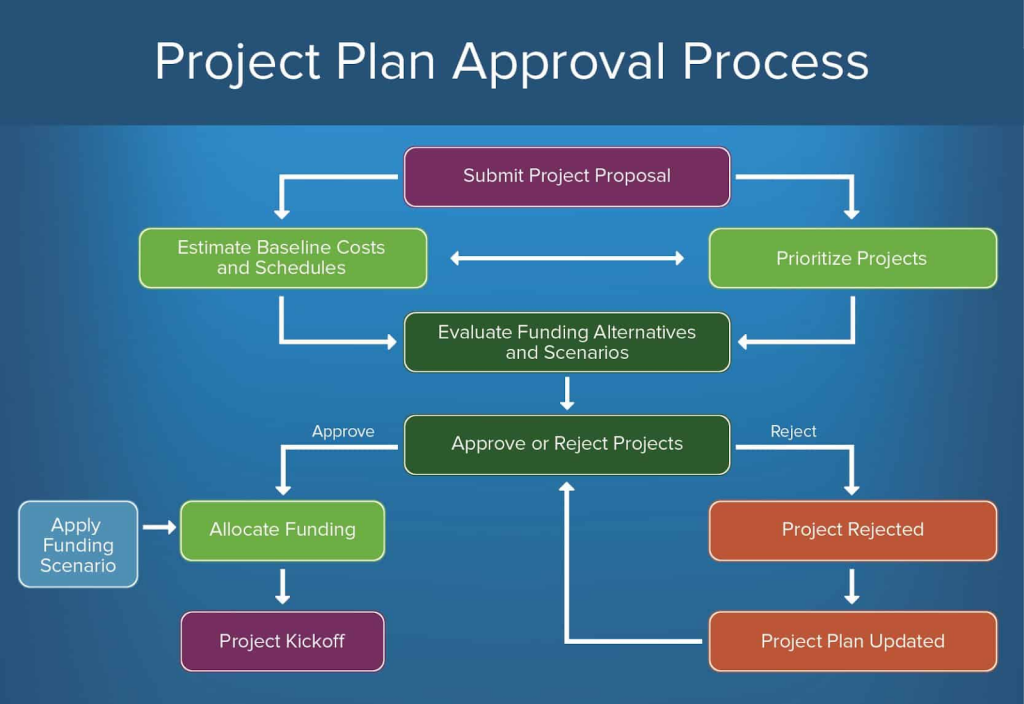
Create a Project Plan and Budget Approval Process :
Every project that an organization adopts must first pass through a series of approvals. With so many competing projects, budgets, and departments, an approval process helps organize and prioritize projects.
To create a project plan and budget approval process, follow this outline of steps:
1.Submit Project Proposal: This is the initial submission, where teams define and request the project they want to take on. You can find a project plan template here.
2.Estimate Baseline Costs and Schedules and Prioritize Projects: In these phases, draft a budget and timeline based on your project proposal, and roughly prioritize projects. There may be some back and forth between these two steps before advancing to the next step.
3.Evaluate Funding Alternatives and Scenarios: It’s important to consider alternatives – both to your project specifications and budget – in the event that your proposal is rejected. Build in a step to draft other options, or aspects of your initial plan.
4.Approve or Reject Projects: The proposal is reviewed by the approving body and either approved or rejected.
- Approved: If approved, funding is allocated for your project and you can hold a project kickoff.
- Rejected: If rejected, the proposal is terminated. However, you can also build a step for submitters to revise the project plan and resubmit for approval.
Important Points to be considered before creating Approval Process in Salesforce.
- Entry criteria for Approval Process in Salesforce must be defined.
- Approval request email template must be created.
- We should gather approval request sender details.
- Determine who is the assigned approver and Delegate approver.
- We must know whether the approval process needs a filter logic or not.
- We must create initial submission actions like email alerts, field updates, tasks, outbound message, updating custo approval status field to “In progress”.
- We can set permissions that users can request approval from a wireless device
- And also we can determine that the users can Edit records that are awaiting for approval.
- And finally we have to assign the actions when an approval requests is approved or rejected.
Conclusion.
When a record is submitted for Approval, it is locked for changes(Except the system administrator and the approver) until the record has completed the approval process. Salesforce limits the number of approval processes in your org, as well as the number of steps and actions in each approval process. Approval Audit History is recorded on a separate related list. After an approval process is activated, you can’t add, delete, or change the order of the steps even if you make the process inactive.In this Salesforce tutorial, we have created Salesforce approval process successfully and also learned about what is Approval Process in Salesforce.com.