
Last updated on 10th Jul 2020| 4268
JMeter is an Open Source testing software. It is a 100% pure Java application for load and performance testing.JMeter is designed to cover various categories of tests such as load testing, functional testing, performance testing, regression testing, etc., and it requires JDK 5 or higher. This tutorial provides in-depth coverage of the jMeter framework including its test plans, listeners, functions, and regular expressions.This tutorial is designed for software professionals in the domain of Testing who are required to test enterprise-level applications for robustness and reliability.
JMeter is a software that can perform load tests, performance-oriented business (functional) tests, regression tests, etc., on different protocols or technologies.Stefano Mazzocchi of the Apache Software Foundation was the original developer of JMeter. He wrote it primarily to test the performance of Apache JServ (now called as Apache Tomcat project). Apache later redesigned JMeter to enhance the GUI and to add functional testing capabilities.
JMeter is a Java desktop application with a graphical interface that uses the Swing graphical API. It can, therefore, run on any environment/workstation that accepts a Java virtual machine, for example − Windows, Linux, Mac, etc.
The protocols supported by JMeter are −
- Web − HTTP, HTTPS sites ‘web 1.0’ web 2.0 (ajax, flex and flex-ws-amf)
- Web Services − SOAP / XML-RPC
- Database via JDBC drivers
- Directory − LDAP
- Messaging Oriented service via JMS
- Service − POP3, IMAP, SMTP
- FTP Service
Why JMeter?
Before going into the details of JMeter, let us first understand a few jargon associated with the testing of any application.
- Performance Test − This test sets the best possible performance expectation under a given configuration of infrastructure. It also highlights early in the testing process if any changes need to be made before the application goes into production.
- Load Test − This test is basically used for testing the system under the top load it was designed to operate under.
- Stress Test − This test is an attempt to break the system by overwhelming its resources.
Benefits of JMeter
Following are some of the features of JMeter −
- Being open-source software, it is freely available.
- It has a simple and intuitive GUI.
- JMeter can conduct load and performance tests for many different server types − Web – HTTP, HTTPS, SOAP, Database via JDBC, LDAP, JMS, Mail – POP3, etc.
- It is a platform-independent tool. On Linux/Unix, JMeter can be invoked by clicking on the JMeter shell script. On Windows, it can be invoked by starting the jmeter.bat file.
- It has full Swing and lightweight component support (precompiled JAR uses packages java.swing.* ).
- JMeter stores its test plans in XML format. This means you can generate a test plan using a text editor.
- Its full multithreading framework allows concurrent sampling by many threads and simultaneous sampling of different functions by separate thread groups.
- It is highly extensible.
- It can also be used to perform automated and functional testing of the applications.
How does it work?
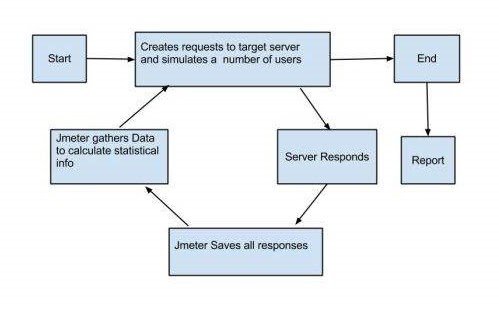
JMeter simulates a group of users sending requests to a target server, and returns statistics that show the performance/functionality of the target server/application via tables, graphs, etc.
Take a look at the following figure that depicts how JMeter works −
- Your First JMeter Script
- First, download JMeter.
- This is the JMeter interface:
What is a Test Plan?
A Test Plan can be viewed as a container for running tests. It defines what to test and how to go about it. A complete test plan consists of one or more elements such as thread groups, logic controllers, sample-generating controllers, listeners, timers, assertions, and configuration elements. A test plan must have at least one thread group.
Writing a Test Plan
Follow the steps given below to write a test plan −
Step 1: Start the JMeter Window
- Open the JMeter window by clicking /home/manisha/apache-jmeter-2.9/bin/jmeter.sh. The JMeter window will appear as below −
- The Test Plan is your JMeter script, and it determines the flow of your load test.
- In this post, we will load test the demo we always use at CA BlazeMeter, of a mock travel agency named Simple. The Simple Travel Agency lets us search and choose flights, and we will simulate these actions through JMeter.
Thread Groups
This is a plain and blank JMeter window without any additional elements added to it. It contains two nodes −
- Test Plan node − is where the real test plan is kept.
- Workbench node − It simply provides a place to temporarily store test elements while not in use, for copy/paste purposes. When you save your test plan, Workbench items are not saved with it.
Step 2: Add/Remove Elements
- Elements (which will be discussed in the next chapter Test Plan Elements) can be added to a test plan by right-clicking on the Test Plan node and choosing a new element from the “add” list.
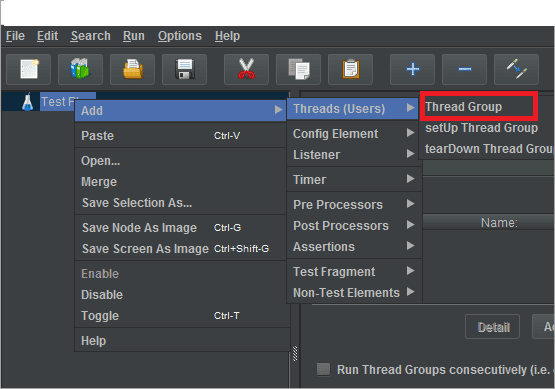
- Alternatively, you can load an element from a file and add it by choosing the “merge” or “open” option.For example, let us add a Thread Group element to a Test Plan as shown below −
- To start building the test script, go back to JMeter and add a Thread Group.Thread groups determine the user flow and simulate how users behave on the app. Each thread represents a user.
- Right click – Add->Threads(Users)->Thread Group.
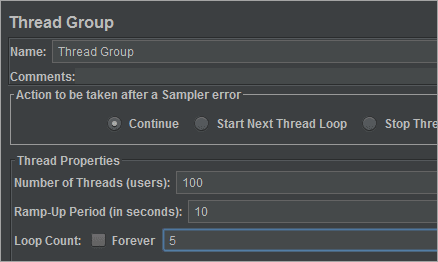
- Configure the Thread Group –
- Its name (for your convenience)
- Number of threads – the number of users you are testing. Let’s say 3.
- Ramp-up time – how much time you want to allow the Thread Group to go from 0 to 3 users. Let’s say 5 seconds.
- Loop count – How many times the test should be looped. Let’s say 1 time.
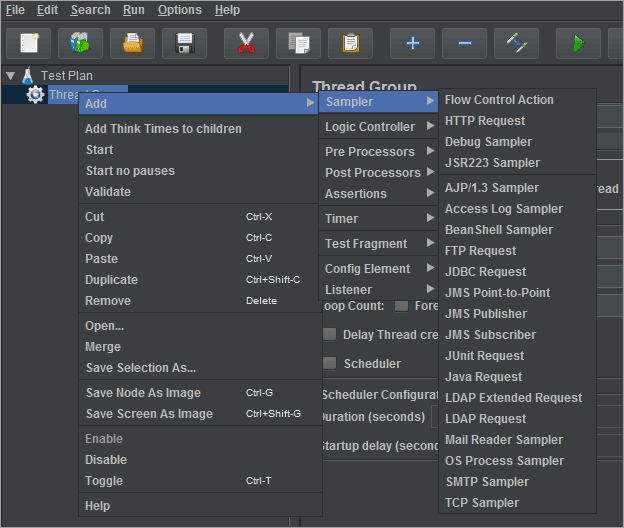
- Samplers.
- We want to send a HTTP request to our site, in this case to our demo, so we add a HTTP Requests Sampler.
- Right click – Add->Sampler->HTTP Request
- Configure the Sampler –
- Its name (for your convenience)
- The server or IP you’re testing. In this case – blazedemo.com
Timers
- When users click on your website or app, they naturally have pauses and delays. These can be simulated with Timers.
- Constant timers are the most common, and they determine how many milliseconds to wait before between requests.
- Right click – Add->Timer->Constant Timer
In this case, we will wait for 300 milliseconds.

Best In-Depth Practical Oriented JMeter Training By Experts Trainers
- Instructor-led Sessions
- Real-life Case Studies
- Assignments
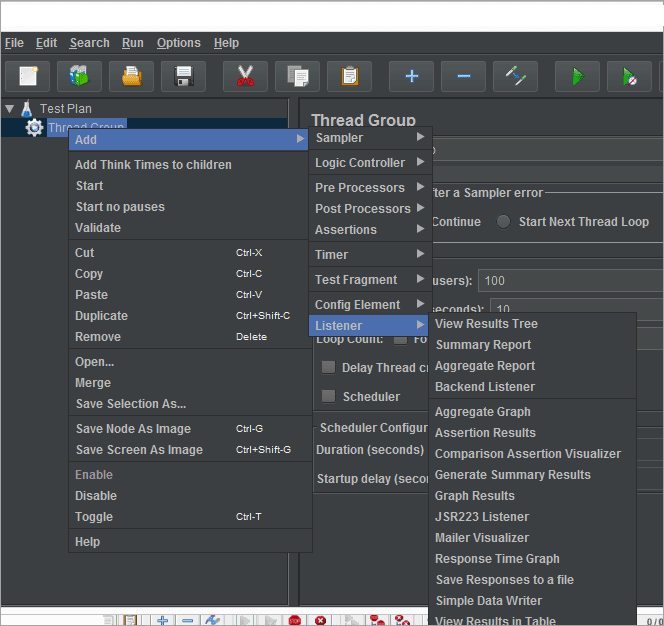
Listeners
- After running our test, we want to see its results (obviously). This is done through Listeners, a recording mechanism that shows results, including logging and debugging.The View Results Tree is the most common Listener.
- We’re done! This is the basic script we created for hitting the BlazeDemo page.Now click ‘Save’. Your test will be saved as a .jmx file.
- To run the test, click the green arrow on top. After the test completes running, you can view the results on the Listener.In this example you can see the tests were successful, because they’re green.
- On the right you can see more detailed results, like load time, connect time, errors, the request data, the response data, etc. You can also save the results if you want to.
Your Second JMeter Script
Congratulations! That was your first script. Now let’s create a second one, and add parameters to it. In our example, we want to also choose the flights.
How do you simulate that?
- Go back to JMeter, add another HTTP Sampler, and this time, add the website path after the server. In our example – reserve.php.
- Afterwards, add the relevant parameters from your website or app. In this case: fromPort, Boston; toPort, London.
- We’ll also add a “View Results in Table” Listener, just to spice things up.
- This is the second test plan, which includes hitting the Home page and then sending two parameters to the Reserve page.
- Save and run the test.
In the results, you can see that each page is hit 3 times.The View Results Table shows us additional data: start time, sent bytes, connect time, latency, etc.
Recording Scripts – Your Third JMeter Script
- Congratulations! You can now create your own basic JMeter scripts. But as you might have understood, if you need to create a long user flow, it could take you a long time.
- Therefore, a better way to create scripts is by recording them. To record, you can either use the JMeter recorder.
- Through your Chrome, start recording and simulate the user scenario you want to test by clicking away. When you’re done, stop the recording, and edit as necessary.
- Export your recording to JMX. Don’t forget to move the downloaded script to your preferred folder.
- Open the .jmx file file in JMeter. You will be able to see your test plan, which was created from the recording and the .jmx file.
- Note that this plan has new elements, like Cookie Manager and Cache Manager. They are here because browsers keep cookies and cache and they were captured in the recording. You can clear them up if you need to, and sometimes it’s even necessary to ensure you are really simulating new users.
- Now add a listener and run the test.
Assertions
- Assertions are elements that let you check for errors, or in other words – determine if your test passes or fails.
- Let’s say we want to make sure a webpage returns the information we’re looking for. In our example, we want to make sure users who purchase flights receive a message on the confirmation page saying – Thank you for your purchase today!Go to JMeter.
- Add a Response Assertion (you know how to do it).
- Add the exact characters you want users to see.
- Save and run the test.
- If the response contains the string, the test will pass. If not, the test will fail, and it will also detail why.
Dynamic Data
- What happens when you want to create a dynamic script, which chooses different parameters each time you test, like passwords, login information or search criteria? This is what Dynamic Data through CSV files is for.
- Create a CSV file on your computer, with the different variables you are testing. Put the file in the JMeter folder. In our case, we created a basic one, with departure and destination cities.Got to JMeter.
- Right click – Add->Config Element ->CSV Data Set Config
- Configure by adding the variable names. In our case, fromPort and toPort.Go back to the HTTP Request (from our second script) and change the variable from the specific name (of the cities) to the general name.
- The data tested will now come from the CSV file, and you will be able to see the dynamic results in the View Results Tree. In our example, it’s no longer Boston and London, but Philadelphia and Berlin, Portland and Rome, etc.
Scalability
- After you built your test and checked it for a low number of users, it’s time to scale it up and check a large number of VUs. How many? That depends on your business goals.
- In general, we recommend that in addition to your expected number of users, you bring your test to the limit. This lets you characterize your system’s strengths and weaknesses, enabling you to plan better and also react in real-time to unexpected bottlenecks and errors.
- The best way to scale is through CA BlazeMeter, which lets you run heavier loads than JMeter. CA BlazeMeter lets you upload your JMeter scripts, scale your number of users, choose your region, set ramp-up time and determine how long the test will run.
Analyzing Results
After running your test on CA BlazeMeter, you will get rich and in-depth reports, with KPIs like throughput, error rate and connection time. Reports let you analyze trends and statistics, determine the health of your system and decide how you want to keep developing your product.
jMeter – Regular Expressions
- Regular expressions are used to search and manipulate text, based on patterns.
- JMeter interprets forms of regular expressions or patterns being used throughout a JMeter test plan, by including the pattern matching software Apache Jakarta ORO.
- With the use of regular expressions, we can certainly save a lot of time and achieve greater flexibility as we create or enhance a Test Plan. Regular expressions provide a simple method to get information from pages when it is impossible or very hard to predict an outcome.
- To use regular expressions in your test plan, you need to use the Regular Expression Extractor of JMeter. You can place regular expressions in any component in a Test Plan.
It is worth stressing the difference between contains and matches, as used on the Response Assertion test element −
- contains means that the regular expression matches at least some part of the target, so ‘alphabet’ “contains” ‘ph.b.’ because the regular expression matches the substring ‘phabe’.
- matches means that the regular expression matched the whole target. Hence the ‘alphabet’ is “matched” by ‘al.*t’.

Learn From Industry Experts Curated JMeter Certification Course
Weekday / Weekend BatchesSee Batch DetailsjMeter – Best Practices
JMeter has some limitations especially when it is run in a distributed environment. Following these guidelines will assist in creating a real and continuous load −
- Use multiple instances of JMeter in case the number of threads are more.
- Check the Scoping Rules and design accordingly.
- Use naming conventions always for all elements.
- Check the default browser Connectivity settings, before executing scripts.
- Add Listeners appropriately.
- Here are some suggestion to reduce resource requirements
- Use non-GUI mode: jmeter -n -t test.jmx -l test.jtl.
- Use as few Listeners as possible; if using the -l flag as above, they can all be deleted or disabled.
- Disable the “View Result Tree” listener as it consumes a lot of memory and can result in the console freezing or JMeter running out of memory. It is, however, safe to use the “View Result Tree” listener with only “Errors” checked.
- Rather than using lots of similar samplers, use the same sampler in a loop, and use variables (CSV Data Set) to vary the sample. Or perhaps use the Access Log Sampler.
- Do not use functional mode.
- Use CSV output rather than XML.
- Only save the data that you need.
- Use as few Assertions as possible.
- Disable all JMeter graphs as they consume a lot of memory. You can view all of the real time graphs using the JTLs tab in your web interface.
- Do not forget to erase the local path from CSV Data Set Config if used.
- Clean the Files tab prior to every test run.
How JMeter Works?
JMeter simulates a heavy load on the server or group of servers to test its strength and to analyze the performance of the server when different types of loads are applied to it. To do this, JMeter creates a virtual load of different sizes and apply them on the server and measure the response times with various loads.
With the increase in load, the different components in the web application provide different response times.
1) Add Thread Group:
Based on the expected number of users, the tester can define the threads (each thread represents a user), loop count (means how many times the test must repeat), and Ramp Up Period (means how much delay must be applied before starting the next user).
For Example, if the expected number of users accessing the website is 100 then tester sets the thread to 100 and sets a ramp-up period of 10 sec, there will be a delay before starting users would be 10 seconds (100/10).
2) Add JMeter elements:
Elements are added through Samplers (as shown in the below image). Elements tell JMeter about which type of request is sent to which server and with what parameters. HTTP Request, FTP Request, JDBC Requests are a few of the commonly used elements.
3) Add Graph Result:
The Listener lists various reports that provide the tester with a variety of graphical analyses of performance reports. The tester can set different reports to measure the performance.
4) Execute Test:
Once the required settings are done, click on the “Start” icon to begin the test. Once the test is complete, the tester can view the results using Sampler as explained in the above step.

Note: The load that JMeter could generate without distorting results can be increased in two ways:
- Run the tests in nonGUI mode (using console – find more)
- Distribute the load generation to multiple JMeter servers.
Conclusion
JMeter can be a very valuable tool for determining how your web application server setup should be improved, to reduce bottlenecks and increase performance. Now that you are familiar with the basic usage of JMeter, feel free to create new test plans to measure the performance of your servers in various scenarios. The test that we used as the example does not accurately reflect a normal user’s usage pattern, but JMeter has the tools to perform a variety of tests that may be useful in your own environment.
For example, JMeter can be configured to simulate a user logging into your application, client-side caching, and handling user sessions with URL rewriting. There are many other built-in samplers, listeners, and configuration tools that can help you build your desired scenario.