Last updated on 09th Jul 2020| 1742
A trigger is an Apex script that executes before or after data manipulation language (DML) events occur. Apex triggers enable you to perform custom actions before or after events to record in Salesforce, such as insertions, updates, or deletions. Just like database systems support triggers, Apex provides trigger support for managing records.
When to use salesforce triggers?
We should use triggers to perform tasks that can’t be done by using the point-and-click tools in the Salesforce user interface. For example, if validating a field value or updating a field on a record, use validation rules and workflow rules instead.
Trigger events in salesforce
A trigger is a set of statement which can be executed on the following events. In above trigger events one or more of below events can be used with comma-separated.
Here is a list of trigger events in salesforce
- before insert
- before update
- before delete
- after insert
- after update
- after delete
- after undelete
Different type of Triggers:
There are two types of triggers:
- Before triggers are used to perform a task before a record is inserted or updated or deleted. These are used to update or validate record values before they are saved to the database.
- After triggers are used if we want to use the information set by Salesforce system and to make changes in the other records. are used to access field values that are set by the system (such as a record’s Id or LastModifiedDate field), and to affect changes in other records. The records that fire the after trigger are read-only.
context variables in triggers
All triggers define implicit variables that allow developers to access run-time context. These variables are contained in the System.Trigger class.
Here is list of context variables in triggers
- isExecuting: Returns true if the current context for the Apex code is a trigger, not a Visualforce page, a Web service, or an executeanonymous() API call.
- isInsert: Returns true if this trigger was fired due to an insert operation, from the Salesforce user interface, Apex, or the API.
- isUpdate: Returns true if this trigger was fired due to an update operation, from the Salesforce user interface, Apex, or the API.
- isDelete: Returns true if this trigger was fired due to a delete operation, from the Salesforce user interface, Apex, or the API.
- isBefore: Returns true if this trigger was fired before any record was saved.
- isAfter: Returns true if this trigger was fired after all records were saved.
- isUndelete: Returns true if this trigger was fired after a record is recovered from the Recycle Bin (that is, after an undelete operation from the Salesforce user interface, Apex, or the API.)
- new: Returns a list of the new versions of the sObject records. This sObject list is only available in insert, update, and undelete triggers, and the records can only be modified in before triggers.
- newMap: A map of IDs to the new versions of the sObject records. This map is only available in before update, after insert, after update, and after undelete triggers.
- old : Returns a list of the old versions of the sObject records. This sObject list is only available in update and delete triggers.
- oldMap: A map of IDs to the old versions of the sObject records. This map is only available in update and delete triggers.
- size: The total number of records in a trigger invocation, both old and new.
Salesforce Objects
Salesforce objects are database tables that permit you to store the data specific to an organization.
Salesforce objects are of two types:
Standard Objects: Standard objects are the kind of objects that are provided by salesforce.com, such as users, contracts, reports, dashboards, etc.
Custom Objects: Custom objects are those that are created by users. It supplies information that is unique and essential to their organization. It is the heart of any application. It provides a structure for sharing data.
Properties of custom objects:
- Custom fields
- Relationship to another object
- Page layouts
- A custom user interface tab
Creating a Salesforce Custom Object
- First, follow this path: Setup > Build > Create > Objects > on the screen, click on the new custom object button > enter label name, plural label, and object name > enter record name as a data type
To create a record name, first, consider the two data types:
- Text
- Auto-number
You also have some optional features while creating objects:
- Allow reports: If you tick off this checkbox, then only these objects will be available to make reports.
- Allow activities: If you tick off this checkbox, then you are able to make activities on this object.
- Track field history: When you tick off this checkbox, then you can merely track fields. You can track up to 20 fields for a single object.
Now, you have the following deployment modes:
- In development: If you opt for this, then this object will remain in the development mode. It will not be present for deployment.
- Deployed: When you opt for this, the object will be available for deployment.
The following options are available only when you are creating a custom object for the first time:
- Add notes and attachments related list
- Launch a new custom tab wizard after saving this custom object
After completing all these settings, press the Save button.
If you do not select ‘Launch new custom tab wizard’ from the object creation page, then the object would be saved without the tab appearance. In such a case, first, you need to make a tab for this object. On the other hand, if you select this option, the object would be saved, along with a tab would be created, which will be visible to you.
Triggers in Salesforce vs Workflows in Salesforce
You learned about Salesforce Workflows in our previous section. Now, when you are learning about triggers, there is a chance for you to get confused between workflows and triggers in Salesforce.
Let me sort this out for you. Well, if Salesforce has created two different products, it is obvious that there would be a huge difference between them.
Now, what is the difference?
Salesforce Workflow:
- It is an automated process that can shoot an action which is based on evaluation and rule criteria.
- Performing DML operations in the workflow is not possible.
- You can obtain a workflow over an object.
- You can’t create a query from the database.
Salesforce Trigger:
- It is a piece of code which is executed either before or after a record is updated or inserted.
- More than 15 DML operations can be used in a single trigger.
- More than 20 SOQLs can be used from the database in a trigger.
- You can access triggers across an object and related to that object.
Limitations of Workflows That Triggers in Salesforce Overcome
- Workflows cannot create or update a separate object.
- You can’t reference certain fields when using workflows.
- You will not have your workflow doing more than just field updates and emails.
Trigger Scenarios in Salesforce
You will now see three trigger scenarios in Salesforce.
Trigger Scenario 1
The following code will prevent users from creating duplicate accounts, with the same names:
- trigger AccountDuplicateTrigger on Account (before insert, before update)
- {
- for(Account a:Trigger.new
- {
- List acc=“Select id from Account where Name=:a.Name and
- Rating=:a.Rating
- if(acc.size()
- acc.Name.addError(‘You Cannot Create the Duplicate Account’);}
- }
- }
Trigger Scenario 2
This code will add a prefix ‘Dr.’ to all lead names whenever a record is updated or inserted:
trigger PrefixDoctor on Lead (before insert,before update)

Learn Hands-On Practical Salesforce Certification Course to Advance Your Career
Weekday / Weekend BatchesSee Batch Details- {
- List leadList = trigger.new;
- for(Lead l: leadList)
- {
- l.firstname = ‘Dr.’+ l.firstname;
- }}
- }
Trigger Scenario 3
This trigger will stop users from deleting an account, as only the System Administrator has all permissions:
- trigger AccountDelete on Account (before delete)
- {
- for(Account Acc:trigger.old)
- {
- acc.adderror(‘You Cannot Delete the Account Record’);
- }
- }
This is all about triggers in Salesforce. I hope it helped you and has given you a very precise idea of what actually a trigger is in Salesforce
Step by Step triggers in Salesforce.
- Creating Fields
- Creating Tab and Validation Rule
- Creating Email Template
- Creating Workflow rule
- Creating Trigger and Test cases
This is the last tutorial in series and we will see that how to create a Trigger and Test Cases in salesforce.
A trigger is an Apex script that executes before or after specific data manipulation language (DML) events occur, such as before object records are inserted into the database, or after records have been deleted.
Triggers are stored as metadata in Salesforce.com. A list of all triggers in your organization is located at Setup | Develop | Apex Triggers. In addition to this list, triggers are associated and stored with specific objects.
To define a trigger:
- For a standard object, click Setup | Customize, click the name of the object, then click Triggers.For a custom object, click Setup | Create | Objects and click the name of the object.For campaign members, click Setup | Customize | Campaigns | Campaign Member | Triggers.For case comments, click Setup | Cases | Case Comments | Triggers.
For email messages, click Setup | Cases | Email Messages | Triggers. - In the Triggers related list, click New.
- Click Version Settings to specify the version of Apex and the API used with this trigger. If your organization has installed managed packages from the AppExchange, you can also specify which version of each managed package to use with this trigger. Generally, you should use the default values for all versions. This associates the trigger with the most recent version of Apex and the API, as well as each managed package. You can specify an older version of a managed package if you want to access components or functionality that differs from the most recent package version. You can specify an older version of Apex and the API to maintain specific behavior.
- Select the Is Active checkbox if the trigger should be compiled and enabled. Leave this checkbox deselected if you only want to store the script in your organization’s metadata. This checkbox is selected by default.
- In the Body text box, enter the Apex for the trigger. A single trigger can be up to “1 million” characters in length.
To define a trigger, use the following syntax:
- trigger triggerName on ObjectName (trigger_events) {
- code_block
- }
where trigger_events can be a comma-separated list of one or more of the following events:
- before insert
- before update
- before delete
- after insert
- after update
- after delete
- after undelete
So, lets start with creating trigger.
I want that duplicate student should not be created on the basis of Email id. we can achieve this by other way also, like during creation of email field, we can specify it as unique field.
Open eclipse and right click on salesforce project and select Create new Trigger, as shown in below image
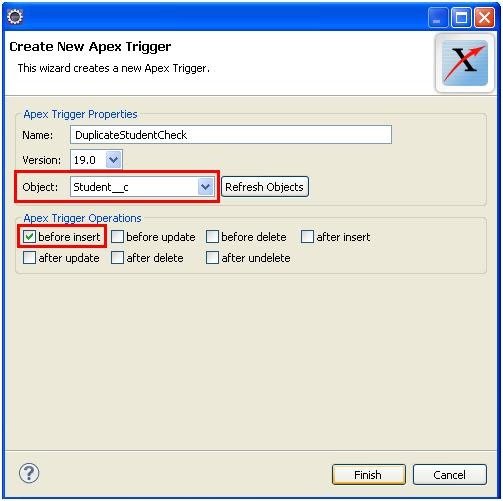
Creating Trigger in Salesforce using force.com IDE
As you can see, to create trigger we have to select the Apex version and operations in wizard.
During Trigger creation, keep in mind that it may be required in bulk operations so governor limit may be problem.
So instead of getting query for all triggers individually, I created an array and after that created a set of email entered for all records, and loop through all records invidually and checked for duplicity.
Only one SOQL is fired instead of all triggers individually and thus can work for bulk insert.
- trigger DuplicateStudentCheck on Student__c (before insert)
- {
- //Get all Student__c related to the incoming Student records in a single SOQL query. Student__c[] studentsList = Trigger.new;
- Set emailSet = new Set();
- for(Student__c s : studentsList)
- {
- emailSet.add(s.Email__c);
- }
- //Get list of duplicate Students List duplicateStudentList = [Select s.Name, s.Email__c From Student__c s where s.Email__c IN :emailSet];
- Set duplicateEmailIds = new Set();for(Student__c s : duplicateStudentList)
- { duplicateEmailIds.add(s.Email__c); }
- for(Student__c s : studentsList) {
- if(duplicateEmailIds.contains(s.Email__c)) { s.Email__c.addError(‘Record already exist with same email Id’);
- } } }
Note: You can add, edit, or delete Apex using the Salesforce.com user interface only in a Developer Edition organization, a Salesforce.com Enterprise Edition trial organization, or sandbox organization. In a Salesforce.com production organization, you can only make changes to Apex by using the Metadata API deploy call, the Force.com IDE, or theForce.com Migration Tool. The Force.com IDE and Force.com Migration Tool are free resources provided by salesforce.com to support its users and partners, but are not considered part of our Services for purposes of the salesforce.com Master Subscription Agreement.
Test Cases in Salesforce :
Test case integral part of code developement.
- You must have at least 75% of your Apex scripts covered by unit tests to deploy your scripts to production environments. In addition, all triggers should have some test coverage.
- Salesforce.com recommends that you have 100% of your scripts covered by unit tests, where possible.
- Calls to
System.debug are not counted as part of Apex code coverage in unit tests.
So, here we are going to create Test Case for trigger which we have written:
- @isTest
- private class TestTriggers {
- static testMethod void myUnitTest() {
- Student__c s = new Student__c()
- s.Name = ‘Om Test’;
- s.l_Name__c = ‘LastName’;
- Course__c c = new Course__c();
- c.Name = ‘SFDC’;
- c.Fees__c = 2000;
- insert c;
- s.Course__c = c.Id;
- s.Installment_1__c = 2000;
- try{
- insert s;}
- catch(System.DMLException e)}
- System.assert(e.getMessage().contains(‘Record already exist with same email Id’));}}}
To run the test case from Eclipse, right click on test class as shown in below image:

Get Best Salesforce Training from Industry Experts to Boost UP Your Skills
- Instructor-led Sessions
- Real-life Case Studies
- Assignments
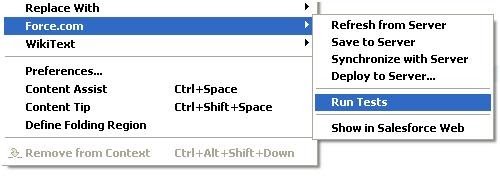
Run Test Case using Eclipse in Salesforce
The output of the test case, Test coverage result:

- Test Coverage result Eclipse in Salesforce
- Run test cases from salesforce.com browser:
- click Setup | Develop | Apex Classes, click the name of the class, then click Run Test.
- If your class calls another class or causes a trigger to execute, those Apex scripts are included in the total amount used for calculating the percentage of code covered.
To run all the unit tests in your organization, click Setup | Develop | Apex Classes, then click Run All Tests.
REASONS NOT TO USE TRIGGERS
But first, let’s talk about the reasons why we don’t use Triggers. I know I said that we were going to be looking at the benefits of using Triggers, but it will help if we have the usual objections to using Triggers in mind while we review those benefits. The main reason that users will avoid Triggers is that they don’t know how to write code or don’t have the budget to pay a developer to build a Trigger. These reasons are hard to argue with. If no-code options are your only options, then you have to go with them. On the flip side, you will encounter circumstances where only code will accomplish what you want. In these cases, you’ll want to use Apex Triggers as the more powerful option.
Another reason for using no-code options is dat, for simple automation, they are easier and faster to create and deploy. When you build a new Trigger, you’ve got to create a new Sandbox and write tests for your Trigger. You’ve got to run your tests until they pass and debug your code when they fail. And when you’ve finally got everything right, you still need to deploy to production. If all you need to do is send an email when a record meets specific criteria, tan use a Workflow Rule. You’ll has it working in fifteen minutes. For more complex automation, you might find dat dis ease of deployment comes wif a catch. We’ll look more at dat later in the post.
TRIGGERS ARE POWERFUL
Now we turn to the benefits of Triggers. The first is one that I’ve mentioned already. They are simply more powerful than non-code automation options. Workflow Rules and Processes can only run in two situations, after a record is created or after it’s updated. Triggers can fire before or after creating, updating, or deleting records. They can also fire after undeleting records. Workflow rules don’t allow for branching logic and can only perform five different actions, and a couple of them only in a limited way. Process Builder allows a few more actions, and some very simple logic. But Triggers are only limited by what you can do in Apex. They allow for loops and complex logic and allow you to take almost any action that Salesforce is capable of taking.
TRIGGERS ARE FASTER
Flows in Salesforce are capable of performing actions nearly as complex as those that can be done by Triggers. And while Flows may be capable enough for any automation you might need, there are reasons for avoiding overly complicated Flows. First, Flows will execute more slowly and use more CPU time than Apex Triggers performing the same task. If you bulk-create or bulk-update records that will launch a complex Flow, you may even get an error that the Apex CPU time limit was exceeded. A well written Apex Trigger would resolve this problem.
WRITING TESTS ACTUALLY SAVES TIME
Complex Flows can also be difficult to test. It’s important to test them thoroughly, even though Salesforce doesn’t require it. If you want to test a Flow launched by a Process, you need to activate the Flow and update or create data in your Sandbox. You’ll need to bulk create records using a data loading tool to see how the Flow responds when it needs to be run for 200 records. With an Apex Trigger, you write all of your tests with code and, if you need to make changes to your Trigger to address bugs, you can rerun your tests with the click of a button.
Remember when I said that the ease of deploying non-code automation comes with a catch? Salesforce requires you to write tests for a reason. Let’s say you are deploying some new code to your Production Salesforce instance and that new code breaks an existing Flow. You may not even know about the issue until you get an email with an error message in it. Then you have to debug you Flow on a live Production instance. For simple Flows or Workflow Rules, this probably isn’t a big deal. But complex Flows could cause some difficulty. The tests that you write for a Trigger insure that no additional code can deployed unless those tests pass. It allows you to discover and troubleshoot issues in your Sandbox, where bugs are easier to deal with.
WHEN TO USE TRIGGERS
This is not to say that you should stop using Flows entirely. As I said in the beginning, Workflow Rules, Process Builder, and Flows are great. Take advantage of them as much as you can. You will run into situations, though, when these options fall short. If you’ve investigated no-code options and they just can’t do what you need them to do, check out Triggers. If you’re working on a Flow that feels like it’s getting out of hand, consider using a Trigger instead.