Last updated on 07th Jul 2020| 1976
Amazon Redshift is a fully managed data warehouse service in the cloud. Its datasets range from 100s of gigabytes to a petabyte. The initial process to create a data warehouse is to launch a set of compute resources called nodes, which are organized into groups called cluster. After that you can process your queries.
- The Amazon Redshift is defined explicitly as one of the fully managed, fast, pet byte warehouse services which offer the most cost-effective ways to analyze the data by using the intelligence tools.
- This Amazon Redshift is used to optimize the data sets ranges from the hundred GB’s to the pet byte or else more, which will cost less than the TB cost. It is considered as one of the top traditional warehousing solutions available in the market. All this process can help your clients and business to acquire new insights according to their unique needs.
How to Set Up Amazon Redshift?
Following are the steps to set up Amazon Redshift.
Step 1 : Sign in and launch a Redshift Cluster using the following steps.
- Sign in to AWS Management console and use the following link to open Amazon Redshift console − https://console.aws.amazon.com/redshift/
- Select the region where the cluster is to be created using the Region menu on the top right side corner of the screen.
- Click the Launch Cluster button.
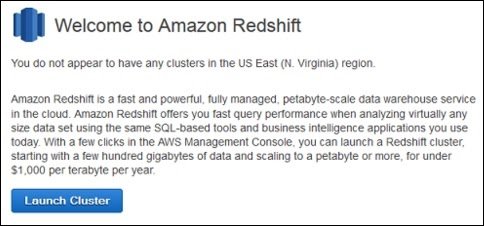
The Cluster Details page opens. Provide the required details and click the Continue button till the review page.

A confirmation page opens. Click the Close button to finish so that cluster is visible in the Clusters list.
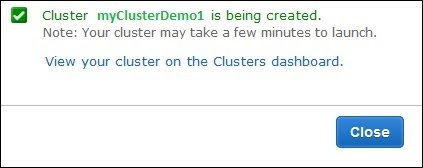
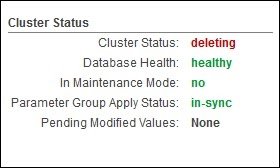
Select the cluster in the list and review the Cluster Status information. The page will show Cluster status.
Step 2 : Configure security group to authorize client connections to the cluster. The authorizing access to Redshift depends on whether the client authorizes an EC2 instance or not.
Follow these steps to security group on EC2-VPC platform :
- Open Amazon Redshift Console and click Clusters on the navigation pane.
- Select the desired Cluster. Its Configuration tab opens.

- Click the Security group.
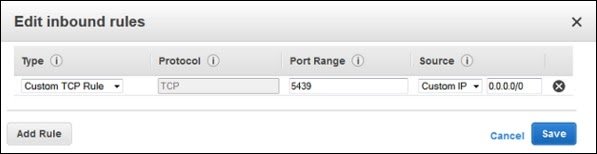
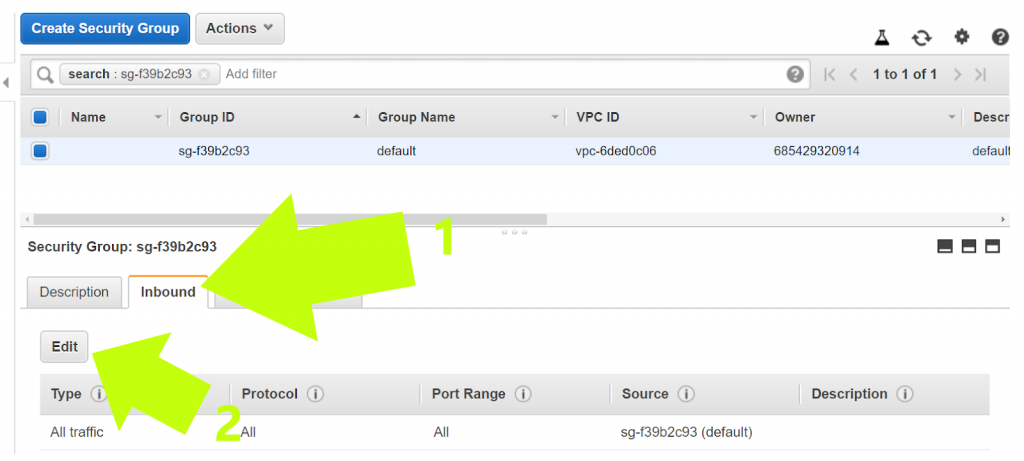
- Once the Security group page opens, click the Inbound tab.
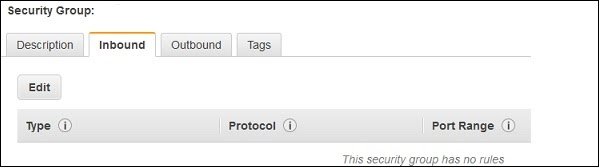
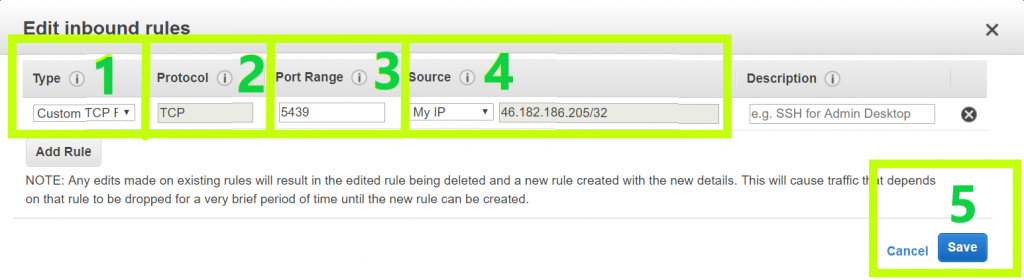
Click the Edit button. Set the fields as shown below and click the Save button.
- Type : Custom TCP Rule.
- Protocol : TCP.
- Port Range : Type the same port number used while launching the cluster. By-default port for Amazon Redshift is 5439.
- Source : Select Custom IP, then type 0.0.0.0/0.
Step 3 : Connect to Redshift Cluster.
There are two ways to connect to Redshift Cluster : Directly or via SSL.
Following are the steps to connect directly :
1. Connect the cluster by using a SQL client tool. It supports SQL client tools that are compatible with PostgreSQL JDBC or ODBC drivers. Use the following links to download − JDBC https://jdbc.postgresql.org/download/postgresql-8.4-703.jdbc4.jar
ODBC https://ftp.postgresql.org/pub/odbc/versions/msi/psqlodbc_08_04_0200.zip or http://ftp.postgresql.org/pub/odbc/versions/msi/psqlodbc_09_00_0101x64.zip for 64 bit machines
2. Use the following steps to get the Connection String.
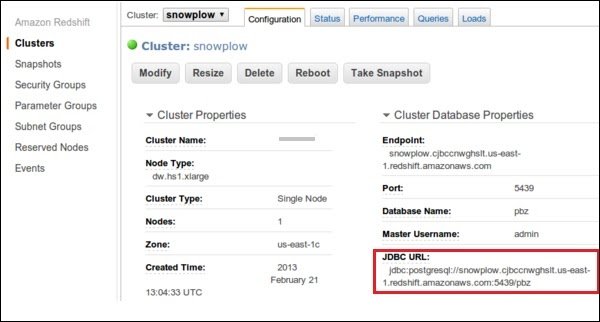
- Open Amazon Redshift Console and select Cluster in the Navigation pane.
- Select the cluster of choice and click the Configuration tab.
- A page opens as shown in the following screenshot with JDBC URL under Cluster Database Properties. Copy the URL.
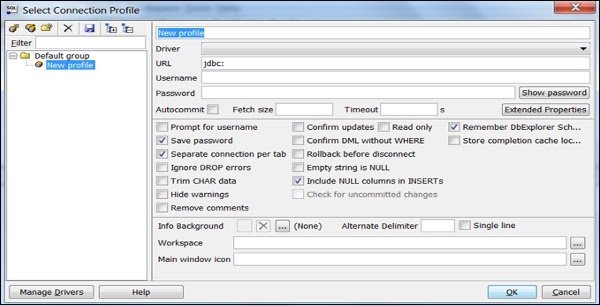
Use the following steps to connect the Cluster with SQL Workbench/J.
- Open SQL Workbench/J.
- Select the File and click the Connect window.
- Select Create a new connection profile and fill the required details like name, etc.
- Click Manage Drivers and Manage Drivers dialog box opens.
- Click the Create a new entry button and fill the required details.
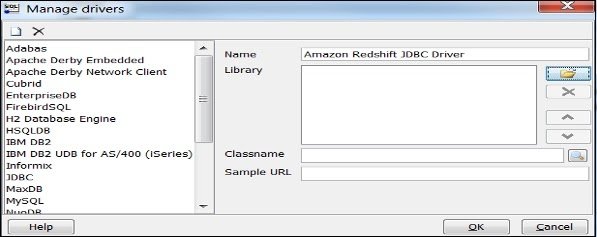
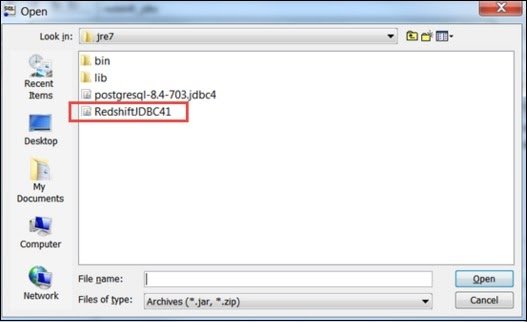
Click the folder icon and navigate to the driver location. Finally, click the Open button.
- Leave the Classname box and Sample URL box blank. Click OK.
- Choose the Driver from the list.
- In the URL field, paste the JDBC URL copied.
- Enter the username and password to their respective fields.
- Select the Autocommit box and click Save profile list.
Redshift Configuration
Redshift consists of two types of nodes:
- Single node
- Multi-node
Single node: A single node stores up to 160 GB.
Multi-node: Multi-node is a node that consists of more than one node. It is of two types:
Leader Node : It manages the client connections and receives queries. A leader node receives the queries from the client applications, parses the queries, and develops the execution plans. It coordinates with the parallel execution of these plans with the compute node and combines the intermediate results of all the nodes, and then return the final result to the client application.
Compute Node : A compute node executes the execution plans, and then intermediate results are sent to the leader node for aggregation before sending back to the client application. It can have up to 128 compute nodes.
Create a Free Amazon Redshift Data Warehouse
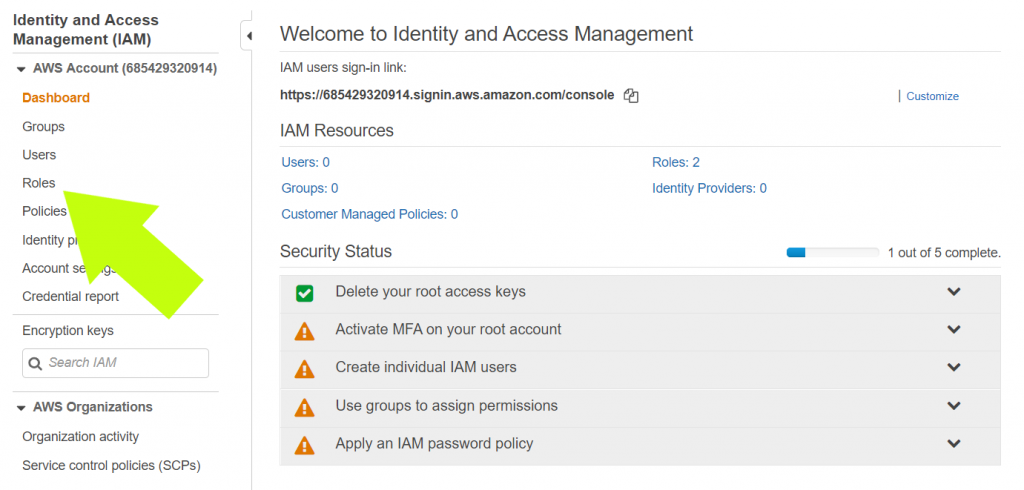
The first step of your data warehouse journey is to create a free Amazon Web Services (AWS) account and log into it. After doing that, you’re ready to start a Redshift instance. But first, you’ll have to set up and connect an IAM role.
(a) Set Up Your IAM Role:
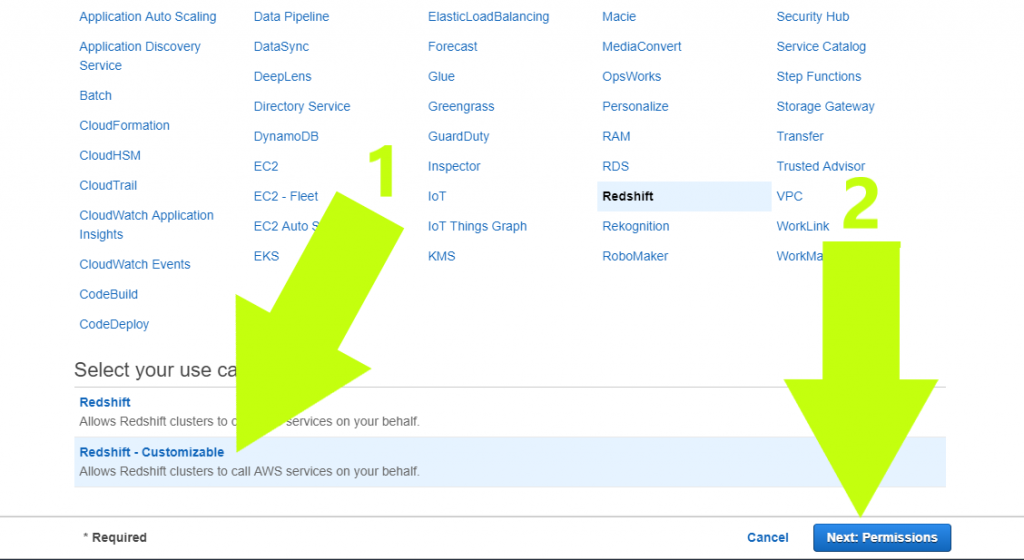
Without getting too technical, your IAM role allows you to access data from AWS instances called S3 (Simple Storage Service) buckets. S3 buckets are like file folders in the AWS ecosystem. These “buckets” contain data and descriptive metadata. The IAM role provides a data connection, so your Redshift cluster can access the data in your S3 buckets. Use the instructions and images that follow to set up your IAM role.
1. Click “create role”

2. Click “Redshift”
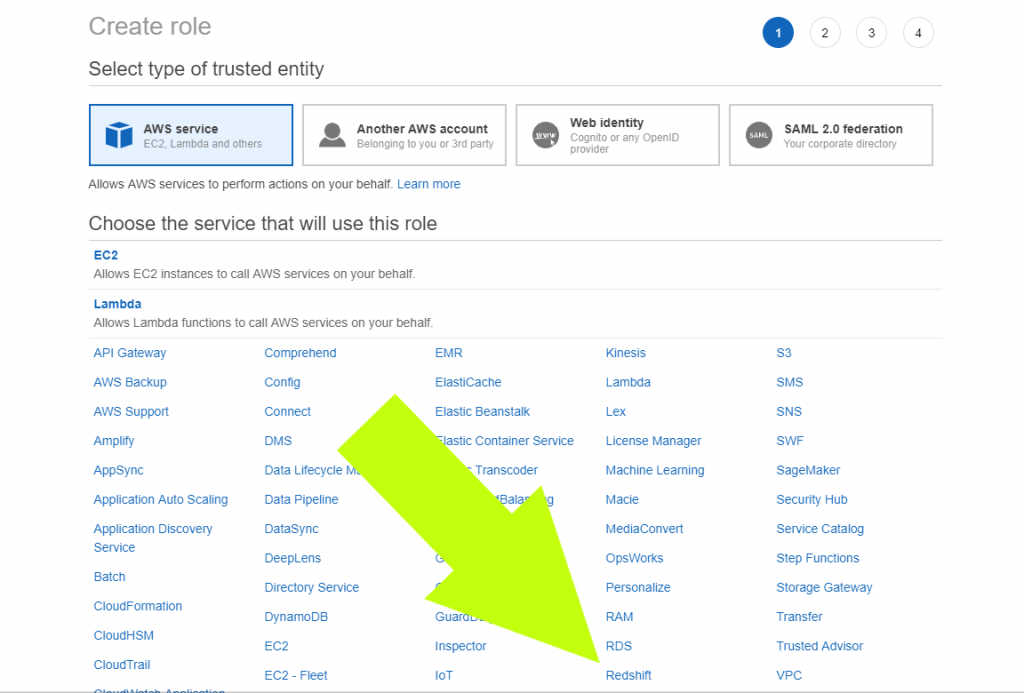
3. Next, (1) click “Redshift – Customizable”, then (2) click “Next: Permissions”

Get Best Amazon Redshift Training to Become An Certified Experts
- Instructor-led Sessions
- Real-life Case Studies
- Assignments
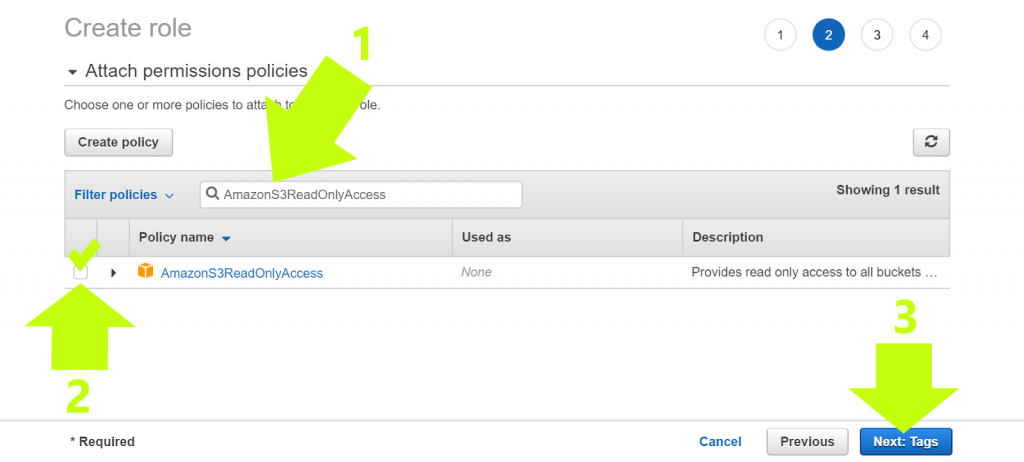
4. On the “Attach Permissions Policies” page, (1) type “AmazonS3ReadOnlyAccess” into the search field, (2) select the checkbox, and (3) click “Next: Tags”
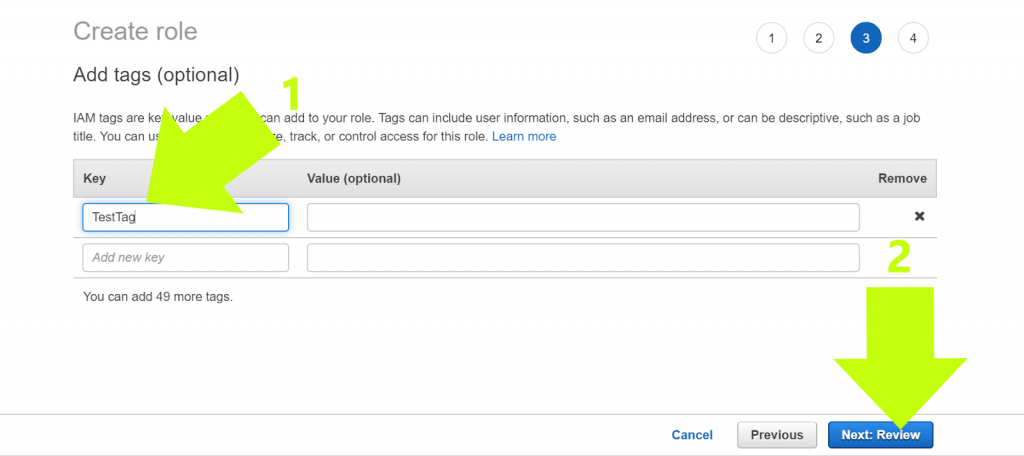
5. “Tag” your IAM role so it’s easy to find. Create any tag you want in the field under “Key” (this step is optional)
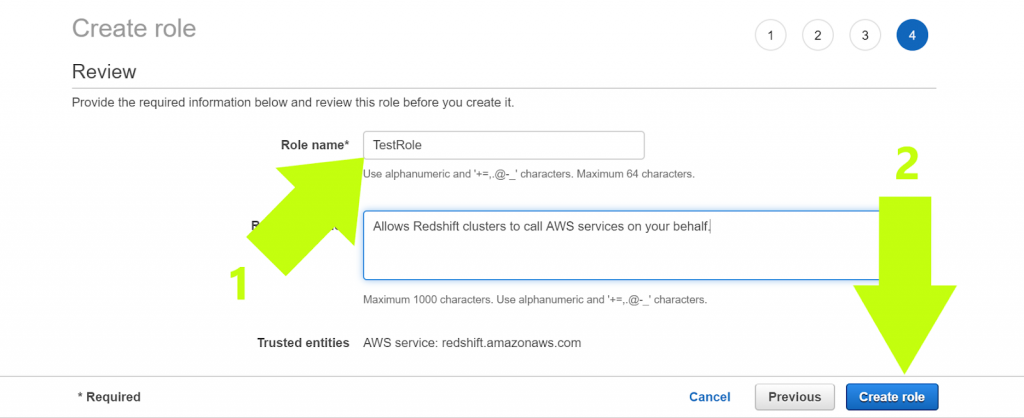
6. Name your IAM role (this step is necessary): (1) Name it what you want, then (2) click “Create Role”
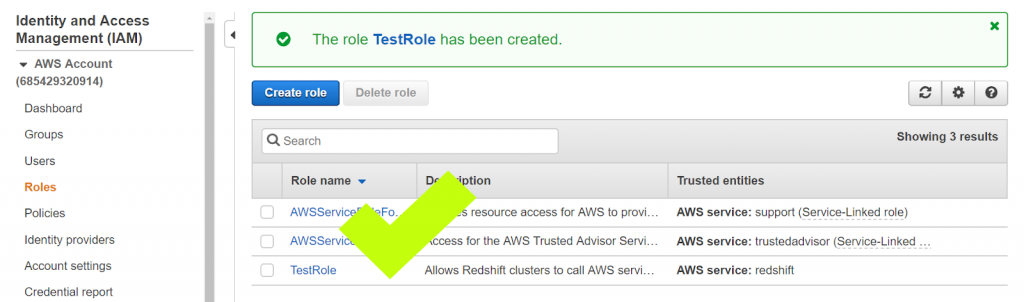
7. Congratulations. You’ll now see your IAM role on the list of roles
(b) Set Up a Cluster for Your Redshift Data Warehouse:
8. According to Amazon: “An Amazon Redshift data warehouse is a collection of computing resources called nodes, which are organized into a group called a cluster. Each cluster runs an Amazon Redshift engine and contains one or more databases.”
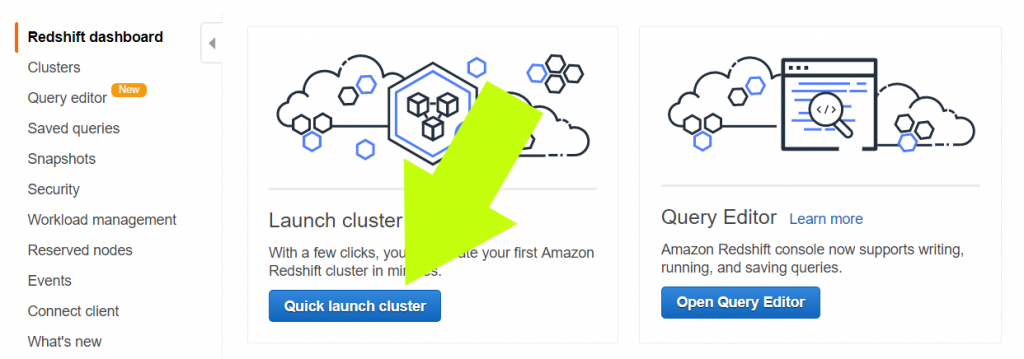
9. To set up a Redshift cluster for your data warehouse, you need to open your Redshift Management Console. Next, you’ll click the button “Quick Launch Cluster”
10. Next, you’re going to configure a basic cluster that keeps you eligible for Amazon’s free tier. This configuration shouldn’t trigger any charges, but please keep in mind that Amazon’s pricing structure could change, and we are not responsible for any charges you incur. Always double-check to ensure you will not incur charges before proceeding with any steps in this guide.
11. If you understand your future data needs, and know you’ll need a larger setup, consider a bigger node type than the default “dc2.large.” Otherwise, leave all of the default settings as they are.
12. Now, you will (1) choose a password for your cluster; (2) attach your newly created IAM role to the cluster by selecting it from the drop-down titled “Available IAM Roles”; and (3) launch the cluster
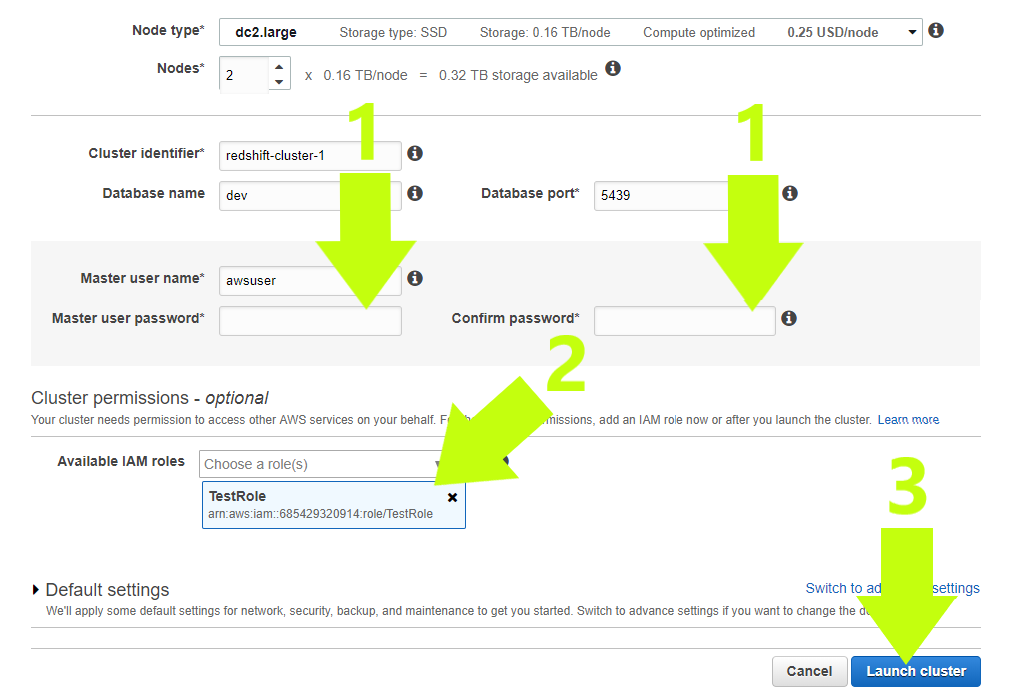
HINT: Look at arrow #2 in the image above. Do you see the text with letters and numbers in the blue box under “TestRole”? These are the credentials for your IAM role. Copy them and save them in a file. You will need them when you’re importing data into your data warehouse.
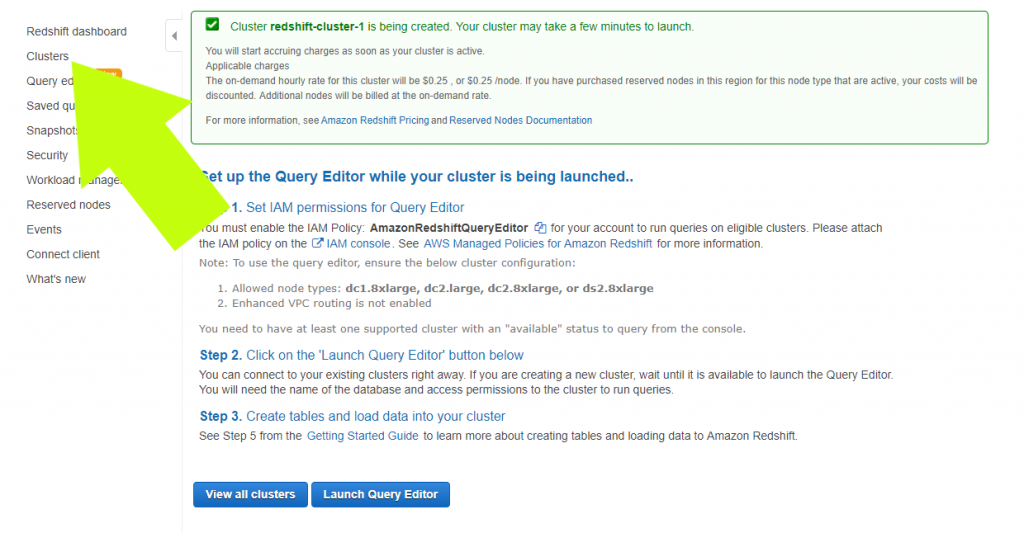
Congratulations! Your cluster is launching! You can watch the progress by clicking the “clusters” link on the left of the screen
(c) Secure Access to Your Redshift Data Warehouse:
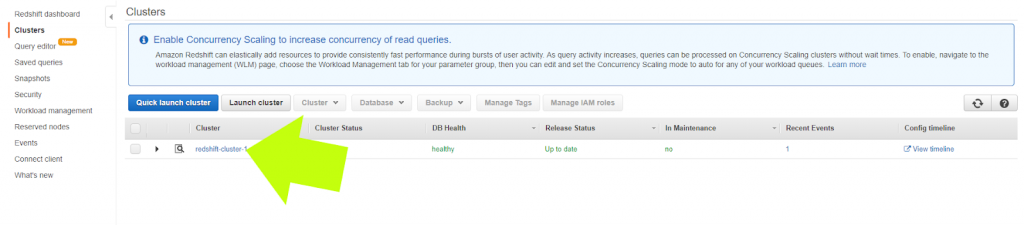
After your cluster is ready, but before you integrate data into the cluster, it’s vital to adjust the access settings to make sure your data warehouse is secure. You’ll secure access to your Redshift cluster by going to the Redshift Console and clicking “Clusters.” Next, click on your newly created cluster, which should be the only one on the list (see image below)
13. Now you should be on the tab labeled “Configuration.” Under the section called “Cluster Properties,” click the link beside “VPC Security Groups.” It will say “default” along with some numbers and letters as per the image below

Learn Hands-On Practical Amazon Redshift Training & Certification Course
Weekday / Weekend BatchesSee Batch Details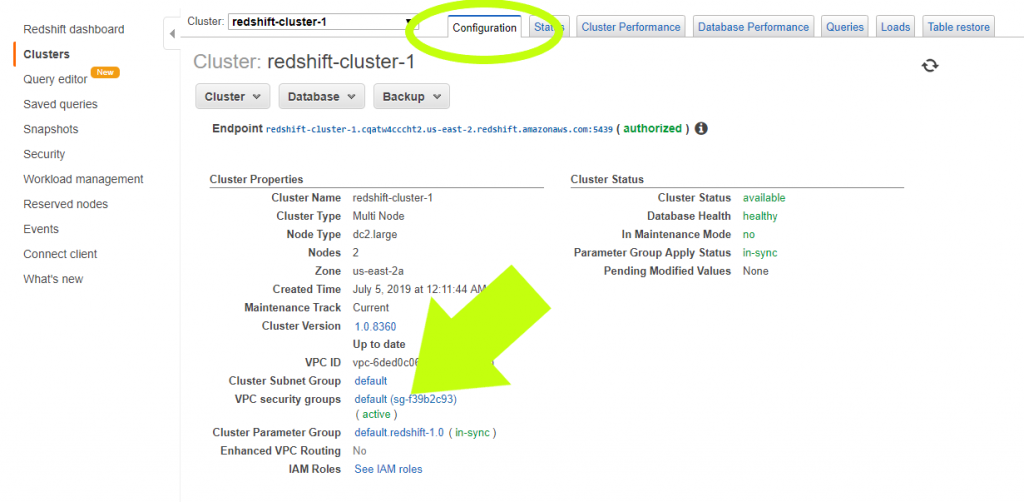
14. In the new screen, (1) click the tab labeled “inbound,” then (2) click “edit”
Here’s how to configure the settings:
- Under “Type,” select “Custom TCP Rule.”
- Under “Protocol,” select “TCP.”
- Under “Port Range,” type 5439. This will be the same port you set when launching the cluster.
- Under “Source,” select “Custom IP” and input the IP address you’ll use to connect to the database (and any other IP addresses you or your team plan to use). Don’t know your IP address? Go here, or just select “My PI.”
- Click “Save.”
Benefits of AWS Redshift
Leading Customers using Amazon Redshift

Redshift features
Features of Redshift are given below:
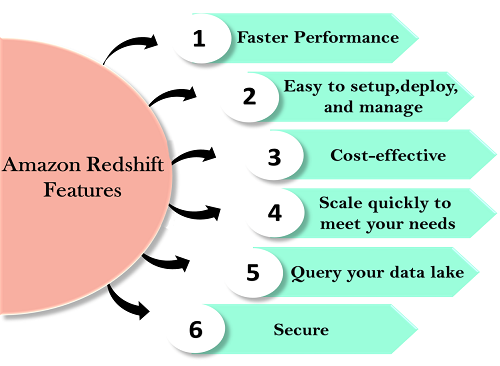
Easy to setup, deploy and manage
Automated Provisioning : Redshift is simple to set up and operate. You can deploy a new data warehouse with just a few clicks in the AWS Console, and Redshift automatically provisions the infrastructure for you. In AWS, all the administrative tasks are automated, such as backups and replication, you need to focus on your data, not on the administration.
Automated backups : Redshift automatically backups your data to S3. You can also replicate the snapshots in S3 in another region for any disaster recovery.
Cost-effective
- No upfront costs, pay as you go
Amazon Redshift is the most cost-effective data warehouse service as you need to pay only for what you use.
Its costs start with $0.25 per hour with no commitment and no upfront costs and can scale out to $250 per terabyte per year.
Amazon Redshift is the only data warehouse service that offers On Demand pricing with no up-front costs, and it also offers Reserved instance pricing that saves up to 75% by providing 1-3 year term. - Choose your node type.
You can choose either of the two nodes to optimize the Redshift. - Dense compute node
Dense compute node can create a high-performance data warehouses by using fast CPUs, a large amount of RAM, and solid-state disks. - Dense storage node
If you want to reduce the cost, then you can use Dense storage node. It creates a cost-effective data warehouse by using a larger hard disk drive.
Scale quickly to meet your needs :
Petabyte-scale data warehousing : Amazon Redshift automatically scales up or down the nodes according to the need changes. With just a few clicks in the AWS Console or a single API call can easily change the number of nodes in a data warehouse.
Exabyte-scale data lake analytics : It is a feature of Redshift that allows you to run the queries against exabytes of data in Amazon S3. Amazon S3 is a secure and cost-effective data to store unlimited data in an open format.
Limitless concurrency : It is a feature of Redshift means that the multiple queries can access the same data in Amazon S3. It allows you to run the queries across the multiple nodes regardless of the complexity of a query or the amount of data.
Query your data lake : Amazon Redshift is the only data warehouse which is used to query the Amazon S3 data lake without loading data. This provides flexibility by storing the frequently accessed data in Redshift and unstructured or infrequently accessed data in Amazon S3.
Secure : With a couple of parameter settings, you can set the Redshift to use SSL to secure your data. You can also enable encryption, all the data written to disk will be encrypted.
Faster performance : Amazon Redshift provides columnar data storage, compression, and parallel processing to reduce the amount of I/O needed to perform queries. This improves query performance.
Conclusion
Hence, in this Amazon web services Redshift tutorial, we studied the benefits of AWS Redshift. In addition, we get to know about Amazon Redshift also provides Encryption as it has a built-in encryption, the user has to switch it on and all the data will be automatically encrypted. In addition, SSL and Amazon VPC are also built in. The user can also pay by the hours with no upfront commitments. Amazon Redshift is preferred because of the quality it provides within the cost limit and with no upfront cost.