
Last updated on 19th Jul 2020| 2656
Ansible is an open-source automation tool, or platform, used for IT tasks such as configuration management, application deployment, intraservice orchestration, and provisioning. Automation is crucial these days, with IT environments that are too complex and often need to scale too quickly for system administrators and developers to keep up if they had to do everything manually. Automation simplifies complex tasks, not just making developers’ jobs more manageable but allowing them to focus attention on other tasks that add value to an organization. In other words, it frees up time and increases efficiency. And Ansible, as noted above, is rapidly rising to the top in the world of automation tools. Let’s look at some of the reasons for Ansible’s popularity
Most importantly Ansible does not use an agent to automate tasks on different machines.
Ansible ensures maintaining exact versions and up to date information to the software packages.
For Example, if you want to install JDK 8 or Tomcat or any other software package in 10 or 20 different machines it is not actually feasible to go to all the machines and install them rather use Ansible to automate the installation or even software deployments using Playbooks and Inventory written in a very simple language.
So Ansible is:
- Free and Open Source
- Maintained by Redhat
- Essentially a server configuration
- Configuration Management
Ansible Installation Process
Ansible can be installed and run from any machine.
Typically you will need a Control machine for installation which should be Linux. Windows machine does not support being a control machine. The control machine will manage the other remote machines. As mentioned earlier Ansible uses SSH to manage remote machines.
Throughout this tutorial, I will be using AWS EC2 instances to showcase the examples. I have used 2 instances (one control machine and other as a target for automating tasks) and Redhat Linux 7.5.
Whether on-premise or cloud instances you will need to open ports appropriately based on the tasks being automated. I have the following ports open as a part of the security group for the EC2 instances to demonstrate the examples mentioned in the tutorial.
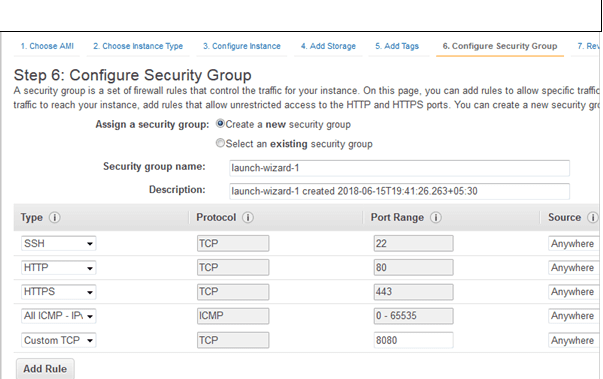
In the above screen, I have mentioned opening port 8080 as I will be showing about automating software deployment automation using Tomcat which will be useful from a DevOps point of view, especially during the continuous delivery process.
Advantages of Ansible
- Free: Ansible is an open-source tool.
- Very simple to set up and use: No special coding skills are necessary to use Ansible’s playbooks (more on playbooks later).
- Powerful: Ansible lets you model even highly complex IT workflows.
- Flexible: You can orchestrate the entire application environment no matter where it’s deployed. You can also customize it based on your needs.
- Agentless: You don’t need to install any other software or firewall ports on the client systems you want to automate. You also don’t have to set up a separate management structure.
- Efficient: Because you don’t need to install any extra software, there’s more room for application resources on your server.
Ansible’s Features and Capabilities
Configuration Management
Ansible is designed to be very simple, reliable, and consistent for configuration management. If you’re already in IT, you can get up and running with it very quickly. Ansible configurations are simple data descriptions of infrastructure and are both readable by humans and parsable by machines. All you need to start managing systems is a password or an SSH (Secure Socket Shell, a network protocol) key. An example of how easy Ansible makes configuration management: If you want to install an updated version of a specific type of software on all the machines in your enterprise, all you have to do is write out all the IP addresses of the nodes (also called remote hosts) and write an Ansible playbook to install it on all the nodes, then run the playbook from your control machine.
Application Deployment
Ansible lets you quickly and easily deploy multitier apps. You won’t need to write custom code to automate your systems; you list the tasks required to be done by writing a playbook, and Ansible will figure out how to get your systems to the state you want them to be in. In other words, you won’t have to configure the applications on every machine manually. When you run a playbook from your control machine, Ansible uses SSH to communicate with the remote hosts and run all the commands (tasks).
Security and Compliance
As with application deployment, sitewide security policies (such as firewall rules or locking down users) can be implemented along with other automated processes. If you configure the security details on the control machine and run the associated playbook, all the remote hosts will automatically be updated with those details. That means you won’t need to monitor each machine for security compliance continually manually. And for extra security, an admin’s user ID and password aren’t retrievable in plain text on Ansible.
Ansible Glossary
The following Ansible-specific terms are largely used throughout this guide:
- Control Machine / Node: a system where Ansible is installed and configured to connect and execute commands on nodes.
- Node: a server controlled by Ansible.
- Inventory File: a file that contains information about the servers Ansible controls, typically located at /etc/ansible/hosts.
- Playbook: a file containing a series of tasks to be executed on a remote server.
- Role: a collection of playbooks and other files that are relevant to a goal such as installing a web server.
- Play: a full Ansible run. A play can have several playbooks and roles, included from a single playbook that acts as entry point.
If you’d like to practice the commands used in this guide with a working Ansible playbook, you can use this playbook from our guide on Automating Initial Server Setup with Ansible on Ubuntu 18.04. You’ll need at least one remote server to use as node.
Testing Connectivity to Nodes
To test that Ansible is able to connect and run commands and playbooks on your nodes, you can use the following command:
- ansible all -m ping
The ping module will test if you have valid credentials for connecting to the nodes defined in your inventory file, in addition to testing if Ansible is able to run Python scripts on the remote server. A pong reply back means Ansible is ready to run commands and playbooks on that node.
Connecting as a Different User
By default, Ansible tries to connect to the nodes as your current system user, using its corresponding SSH keypair. To connect as a different user, append the command with the -u flag and the name of the intended user:
- ansible all -m ping -u sammy
The same is valid for ansible-playbook:
- ansible-playbook myplaybook.yml -u sammy
Using a Custom SSH Key
If you’re using a custom SSH key to connect to the remote servers, you can provide it at execution time with the –private-key option:
- ansible all -m ping –private-key=~/.ssh/custom_id
This option is also valid for ansible-playbook:
- ansible-playbook myplaybook.yml –private-key=~/.ssh/custom_id
Using Password-Based Authentication
If you need to use password-based authentication in order to connect to the nodes, you need to append the option –ask-pass to your Ansible command.
This will make Ansible prompt you for the password of the user on the remote server that you’re attempting to connect as:
- ansible all -m ping –ask-pass
This option is also valid for ansible-playbook:
- ansible-playbook myplaybook.yml –ask-pass
Providing the sudo Password
If the remote user needs to provide a password in order to run sudo commands, you can include the option –ask-become-pass to your Ansible command. This will prompt you to provide the remote user sudo password:
- ansible all -m ping –ask-become-pass
This option is also valid for ansible-playbook:
- ansible-playbook myplaybook.yml –ask-become-pass
Using a Custom Inventory File
The default inventory file is typically located at /etc/ansible/hosts, but you can also use the -i option to point to custom inventory files when running Ansible commands and playbooks. This is useful for setting up per-project inventories that can be included in version control systems such as Git:
- ansible all -m ping -i my_custom_inventory
The same option is valid for ansible-playbook:
- ansible-playbook myplaybook.yml -i my_custom_inventory
Using a Dynamic Inventory File
Ansible supports inventory scripts for building dynamic inventory files. This is useful if your inventory fluctuates, with servers being created and destroyed often.

Start Your Ansible learning Journey from Ansible Training & Certification Course
Weekday / Weekend BatchesSee Batch DetailsYou can find a number of open source inventory scripts on the official Ansible GitHub repository. After downloading the desired script to your Ansible control machine and setting up any required information — such as API credentials — you can use the executable as custom inventory with any Ansible command that supports this option.
The following command uses Ansible’s DigitalOcean inventory script with a ping command to check connectivity to all current active servers:
- ansible all -m ping -i digital_ocean.py
For more details on how to use dynamic inventory files, please refer to the official Ansible documentation.
Running ad-hoc Commands
To execute a command on a node, use the -a option followed by the command you want to run, in quotes.
This will execute uname -a on all the nodes in your inventory:
- ansible all -a “uname -a”
It is also possible to run Ansible modules with the option -m. The following command would install the package vim on server1 from your inventory:
- ansible server1 -m apt -a “name=vim”
Before making changes to your nodes, you can conduct a dry run to predict how the servers would be affected by your command. This can be done by including the –check option:
- ansible server1 -m apt -a “name=vim” –check
Running Playbooks
To run a playbook and execute all the tasks defined within it, use the ansible-playbook command:
- ansible-playbook myplaybook.yml
To overwrite the default hosts option in the playbook and limit execution to a certain group or host, include the option -l in your command:
- ansible-playbook -l server1 myplaybook.yml
Getting Information about a Play
The option –list-tasks is used to list all tasks that would be executed by a play without making any changes to the remote servers:
- ansible-playbook myplaybook.yml –list-tasks
Similarly, it is possible to list all hosts that would be affected by a play, without running any tasks on the remote servers:
- ansible-playbook myplaybook.yml –list-hosts
You can use tags to limit the execution of a play. To list all tags available in a play, use the option –list-tags:
- ansible-playbook myplaybook.yml –list-tags
Controlling Playbook Execution
You can use the option –start-at-task to define a new entry point for your playbook. Ansible will then skip anything that comes before the specified task, executing the remaining of the play from that point on. This option requires a valid task name as argument:
- ansible-playbook myplaybook.yml –start-at-task=”Set Up Nginx”
To only execute tasks associated with specific tags, you can use the option –tags. For instance, if you’d like to only execute tasks tagged as nginx or mysql, you can use:
- ansible-playbook myplaybook.yml –tags=mysql,nginx
If you want to skip all tasks that are under specific tags, use –skip-tags. The following command would execute myplaybook.yml, skipping all tasks tagged as mysql:
- ansible-playbook myplaybook.yml –skip-tags=mysql
Using Ansible Vault to Store Sensitive Data
If your Ansible playbooks deal with sensitive data like passwords, API keys, and credentials, it is important to keep that data safe by using an encryption mechanism. Ansible provides ansible-vault to encrypt files and variables.
Even though it is possible to encrypt any Ansible data file as well as binary files, it is more common to use ansible-vault to encrypt variable files containing sensitive data. After encrypting a file with this tool, you’ll only be able to execute, edit or view its contents by providing the relevant password defined when you first encrypted the file.
Creating a New Encrypted File
You can create a new encrypted Ansible file with:
- ansible-vault create credentials.yml
This command will perform the following actions:
- First, it will prompt you to enter a new password. You’ll need to provide this password whenever you access the file contents, whether it’s for editing, viewing, or just running playbooks or commands using those values.
- Next, it will open your default command-line editor so you can populate the file with the desired contents.
- Finally, when you’re done editing, ansible-vault will save the file as encrypted data.
Encrypting an Existing Ansible File
To encrypt an existing Ansible file, you can use the following syntax:
- ansible-vault encrypt credentials.yml
This will prompt you for a password that you’ll need to enter whenever you access the file credentials.yml.
Viewing the Contents of an Encrypted File
If you want to view the contents of a file that was previously encrypted with ansible-vault and you don’t need to change its contents, you can use:
- ansible-vault view credentials.yml
This will prompt you to provide the password you selected when you first encrypted the file with ansible-vault.
Editing an Encrypted File
To edit the contents of a file that was previously encrypted with Ansible Vault, run:
- ansible-vault edit credentials.yml
This will prompt you to provide the password you chose when first encrypting the file credentials.yml with ansible-vault. After password validation, your default command-line editor will open with the unencrypted contents of the file, allowing you to make your changes. When finished, you can save and close the file as you would normally, and the updated contents will be saved as encrypted data.
Decrypting Encrypted Files
If you wish to permanently revert a file that was previously encrypted with ansible-vault to its unencrypted version, you can do so with this syntax:
- ansible-vault decrypt credentials.yml
This will prompt you to provide the same password used when first encrypting the file credentials.yml with ansible-vault. After password validation, the file contents will be saved to the disk as unencrypted data.
Using Multiple Vault Passwords
Ansible supports multiple vault passwords grouped by different vault IDs. This is useful if you want to have dedicated vault passwords for different environments, such as development, testing, and production environments.
To create a new encrypted file using a custom vault ID, include the –vault-id option along with a label and the location where ansible-vault can find the password for that vault. The label can be any identifier, and the location can either be prompt, meaning that the command should prompt you to enter a password, or a valid path to a password file.
- ansible-vault create –vault-id dev@prompt credentials_dev.yml
This will create a new vault ID named dev that uses prompt as password source. By combining this method with group variable files, you’ll be able to have separate ansible vaults for each application environment:
- ansible-vault create –vault-id prod@prompt credentials_prod.yml
We used dev and prod as vault IDs to demonstrate how you can create separate vaults per environment, but you can create as many vaults as you want, and you can use any identifier of your choice as vault ID.
Now to view, edit, or decrypt these files, you’ll need to provide the same vault ID and password source along with the ansible-vault command:
- ansible-vault edit credentials_dev.yml –vault-id dev@prompt
Using a Password File
If you need to automate the process of provisioning servers with Ansible using a third-party tool, you’ll need a way to provide the vault password without being prompted for it. You can do that by using a password file with ansible-vault.

Be An Expert in Ansible Modules with Hands-on Practical Ansible Training
- Instructor-led Sessions
- Real-life Case Studies
- Assignments
A password file can be a plain text file or an executable script. If the file is an executable script, the output produced by this script will be used as the vault password. Otherwise, the raw contents of the file will be used as vault password.
To use a password file with ansible-vault, you need to provide the path to a password file when running any of the vault commands:
- ansible-vault create –vault-id dev@path/to/passfile credentials_dev.yml
Ansible doesn’t make a distinction between content that was encrypted using prompt or a password file as password source, as long as the input password is the same. In practical terms, this means it is OK to encrypt a file using prompt and then later use a password file to store the same password used with the prompt method. The opposite is also true: you can encrypt content using a password file and later use the prompt method, providing the same password when prompted by Ansible.
For extended flexibility and security, instead of having your vault password stored in a plain text file, you can use a Python script to obtain the password from other sources. The official Ansible repository contains a few examples of vault scripts that you can use for reference when creating a custom script that suits the particular needs of your project.
Running a Playbook with Data Encrypted via Ansible Vault
Whenever you run a playbook that uses data previously encrypted via ansible-vault, you’ll need to provide the vault password to your playbook command.
If you used default options and the prompt password source when encrypting the data used in this playbook, you can use the option –ask-vault-pass to make Ansible prompt you for the password:
- ansible-playbook myplaybook.yml –ask-vault-pass
If you used a password file instead of prompting for the password, you should use the option –vault-password-file instead:
- ansible-playbook myplaybook.yml –vault-password-file my_vault_password.py
If you’re using data encrypted under a vault ID, you’ll need to provide the same vault ID and password source you used when first encrypting the data:
- ansible-playbook myplaybook.yml –vault-id dev@prompt
If using a password file with your vault ID, you should provide the label followed by the full path to the password file as password source:
- ansible-playbook myplaybook.yml –vault-id dev@vault_password.py
If your play uses multiple vaults, you should provide a –vault-id parameter for each of them, in no particular order:
- ansible-playbook myplaybook.yml –vault-id dev@vault_password.py –vault-id test@prompt –vault-id ci@prompt
Debugging
If you run into errors while executing Ansible commands and playbooks, it’s a good idea to increase output verbosity in order to get more information about the problem. You can do that by including the -v option to the command:
- ansible-playbook myplaybook.yml -v
If you need more detail, you can use -vvv and this will increase verbosity of the output. If you’re unable to connect to the remote nodes via Ansible, use -vvvv to get connection debugging information:
- ansible-playbook myplaybook.yml -vvvv
Conclusion
This guide covers some of the most common Ansible commands you may use when provisioning servers, such as how to execute remote commands on your nodes and how to run playbooks using a variety of custom settings.
There are other command variations and flags that you may find useful for your Ansible workflow. To get an overview of all available options, you can use the help command: