Last updated on 07th Jul 2020| 2275
Define Appium:
An open-source platform for automating testing for mobile applications is called Appium. Using a single API, it enables developers and testers to automate the testing of native, hybrid, and mobile web applications across several mobile platforms. Writing and running tests for a variety of hardware and operating systems is made simpler by Appium’s cross-platform consistency in mobile app testing.
Appium Roles:
Appium plays several important roles in the mobile app testing ecosystem. Here are the main roles of Appium:
- Automation Testing Framework: Appium serves as a comprehensive automation testing framework specifically designed for mobile applications.
- Cross-Platform Compatibility: One of the key roles of Appium is to facilitate cross-platform testing. It allows you to write test scripts once and execute them on multiple platforms, such as Android and iOS.
- Native, Hybrid, and Web App Testing: Appium supports the testing of different types of mobile applications. Whether it’s a native app built with platform-specific technologies, or a hybrid app combining native and web elements.
- Support for multiple programming languages: Appium offers support for a variety of languages, such as Java, Python, JavaScript, Ruby, and C#. This allows developers and testers to write test scripts in their preferred language.
- Device Farm Integration: Appium integrates with cloud-based device farms, such as AWS Device Farm or Firebase Test Lab, to enable scalable and parallel testing on a wide range of real devices or simulators.
Benefits of Appium:
Appium offers several benefits for mobile app testing. Here are some key advantages of using Appium:
- Cross-Platform Capability: Appium allows you to write tests once and run them on multiple platforms, such as Android and iOS. This cross-platform compatibility saves time and effort by eliminating the need to write separate tests for each platform.
- Open-Source and Active Community: Appium is an open-source framework with a vibrant community of developers and testers. This active community contributes to the continuous improvement of Appium, provides support, shares knowledge, and develops plugins and extensions.
- Single API for Multiple Platforms: Appium provides a single API for automating mobile apps across different platforms. This consistent API enables teams to write and maintain tests using their preferred programming language.
- Native App Testing: With Appium, you can automate testing for native apps developed using platform-specific technologies. This allows you to interact with the app’s UI elements.
- Hybrid and Web App Testing: Appium supports testing for hybrid apps, which combine native and web elements, as well as web apps running in mobile browsers.
Installation
Step 1: Java Installation and Setup
With Appium, you would need to write automation test scripts that interact with the screens and controls (buttons, text boxes etc) in your mobile app and perform actions on them. We would use Java to write these automation scripts.
Step 1.1: Download and Install latest version of Java 8 (JDK)
Step 1.2: Setup Java Environment Variables
Step 2: Android Installation and Setup
This is one of the most time consuming process, and the one which is prone to errors if not done properly. The below articles provide you with the step by step approach to download and setup the latest version of Android SDK manager. With the latest version of Android Studio, there are many changes in the way Android needs to be setup. So we recommend you to use the latest version of Android Studio, so that you can follow the steps accurately as provided in the below articles.
Step 2.1: Download and Install Android Studio
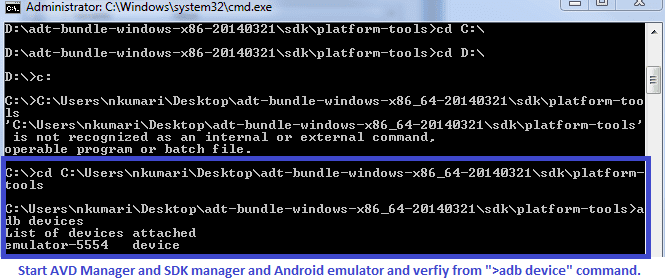
Step 2.2: Install additional Android SDK tools
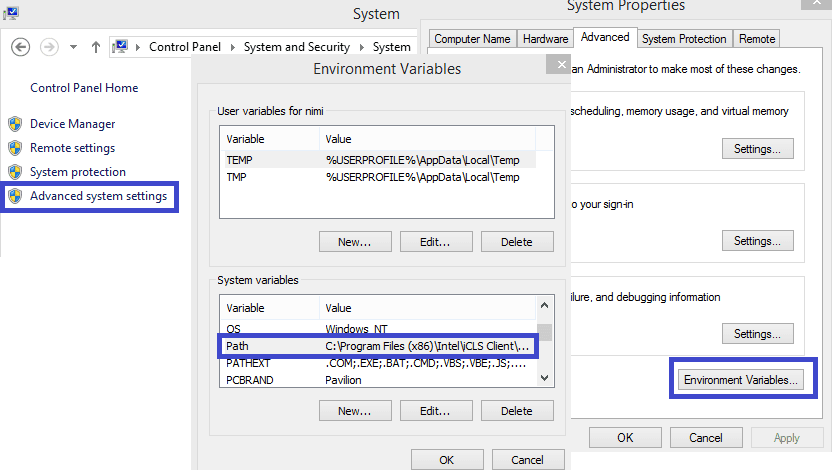
Step 2.3: Setup Android Environment Variables
Step 3: Appium tool setup
With the prerequisites completed, this section covers the Appium related content. This mainly involves setting up the latest version of Appium, and setting up your mobile device for test automation.
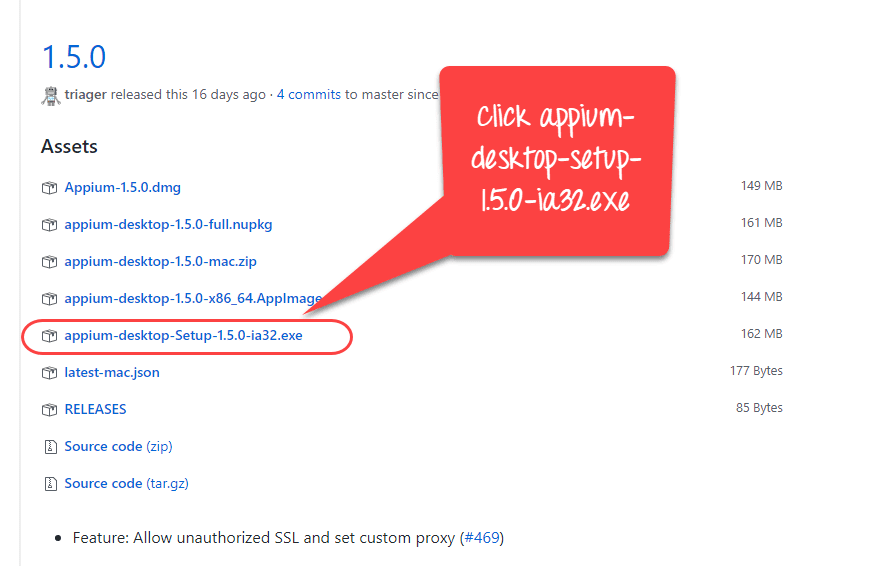
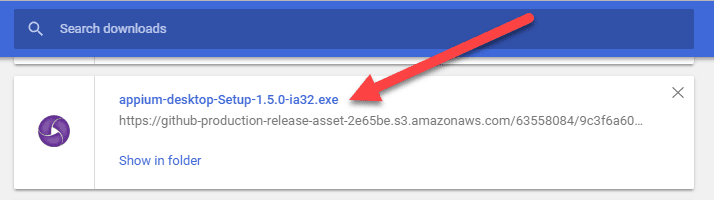
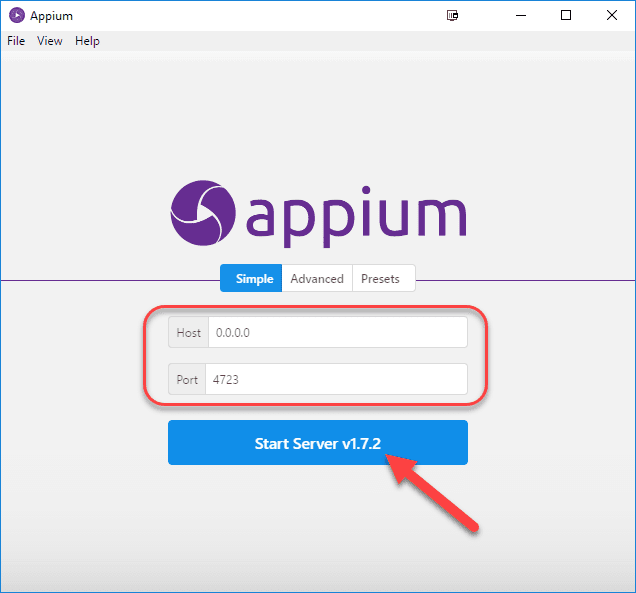
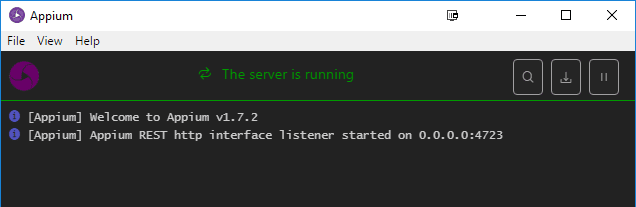
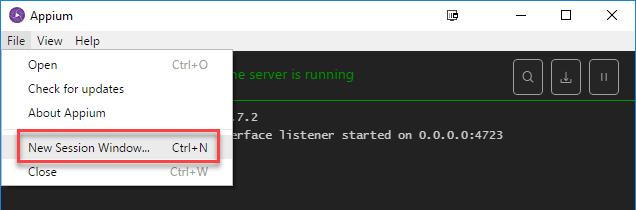
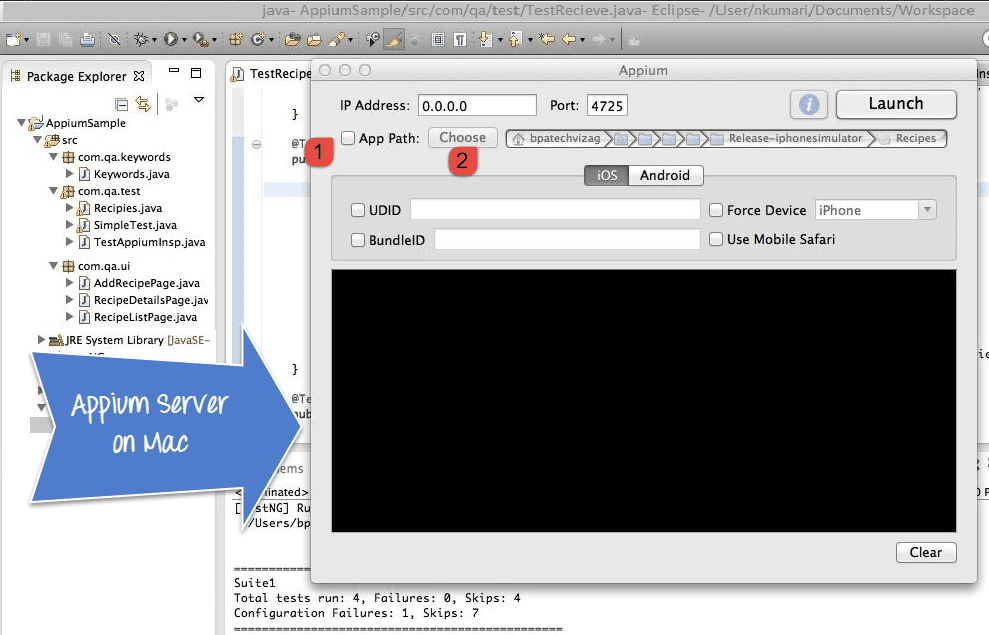
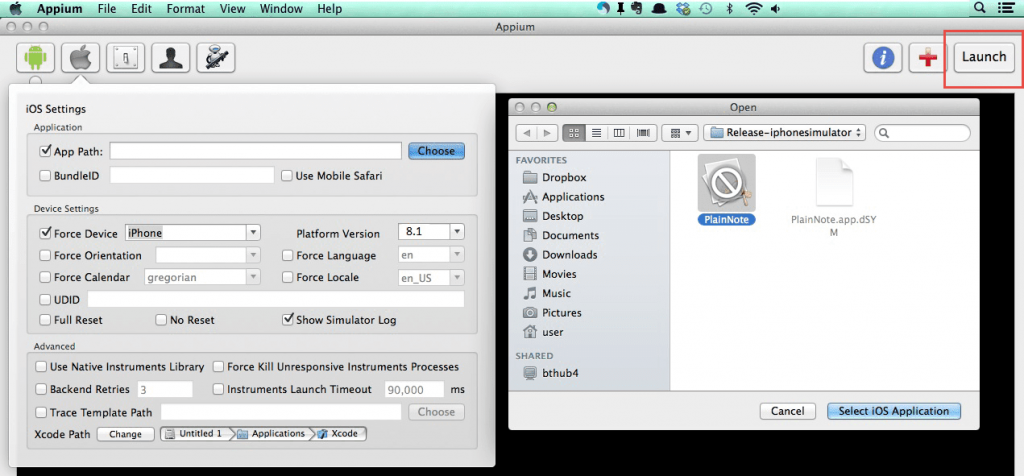
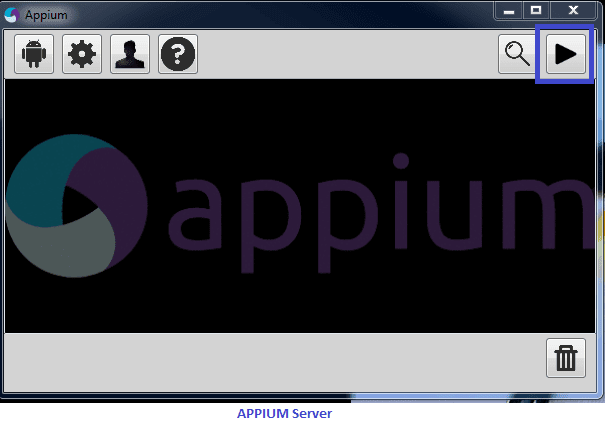
Step 3.1: Download and Install Appium Desktop App
Step 3.2: Download and Install Eclipse IDE for Java
Step 3.3: Turn On USB Debugging on your Android Device
Step 3.4: Download Appium Jars for Eclipse
Step 3.5: Create new project in Eclipse for Appium
Step 3.6: Find appPackage and appActivity name of your app
Step 3.7: First Appium test script to launch app on Android Device
Step 3.8: Learn more about Appium Desktop Client
Step 4: Appium Inspector Tutorial
This section is a series of 4-5 articles and it would explain the process of inspecting elements in your mobile app in detail. You will learn about the different ways in which Appium identifies elements, and you would also see code snippets with detailed examples.
Step 4.1: Learn about the basics of UI Automator Viewer
Step 4.2 (a): Use UIAutomatorViewer to find/inspect elements
Step 4.2 (b): Use UiSelector to identify elements on Android Device
Step 4.3: More about UI Automator Viewer and current limitations with mobile automation
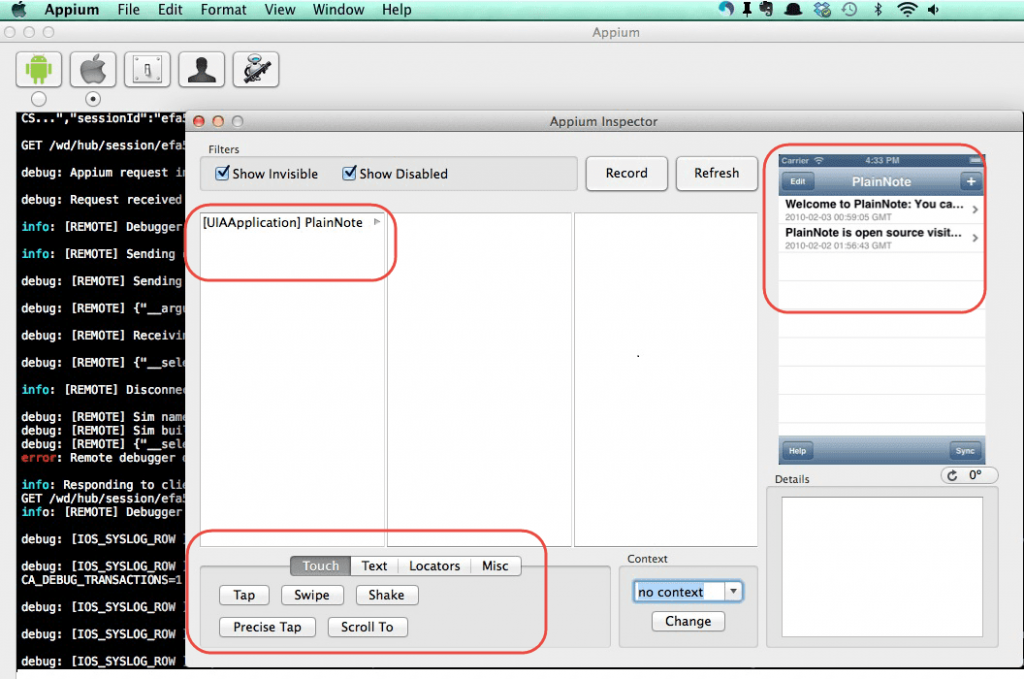
Step 4.4: Learn the basics of Appium Desktop Inspector
Step 4.5: Inspect mobile element using Appium Desktop Inspector
Step 5: Miscellaneous Topics
This section deals with multiple topics which are at somewhat advanced level but you would mostly be using it at some point or the other.
Step 5.1: Learn about different Appium scroll strategies
Mobile Browser Automation
Learn how to automate test scripts on your mobile browser using Appium.
Step 1: Setup Appium for Chrome browser automation
Step 2: First test script to launch Chrome browser on mobile device
Step 3: Identify Mobile Browser Elements with Appium – Part 1
Step 4: Identify Mobile Browser Elements with Appium
Merits of Appium structures:
Here are some key merits of using Appium structures:
- Client-Server design: Appium uses a client-server design, where the Appium server serves as a link between the test automation code (client) and the mobile device or emulator.
- Platform Independence: Appium structures are designed to be platform-independent, meaning you can write test scripts once and run them on multiple platforms, such as Android and iOS.
- Language Flexibility: Appium structures support multiple programming languages, including Java, Python, JavaScript, Ruby, and C#. This flexibility allows you to use the programming language of your choice for writing test scripts, making it easier for teams to leverage their existing skills and libraries.
- Element Locators: Appium provides various element locators, such as ID, name, class, XPath, and accessibility identifiers, to locate elements within the mobile app’s user interface.
- Native and Web Context Switching: Appium structures allow seamless switching between native and web contexts within a hybrid app. This is particularly useful when automating hybrid apps that combine both native and web elements, as it enables you to interact with web views and perform web-specific actions.

Learn Appium Training from the Expert Trainers to Advance Your Career
- Instructor-led Sessions
- Real-life Case Studies
- Assignments
Drawbacks of using Appium Structures
Here are some drawbacks of using Appium structures:
- Setup and Configuration Complexity: Setting up and configuring Appium can be complex, especially for beginners. It requires installing and configuring various dependencies, such as the Appium server, platform-specific tools, device emulators/simulators, and drivers.
- Limited Support for Non-Mobile Platforms: Appium primarily focuses on mobile app testing and has limited support for non-mobile platforms such as desktop or web applications. If you require testing for these non-mobile platforms.
- Limited Support for Desktop Operating Systems: Appium’s core functionality is centered around mobile operating systems like Android and iOS. While there are extensions like WinAppDriver for Windows desktop application testing.
- Performance Limitations: Appium relies on the WebDriver protocol to interact with mobile apps, which introduces some overhead compared to lower-level automation frameworks.
- Stability and Compatibility Issues: Appium’s compatibility with different versions of mobile operating systems, devices, and browser versions can sometimes be challenging.
Future Scope of Appium:
Here are some factors that contribute to the positive outlook for Appium courses:
- Growing Mobile App Industry: The mobile app industry continues to expand, with new applications being developed across various sectors such as finance, healthcare, e-commerce, entertainment, and more. This growth creates a demand for robust mobile app testing solutions like Appium.
- Cross-Platform Testing Needs: As companies strive to reach a wider audience, they develop apps for multiple platforms, including Android and iOS. Appium’s cross-platform compatibility makes it an ideal choice for automating tests across different platforms, ensuring consistent app performance and user experience.
- Agile and DevOps Practices: Agile development methodologies and DevOps practices have become prevalent in the software industry. Appium aligns well with these practices by providing the ability to integrate test automation into the development pipeline, allowing for faster releases and continuous testing.
- Shift towards Test Automation: Manual testing is time-consuming, error-prone, and cannot keep up with the pace of frequent software updates. As a result, companies are increasingly adopting test automation solutions like Appium to achieve faster and more reliable testing cycles.
- Industry Adoption and Community Support: Appium has gained significant traction and has a strong community of developers and testers contributing to its growth. This active community ensures the availability of resources, tutorials, and support, making it easier for individuals to learn and apply Appium effectively.
- Cloud-Based Testing Solutions: Cloud-based device farms and testing platforms, such as AWS Device Farm, Firebase Test Lab, and BrowserStack, are widely used for mobile app testing. These platforms often provide built-in integration with Appium, further increasing its popularity and demand.
- Evolving Features and Enhancements: Appium continues to evolve, with regular updates and improvements addressing bug fixes, new OS versions, and feature enhancements. Staying updated with the latest features and capabilities of Appium through a course ensures that professionals are well-equipped for the industry’s changing needs.
Appium Advanced Techniques:
Certainly! Here are some advanced techniques and features in Appium that can enhance your mobile app testing capabilities:
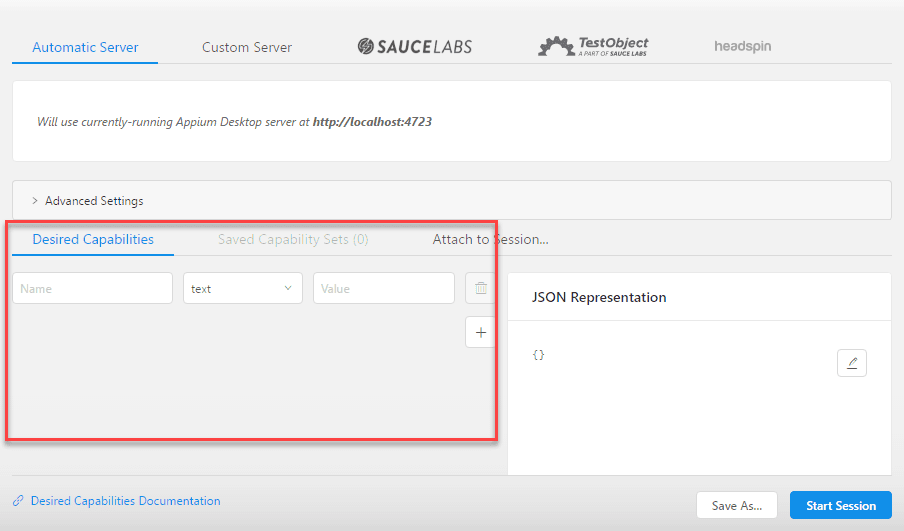
- Growing Mobile App Industry:Desired Capabilities: Appium allows you to configure desired capabilities to customize the behavior of the Appium server and the test execution. Advanced capabilities include specifying appiumSettings, autoGrantPermissions, noReset, fullReset, and more.
- Page Object Model (POM): Implementing the Page Object Model design pattern in your Appium tests can improve test maintainability and readability. POM involves creating separate classes to represent each screen or page of your application.
- Custom Device Configurations: Appium supports defining custom device configurations using the capabilities provided by platform-specific tools like Android Debug Bridge (ADB) or iOS Simulator. This allows you to configure specific device settings, and stimulate network conditions during test execution.
- Implicit and Explicit Waits: Appium provides implicit and explicit wait mechanisms to handle synchronization in test automation. Implicit waits allow you to set a timeout globally for the entire test script, while explicit waits let you wait for specific conditions or events
- Touch Actions: Appium allows you to perform advanced touch actions and gestures beyond the basic interactions. You can chain multiple touch actions, such as long-press, double-tap, drag and drop, and multi-touch gestures, to simulate complex user interactions and test different scenarios.
- Context Switching: Appium supports context switching between multiple contexts within a mobile app. This is especially useful for testing hybrid apps that contain both native and web elements. You can switch between native and web contexts to interact with web views or perform web-specific actions.
- Deep Link Testing: Appium enables deep link testing, which involves launching the app through specific URLs or intents. Deep link testing allows you to validate app behavior when it is opened through external links or specific app routes.

Join in Appium Certification Course with Global Recognised Certification
Weekday / Weekend BatchesSee Batch Details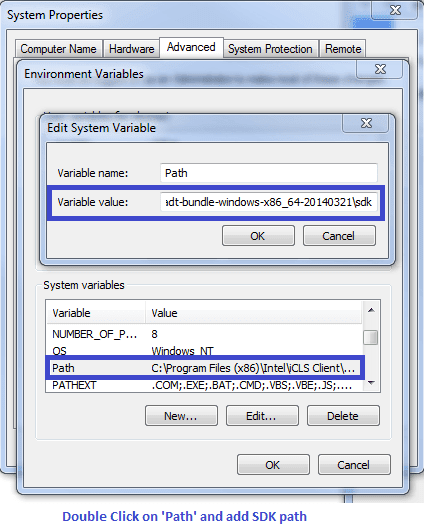
Career Prospects in Appium:
The increased need for mobile app testing and automation makes career opportunities in Appium alluring. Businesses are prioritising the quality and effectiveness of mobile applications as they are used more frequently, which is driving up demand for qualified Appium personnel. There are positions in the following categories in Appium:
- Mobile Test Automation Engineer : If you are an expert in Appium. You will be in responsible of planning, creating, and upkeep of Appium-based automated test scripts. You will be in charge of creating test plans, carrying out tests, resolving problems, and working with the development and QA teams.
- Mobile Quality Assurance Engineers: Mobile QA engineers are concerned with assuring the excellence of mobile applications. You can specialise in mobile QA testing using your Appium talents. You will test mobile applications across a range of gadgets and operating systems, look for bugs, and give the development team feedback. With knowledge of Appium, you can automate tests and speed up the QA process.
- Mobile Test Architect: Developing the overall testing framework and strategy for mobile applications will be your responsibility as a “mobile test architect,” or anyone who specialises in this area. You will use Appium to specify best practises, create frameworks for test automation, and direct the team in putting in place efficient testing procedures. A thorough understanding of Appium and mobile app testing procedures is essential for this position.
- Mobile App Developer/Test Hybrid: Some professionals choose to specialize in both mobile app development and testing. With Appium proficiency, you can work as a mobile app developer/test hybrid, responsible for building mobile apps and ensuring their quality through automation testing. This combination of skills can be valuable in agile development environments, where developers actively participate in testing activities.
- Mobile Test Lead/Manager: As a mobile test lead or manager, you will oversee the mobile testing activities within an organization. Your role will involve coordinating and managing the Appium test automation efforts, ensuring test coverage, mentoring junior testers, and collaborating with cross-functional teams. Appium expertise will enable you to make informed decisions regarding testing strategies and tooling.