Last updated on 09th Jul 2020| 2872
Android Studio is the official Integrated Development Environment (IDE) for Android app development, based on IntelliJIDEA. On top of IntelliJ’s powerful code editor and developer tools, Android Studio offers even more features that enhance your productivity when building Android apps, such as:
- A flexible Gradle-based build system
- A fast and feature-rich emulator
- A unified environment where you can develop for all Android devices
- Apply Changes to push code and resource changes to your running app without restarting your app
- Code templates and GitHub integration to help you build common app features and import sample code
- Extensive testing tools and frameworks
- Lint tools to catch performance, usability, version compatibility, and other problems
- C++ and NDK support
- Built-in support for Google Cloud Platform, making it easy to integrate Google Cloud Messaging and App Engine.
Android Architecture
Android architecture or Android software stack is categorized into five parts:
- linux kernel
- native libraries (middleware),
- Android Runtime
- Application Framework
- Applications
Let’s see the android architecture first.
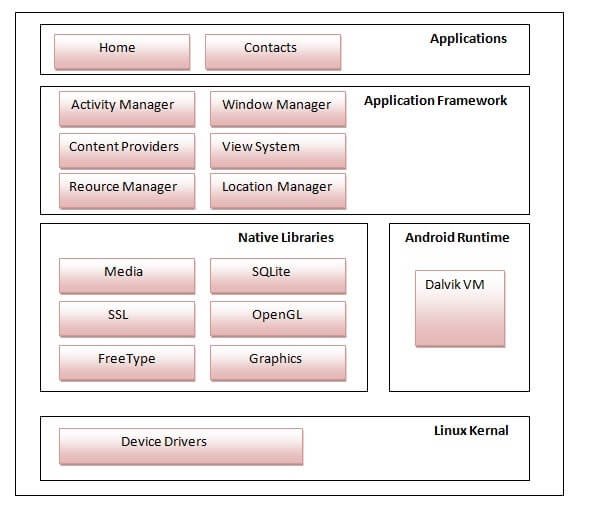
1) Linux kernel
- It is the heart of android architecture that exists at the root of android architecture. Linux kernel is responsible for device drivers, power management, memory management, device management and resource access.
2) Native Libraries
- On the top of linux kernel, their are Native libraries such as WebKit, OpenGL, FreeType, SQLite, Media, C runtime library (libc) etc.
- The WebKit library is responsible for browser support, SQLite is for database, FreeType for font support, Media for playing and recording audio and video formats.
3) Android Runtime
- In android runtime, there are core libraries and DVM (Dalvik Virtual Machine) which is responsible to run android application. DVM is like JVM but it is optimized for mobile devices. It consumes less memory and provides fast performance.
4) Android Framework
- On the top of Native libraries and android runtime, there is android framework. Android framework includes Android API’s such as UI (User Interface), telephony, resources, locations, Content Providers (data) and package managers.
- It provides a lot of classes and interfaces for android application development.
5) Applications
- On the top of android framework, there are applications. All applications such as home, contact, settings, games, browsers are using android framework that uses android runtime and libraries. Android runtime and native libraries are using linux kernal.
INSTALLATION AND SETUP
Getting started with Android Studio
- The most efficient IDE for developing android apps. The most recent stable version available is 2.1.1.
- Google provides Android studio for Windows, Mac, OS X, and Linux platforms.
- Before you install android studio you need to be sure that your platform is compatible for Android studio. Following are the requirements.
WINDOWS
- Microsoft Windows 7/8/10 (32-bit or 64-bit)
- 2 GB RAM minimum, 8 GB RAM recommended
- Minimum of 2 GB of available disk space, 4 GB Recommended (500 MB for IDE + 1.5 GB for Android SDK and emulator system image)
- JDK 8.0
- For accelerated emulator –
- A 64-bit operating system, and
- Intel processor with support for Intel VT-x, Intel EM64T (Intel 64), and
- Execute Disable (XD) Bit functionality.

Get JOB Oriented Android Training from Real Time Experts
- Instructor-led Sessions
- Real-life Case Studies
- Assignments
MAC.
- Mac OS X 10.8.5 or higher, up to 10.11.4 (El Capitan)
- 2 GB RAM minimum, 8 GB RAM recommended
- Minimum of 2 GB of available disk space, 4 GB Recommended (500 MB for IDE + 1.5 GB for Android SDK and emulator system image)
- 1280 x 800 minimum screen resolution
- JDK 6
LINUX.
- GNOME or KDE desktop: Tested on Ubuntu 12.04, Precise Pangolin (64-bit distribution capable of running 32-bit applications)
- 64-bit distribution capable of running 32-bit applications
- GNU C Library (Glibc) 2.11 or later
- 2 GB RAM minimum, 8 GB RAM recommended
- Minimum of 2 GB of available disk space, 4 GB Recommended (500 MB for IDE + 1.5 GB for Android SDK and emulator system image)
- 1280 x 800 minimum screen resolution
- JDK 8
- For accelerated emulator –
- Intel processor with support for Intel VT-x, Intel EM64T (Intel 64), and
- Execute Disable (XD) Bit functionality, or AMD processor wif support for AMD Virtualization (AMD-V)
Once you have made sure that your Windows OS is compatible for Android studio to be installed follow these steps.
TOC
Setup JDK (JAVA DEVELOPMENT KIT)
Download the latest version of JDK
Check that environment variable JAVA_HOME is set to the JDK installation directory via the below command. Otherwise, define it from the “Control Panel”.
set JAVA_HOME
If you are using windows right-click on My Computer, select Properties, then Advanced, then Environment Variables. Then, you would update the PATH value and press the OK button.
set PATH=C:\jdk1.8.0_102\bin;%PATH%
set JAVA_HOME=C:\jdk1.8.0_102
TOC
Download Android IDE
Click on the below link to download Android Studio for Windows.
Get Android Development Studio.
e.g. android-studio-bundle-141.xxxxxx-windows.exe
TOC
Install the Android IDE
1. Launch the .exe file to start the installation process.
2. Click the next button which will take you to the following dialog box.
3. Keep the default settings and click next.
4. Click on I Agree. Next dialog box brings you to change the location for android studio and Android SDK.
5. Click the next button. Here you can choose to have a shortcut button.
6. Click on install.
7. Click on the finish button.
Note – This installation installs only basic SDK packages.
8. Now, launch Android Studio.
9. You’ll see a splash screen like the one shown below.
Select the checkbox with the following text and press “OK”.
“I do not have a previous version of Android Studio.”
10. Click on next button.
11. Select the install type to be standard and click on next.
12. Press the Finish button.
After this, Welcome to Android studio dialog box will appear.
Yes, you are done with the Android Studio Installation and Setup. Kudos!