Last updated on 13th Jul 2020| 2633
What is a Raspberry Pi?
The Raspberry Pi is a very small computer that is almost the size of your credit card. It costs between Rs 750 and Rs 4000. It can function as a proper desktop computer or use it to build smart devices and is available anywhere in the world. The Pi changed into what initially was meant to be a microcomputer to teach kids coding. Its scope can expand after hobbyists and engineers noticed its capacity, and it’s far now one of the most famous objects inside the international era.
Why is it called Raspberry Pi?
The “Raspberry” name is a homage to computer companies in early times that were being named after a fruit, like Apple, Apricot Computers, Tangerine Computer Systems. The idea to make a small computer to run only the Python programming language is where the “Pi” derives from.
Raspberry Pi
The Raspberry Pi is a low cost, credit-card sized computer that plugs into a computer monitor or TV, and uses a standard keyboard and mouse. It is a capable little device that enables people of all ages to explore computing and to learn how to program in languages like Scratch and Python. It’s capable of doing everything you’d expect a desktop computer to do, from browsing the internet and playing high-definition video, to making spreadsheets, word-processing, and playing games.
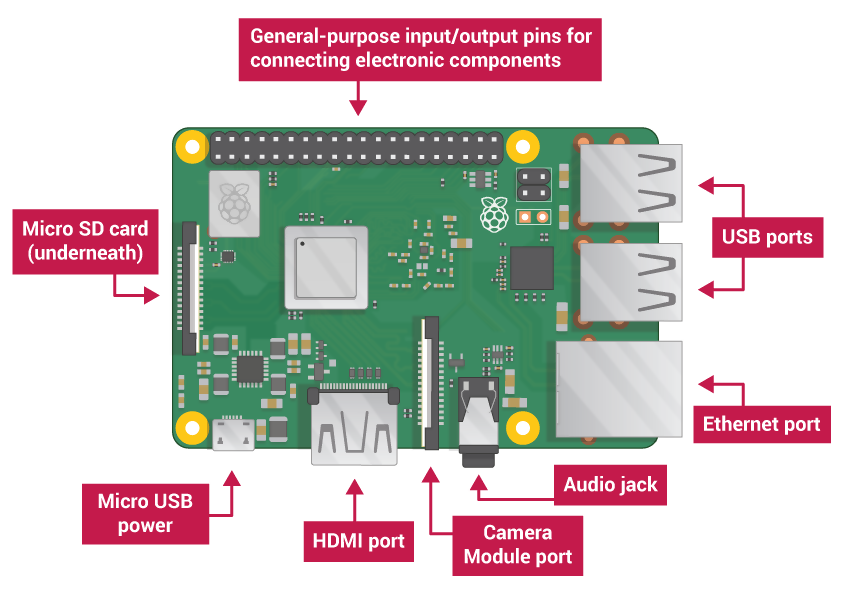
Raspberry Pi will have the following ports:
- USB : USB ports are used to connect a wide variety of components, most commonly a mouse and keyboard.
- HDMI : The HDMI port outputs video and audio to your monitor.
- Audio : The audio jack allows you to connect standard headphones and speakers.
- Micro USB : The Micro USB port is only for power, do not connect anything else to this port. Always connect the power after you have already connected everything else.
- GPIO : The GPIO ports allow the Raspberry Pi to control and take input from any electronic component.
- SD card slot : The Raspberry Pi uses SD cards the same way a full-size computer uses a hard drive. The SD card provides the Raspberry Pi with internal memory and stores the hard drive.
What you’ll need to get started with Raspberry Pi :
- The Pi : Raspberry Pi 3 Model B+ ($47 at Amazon)
- For downloading the software : SanDisk Ultra 32GB microSD card ($8 at Amazon)
- For adapting the microSD card to your computer : SanDisk Mobile Mate microSD card reader ($13 at Amazon)
- The power supply : CanaKit 5V Raspberry Pi Power supply ($10 at Amazon)
- You’ll need this to type : Verbatim Slimline Keyboard ($10 at Amazon)
- For pointing & clicking : Logitech B100 ($10 at Amazon)
- The monitor connector : AmazonBasics HDMI
- For internet hardwire : AmazonBasics Ethernet cable
You’ll also need a monitor or TV that accepts either HDMI or composite video input. HDMI works best, but the composite video is workable. Many Raspberry Pi projects use an internet connection, so you’ll also want a Wi-Fi dongle or ethernet cable
Applications for Your Raspberry Pi
There are no limits to what you can do with your Raspberry Pi. But here are some ideas:
- Create your own programs
- Create your own electronics projects
- Build a retro gaming console
- Use your Pi as a desktop computer
- Build a home automation system
- Make your own CCTV system
- Create your own web server
- and much more.
You can also read our dedicated post to Raspberry Pi uses: 11 Clever Uses for Your Raspberry Pi
Different Raspberry Pi Boards
There are different releases of the Raspberry Pi board:
- February 2012: Raspberry Pi 1 Model B (Rev. 1)
- April 2012: Raspberry Pi 1 Model B (Rev. 2)
- February 2013: Raspberry Pi 1 Model A
- July 2014: Raspberry Pi 1 Model B+
- November 2014: Raspberry Pi 1 Model A+
- February 2015: Raspberry Pi 2 Model B
- November 2015: Raspberry Pi Zero
- February 2016: Raspberry Pi 3 Model B
- February 2017: Raspberry Pi Zero W
- March 2018: Raspberry Pi 3 Model B+
If you don’t have a Raspberry Pi yet, we recommend getting a Raspberry Pi 3 Model B, or a Raspberry Pi Zero W, depending on what you intend to do. The table below compares these two boards:
| Feature | Pi 3 Model B | Pi Zero W |
|---|---|---|
| Size | 85x56mm | 65x30mm |
| Processor | 1.2GHz quad‑core ARMv8 | 1GHz, single-core CPU |
| RAM | 1GB | 512MB RAM |
| USB Ports | 4 | USB On-The-Go ports |
| GPIOs | 40 | 40 |
| Ethernet Port | Yes | No |
| HDMI | Full-size HDMI | Mini HDMI |
| Storage | MicroSD | MicroSD |
| Wi-Fi | BCM43438 wireless LAN | 802.11 b/g/n wireless LAN |
| Bluetooth | Bluetooth Low Energy (BLE) on board | Bluetooth 4.1/Bluetooth Low Energy |
| Price | $35 | $10 |
| Power-Source | MicroUSB | MicroUSB |
Parts of the Raspberry Pi
GPIO : GPIO is arguably the most important feature of the Raspberry Pi and is the equivalent of GPIO pins on the Arduino. These pins can be used in programs to read electrical signals from circuits as well as provide electrical signals for controlling circuits. Be very careful when using GPIO as they are easily damaged and use 3.3V logic. If you intend to control external devices that draw more than 20mA current, you should use a driver circuit (see 3.3 connecting I/O). This includes devices such as relays, inductors, and high brightness LEDs.
DSI Display Port : The DSI display port allows the Raspberry Pi to connect to a serial display similar to those used in tablets. Such display modules are available with touch controls and in common sizes such as 7 inches.
CSI Camera Port :The CSI camera port is a connector that allows the Raspberry Pi to connect to a Raspberry Pi camera module. Generic web cameras will not work as they commonly have only a USB connector.
MicroSD Slot : This slot is used to house the microSD card that holds the Raspberry Pi operating system. The microSD card does not come with the Pi. This SD card also holds all files, folders, documents, and pictures created by the user. It is essentially the hard drive of the computer.
HDMI / USB / Network : These slots are used to connect the Pi to an HDMI screen, USB devices such as mice and keyboards, and to an ethernet connection for internet access. However, the Raspberry Pi 3 comes with integrated Wi-Fi so there is often no need for the ethernet connector.

Enroll in Raspberry Pi Training to Build Skills & Advance Your Career
- Instructor-led Sessions
- Real-life Case Studies
- Assignments
Micro USB Power : Power to the Raspberry Pi can be provided using either a micro USB lead to the micro USB connector (recommended) or 5V can be directly fed into the 5V GPIO pin. Now that you’re familiar with the parts that make up the Raspberry Pi, you may find that when powered up, your Raspberry Pi does absolutely nothing. This is because we need to get an operating system onto it first! In the next article, I’ll cover how to install Raspbian, Raspberry Pi’s most popular OS, onto a microSD card.
What can you ACTUALLY do with this?
Ok, so now you have a small computer that runs a bunch of free software. What can you actually do with it? Well, here’s an easy and fun Python project that I have implemented with a group of middle school students as part of a coding class.
Using a Raspberry Pi compatible temperature/humidity/pressure sensor with LED screen, I taught the concept of randomness using random colors on the LED screen rather than numbers. My students loved how they could visually and physically interact with their own code. You can see the video of the project here:
Using the same device, we also built a calculator, gaming device, weather station, and much more. I found them a very useful and cost-efficient way to teach introductory programming to young students. I plan to cover the details of my curriculums in an article some other time. One of my colleagues at Stanford built a customized Raspberry Pi secured espresso machine to protect our precious coffee. The idea is somewhat similar to a Raspberry Pi secured door lock as seen here.
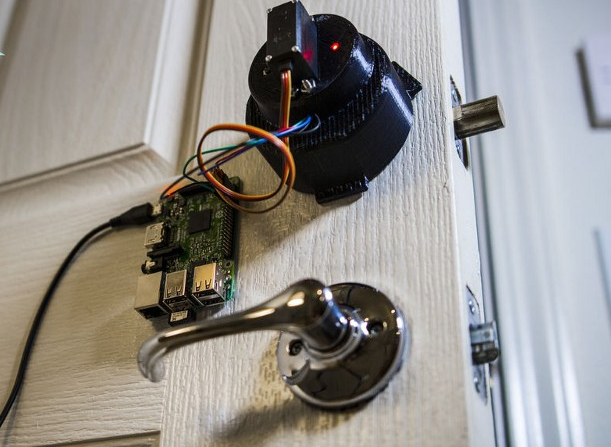
Raspberry Pi secured door lock by HackerHouse
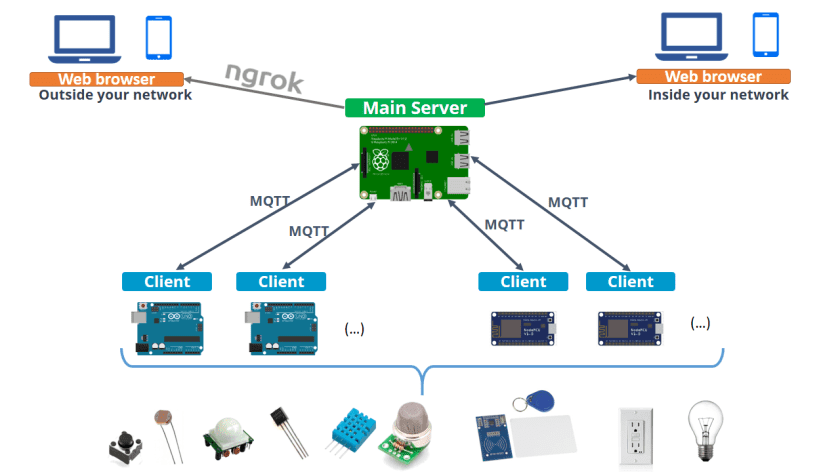
There are many, many articles on using a Raspberry Pi to build fun and useful IoT devices. Here is some list of them I found: Raspberry Pi Security Camera, Raspberry Pi Media Center, Raspberry Pi Code Club.
Setting up your Raspberry Pi for the first time
Getting your Raspberry Pi up and running is a very easy process, just follow these simple steps:
1. Insert an SD card with a Linux operating system on it. We strongly recommend using Raspbian or another OS designed specifically for the Raspberry Pi, at least until you are more familiar with its capabilities. We provide our Raspberry Pis with a Raspbian installation already on the SD card, so if you got yours from us you can skip this step. If you bought your Raspberry Pi elsewhere, please read our NOOBS tutorial below.
2. Connect a monitor to the HDMI port. Make sure the monitor is connected to a wall socket and is powered on. The Raspberry Pi is still off, so you won’t see anything yet. If you are connecting a non-HDMI monitor, use an adapter that won’t block access to the USB ports.
3. Connect a mouse and keyboard to the USB ports. High-end equipment such as ‘gaming’ mice can drain power, put unnecessary load on the processor, and may need software and drivers to work properly. To avoid complications, stick to simple ‘plug-and-play’ devices.
Your Raspberry Pi should now look like this:
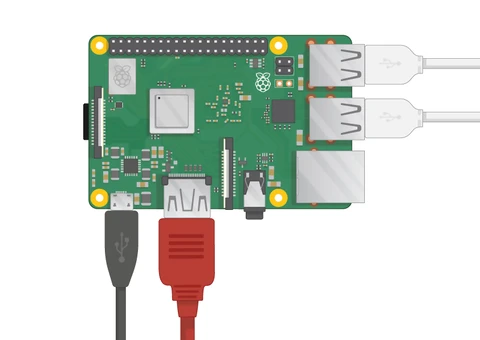
- If you want to connect to the Internet via Ethernet instead of WiFi, you should also plug in an Ethernet cable. If you want to hear sound through speaker or headphones, you should also plug those in now. Neither of these is necessary to start up the Raspberry Pi.
- Finally, connect the power supply to a wall socket and plug in the micro USB cable. A red LED will light up on the Raspberry Pi, and on the monitor, you will see the Raspberry Pi boots up. In a few moments, you will see a desktop screen.
Final steps :
If this is the first time you have loaded up your Raspberry Pi, you will see a welcome screen asking you to provide some basic settings.
1.Click Next to begin:
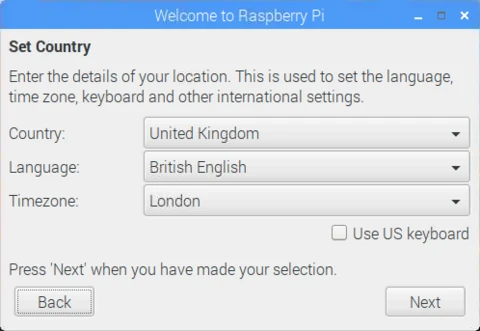
Choose your Country, Language, and Timezone. You can also set whether you are using a US keyboard layout. If you want to use an AZERTY keyboard or any other layout, we will cover how to change this in the Terminal section. Click Next to continue.

Next, you will be asked to create a password. The default password is ‘raspberry’ and unless you want anyone to be able to log in, you should definitely change this.
2.Click Next to continue.
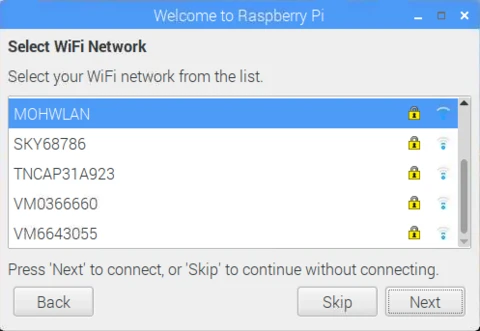
On the next screen, the Raspberry Pi will display a list of the wireless networks it can pick up. If your model does not have WiFi, this screen will not appear and you can skip this step. Select your network, enter your WiFi password and

3. Click Next.

Exploring the Raspberry Pi
- Clicking the Raspberry icon in the top right of the screen will open the menu. From here you can find a wide variety of lightweight open-source programs packaged with Raspbian. These include basic text and image editing tools as well as programming and educational tools such as Scratch and Squeak.
- Also along the top right of the screen, you should see a globe icon for Chromium. This is your Internet browser, and if you set up your network settings you can browse the web here.
- Next along is the file manager, which allows you to browse the files on your SD card and external USB storage.
- Finally, the black icon opens up the Terminal. This allows you to type commands directly, and for advanced users can be a faster and more flexible way to perform certain tasks.
Remote Access with Raspberry Pi
- First, let’s connect via shell (SSH). Open the terminal on the Raspberry Pi (control+alt+t), and type if config. If you’re connected via wifi, then go under the WLAN section, and look for your inet address. This will be your local IP, something like 192.168.XX.XXX. We can use this to connect via SSH (user: pi, pass: raspberry), BUT we first have to enable the SSH server. To do this, type sudo raspi-config. Here, we can do quite a few things, but let’s head into option #5 interfacing options, next choose the 2nd option for SSH and enable the server. Once this is done, you can shell into the Raspberry Pi.
- On Mac and Linux, to do this, open a terminal and type: ssh pi@192.168.XX.XXX, where you replace the IP address with the one for your Raspberry Pi.
- On Windows, you will need to use an SSH client. I recommend PuTTY. Once downloaded, you can open PuTTy, fill in the “hostname” field with your Pi’s local IP, hit enter, and then you will be asked for a username and password.
When successful, you should have something like:

This is identical to the terminal you accessed earlier from the Pi’s desktop.
Now, sometimes, you might really want to get access to the desktop instead of just the terminal. To do this, you need the “host” to have remote desktop capabilities, as well as whatever remote PC you attempt to use to access it. First, let’s deal with the Raspberry Pi. We’re going to install xrdp.
- sudo apt-get remove xrdp vnc4server tightvncserver
- sudo apt-get install tightvncserver
- sudo apt-get install xrdp
Now let’s deal with the computer from which you plan to connect your Raspberry Pi.
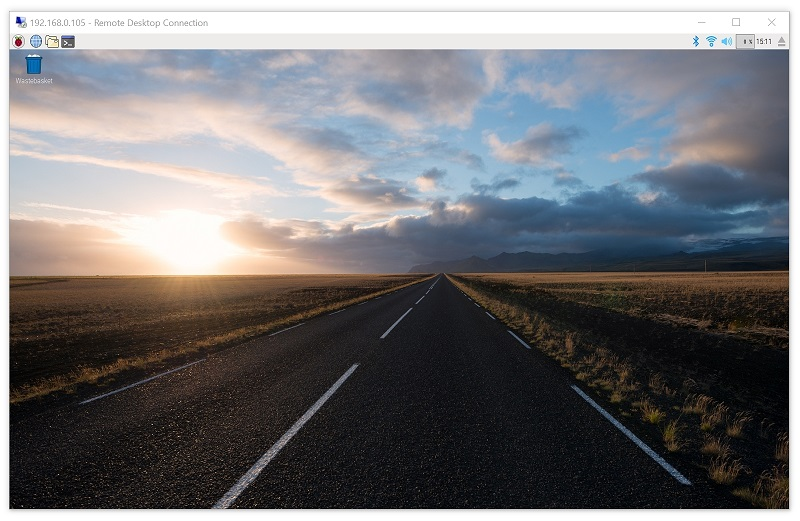
For Mac and Windows, you can use the Microsoft application called Remote Desktop. On Linux, you can use desktop (Sudo apt-get install desktop). All three of these examples are going to act the same way. Run them, fill in the IP address of the Raspberry pi, the username, the password, and connect!
When done, you should have something like:
With the SSH server turned on, you will likely be seeing warnings every time you log in that your password is still the default password. The SSH server is turned off by default because, as the Pi has gained popularity, people who might not realize the security risk are using it in places like their homes and businesses. All it takes is someone to connect to your wifi, scan for other local ips, and try them all with default usernames and passwords for various devices, like the Raspberry Pi, and boom they’re in. If you want to change your password, you can do sudo raspi-config, and it’s the first option.
Using Raspberry Pi remotely
As long as your Raspberry Pi is connected to your network, you can control it remotely through your desktop or laptop using SSH.
- Connect the SD card to your computer and create an empty file in the boot folder, which is inside the Volumes folder. Name the file ssh and make sure it contains the line touch ssh.
- Put the SD card back in the Pi and power the Raspberry Pi on. If you have not set up WiFi on the Raspberry Pi yet, you will need to plug in an Ethernet cable.
- Open Terminal in Mac or Linux, or Command Prompt in Windows. Type ssh pi@raspberrypi. If you have changed the username, enter your username instead of You can also replace raspberry pi with the Raspberry Pi’s IP address.
- Enter your password when prompted, then type yes if you encounter an authenticity warning.
- You should now be able to enter Linux Terminal commands to operate the Raspberry Pi.
Installing Raspbian with NOOBS
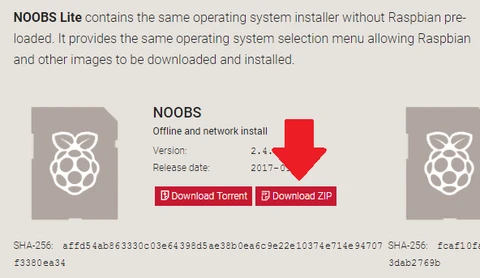
NOOBS is an operating system installer, for use with Raspbian and a variety of other Linux systems for Raspberry Pi. If your Raspberry Pi did not come with Raspbian already installed on an SD card, NOOBS is the easiest way to set it up. Just follow these simple steps:
Download a ZIP folder containing NOOBS
Download and install SD Formatter 4.0. When you insert your SD card into your computer, it will be assigned a drive letter. Use the SD Formatter to format this drive letter. You will lose everything that was on the SD card, so back up any files you want to save first.
Find the NOOBS ZIP folder you downloaded earlier, and extract the contents to a new folder. Right-click and copy the contents of the new folder, then open your SD card and paste the files onto the SD card. When this has completed, eject the SD card. Put the SD card into your Raspberry Pi, and plug in the micro-USB to power it on. Once loaded, the installer will ask you which operating system you want to install. Select Raspbian, and click Yes when a warning box appears.
Installing Raspbian will take a few minutes. A dialogue box will appear telling you the installation was successful. When you click OK the Raspberry Pi will restart and load up Raspbian.
<>Accessories You Need To Get StartedWhen you buy a Raspberry Pi board, you only get a bare electronic board that doesn’t do much on its own. You need several accessories to get started.
There are a lot of accessories for the Raspberry Pi, but you need at least a microSD are and a power supply. Without these accessories your Raspberry Pi is useless.

- Power supply: you need a power adapter that provides 2.5A 5V
- MicroSD card: you need at least one with 8GB, class 10. You need a microSD card to store your files and the Pi’s operating system. The Pi doesn’t have a hard drive, so everything you do on your Pi is saved on the microSD card, even the operating system. You can get a microSD card with the operating system preloaded or install the operating system yourself.
There are also useful accessories you may consider to get like an HDMI cable to connect a monitor, and a Raspberry Pi case to protect your board. A spare mouse and keyboard can also be useful to set your Raspberry Pi as a desktop computer.