
Last updated on 29th Dec 2021| 3763
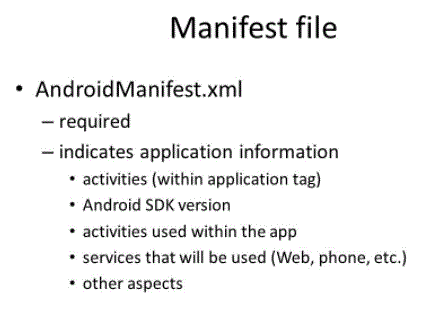
The Android Manifest is an XML file which contains important metadata about the Android app. This includes the package name, activity names, main activity (the entry point to the app), Android version support, hardware features support, permissions, and other configurations.
- Introduction to Android Manifest
- How Unity produces the Android Manifest
- Overriding the Android manifest
- Permissions
- Examining the resulting Android manifest
- Why Manifest File?
- Some of the manifest sub-node tags that are mainly used are
- File Features
- Icons and labels
- Conclusion
Introduction to Android Manifest:
Android Manifest is an XML file that contains important metadata about an Android app. This includes package name, activity name, main activity (the app’s entry point), Android version support, hardware features support, permissions, and other configurations. For more information about the Android Manifest file, see the Android Developer documentation on Android Manifest.

- mouse
- Name
- Initial Activity and its Intents
- install location
- Supported Screen Sizes is game setting
- LibraryManifest.xml – located at
- Integration Activity
- permissions
- Theme used by Unity Activity
- VR Mode
- vr performance
- Make the activity non-resizable (for VR)
- setting maximum aspect ratio
- react to configuration changes
- Leaning
- launch mode
- Android UI
- Hardware acceleration
- Features used (such as a gamepad or graphics API)
- notch support
- initial window size
- ability to resize window
- Unity uses LibraryManifest.xml or AndroidManifest.xml as the main manifest.
- It then looks for all the Android manifests of your plug-ins (.aar files and Android libraries).
- This plug-in uses Google’s ManifestMerger class to merge the manifest into the main manifest.
- Modify manifest files in Unity Launcher and Library Modules. It automatically adds permissions, configuration options, features used, and other information.
How Unity produces the Android Manifest:
In Unity 2019.3 and newer versions, Android Gradle.
The project that Unity generates consists of two template manifest files:
LauncherManifest.xml – located at root/Launcher/src/main/AndroidManifest.xml in the exported project. This file contains the app:
root/unityLibrary/src/main/AndroidManifest.xml in the exported project. You can override this manifest with a custom_AndroidManifest.xml_ that you add to the plugins/android folder. This file declares:
When Unity builds your app, it automatically generates Android Manifest files by following the steps below:
- To use the Android Manifest you created outside of Unity, import your Android Manifest file to the following location: assets/plugins/Android/AndroidManifest.xml. It overrides the default LibraryManifest.xml.
- In this case, Unity merges the manifest of your Android library into your main manifest, and ensures that the configuration of the resulting manifest is correct. For full control of the manifest, including permissions, you need to export the project and modify the final manifest in Android Studio.
- Note: Unity only supports [launchMode – singleTask](https://developer.android.com/guide/topics/manifest/activity-element.html#lmode)%20launch%20mode.
Overriding the Android manifest:
Although Unity generates a true manifest for your app, you want direct control over its content.
- network classes add internet permission
- Using vibrate (eg handheld. vibrate) adds vibration
- InternetReachability] adds property ACCESS_NETWORK_STATE
- Location API (like Location Service) adds ACCESS_FINE_LOCATION
- WebCamTexture APIs add CAMERA
- Permission
- Adds the microphone class RECORD_AUDIO
- Add NetworkDiscovery and NetworkTransport.SetMulticastLock CHANGE_WIFI_MULTICAST_STATE
- For more information about permissions, see the Android Developer documentation on Android Manifest Permissions.
Permissions:
Unity automatically adds the Android player settings and necessary permissions based on the Unity API to the manifest that your app calls scripts from. for example:
If your plug-in requires permission by declaring it in its manifest, Unity automatically adds the permission to the resulting Android manifest during the merge phase. All Unity APIs that the plug-in calls also contribute to the permission list.
Runtime Permissions in Android 6.0 (Marshmallow)- If your app is running on Android 6.0 (Marshmallow) or later and also targets Android API level 23 or higher, your app uses the Android runtime permission system.
The Android runtime permission system asks the user to grant permissions while the app is running, rather than when they first install the app. Users of the app can usually grant or deny each permission while the app is running (for example, requesting camera permission before taking a picture). It allows an app to run without permission with limited functionality. You can use the Android.Permission class in Unity to check whether a user has granted or denied specific permissions. If the permission your app requires is denied, you can inform the user why the app needs it and ask them to approve the permission. For more information, see the documentation on requesting permissions.
- To check the final Android Manifest generated by Unity for your app, open the Temp/StagingArea/AndroidManifest.xml file after building your project but before closing the Unity Editor.
- The manifest is stored in the output package (.apk) in binary format. an .apk . To check the contents of a manifest inside you can use Android Studio APK Analyzer, or any other third-party tool like Apktool.
Examining the resulting Android manifest:
Why Manifest File?
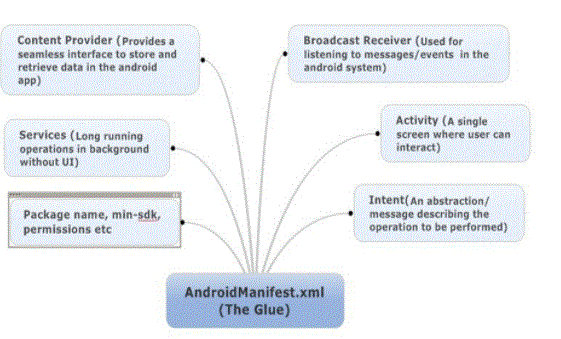
Each project in Android includes a manifest file, which is AndroidManifest.xml, which is stored in the root directory of its project hierarchy. Manifest file is an important part of our app as it defines the structure and metadata of our application, its components and its requirements. This file contains the nodes for each of the activities, services, content providers and broadcast receivers that make up the application and uses intent filters and permissions to determine how they coordinate with each other and other applications.
The manifest file also specifies application metadata, including its icon, version number, theme, etc., and additional top-level nodes can specify any required permissions, unit tests, and define hardware, screen, or platform requirements. can. The manifest contains the root manifest tag with the package attribute set to the project’s package. It should also include an xmlns:android attribute which will supply many of the system attributes used within the file. We use the VersionCode attribute to define the current application version as an integer that increments itself with the iteration of the version due to updates. Also, the versionName attribute is used to specify the public version that will be displayed to users.
- <"support-screen
- android:small screen=”false”
- android:normal screen=”true”
- android:largeScreen=”true”
- android:xlargeScreens=”true”/>
- <'permission
- android:name=”com.pad.DETONATE_DEVICE”
- android:security level=”dangerous”
- android:label=”self-destruct”
- android:description = “@string/explode_details”>
Some of the manifest sub-node tags that are mainly used are:
1. util-sdk
It is used to define the minimum and maximum SDK version that must be available on a device in order for our application to function properly, and target the SDK for which it is required, using a combination of the minSdkVersion, maxSdkVersion and targetSdkVersion attributes respectively has been designed.

Develop Your Skills with Advanced Android Certification Training
Weekday / Weekend BatchesSee Batch Details2. util-config
The use-configuration node is used to specify a combination of input mechanisms supported by our application. This is useful for games that require specialised input controls.
3. Usage-features
It is used to specify which hardware represents your application requirement. This will prevent our application from being installed on a device that does not include the required hardware
4. Support-Screen
It is used to describe the screen support for our application:
5. Permission
It is used to create permissions to restrict access to shared application components. We may also use existing platform permissions for this purpose or define your own permissions in the manifest.
6. Application
There can be only one application node in a manifest. It uses attributes to specify metadata for your application (including its title, icon, and theme). During development, we should set the debuggable attribute to true to enable debugging, then make sure to disable it for our release builds. The application node also serves as a container for the Activity, Service, Content Provider, and Broadcast Receiver nodes that specify the application components. The name of our custom application class can be specified using the android:name attribute.
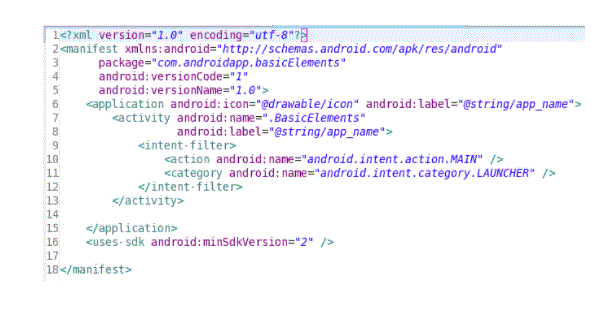
- <'?xml version="1.0" encoding="utf-8"?>
- <'manifest xmlns:android="http://schemas.android.com/apk/res/android"
- package = “com.example.myapp”
- android:versionCode=”1″
- android:versionName=”1.0″ ,
- <'appear>
- When building your app into a final application package (APK), the Android build tools use the package attribute for two things:
- It implements this name as the namespace of your app’s generated R.java class (used to access your app resources).
- Example: With the above manifest, the R class is created at com.example.myapp.R.
- It uses this name to resolve any related class names that are declared in the manifest file.
- Example: With the above manifest, the activity declared as <'activity android:name=".MainActivity"> is resolved as com.example.myapp.MainActivity
- Therefore, the name in the package attribute of the manifest should always match the parent package name of your project where you place your activities and other app code. Of course, there may be other subpackages in your project, but those files must import the R.java class using the namespace from package attribute.
File Features:
The following sections describe how some of the most important features of your app appear in the manifest file. Package Name and Application ID. The root element of the manifest file requires an attribute for your app’s package name (usually matching your project directory structure-java namespace).
For example, the following snippet shows the root manifest element with the package name “com.example.myapp”:
Icons and labels:
Many manifest elements have icon and label attributes for the respective app component to display to users a small icon and a text label, respectively. In each case, the icons and labels set in the parent element become the default icon and label values for all child elements. For example, the icons and labels set in the <'application> element are the default icons and labels for each component of the app (such as all activities).
Icons and labels set in a component’s < intent-filter > are shown to the user when that component is presented as an option to fulfil an intent. By default, this icon inherits from any icon declared for the parent component (either the < activity > or < application > <'application> < application > element), but you may want to change the icon for an intent filter if it is a unique one. Provides the action that you’d better indicate in the selector dialog.
File convention
This section describes conventions and rules that generally apply to all elements and attributes in a manifest file.
Elements
Only the <'appear> and <'application> elements are required. Each of them should occur only once. Most other elements can occur zero or more times. However, some of them must be present for the manifest file to be useful. All values are set via attributes, not as character data within an element. Elements of the same level are usually not sorted. For example, the <'activity>, <'provider>, and <'service> elements can be placed in any order. There are two major exceptions to this rule:
Resource value
Some attributes have values that are displayed to users, such as the title of an activity or your app icon. The value of these attributes may vary depending on the user’s language or other device configuration (e.g. to provide a different icon size based on the pixel density of the device), so the values may be set from a resource or theme rather than hard-coded. should be done. in the manifest file. The actual value may then change based on the optional resources that you provide for different device configurations.
Conclusion:
Android Manifest is an XML file that contains important metadata about an Android app. This includes package name, activity name, main activity (the app’s entry point), Android version support, hardware features support, permissions, and other configurations.
use-permission – Used to specify the permissions requested for security purposes.
Permission – Used to set permissions to provide access control to some specific component of the application.
permission-group – does the same as above for a set of components.
permission-tree – View a specific name of a component that is the owner or parent of a set of components.
Instrumentation – Enables knowing the interaction between the Android system and the application.
util-sdk – Specifies the platform compatibility of the application.
util-configuration – Specifies the set of hardware and software requirements for the application.
Usability – Specifies a single hardware and software requirement and their respective unit.
support-gl-texture – Specifies the texture based on which the application is filtered.