Last updated on 23rd Dec 2021| 2632
A background service performs an operation that isn’t directly noticed by the user. For example, if an app used a service to compact its storage, that would usually be a background service.
- Introduction to Background Services
- Handling Incoming Intents
- Define the intent service in the manifest
- Types of Android Services
- The Life Cycle of Android Services
- Fundamentals of Android Services
- What are the limitations on services starting from Android OS?
- Why do we need to restrict the use of background services?
- How can you run background tasks?
- Conclusion
- It cannot interact directly with your user interface. To put its results in the UI, you need to send them to an Activity.
- Task requests run sequentially. If an IntentService has an operation going on, and you send another request to it, the request waits until the first operation is finished.
- Operations running on IntentService cannot be interrupted.
- However, in most cases an IntentService is the preferred way to perform simple background operations.
- Create your own subclass of IntentService.
- Make the required callback method onHandleIntent().
- Define IntentService in your manifest file.
Introduction to Background Services:
The IntentService class provides a straightforward structure for running an operation on a single background thread. This allows for long running operations to be handled without affecting the responsiveness of your user interface. Also, an IntentService is not affected by most user interface lifecycle events, so it continues to run under conditions that would kick off an AsyncTask
There are some limitations of an IntentService:
This guide shows you how to do the following:
- class RSSPullService: IntentService(RSSPullService::class.simpleName)
- override fun on HandleIntent(WorkIntent: Intent) {
- // get data from incoming intent
- val datastring = workIntent.dataString
- ,
- // operate here, based on the contents of the datastring
- ,
- ,
- ,
Handling Incoming Intents:
To create an IntentService component for your app, define a class that extends IntentService, and within it, define a method that overrides onHandleIntent(). for example:
Note that other callbacks of a regular service component, such as onStartCommand() are automatically invoked by the IntentService. In an IntentService, you should avoid overriding these callbacks.
- Application
- android:icon=”@drawable/icon”
- android:label=”@string/app_name”>
- ,
- ,
- Because android:export is set to “false”,
- The service is only available for this app.
- ,
- < service
- android:name=”.RSSPullService”
- android:exported=”false” />
- ,
- The attribute android:name specifies the class name of the IntentService.
- Note that there is no intent filter in the <;service> element. The activity that sends the job request to the service uses an explicit intent, so no filters are needed. This also means that only components of the same app or other applications with the same user ID can access the service.
- Now that you have a basic IntentService class, you can send work requests to it with Intent objects. The process of creating these objects and passing them to your IntentService is described in Send Task Requests to BackgroundServices.
Define the intent service in the manifest:
An IntentService also requires an entry in your application manifest. Provide this entry as a <;service> element that is a child of the <;application> element:
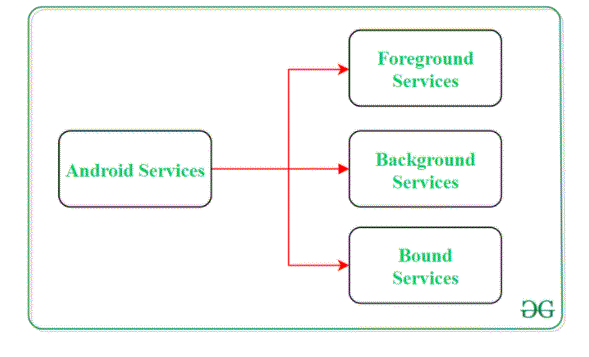
Types of Android Services:
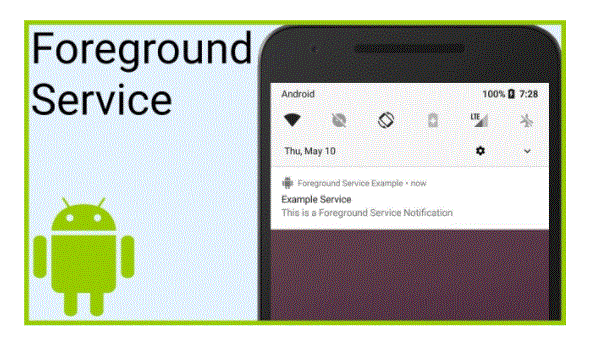
1. Foreground Services:
The services that inform the user about its ongoing operations are called foreground services. Users can interact with the Service by providing information about an ongoing task. Like in downloading a file, the user can keep track of the progress in downloading and can also pause and resume the process.

Learn Advanced Android Certification Training Course to Build Your Skills
Weekday / Weekend BatchesSee Batch Details2. Background Services:
Background services do not require any user intervention. These services do not notify the user about the background tasks running and the user cannot access them either. Processes like scheduled syncing of data or storing data are covered under this service.
3. Bound Services:
This type of Android service allows components of an activity like an application to bind themselves to it. Bound services perform their function as long as any application component is bound to it. More than one component is allowed to bind itself to the service at a time. The bindService() method is used to bind an application component to a service.
- By calling stopService() method,
- The service can stop itself by using the stopSelf() method.
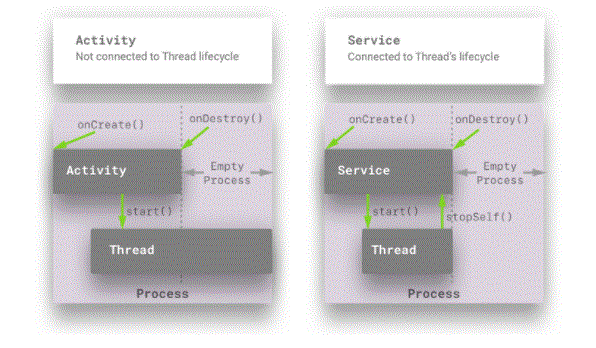
The Life Cycle of Android Services:
In Android, Services have 2 possible paths to complete their life cycle, namely Start and Bound.
1. Service Started (Unbound Service):
Following this path, a service will be started when an application component calls the startService() method. Once started, the service can run continuously in the background even if the component responsible for starting the service is destroyed. There are two options available to stop the execution of the service:
2. Tied Service:
It can be thought of as a server in a client-server interface. By following this path, Android application components can send requests to the service and receive results. A service is said to be bound when an application component binds itself to a service by calling the bindService() method. To stop the execution of this service, all components must detach themselves from the service using the unbindService() method.
Fundamentals of Android Services:
A user-defined service can be created through a generic class that extends the class Service. In addition, in order to complete the operation of the service on the application, there are some callback methods that need to be overridden. Following are some of the important features of Android Services:
methods and Description
onStartCommand() – Android service calls this method when a component (eg: Activity)
Requests to start a service using startService(). After the service is started, – This can be explicitly stopped using the stopService() or stopSelf() methods.
onBind() – This method is mandatory to implement in android service and it is implemented
Whenever an application component calls the bindService() method – Arm yourself with a service. User-interface is also provided to communicate
With the service effectively done by returning the IBinder object. – If the binding of the service is not required, the method must return void.
onBind() – Android system implements this method when all clients. Get disconnected from a particular service interface. onRebind() – Once all clients are disconnected from the particular interface of the service and
onCreate() – Whenever a service is created using either onStartCommand() or onBind() ,
One time set-up.– onDestroy() – When a service is no longer in use, the system invokes this method.
- Starting with Android O, if your application is in the background (check above three conditions), your application is allowed to create and run background services for a few minutes.
- After a few minutes have passed, your application will enter an inactive state. When your application enters an idle state, the system will stop all background services as soon as your service calls Service.stopSelf(). And here comes the fun part.
- As I discussed above, the problem of battery drain and memory consumption is mainly caused by started services. To eliminate this, Android O completely forbids the use of the startService() method to start a service. If you call startService() on Android O, you will get IllegalArgumentException
- When a high priority FCM message was received
- Receive broadcast
- Executing a pending intent from a notification.
What are the limitations on services starting from Android OS?
There are a few exceptions to these scenarios when your application is temporarily whitelisted. During this period, your application can create background services independently. The application will be provisionally whitelisted under the following conditions:
- Whenever your applications run in the background using services, your application consumes two precious resources: 1) memory and 2) battery. Both of these are limited resources on mobile devices and most low to medium range devices don’t have a lot of memory or battery.
- Let’s say, if your application is doing some very intensive tasks in the background and using a large amount of RAM to perform that task, it will create a very user experience, especially if the user Using another resource-intensive app, such as playing a game or watching a video in the foreground.
- As per the documentation the best practice for a service started is, When the operation is complete, the service should stop automatically.
- But, many applications have long running background services, which basically run for an infinite amount of time to maintain socket connection with the server or to monitor certain tasks or user activity. These services create battery drain and also they consume memory continuously.
- Since the last few releases of Android (starting with Marshmallow), Google has been working very hard to increase battery life and reduce the memory consumption used by applications, doze mode and apps by delaying background execution for some time. Initiating standby. If the phone is idle.
- But most of the time developers still use them despite knowing the drawbacks of long-running services. (Mostly because it’s easier to implement and maintain than to use other workarounds.)
Why do we need to restrict the use of background services?
- This API allows you to run scheduled service and the Android system will batch all the services from different applications and run them simultaneously in some particular time frame. The reason behind this is to reduce the amount of time your phone’s CPU and radio work together. This will consume less battery and maintain the health of the system.
- What if your application has minSdkVersion < 21? The official way to schedule a job in this situation is to use the Firebase Job Dispatcher. Firebase Job Dispatcher is supported all the way up to API9.
- If you want to do some long-running tasks in the background, consider using foreground services for that. None of the above background execution limits apply to foreground services.
- It will also keep your user aware that your application is doing some background work by displaying an ongoing notification. This will increase transparency with your user.
- Before Android O, if you wanted to create a foreground service, you usually started a background service by calling startService(). You can then promote your service to the foreground service by specifying the notification that is running using the startForeground() method. But starting with Android O, you can no longer use startService() . So to create a foreground service you have to use NotificationManager.startServiceInForeground(). This method is equivalent to creating a background service and promoting it to the foreground service combination.
How can you run background tasks?
If you are building a very large Android application, there may be some real scenarios where you need to perform some tasks in the background. Since starting a service using the startService() command is not an option, we need to find other ways to perform tasks in the background.
Scheduling your tasks using the Job Scheduler API:
The JobScheduler api has been introduced in API21 to perform background tasks.
Use foreground service
Conclusion:
These limits applied to background service will definitely provide extended battery life and also less RAM usage. Ultimately this will make your application smooth and your user happy.
Android O is still in DP1. There are 3 more developer previews to be released before the final version of Android O is released. There may be some API changes in the upcoming release. So, now is the time to think about the implications of these changes in your application and think of an alternative solution to them. After Developer Preview 3-4 is released, apply those changes to your application and make your application Android O compatible