Last updated on 09th Jul 2020| 2524
Jenkins is an automation tool written in Java programming language and suitable Continuous Integration tasks. It is used for continuous building of projects and you can quickly integrate the changes when needed. Also, Jenkins helps in the rapid deployment of a project by utilizing a wide number of deployment technologies. The acceleration in the development phase is achieved by automating tasks. Like a team lead, Jenkins will continuously check and evaluate the code for identifying unexpected errors early in the development phase.

Jenkins Installation
- First of all, you should install Java. $ sudo apt update $ sudo apt install openjdk-8-jdk
- In the second step, the Jenkins repository should be added. $ wget -q -o -https://pkg.jenkins.io/debian/jenkins.io.key | sudo apt-key add –
- Now, add the Jenkins Repository to the system $sudo sh -c ‘echo deb http://pkg.jenkins.io/debian-stable_binary/>/etc/apt/sources.list.d/jenkins.list’
- In the 4th step, you should install Jenkins $ sudo apt update $ sudo apt install Jenkins
- Once you have setup the installation, it is the right time to verify the Jenkins Installation. $systemctl status Jenkins
- Now, Jenkins is ready to run on your system, you can access it through the following link. http://localhost:8080
Jenkins Cheat Sheet
- Continuous Integration is a software development practice in which developers are required to frequently commit changes to the source code in a shared repository. Each commit is then continuously pulled & built. Jenkins is an open-source, Continuous Integration (CI) tool, written in Java. It continuously pulls, builds and tests any code commits made by a developer with the help of plugins.
Installation:
Step 1: Install Java
$ sudo apt update
$ sudo apt install openjdk-8-jdk
Step 2: Add Jenkins Repository
$ wget -q -O – https://pkg.jenkins.io/debian/jenkins.io.key | sudo apt-key add –
Step 3: Add Jenkins repo to the system
$ sudo sh -c ‘echo deb http://pkg.jenkins.io/debian-stable binary/ > /etc/apt/sources.list.d/jenkins.list’
Step 4: Install Jenkins
$ sudo apt update
$ sudo apt install Jenkins
Step 5: Verify installation
$ systemctl status Jenkins
Step 6: Once Jenkins is up and running, access it from the link:
http://localhost:8080
Jenkins Pipeline
- Jenkins pipeline is a single platform that runs the entire pipeline as code. Instead of building several jobs for each phase, you can now code the entire workflow and put it in a Jenkinsfile.
- Jenkinsfile is a text file that stores the pipeline as code. It is written using the Groovy DSL. It can be written based on two syntax’s:
Scripted pipeline
Code is written on the Jenkins UI instance and is enclosed within the node block
- node {
- scripted pipeline code
- }
Declarative pipeline
Code is written locally in a file and is checked into a SCM and is enclosed within the pipeline block
- pipeline {
- declarative pipeline code
- }
Build Pipeline
- Build pipeline can be used to chain several jobs together and run them in a sequence. Let’s see how to install Build Pipeline:
Jenkins Dashboard -> Manage Jenkins -> Manage Plugins -> Available
- In the filter text field enter the name of the plugin you want to install.
Build Pipeline Example
Step 1: Create 3 freestyle Jobs (Job1, Job2, Job3)
Step 2: Chain the 3 Jobs together
Job1 -> configure -> Post Build -> Build other projects -> Job2
Job2 -> configure -> Post Build -> Build other projects -> Job3
Step 3: Create a build pipeline view
Jenkins Dashboard -> Add view -> Enter a name -> Build pipeline view -> ok ->
configure -> Pipeline flow -> Select Initial job -> Job1 -> ok
Step 4: Run the Build Pipeline
Pipeline Concepts
The below fundamentals are common to both, scripted and declarative pipeline:
- Pipeline: A user-defined block which contains all the stages. It is a key part of declarative pipeline syntax.
- Node: A node is a machine that executes an entire workflow. It is a key part of the scripted pipeline syntax.
- Agent: instructs Jenkins to allocate an executor for the builds. It is defined for an entire pipeline or a specific stage.
It has the following parameters:
- Any: Runs pipeline/ stage on any available agent
- None: applied at the root of the pipeline, it indicates that there is no global agent for the entire pipeline & each stage must specify its own agent
- Label: Executes the pipeline/stage on the labelled agent.
- Docker: Uses docker container as an execution environment for the pipeline or a specific stage.
- Stages: It contains all the work; each stage performs a specific task.
- Steps: steps are carried out in sequence to execute a stage
Jenkins Pipeline syntax example
- node {
- stage(‘SCM checkout’) {
- //Checkout from your SCM(Source Control Management)
- //For eg: Git Checkout
- }
- stage(‘Build’) {
- //Compile code
- //Install dependencies
- //Perform Unit Test, Integration Test
- }
- stage(‘Test’) {
- //Resolve test server dependencies
- //Perform UAT
- }
- stage(‘Deploy’) {
- //Deploy code to prod server
- //Solve dependency issues
- }
- }
Create your first Jenkins Pipeline
- After installing Jenkins, building jobs using the Build pipeline and briefly discussing pipeline concepts, let’s see how to create a Jenkins pipeline.
- Follow the below steps to create both, a scripted pipeline and a declarative pipeline:
Step 1: Log into Jenkins and select ‘New Item from the Dashboard’
Step 2: Next, enter a name for your pipeline and select ‘Pipeline project’. Click ‘ok’ to proceed
Step 3: Scroll down to the pipeline and choose if you want a Declarative or Scripted pipeline
Step 4a: If you want a Scripted pipeline, then choose ‘pipeline script’ and start typing your code
Step 4b: If you want a Declarative Pipeline, select ‘Pipeline script from SCM’ and choose your SCM and enter your repository URL
Step 5: Within the Script path is the name of the Jenkinsfile that is going to be accessed from your SCM to run. Finally click on ‘apply’ and ‘save’
Jenkins Tips and Tricks

Learn Experts Curated Jenkins Training to Build Your Skills & Ability
- Instructor-led Sessions
- Real-life Case Studies
- Assignments
Start, stop and restart Jenkins
Follow the below command to start, stop and restart Jenkins through the CLI.
$ sudo service jenkins restart
$ sudo service jenkins stop
$ sudo service jenkins start
Deploy a custom build of a core plugin
Step 1: Stop Jenkins.
Step 2: Copy the custom HPI to $Jenkins_Home/plugins.
Step 3: Delete the previously expanded plugin directory.
Step 4: Make an empty file called <plugin>.hpi.pinned.
Step 5: Start Jenkins.
Schedule a build periodically
- Jenkins uses a cron expressions to schedule a job. Each line consists of 5 fields separated by TAB or whitespace:
Syntax: (Minute Hour DOM Month DOW)
MINUTE: Minutes in one hour (0-59)
HOURS: Hours in one day (0-23)
DAYMONTH: Day in a month (1-31)
MONTH: Month in a year (1-12)
DAYWEEK: Day of the week (0-7) where 0 and 7 are Sunday
Example: H/2 * * * * (schedule your build for every 2 minutes)
Try this example:
H/2 * * * * (schedules your build for every 2 minutes)
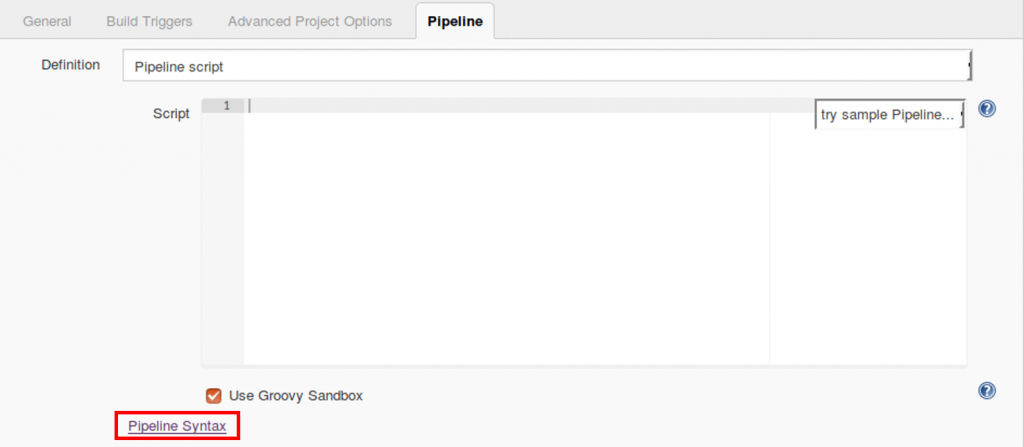
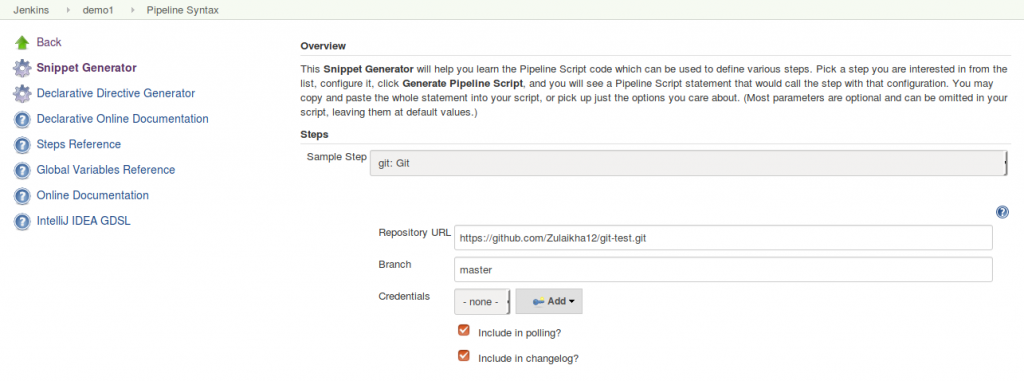
Snippet Generator
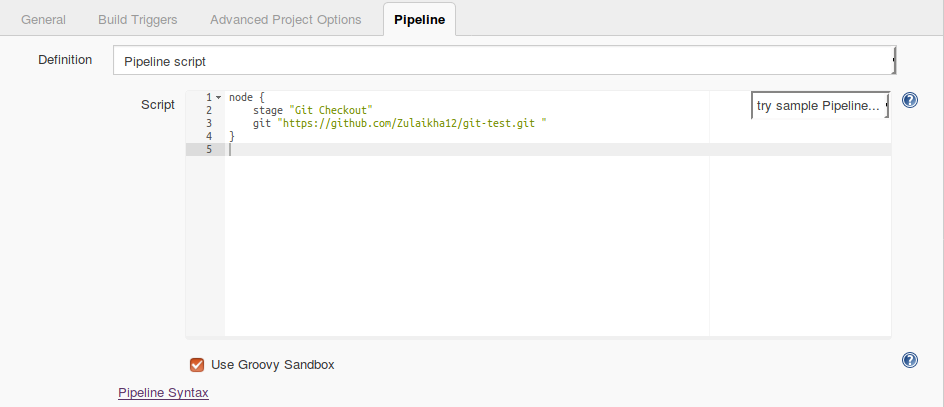
- A tool that lets users generate code for individual steps in a scripted pipeline. Let’s look at an example:
Step 1: Create a pipeline job > configure
Step 2: Select pipeline script from pipeline definition
Step 3: Click on Pipeline syntax > snippet generator
Step 4: Step > select Git > enter repo URL
Step 5: Scroll down > Generate pipeline script
Step 6: Copy the script into your pipeline script UI
- Below is an image of the Snippet Generator. You can select from a variety of steps and generate a code for each step.
- Below is an image of the Scripted pipeline UI with the code generated from snippet generator
Conclusion
- Jenkins Cheat Sheet for beginners is a must go through the blog for people who want to learn Jenkins or want to get into DevOps space. It is not easy learning all features and commands theoretically but you have to practice them thoroughly.