Last updated on 30th May 2020| 2763
Advantages of Puppet Tool:
Adobe After Effects, a well-known program used for video editing, motion graphics, and visual effects, has a potent tool called the Puppet Tool. It enables you to naturally and dynamically move and alter photos or objects. The following are some advantages of utilizing the puppet tool:
- Natural Animation: By allowing you to warp and bend pictures or objects, the puppet tool enables you to produce organic and lifelike animations. Character animation, secondary motion, or dynamic effects like moving water or swinging trees may all be accomplished using it.
- Flexibility: Puppet Tool gives you a lot of freedom to manipulate and animate your artwork. To construct the necessary animation, you can designate different pins on an image and edit those pins.
- Ease of Use: The Puppet Tool is very simple to use and doesn’t call for intricate rigging or a deep understanding of conventional animation methods. You can rapidly produce spectacular and realistic-looking animations with a little practice.
- Non-Destructive: The Puppet Tool doesn’t permanently change your original artwork because it operates in a non-destructive manner. Without changing the underlying picture or video, you may apply the puppet tool, change the parameters, and experiment with alternative animations.
- Time-Saving: Puppet Tool may save a great deal of time in comparison to conventional frame-by-frame animation. The burden is decreased and the animation process is sped up since it enables you to build complicated animations with fewer keyframes.
- Integration with Other Effects: The Puppet Tool may be used in conjunction with other After Effects tools and features, including as masks, keyframes, and motion blur, to produce animations that are even more complex and aesthetically pleasing.
- Applications: The Puppet Tool has a wide range of uses and is adaptable. These uses include character animation, motion graphics, visual effects, and more. It offers innovative opportunities that are only constrained by your imagination.
- Realistic Deformations: By using a mesh to describe the deformation areas, the puppet tool enables you to produce realistic deformations including limb bending, expressions on the face, and squash and stretch effects.
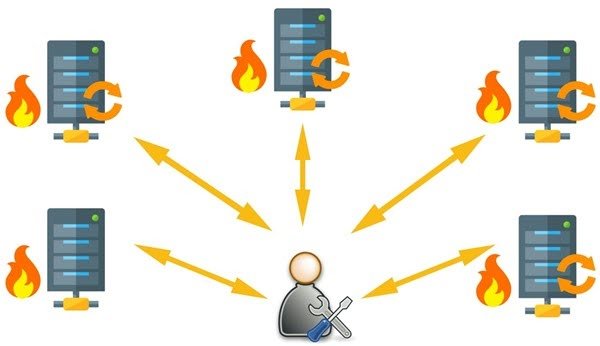
System Admin working manually on the servers
Functions of Puppet:
The Puppet Tool is a function in Adobe After Effects that lets you move and manipulate pictures or objects in a realistic and dynamic way. It presents a mesh-based deformation technology that is versatile and simple to use for animating objects. The Puppet Tool has a number of features, including:
1. Creating Puppet Pins: Adding Puppet Pins to the Layer You Want to Animate is the First Step in Using the Puppet Tool. You may control the artwork using these pins as control points.
2. Mesh Creation: The Puppet Tool automatically produces a mesh surrounding the artwork after inserting puppet pins, joining the pins. The zones of effect for each Puppet Pin are specified by this mesh, which also controls how the artwork deforms during animation.
3. Pin Positioning: You may reposition certain portions of the artwork by moving the Puppet Pins. The linked mesh of the artwork deforms as you move the pins.
4. Controlling Stiffness (Starch): You may modify how stiff specific elements of the artwork are by using the Puppet Starch tool. You may restrict their mobility and reduce their flexibility in particular locations by applying Puppet Starch there.
5. Animating Pins: Pins may be animated by setting up keyframes for their locations over time after you’ve placed the puppet pins. After Effects automatically interpolates the animation as you move the pins and apply keyframes, producing fluid and organic motion.
6. Mesh Expansion Can Be Animated: This feature is helpful for effects when the deformation area varies dynamically. Mesh expansion can be animated over time.
7. Puppet Overlap: You may activate puppet overlap to guarantee that elements of the artwork maintain their connectivity during deformation, preventing gaps or disconnected sections.
8. Puppet Position and Rotation: You may animate the position and rotation attributes of the puppet pin tools to produce more intricate and dynamic movements.

Get Advanced Puppet Training from Top-Rated Instructors
- Instructor-led Sessions
- Real-life Case Studies
- Assignments
Future Scope of Puppet:
- Improved Speed and Performance: As hardware and software develop, future iterations of After Effects may optimize the Puppet Tool’s speed and responsiveness, especially when working with intricate animations and high-resolution materials.
- Enhanced Mesh Deformation: Upcoming versions may make changes to the mesh’s deformation and interpolation between puppet pins. This could lead to smoother, more realistic animations that have more control over how complicated forms deform.
- 3D Integration: After Effects already includes some 3D functionality, but combining the Puppet Tool with more powerful 3D features may provide animators new opportunities to build intricate 3D character motions and interactions.
- Machine Learning and AI Integration: Artificial intelligence and machine learning developments may be utilized to improve the Puppet Tool’s ability to generate keyframes automatically and streamline the animation process.
- Additional Constraints and Effects: Updates in the future may add new restrictions or modifications that affect puppet pins. This could involve sophisticated dynamics, physics-based restrictions, and improved deformation control.
- Integration with Character Rigging: The Puppet Tool might be integrated with more sophisticated character rigging systems to provide animators a more thorough and efficient workflow for character animation.
- Puppet Tool Presets and Libraries: Future iterations of After Effects may make it easier to create and share Puppet Tool presets and libraries, enabling creators to draw from a wider selection of pre-made animations and effects.
- Real-time Preview and VR Support: The Puppet Tool’s applications might be expanded to include interactive and immersive experiences with better real-time preview capabilities and support for virtual reality.
- Collaboration and Cloud Integration: In the future, After Effects may improve its collaboration capabilities, allowing several animators to work on Puppet Tool animations at once and share materials via cloud-based processes.
- Cross-platform and Mobile Integration: As smartphones and tablets gain power, Adobe could look at incorporating the Puppet Tool or other comparable features into mobile apps to increase the usability of animation on portable devices.
Puppet Tutorial
Puppet Tutorial is the second blog of the Puppet blog series. I hope you have read my previous blog on “What is Puppet” which explains Configuration Management and why it is important with the help of use cases.
In this Puppet Tutorial following topics will be covered:
- What is Configuration Management?
- Puppet Architecture
- Puppet Master-Slave Communication
- Puppet Components
- Hands-On
What is Configuration Management?
In my previous blog, I have given an introduction to Configuration Management and what challenges it helps us to overcome. In this Puppet Tutorial, I will explain to you the different interdependent activities of Configuration Management. But before that, let us understand what is Configuration Item (CI) is. A Configuration Item is any service component, infrastructure element, or other item that needs to be managed in order to ensure the successful delivery of services. Examples of CI include individual requirements documents, software, models, and plans.
Configuration Management consists of the following elements:
- Configuration Identification
- Change Management
- Configuration Status Accounting
- Configuration Audits
The diagram below explains these components:
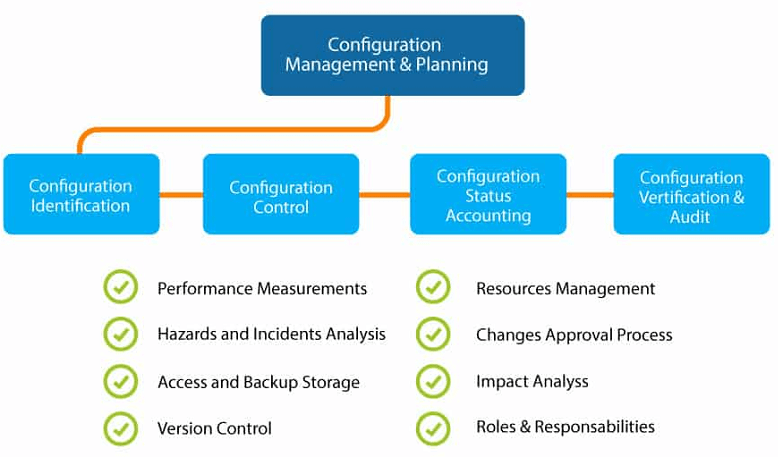
Configuration Identification:
It is the process of
- Labeling software and hardware configuration items with unique identifiers
- Identifying the documentation that describes a configuration item
- Grouping related configuration items into baselines
- Labeling revisions to configuration items and baselines.
Change Management: It is a systematic approach to dealing with change both from the perspective of an organization and the individual.
Configuration Status Accounting: It includes the process of recording and reporting configuration item descriptions (e.g., hardware, software, firmware, etc.) and all departures from the baseline during design and production. In the event of suspected problems, the verification of baseline configuration and approved modifications can be quickly determined.
Configuration Audits: Configuration audits provide a mechanism for determining the degree to which the current state of the system is consistent with the latest baseline and documentation. Basically, it is a formal review to verify that the product being delivered will work as advertised, promoted or in any way promised to the customers. It uses the information available as an outcome of the quality audits and testing along with the configuration status accounting information, to provide assurance that what was required has been build.
Now is the correct time to understand Puppet Architecture.
Puppet Tutorial – Architecture of Puppet
Puppet uses a Master-Slave architecture. The diagram below depicts the same:
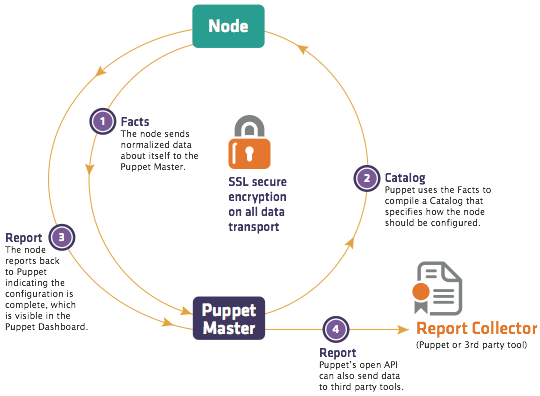
The following functions are performed in the above image:
- The Puppet Agent sends the Facts to the Puppet Master. Facts are basically key/value data pair that represents some aspect of Slave state, such as its IP address, up-time, operating system, or whether it’s a virtual machine. I will explain Facts in detail later in the blog.
- Puppet Master uses the facts to compile a Catalog that defines how the Slave should be configured. Catalog is a document that describes the desired state for each resource that Puppet Master manages on a Slave. I will explain catalogs and resources in detail later.
- Puppet Slave reports back to Master indicating that Configuration is complete, which is visible in the Puppet dashboard.
Check out this Puppet tutorial video for deep understanding of Puppet.

Enroll in Puppet Course to Take Your Skills to the Next level as a Puppet Developer
Weekday / Weekend BatchesSee Batch DetailsPuppet Tutorial – Puppet Master and Slave Communication
Puppet Master and Slave communicates through a secure encrypted channel with the help of SSL. The diagram below depicts the same:
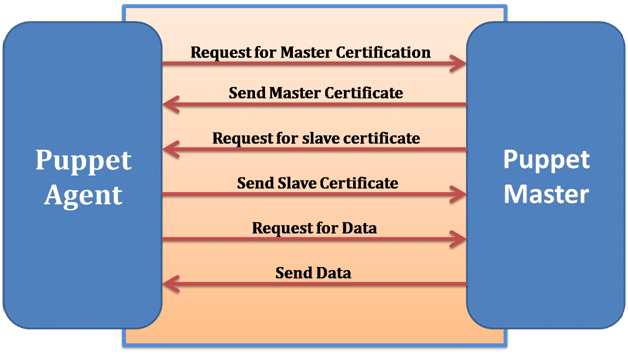
As you can see from the above Image:
- Puppet Slave asks for Puppet Master certificate.
- After receiving Puppet Master certificate, Master requests for Slave certificate.
- Once Master has signed the Slave certificate, Slave requests for configuration/data.
- Finally, Puppet Master will send the configuration to Puppet Slave.
Let us now have a look at various Puppet components.
Puppet Tutorial – Components of Puppet:
Manifests: Every Slave has got its configuration details in Puppet Master, written in the native Puppet language. These details are written in the language which Puppet can understand and are termed as Manifests. They are composed of Puppet code and their filenames use the .pp extension. These are basically Puppet programs. For example: You can write a Manifest in Puppet Master that creates a file and installs Apache server on all Puppet Slaves connected to the Puppet Master.
Module: A Puppet Module is a collection of Manifests and data (such as facts, files, and templates), and they have a specific directory structure. Modules are useful for organizing your Puppet code, because they allow you to split your code into multiple Manifests. Modules are self-contained bundles of code and data.
Resource: Resources are the fundamental unit for modeling system configurations. Each Resource describes some aspect of a system, like a specific service or package.
Facter: Facter gathers basic information (facts) about Puppet Slave such as hardware details, network settings, OS type and version, IP addresses, MAC addresses, SSH keys, and more. These facts are then made available in Puppet Master’s Manifests as variables.
Mcollective: It is a framework that allows several jobs to be executed in parallel on multiple Slaves. It performs various functions like:
- Interact with clusters of Slaves, whether in small groups or very large deployments.
- Use a broadcast paradigm to distribute requests. All Slaves receive all requests at the same time, requests have filters attached, and only Slaves matching the filter will act on requests.
- Use simple command-line tools to call remote Slaves.
- Write custom reports about your infrastructure.
Catalogs: A Catalog describes the desired state of each managed resource on a Slave. It is a compilation of all the resources that the Puppet Master applies to a given Slave, as well as the relationships between those resources. Catalogs are compiled by a Puppet Master from Manifests and Slave-provided data (such as facts, certificates, and an environment if one is provided), as well as an optional external data (such as data from an external Slave classifier, exported resources, and functions). The Master then serves the compiled Catalog to the Slave when requested.
Now in this Puppet Tutorial my next section will focus on Hands-On.
Puppet Tutorial – Hands-On
I will show you how to deploy MySQL and PHP from Puppet Master to Puppet Slave. I am using only one Slave for demonstration purpose there can be hundreds of Slaves connected to one Master. To deploy PHP and MySQL I will use predefined modules available at forge.puppet.com. You can create your own modules as well.
Features of Puppet:
Following are the features of Puppet:
Platform Support
Puppet is compatible with all platforms that support Ruby, like Microsoft Windows, Linux, MacOS X, etc.
Scalable
The puppet was developed in 2005; therefore, many different organizations, including medium and large, have deployed Puppet, and hence its scalability is very large.
Documentation
Puppet provides a large number of well-developed wiki pages with detailed documentation.
Idempotency
Unlike other configuration management tools, in Puppet, we can safely run the same set of configurations multiple times on the same machine. Means, after deploying a configuration on any machine, the puppet keeps verifying those configurations in certain intervals.
Open-Source
A puppet is an open-source tool, and because of this feature, it is easy to extend it to build custom libraries and modules.
Reporting Compliance
The enterprise version of the puppet supports graphical reporting with the help of this you can simply visualize the infrastructure, communicate, and quickly respond to the modifications. It provides you the real-time visibility into the effects of changes, which allows you to see what’s going on your infrastructure.
Cost-Effective
When you have many numbers of systems and want to make some minor code changes, then Puppet helps to reduce the effort and cost.
Faster
Puppet allows DevOps professionals and System Administrators to work more quickly and effectively.
Growing Fast
Today, many companies have adopted puppet to manage their infrastructure, such as Google, Red Hat, AT&T, Spotify, AON, US Air Force, etc.
Prerequisites
Before proceeding with this tutorial, you should have a basic knowledge of system administration, network protocol communication, and infrastructure. To automate the infrastructure provisioning, we should have a basic understanding of Ruby scripts and the system where we want to use Puppet.
Audience
This tutorial is created for those who would like to learn the basics of Puppet. This tutorial will provide enough understanding to reduce the complexity of managing infrastructure. After completion of this tutorial, you will get a basic level of understanding of Puppet and workflow. This tutorial will also give you a good understanding of the configuration of Puppet in a preconfigured infrastructure and how to use it for automation.
Problems
We assure you that you will not find any difficulty while learning our Puppet tutorial. But if there is any mistake in this tutorial, kindly post the problem or error in the contact form so that we can improve it.