
Last updated on 12th Jun 2020| 2167
How to Host your Static Website with AWS Tutorial
Static websites deliver HTML, JavaScript, images, video and other files to your website visitors, and contain no application code. They are best for sites with few authors and relatively infrequent content changes, typically personal and simple marketing websites. Static websites are very low cost, provide high-levels of reliability, require almost no IT administration, and scale to handle enterprise-level traffic with no additional work.
1. Naming Your S3 Bucket
Before you begin hosting your awesome static website out of S3, you need a bucket first. For this blog post, it is critical that your bucket has the same name as your domain name.
If your website domain is www.my-awesome-site.com, then your bucket name must be www.my-awesome-site.com.
The reasoning for this has to do with how requests are routed to S3. The request comes into the bucket, and then S3 uses the Host header in the request to route to the appropriate bucket.

2. Configuring Your S3 Bucket for Static Website Hosting
Alright, you have your bucket. It has the same name as your domain name, yes? Time to configure the bucket for static website hosting.
Guess what? Turning on static website hosting for your bucket is as simple as a few clicks in the AWS Console.
- Navigate to S3 in the AWS Console.
- Click into your bucket.
- Click the “Properties” section.
- Click the “Static website hosting” option.
- Select “Use this bucket to host a website”.
- Enter “index.html” as the Index document.
Or if you are all about command lines and would rather not have a graphical user interface (GUI) in your way, this AWS CLI command turns website hosting on for your bucket
Your bucket serves your static website, so it must be accessible to anyone in the world. This is referred to as anonymous access to the bucket.
By default, any new buckets created in an AWS account deny you the ability to add a public access bucket policy. This is in response to the recent leaky buckets where private information has been exposed to bad actors. However, for our use case, we need a public access bucket policy. To allow this you must complete the following steps before adding your bucket policy.
- Click into your bucket.
- Select the “Permissions” tab at the top.
- Under “Public Access Settings” we want to click “Edit”.
- Change “Block new public bucket policies”, “Block public and cross-account access if bucket has public policies”, and “Block new public ACLs and uploading public objects” to be false and Save.
You must complete this step before adding the bucket policy to your static website bucket.
Now you must update the Bucket Policy of your bucket to have public read access to anyone in the world. The steps to update the policy of your bucket in the AWS Console are as follows:
- Navigate to S3 in the AWS Console.
- Click into your bucket.
- Click the “Permissions” section.
- Select “Bucket Policy”.
- Add the following Bucket Policy and then Save
- {
- “Version”: “2008-10-17”,
- “Id”: “PolicyForPublicWebsiteContent”,
- “Statement”: [
- {
- “Sid”: “PublicReadGetObject”,
- “Effect”: “Allow”,
- “Principal”: {
- “AWS”: “*”
- },
- “Action”: “s3:GetObject”,
- “Resource”: “arn:aws:s3:::www.my-awesome-site.com/*”
- }
- ]
- }
Or for the command line fans out there, if policy.json is the above bucket policy, then use:
- aws s3api put-bucket-policy –bucket www.my-awesome-site.com –policy file://policy.json
It is important to note the “Principal”: { “AWS”: “*” }section of the bucket policy. This part of the policy opens up your bucket to anyone in the world. Any object in this bucket is available to the public via the S3 website url. Don’t put anything in this bucket that you’re not willing to share with the world.

Learn To Host A Static Website with AWS & Enhance Your Skills
- Instructor-led Sessions
- Real-life Case Studies
- Assignments
3. Adding A CNAME Record For Your Bucket Url
You have a bucket that is configured for static website hosting. It has an S3 website url. You understand that this bucket is accessible to the world? You are cruising right through this.
In order for a user to load your S3 website you’ll need to provide mapping from your domain name www.my-awesome-site.com, to your S3 website url
The process to complete this step varies depending on who your DNS provider is. In general this is what you are looking for within your DNS provider:
- Create a record for a host like
- The record type must be
- The value must be your S3 website url
4. Uploading Your Static Website
Your bucket is configured for static website hosting. You have a CNAME record in your DNS records that resolves to the S3 website url? Awesome, it’s showtime then.
Remember S3 is a flat object store, which means each object in the bucket represents a key without any hierarchy. While the AWS S3 Console makes you believe there is a directory structure, there isn’t. Everything stored in S3 is keys with prefixes.
This is important to note because if you have a website structure like this:
- about/
- index.html
- contact/
- index.html
- css/
- styles.min.css
- …
- …
- index.html
5. Validate That It Worked
Your static website has been uploaded to your S3 website bucket. You can go to www.my-awesome-site.com and your static website loads from your S3 bucket.

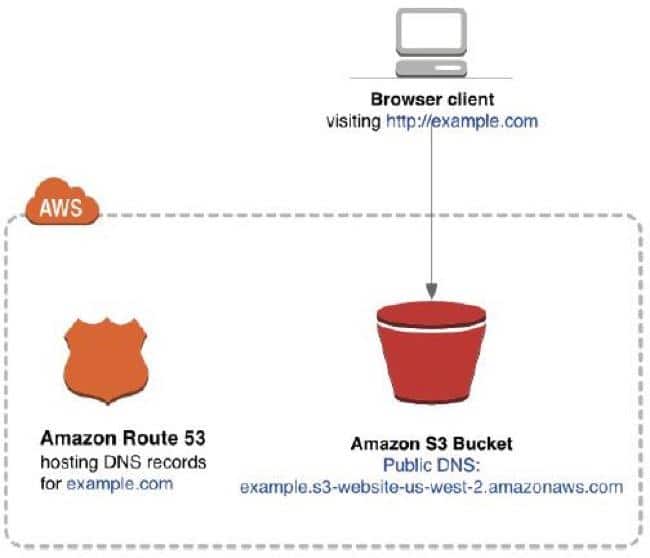
Hosting a static website on Amazon S3
You can use Amazon S3 to host a static website. On a static website, individual webpages include static content. They might also contain client-side scripts.
By contrast, a dynamic website relies on server-side processing, including server-side scripts such as PHP, JSP, or ASP.NET. Amazon S3 does not support server-side scripting, but AWS has other resources for hosting dynamic websites. To learn more about website hosting on AWS, see Web Hosting.
Note:
You can use the AWS Amplify Console to host a single page web app. The AWS Amplify Console supports single page apps built with single page app frameworks (for example, React JS, Vue JS, Angular JS, and Nuxt) and static site generators (for example, Gatsby JS, React-static, Jekyll, and Hugo). For more information, see Getting Started in the AWS Amplify Console User Guide.To configure your bucket for static website hosting, you can use the AWS Management Console without writing any code. You can also create, update, and delete the website configuration pro-grammatically by using the AWS SDKs. The SDKs provide wrapper classes around the Amazon S3 REST API. If your application requires it, you can send REST API requests directly from your application.
To host a static website on Amazon S3, you configure an Amazon S3 bucket for website hosting and then upload your website content to the bucket. When you configure a bucket as a static website, you must enable website hosting, set permissions, and create and add an index document. Depending on your website requirements, you can also configure redirects, web traffic logging, and a custom error document.
After you configure your bucket as a static website, you can access the bucket through the AWS Region-specific Amazon S3 website endpoints for your bucket. Website endpoints are different from the endpoints where you send REST API requests. For more information, see Website endpoints. Amazon S3 doesn’t support HTTPS access for website endpoints. If you want to use HTTPS, you can use CloudFront to serve a static website hosted on Amazon S3. For more information, see Speeding up your website with Amazon CloudFront.
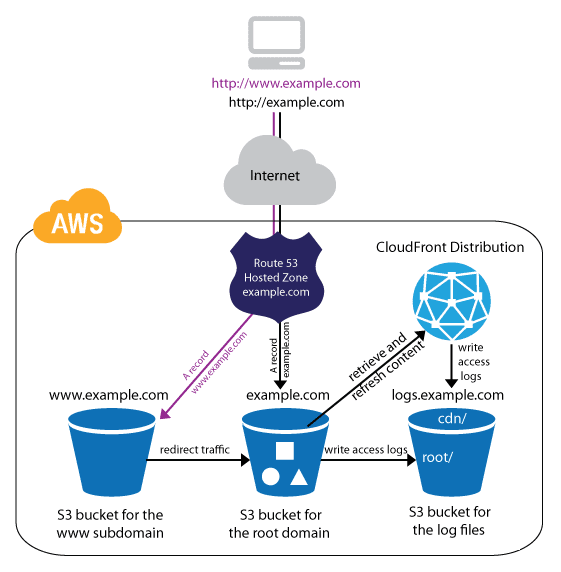
Configuring a static website using a custom domain registered with Route 53.Suppose that you want to host your static website on Amazon S3. You’ve registered a domain with Amazon Route 53 (for example, example.com), and you want requests for http://www.example.com and http://example.com to be served from your Amazon S3 content. You can use this walkthrough to learn how to host a static website and create redirects on Amazon S3 for a website with a custom domain name that is registered with Route 53. You can work with an existing website that you want to host on Amazon S3, or you use this walkthrough to start from scratch.
Once you complete this walkthrough, you can optionally use Amazon CloudFront to improve the performance of your website. For more information, see Speeding up your website with Amazon CloudFront.
Note:
Amazon S3 does not support HTTPS access to the website. If you want to use HTTPS, you can use Amazon CloudFront to serve a static website hosted on Amazon S3.
For more information, see How do I use CloudFront to serve a static website hosted on Amazon S3? and Requiring HTTPS for communication between viewers and AWS CloudFormation.
Automating static website set up with an AWS CloudFormation template
You can use an AWS CloudFormation template to automate your static website setup. The AWS CloudFormation template sets up the components that you need to host a secure static website so that you can focus more on your website’s content and less on configuring components.
The AWS CloudFormation template includes the following components:
- Amazon S3‐Creates an Amazon S3 bucket to host your static website.
- CloudFront‐ Creates a CloudFront distribution to speed up your static website.
- Lambda@Edge‐Uses Lambda@Edge to add security headers to every server response. Security headers are a group of headers in the web server response that tell web browsers to take extra security precautions. For more information, refer to this blog post: Adding HTTP security headers using Lambda@Edge and Amazon CloudFront.
This AWS CloudFormation template is available for you to download and use. For information and instructions, see Getting started with a secure static website in the Amazon CloudFront Developer Guide.
Topics
- Before you begin
- Step 1: Register a custom domain with Route 53
- Step 2: Create two buckets
- Step 3: Configure your root domain bucket for website hosting
- Step 4: Configure your subdomain bucket for website redirect
- Step 5: Configure logging for website traffic
- Step 6: Upload index and website content

Get Hands-on Experience with How to Host Your Static Website with AWS Training Course
Weekday / Weekend BatchesSee Batch DetailsBefore you begin
As you follow the steps in this example, you work with the following services:
Amazon Route 53 – You use Route 53 to register domains and to define where you want to route internet traffic for your domain. The example shows how to create Route 53 alias records that route traffic for your domain (example.com) and subdomain (www.example.com) to an Amazon S3 bucket that contains an HTML file.
Amazon S3 – You use Amazon S3 to create buckets, upload a sample website page, configure permissions so that everyone can see the content, and then configure the buckets for website hosting.
Step 1: Register a custom domain with Route 53
If you don’t already have a registered domain name, such as example.com, register one with Route 53. For more information, see Registering a New Domain in the Amazon Route 53 Developer Guide. After you register your domain name, you can create and configure your Amazon S3 buckets for website hosting.
Step 2: Create two buckets
To support requests from both the root domain and subdomain, you create two buckets.
- Domain bucket ‐ example.com
- Subdomain bucket ‐ www.example.com
These bucket names must exactly match your domain name. In this example, the domain name is example.com. You host your content out of the root domain bucket (example.com). You create a redirect request for the subdomain bucket (www.example.com). If someone enters www.example.com in their browser, they are redirected to example.com and see the content that is hosted in the Amazon S3 bucket with that name.
To create your buckets for website hosting
The following instructions provide an overview of how to create your buckets for website hosting. For detailed, step-by-step instructions on creating a bucket, see How Do I Create an S3 Bucket? in the Amazon Simple Storage Service Console User Guide.
Sign in to the AWS Management Console and open the Amazon S3 console at Create your root domain bucket:
- Choose Create bucket.
- Enter the Bucket name (for example, example.com).
- Choose the Region where you want to create the bucket.
Choose a Region close to you to minimize latency and costs, or to address regulatory requirements. The Region that you choose determines your Amazon S3 website endpoint. For more information, see Website endpoints. - To accept the default settings and create the bucket, choose Create.
Create your subdomain bucket:
- Choose Create bucket.
- Enter the Bucket name (for example, www.example.com).
- Choose the Region where you want to create the bucket.
Choose a Region close to you to minimize latency and costs, or to address regulatory requirements. The Region that you choose determines your Amazon S3 website endpoint. For more information, see Website endpoints. - To accept the default settings and create the bucket, choose Create.
In the next step, you configure example.com for website hosting.
Step 3: Configure your root domain bucket for website hosting
In this step, you configure your root domain bucket (example.com) as a website. This bucket will contain your website content. When you configure a bucket for website hosting, you can access the website using the Website endpoints.
To enable static website hosting
- Sign in to the AWS Management Console and open the Amazon S3 console at
- In the Bucket name list, choose the bucket that you want to use for your static website.
- Choose Properties.
- Choose Static website hosting.
- Choose Use this bucket to host a website.
- Enter the name of your index document.
The index document name is typically index.html. The index document name is case sensitive and must exactly match the file name of the HTML index document that you plan to upload to your S3 bucket. For more information, see Configuring an index document. - (Optional) If you want to add a custom error document, in the Error document box, enter the key name for the error document (for example, error.html).
The error document name is case sensitive and must exactly match the file name of the HTML error document that you plan to upload to your S3 bucket. For more information, see (Optional) configuring a custom error document. - (Optional) If you want to specify advanced redirection rules, in Edit redirection rules, use XML to describe the rules.
For more information, see Configuring advanced conditional redirects. - Under Static website hosting, note the Endpoint.
The Endpoint is the Amazon S3 website endpoint for your bucket. After you finish configuring your bucket as a static website, you can use this endpoint to test your website. - Choose Save.
In the next step, you configure your subdomain (www.example.com) to redirect requests to your domain (example.com).
Step 4: Configure your subdomain bucket for website redirect
After you configure your root domain bucket for website hosting, you can configure your subdomain bucket to redirect all requests to the domain. In this example, all requests for www.example.com are redirected to example.com.
To configure a redirect request
- On the Amazon S3 console, in the Buckets list, choose your subdomain bucket ( www.example.com in this example).
- Choose Properties.
- Choose Static website hosting.
- Choose Redirect requests.
- In the Target bucket or domain box, enter your domain (for example, example.com).
- In the Protocol box, enter http.
- Choose Save.
Step 5: Configure logging for website traffic
If you want to track the number of visitors accessing your website, you can optionally enable logging for your root domain bucket. For more information, see Amazon S3 Server Access Logging. If you plan to use Amazon CloudFront to speed up your website, you can also use CloudFront logging.
To enable server access logging for your root domain bucket
- Open the Amazon S3 consoleIn the same Region where you created the bucket that is configured as a static website, create a bucket for logging, for example logs.example.com.
- Create a folder for the server access logging log files (for example, logs).
- (Optional) If you want to use CloudFront to improve your website performance, create a folder for the CloudFront log files (for example, cdn).
- In the Bucket list, choose your root domain bucket.
- Choose Properties.
- Choose Server access logging.
- Choose Enable logging.
- For Target bucket, choose the bucket that you created for the log files, for example logs.example.com.
- For Target prefix, enter the name of the folder that you created for the log files followed by the delimiter (/), for example logs/.
When you set the Target prefix, you group your log data files in a folder so that they are easy to locate. - Choose Save.
In your log bucket, you can now access your logs. Amazon S3 writes website access logs to your log bucket every 2 hours. - To view the logs, choose Overview, and choose the folder.
Step 6: Upload index and website content
In this step, you upload your index document and optional website content to your root domain bucket.
When you enable static website hosting for your bucket, you enter the name of the index document (for example, index.html). After you enable static website hosting for the bucket, you upload an HTML file with this index document name to your bucket.
To configure the index document
- Create an index.html file.
If you don’t have an index.html file, you can use the following HTML to create one:
- <html xmlns=”http://www.w3.org/1999/xhtml” >
- <head>
- <title>My Website Home Page</title>
- </head>
- <body>
- <h1>Welcome to my website</h1>
- <p>Now hosted on Amazon S3!</p>
- </body>
- <html>
- Save the index file locally with the exact index document name that you entered when you enabled static website hosting for your bucket (for example, index.html).
The index document file name must exactly match the index document name that you enter in the Static website hosting dialog box. The index document name is case sensitive. For example, if you enter index.html for the Index document name in the Static website hosting dialog box, your index document file name must also be index.html and not Index.html. - Sign in to the AWS Management Console and open the Amazon S3 console at In the Buckets list, choose the name of the bucket that you want to use to host a static website.
- Enable static website hosting for your bucket, and enter the exact name of your index document (for example, index.html). For more information, see Enabling website hosting.
After enabling static website hosting, proceed to step 6. - To upload the index document to your bucket, do one of the following:
- Drag and drop the index file into the console bucket listing.
- Choose Upload, and follow the prompts to choose and upload the index file.
- For step-by-step instructions, see How Do I Upload Files and Folders to an Amazon S3 Bucket? in the Amazon Simple Storage Service Console User Guide.
- (Optional) Upload other website content to your bucket.