Last updated on 09th Jul 2020| 4220
- MuleSoft is one of the popular integration platforms with its sophisticated ESB and API management offering and a great set of feature-rich tools for design development, testing, deployment, management and monitoring of Mule Applications and APIs to integrate diverse systems and applications.
- MuleSoft provides AnyPoint studio which is an Eclipse based IDE to design and develop message flows as Mule Applications with dozens of ready to use connectors for enabling integration between different types of applications and systems in a seamless manner.
- In this tutorial, I will explain how we can create a Mule Application using Anypoint Studio and query data from Oracle database and return this data in JSON format back to the client as a response to a REST web service.
- ESB stands for Enterprise Service Bus which is basically a middleware tool for integrating various applications together over a bus-like infrastructure. Fundamentally, it is an architecture designed to provide a uniform means of moving work among integrated applications. In this way, with the help of ESB architecture we can connect different applications through a communication bus and enable them to communicate without depending on one another.
Implementing ESB
The main focus of ESB architecture is to decouple the systems from each other and allow them to communicate in a steady and controllable way. ESB’s implementation can be done with the help of ‘Bus’ and ‘Adapter’ in the following way −
- The concept of “bus”, which is achieved through a messaging server like JMS or AMQP, is used to decouple different applications from one another.
- The concept of “adapter”, responsible for communicating with backend application and transforming data from application format to bus format, is used between applications and bus.
The data or message passing from one application to another through the bus is in a canonical format which means there would be one consistent message format.
The adapter can also perform other activities like security, monitoring, error handling and message routing management.
ESB’s Guiding Principles
We can call these principles as core integration principles. They are as follows −
- Orchestration
Integration of two or more services to achieve synchronization between data and process.
- Transformation
Transforming data from canonical format to application specific format.
- Transportation
Handling protocol negotiation between formats like FTP, HTTP, JMS, etc.
- Mediation
Providing multiple interfaces to support multiple versions of a service.
- Non-functional consistency
Providing mechanism for managing transactions and security also.
Need of ESB
ESB architecture enables us to integrate different applications where each application can communicate through it. Following are some guidelines on when to use ESB −
- Integrating two or more applications
Use of ESB architecture is beneficial when there is a need to integrate two or more services or applications.
- Integration of more applications in future
Suppose if we want to add more services or applications in future, then it can be easily done with the help of ESB architecture.
- Using multiple protocols
In case if we need to use multiple protocols like HTTP, FTP, JMS etc., ESB is the right option.
- Message routing
We can use ESB in case if we require message routing based on message content and other similar parameters.
- Composition and consumption
ESB can be used if we need to publish services for composition and consumption.
P2P integration vs. ESB integration
With the increase in number of applications, a big question in front of developers was how to connect different applications? The situation was handled by hand-coding a connection between various application. This is called point-to-point integration.
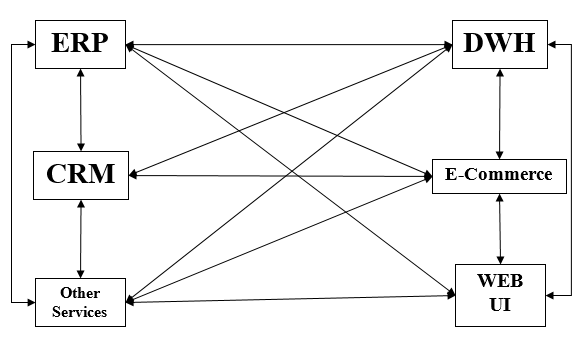
Rigidity is the most obvious drawback of point-to-point integration. The complexity increases with the increased number of connections and interfaces. The disadvantages of P-2-P integration leads us to ESB integration.
ESB is a more flexible approach to application integration. It encapsulates and exposes each application functionality as a set of discrete reusable capabilities. No application directly integrates with other, instead they integrate through an ESB as shown below −
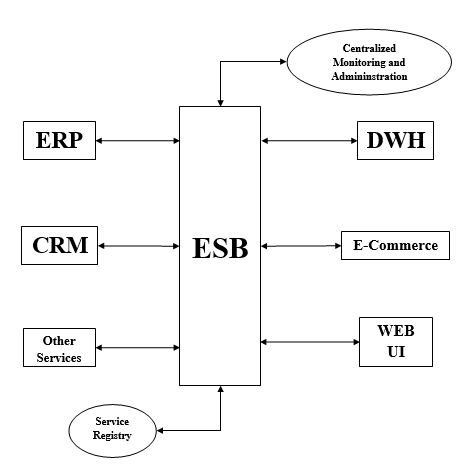
For managing the integration, ESB has the following two components −
- Service Registry
Mule ESB has Service Registry/Repository where all the services exposed into the ESB are published and registered. It acts as a point of discovery from where one can consume the services and capabilities of other applications.
- Centralized Administration
As the name implies, it provides a view of transactional flows of performance of interactions occurring inside the ESB.
ESB Functionality − VETRO abbreviation is generally used to summarize the functionality of ESB. It is as follows −
- V(Validate)
As the name implies, it validates the schema validation. It requires a validating parser and up-to-date schema. One example is an XML document confirming to an up-to-date schema.
- E(Enrich)
It adds additional data to a message. The purpose is to make message more meaningful and useful to a target service.
- T(Transform)
It converts the data structure to a canonical format or from a canonical format. Examples are conversion of date/time, currency, etc.
- R(Routing)
It will route the message and act as a gatekeeper of the endpoint of a service.
- O(Operate)
The main job of this function is to invoke the target service or interacts with the target app. They run at the backend.
VETRO pattern provides overall flexibility to the integration and ensures that only consistent and validated data will be routed throughout the ESB.
What is Mule ESB?
Mule ESB is a lightweight and highly scalable Java-based enterprise service bus (ESB) and integration platform provided by MuleSoft. Mule ESB allows the developer to connect applications easily and quickly. Regardless of various technologies used by applications, Mule ESB enables easy integration of applications, enabling them to exchange data. Mule ESB has the following two editions −
- Community Edition
- Enterprise Edition
An advantage of Mule ESB is that we can easily upgrade from Mule ESB community to Mule ESB enterprise because both the editions are built on a common code base.
Features & Capabilities of Mule ESB
Following features are possessed by Mule ESB −
- It has simple drag-and-drop graphical design.
- Mule ESB is capable of visual data mapping and transformation.
- User can get the facility of 100s of pre-built certified connectors.
- Centralized monitoring and administration.
- It provides robust enterprise security enforcement capabilities.
- It provides the facility of API management.
- There is secure Data Gateway for cloud/on-premise connectivity.
- It provides the service registry where all the services exposed into the ESB are published and registered.
- Users can have control through a web-based management console.
- Rapid debugging can be performed using service flow analyzer.
Mulesoft Setup
Installation, Management, and Deployment
To get started with a local installation of Mule Runtime, Download, and Start Mule Runtime.
You can deploy Mule applications to MuleSoft’s cloud platform via CloudHub and manage them via Runtime Manager. Runtime Manager can be used to manage local deployments as well, making it more accomplished than it’s forerunner Mule Management Console, which is used for local Mule deployments.
MuleSoft is available in two editions:
- Community edition.
- Enterprise edition.
Community edition: It is a free edition developer that you can directly download and use straight away.
Enterprise edition: It is a rather commercial edition, so it has a lot of advantages than Community edition.
MuleSoft provides Enterprise edition – 30 day free trial version, which you can try at your own will.
To implement MuleSoft flows, we need Anypoint Studio, which is basically Eclipse based IDE, specially design to do Mule Development.
JDK Installation:
Before installing Anypoint Studio, you should have JDK on your machine.
- You can download the new version of JDK from this link – Oracle.
- Just download the software and start the installation. It is direct and simple. Just click on next and continue.
- Enable Java Content in the Browser should be enabled.
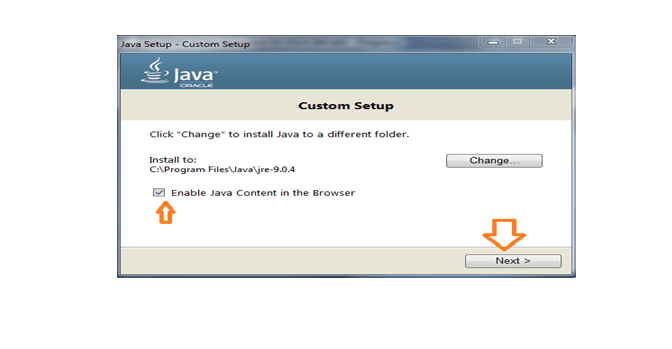
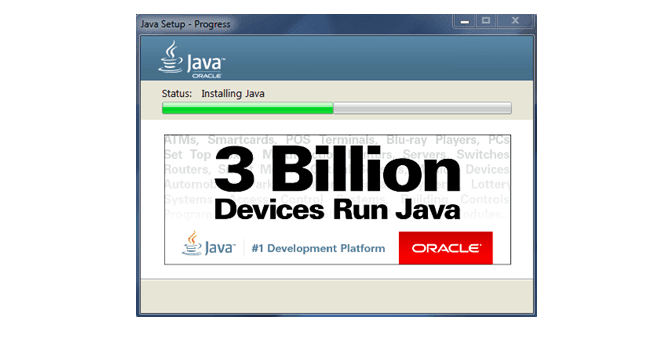
- After installation, you can close the tab, successfully installing JDK on your machine.

Advance Your Skills with MuleSoft Training & Certification Course From Real-Time Experts
Weekday / Weekend BatchesSee Batch DetailsAnypoint Studio Installation:
Anypoint Studio is available in three versions: Windows, MAC and Linux OS.
- You can download MuleSoft from this link – Mulesoft Studio.
- Once you open the link, you will come across “Download Studio” option. Click on that to head to the next page.
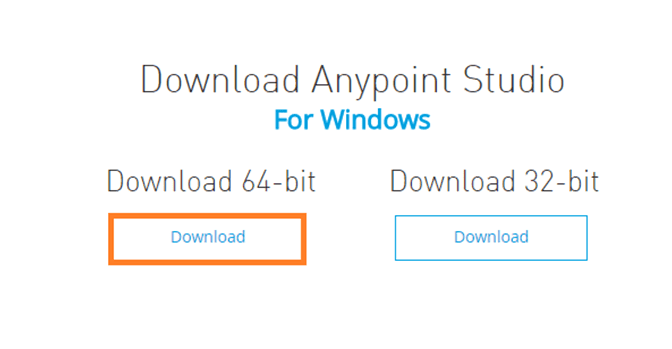
It will redirect you to another page and ask your details. Fill in and select “Download” option. Once you select it, you will be asked about your operating system type, like the below given image. Kindly select anyone with respect to your operating system.
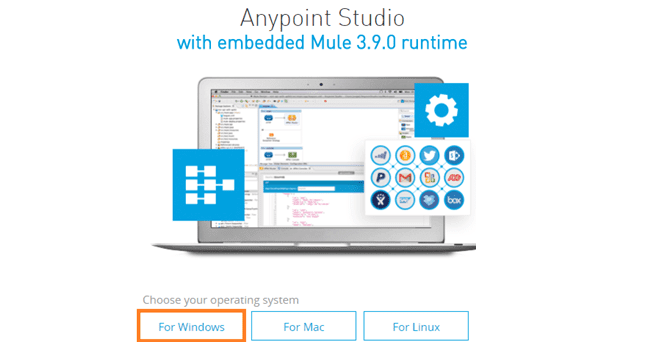
- Here, I am choosing Windows.Next, it will ask Operating system type like shown below. Select any one with respect to your OS.
Installation Process:
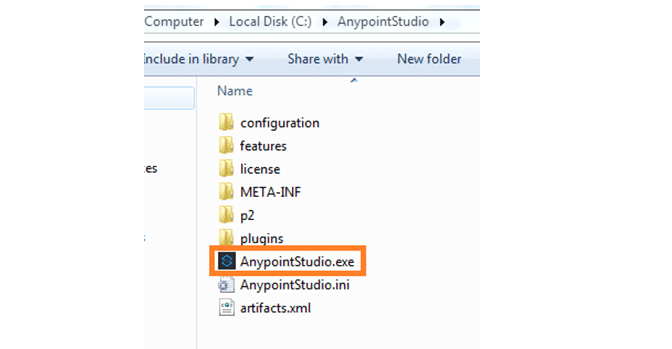
- Once you download the software, unzip the folder and save the folder in “C drive”.
- While installing, it will ask for the path, which could result in a mismatch, so it’s always better to keep the folder in C drive.
- Open the folder and right click on AnypointStudio.exe and run the folder.
Get Free Mulesoft Materials
- The installation process will be start like shown below.
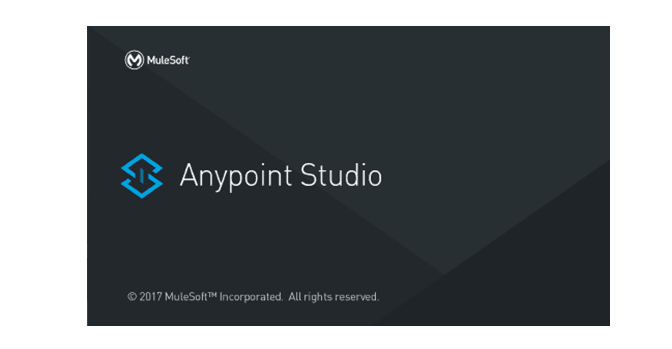
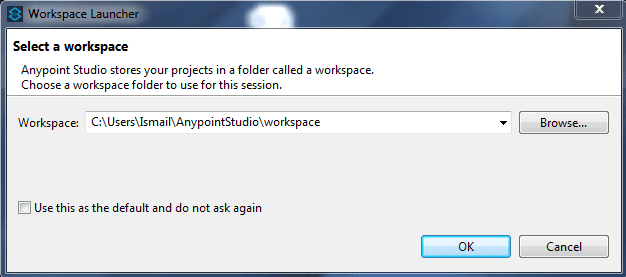
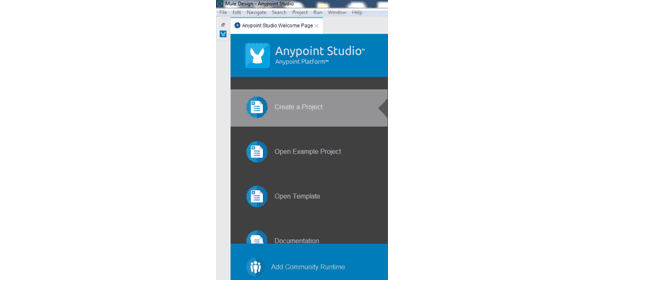
- Click on OK to complete the installation. The tool will open like shown below.
- The above process is same for “muleESB enterprise runtime” and “mule ESB community runtime”installation.
Create a package:
Here, I am trying to create a basic Project.
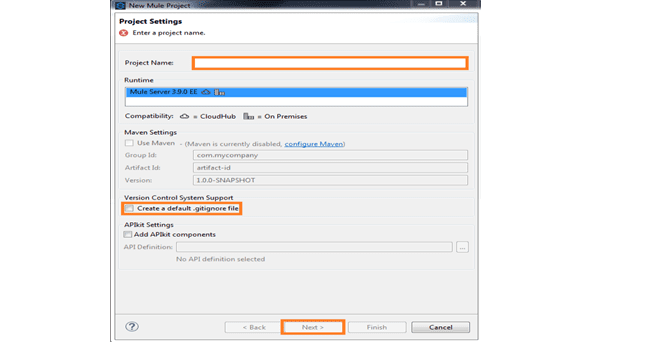
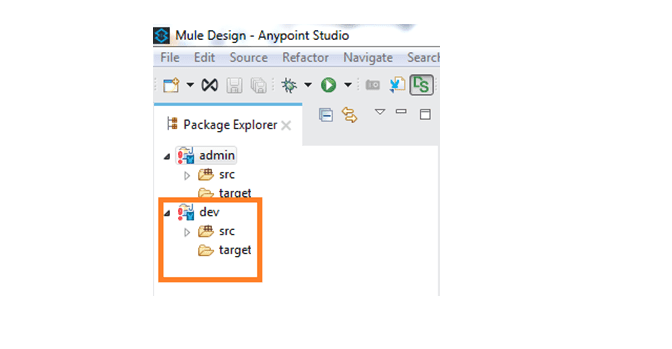
1. First, we have to give a Project name and enable “Create a default .gitignore file“.
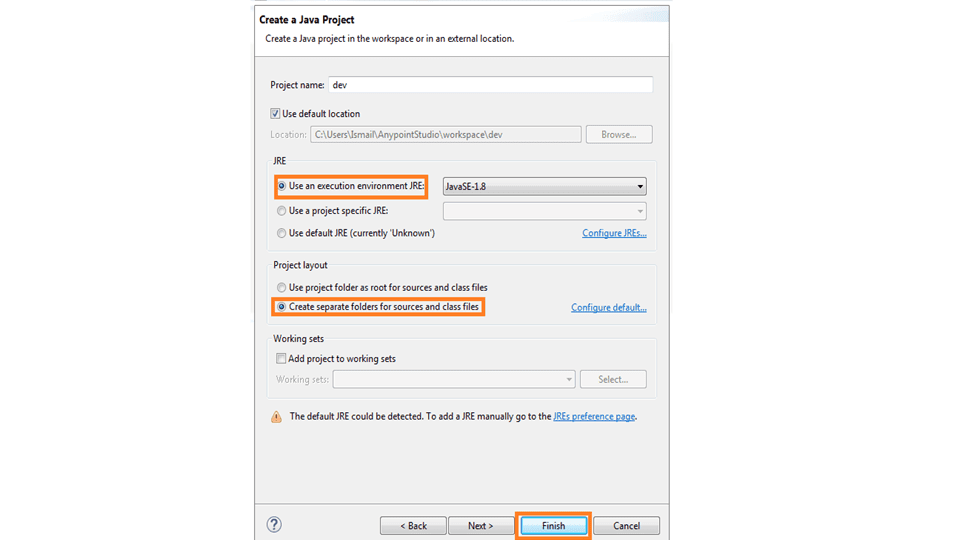
2. Enable Use an execution environment JRE. Under Project Layout, click on the option Create separate folders for sources and class files, as shown in the image below.
3. The project looks like the image below. We can do a lot of operations in these project.
Mule error handling
The new Mule error handling is one of the biggest and major changes done in Mule 4. The new error handling may seem complex, but it is better and more efficient. In this chapter, we are going to discuss components of Mule error, Error types, categories of Mule error and components for handling Mule errors.
Components of Mule Error
Mule error is the result of Mule exception failure has the following components −
Description
It is an important component of Mule error which will give a description about the problem.
Type
The Type component of Mule error is used to characterize the problem. It also allows routing within an error handler.
Cause
The Cause component of Mule error gives the underlying java throwable that causes the failure.
Message
The Message component of Mule error shows an optional message regarding the error.
Child Errors
The Child Errors component of Mule error gives an optional collection of inner errors. These inner errors are mainly used by elements like Scatter-Gather to provide aggregated route errors.
Error Types
Let us understand the Error Types with the help of its characteristics −
- The first characteristics of Mule Error Types is that it consists of both, a namespace and an identifier. This allows us to distinguish the types according to their domain. In the above example, the Error Type is HTTP: UNAUTHORIZED.
- The second and important characteristic is that the Error Type may have a parent type. For example, the Error Type HTTP: UNAUTHORIZED has MULE:CLIENT_SECURITY as the parent which in turn also has a parent named MULE:SECURITY. This characteristic establishes the Error Type as specification of more global item.
Kinds of Error Types
Following are the categories under which all the errors fall −
ANY
The errors under this category are the errors that may occur in a Flow. They are not so severe and can be handled easily.
CRITICAL
The errors under this category are the severe errors that cannot be handled. Following is the list of Error Types under this category −
Error Type and Description
OVERLOAD
This Error Type indicates an error occurred due to problem of overloading. In this case, the execution will be rejected.
FATAL_JVM_ERROR
This kind of Error Type indicates the occurrence of a fatal error. For example, stack overflow.
CUSTOM Error Type
The CUSTOM Error Types are the errors that are defined by us. They can be defined when mapping or when raising the errors. We must give a specific custom namespace to these Error Types for distinguishing them from the other existing Error Types within Mule application. For example, in Mule application using HTTP, we cannot use HTTP as the custom error type.
Categories of Mule Error
In broad sense, the errors in Mule can be divided into two categories namely, Messaging Errors and System Errors.
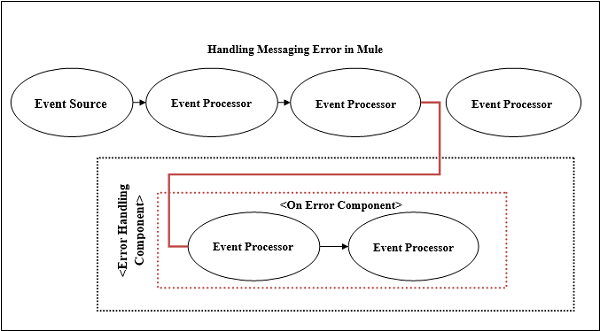
Messaging Error
This category of Mule error is related to the Mule flow. Whenever a problem occurs within a Mule flow, Mule throws a messaging error. We can set up On Error component inside the error handler component to handle these Mule errors.
System Error
System error indicates an exception occurring at the system level. If there is no Mule event, the system error is handled by a system error handler. The following kind of exceptions handle by a system error handler −
- Exception that occurs during an application start-up.
- Exception that occurs when a connection to an external system fails.
In case a system error occurs, Mule sends an error notification to the registered listeners. It also logs the error. On the other hand, Mule executes a reconnection strategy if the error was caused by a connection failure.
Handling Mule Errors
Mule has following two Error Handlers for handling the errors −
On-Error Error Handlers
The first Mule error handler is On-Error component, that defines the types of errors they can handle. As discussed earlier, we can configure On-Error components inside the scope-like Error Handler component. Each Mule flow contain only one error handler, but this error handler can contain as many On-Error scope as we needed. The steps for handling the Mule error inside the flow, with the help of On-Error component, are as follows −
- First, whenever a Mule flow raises an error, the normal flow execution stops.
- Next, the process will be transferred to the Error Handler Component that already have On Error component to match the error types and expressions.
- At last, the Error Handler component routes the error to the first On Error scope that matches the error.
Following are the two types of On-Error components supported by Mule −
On-Error Propagate
On-Error Propagate component executes but propagates the error to the next level and breaks the owner’s execution. The transaction will be rolled back if it is handled by On Error Propagate component.
On-Error Continue
Like On-Error Propagate component, On-Error Continue component also executes the transaction. The only condition is, if the owner had completed the execution successfully then this component will use the result of the execution as the result of its owner. The transaction will be committed if it is handled by On-Error Continue component.
Try Scope Component
Try Scope is one of many new features available in Mule 4. It works similar to try block of JAVA in which we used to enclose the code having the possibility of being an exception, so that it can be handled without breaking the whole code.
We can wrap one or more Mule event processors in Try Scope and thereafter, try scope will catch and handle any exception thrown by these event processors. The main working of try scope revolves around its own error handling strategy which supports error handling on its inner component instead of whole flow. That is why we do not need to extract the flow into a separate flow.
Example
Following is an example of the use of try scope −
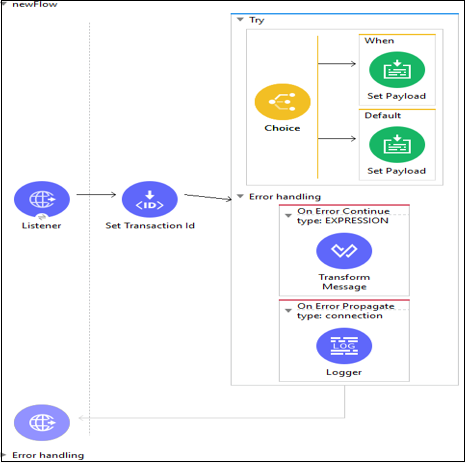
Configuring try scope for handling transactions
As we know, a transaction is a series of actions that should never be executed partially. All the operations within the scope of a transaction are executed in the same thread and if an error occurs, it should lead to a rollback or a commit. We can configure the try scope, in the following manner, so that it treats child operations as a transaction.
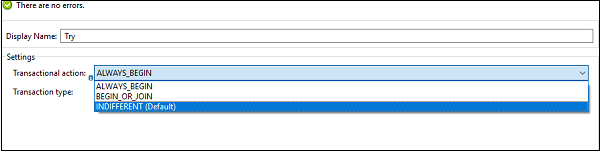
INDIFFERENT [Default]
If we choose this configuration on try block, then the child actions will not be treated as a transaction. In this case, error causes neither rollback nor commits.
ALWAYS_BEGIN
It indicates that a new transaction will be started every time the scope is executed.
BEGIN_OR_JOIN
It indicates that if the current processing of the flow has already started a transaction, join it. Otherwise, start a new one.
Conclusion
We are part of the Conclusion eco system, with 20 specialized entities and 1.300 employees. This enables us to deliver:
- Synergy and solutions that enables a fast and strategic implementation of MuleSoft.
- Assistance in creating a new IT operating model towards production-consumption of API’s which fully leverage your organizations investment in MuleSoft.
- Managed cloud; unburdening in keeping your MuleSoft application up to date.
It has the vision to provide easy solutions to tough problems through cutting-edge technology. This is the current trend in the IT industry. Businesses are looking for a plug and play solution to the most common problems faced by organizations across the globe. With its Anypoint Platform, it is on its way to strike gold