Last updated on 08th Jul 2020| 2430
Kubernetes in an open source container management tool hosted by Cloud Native Computing Foundation (CNCF). This is also known as the enhanced version of Borg which was developed at Google to manage both long running processes and batch jobs, which was earlier handled by separate systems.
Kubernetes comes with a capability of automating deployment, scaling of application, and operations of application containers across clusters. It is capable of creating container centric infrastructure.
Kubernetes is a container management technology developed in Google lab to manage containerized applications in different kind of environments such as physical, virtual, and cloud infrastructure. It is an open source system which helps in creating and managing containerization of application. This tutorial provides an overview of different kind of features and functionalities of Kubernetes and teaches how to manage the containerized infrastructure and application deployment.
Features of Kubernetes
Following are some of the important features of Kubernetes.
- Continues development, integration and deployment
- Containerized infrastructure
- Application-centric management
- Auto-scalable infrastructure
- Environment consistency across development testing and production
- Loosely coupled infrastructure, where each component can act as a separate unit
- Higher density of resource utilization
- Predictable infrastructure which is going to be created
One of the key components of Kubernetes is, it can run application on clusters of physical and virtual machine infrastructure. It also has the capability to run applications on cloud. It helps in moving from host-centric infrastructure to container-centric infrastructure.
How to Spin Up a Kubernetes Cluster
Currently, several services around the globe provide different Kubernetes implementations. Among the most popular ones, you will find:
Minikube:
An open-source tool that you can install in your local machine to use Kubernetes locally. This tool uses a virtualization solution (like VirtualBox or similar) to set up a local Kubernetes cluster.
Google Kubernetes Engine (GKE):
Google’s solution that manages production-ready Kubernetes clusters for you.
Amazon Elastic Kubernetes Service (EKS):
Amazon’s solution that manages production-ready Kubernetes clusters for you.
Azure Kubernetes Service (AKS):
Azure’s solution that provides you managed, production-ready Kubernetes clusters.
OpenShift Kubernetes:
Red Hat’s solution that handles Kubernetes clusters for you.
Kubernetes – Cluster Architecture
As seen in the following diagram, Kubernetes follows client-server architecture. Wherein, we have master installed on one machine and the node on separate Linux machines.
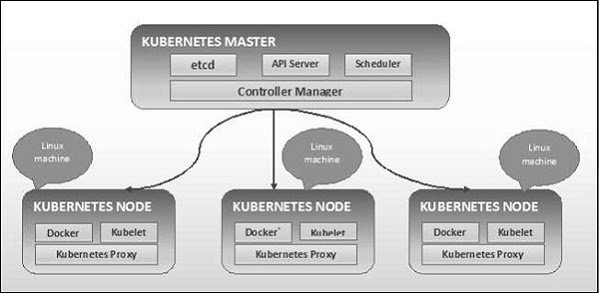
The key components of master and node are defined in the following section.
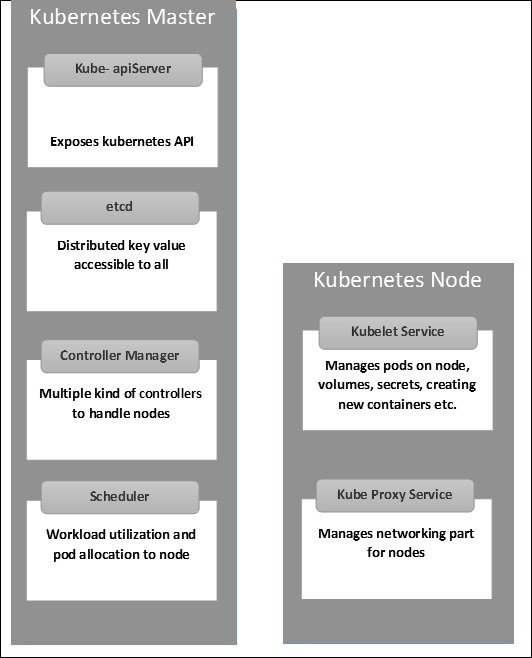
Kubernetes – Master Machine Components
Following are the components of Kubernetes Master Machine.
etcd
It stores the configuration information which can be used by each of the nodes in the cluster. It is a high availability key value store that can be distributed among multiple nodes. It is accessible only by Kubernetes API server as it may have some sensitive information. It is a distributed key value Store which is accessible to all.
API Server
Kubernetes is an API server which provides all the operation on cluster using the API. API server implements an interface, which means different tools and libraries can readily communicate with it. Kubeconfig is a package along with the server side tools that can be used for communication. It exposes Kubernetes API.
Controller Manager
This component is responsible for most of the collectors that regulates the state of cluster and performs a task. In general, it can be considered as a daemon which runs in nonterminating loop and is responsible for collecting and sending information to API server. It works toward getting the shared state of cluster and then make changes to bring the current status of the server to the desired state. The key controllers are replication controller, endpoint controller, namespace controller, and service account controller. The controller manager runs different kind of controllers to handle nodes, endpoints, etc.
Scheduler
This is one of the key components of Kubernetes master. It is a service in master responsible for distributing the workload. It is responsible for tracking utilization of working load on cluster nodes and then placing the workload on which resources are available and accept the workload. In other words, this is the mechanism responsible for allocating pods to available nodes. The scheduler is responsible for workload utilization and allocating pod to new node.
Kubernetes – Node Components
Following are the key components of Node server which are necessary to communicate with Kubernetes master.
Docker
The first requirement of each node is Docker which helps in running the encapsulated application containers in a relatively isolated but lightweight operating environment.
Kubelet Service
This is a small service in each node responsible for relaying information to and from control plane service. It interacts with etcd store to read configuration details and wright values. This communicates with the master component to receive commands and work. The kubelet process then assumes responsibility for maintaining the state of work and the node server. It manages network rules, port forwarding, etc.
Kubernetes Proxy Service
This is a proxy service which runs on each node and helps in making services available to the external host. It helps in forwarding the request to correct containers and is capable of performing primitive load balancing. It makes sure that the networking environment is predictable and accessible and at the same time it is isolated as well. It manages pods on node, volumes, secrets, creating new containers’ health checkup, etc.
Kubernetes – Master and Node Structure
The following illustrations show the structure of Kubernetes Master and Node.
Installing Kube Control (kubectl)

Learn In-Demand Industry Experts Curated Kubernetes Certification Course to Buid Your Skills
Weekday / Weekend BatchesSee Batch DetailsBefore spinning up a Kubernetes cluster, you will need a tool called kubectl. This tool, popularly known as “Kube Control”, is a command-line interface that will allow you to manage your Kubernetes cluster with ease from a terminal. Soon, you will get quite acquainted with kubectl.
To install kubectl, you can head to this resource and choose, from the list shown, the instructions for your operating system. In this list, you will see instructions for:
- Linux(and some of its variations, like Ubuntu);
- macOS (which can be accomplished by using Homebrew or Macports);
- and Windows (which you will find instructions for PowerShell and Chocolatey).
After following these instructions and installing kubectl in your machine, you can issue the following command to confirm that the tool is indeed available:
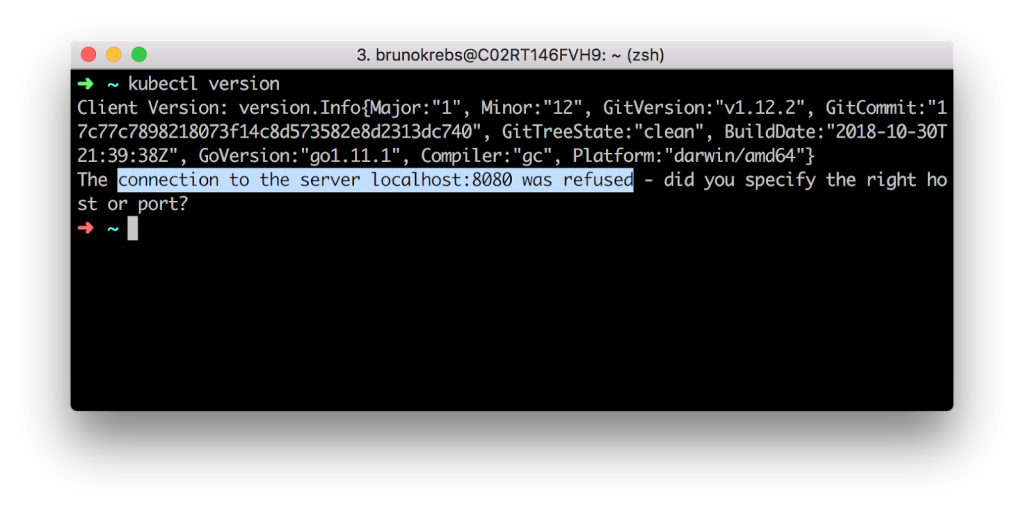
The output of the above command will show the client version (i.e., the release of kubectl) and a message saying that the “connection to the server localhost:8080 was refused.” What this means is that you do have kubectl properly installed, but that you don’t have a cluster available yet (expected, right?). In the next sections, you will learn how to spin up a Kubernetes cluster.
How to Create a Kubernetes Cluster on DigitalOcean
If you already have a Kubernetes cluster that you will use, you can skip this section. Otherwise, please, follow the instructions here to create your Kubernetes cluster on DigitalOcean. For starters, as mentioned before, you will have to use this referral link. If you don’t use a referral link, you will end up paying for your cluster from the very begin.
After using this link to create your account on DigitalOcean, you will get an email confirmation. Use the link sent to you to confirm your email address. Confirming your address will make DigitalOcean ask you for a credit card. Don’t worry about this. If you don’t spend more than $100 USD, they won’t charge you anything.
After inputting a valid credit card, you can use the next screen to create a project, or you can use this link to skip this unnecessary step and to head to the Kubernetes dashboard.
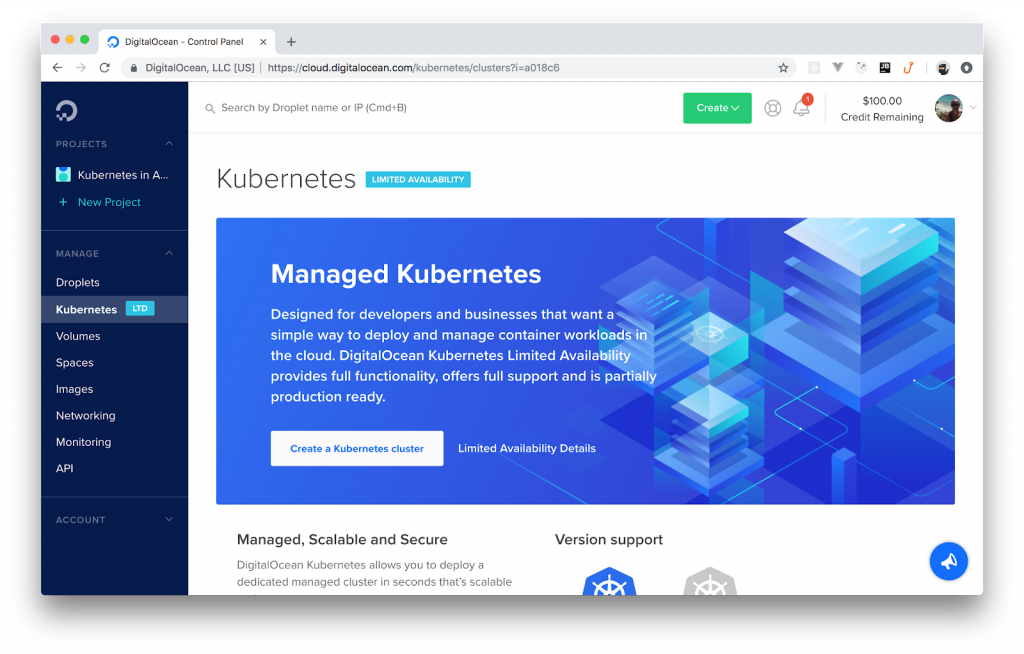
From the Kubernetes dashboard, you can hit the Create a Kubernetes cluster button (you might have to click on Enable Limited Access first). Then, DigitalOcean will show you a new page with a form that you can fill in as follows:
- Select a Kubernetes version: The instructions on this article were tested with the 1.13.5-do.1 version. If you feel like testing other versions, feel free to go ahead. Just let us know how it went.
- Choose a datacenter region: Feel free to choose whatever region you prefer.
- Add node pool(s): Make sure you have just one node pool, that you choose the $10/Month per node option, and that you have at least three nodes.
- Add Tags: Don’t worry about tagging anything.
- Choose a name: You can name your cluster whatever you want (e.g., “kubernetes-tutorial”). Just make sure DigitalOcean accepts the name (e.g., names can’t contain spaces).
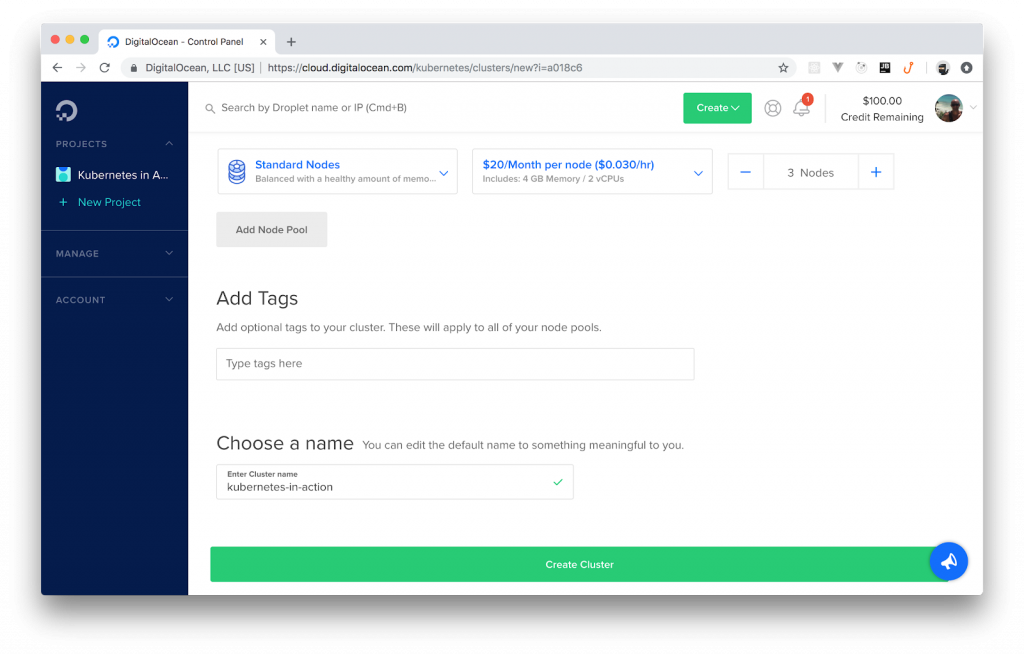
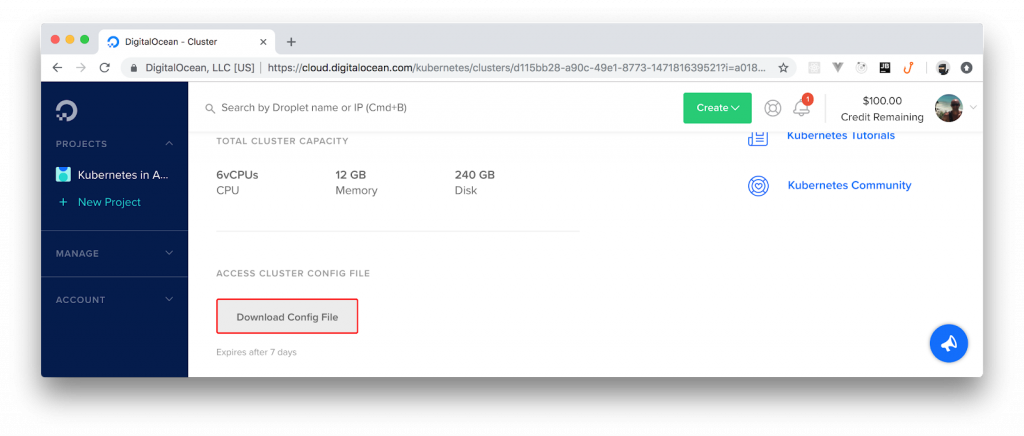
After filling in this form, you can click on the Create Cluster button. It will take a few minutes (roughly 4 mins) before DigitalOcean finishes creating your cluster for you. However, you can already download the cluster’s config file.

Best In-Depth Practical Oriented Kubernetes Training By Expert Trainers
- Instructor-led Sessions
- Real-life Case Studies
- Assignments
This file contains the credentials needed for you to act as the admin of the cluster, and you can find it on the cluster’s dashboard. After you clicked on the Create Cluster button, DigitalOcean redirected you to your cluster’s dashboard. From there, if you scroll to the bottom, you will see a button called Download Config File. Click on this button to download the config file.
When you finish downloading this file, open a terminal and move the file to the .kube directory in your home dir (you might have to create it):
The ~/.kube directory is a good place to keep your Kubernetes credentials. By default, kubectl will use a file named config (if it finds one inside the .kube dir) to communicate with clusters. To use a different file, you have three alternatives:
- First, you can specify another file by using the –kubeconfig flag in your kubectl commands, but this is too cumbersome.
- Second, you can define the KUBECONFIG environment variable to avoid having to type –kubeconfig all the time.
- Third, you can merge contexts in the same config file and then you can switch contexts.
The second option (setting the KUBECONFIG environment variable) is the easiest one, but feel free to choose another approach if you prefer. To set this environment, you can issue the following command:
Keep in mind that this command will set this environment only on this terminal’s session. If you open a new terminal, you will have to execute this command again.
Using Services and Ingresses to Expose Deployments
After learning about pods, deployments, and containers, you probably want to consume your new deployment, right? To do so, you will need to create ingress rules that expose your deployment to the external world. Kubernetes ingress is an “object that manages external access to services in a cluster, typically through HTTP”. With an ingress, you can support load balancing, TLS termination, and name-based virtual hosting from within your cluster.
To configure ingress rules in your Kubernetes cluster, first, you will need an ingress controller. As you can see here, there are many different ingress controllers that you can use. In this tutorial, you will use one of the most popular, powerful, and easy-to-use ones: the NGINX ingress controller.
Conclusion
In this article, you created a Kubernetes cluster on DigitalOcean; then you used it to spin up a sample application. In deploying this app, you learned basic Kubernetes concepts like deployments, pods, containers, services, and ingresses. With this knowledge, you are now ready to move on and start learning about more advanced concepts that will let you orchestrate microservices application on Kubernetes. If you enjoyed the article (and if you want more content about this topic), let us know on the discussion section below.