Selenium IDE (Integrated Development Environment) is primarily a record/run tool that a test case developer uses to develop Selenium Test cases. Selenium IDE is an easy to use tool from the Selenium Test Suite and can even be used by someone new to developing automated test cases for their web applications. One does not require any special setup to get started with Selenium IDE. You just need to add the extension of your specific browser. Selenium IDE provides you with a GUI (Graphical User Interface) for easily recording your interactions with the website.
Selenium IDE allows a user or a test case developer to create the test cases and test suites and edit it later as per their requirements. The development environment also provides the capability of converting test cases to different programming languages, which makes it easier for the user and does not mandate the need for knowing a specific programming language.
Note: The most interesting part is that earlier Selenium IDE was available only for Firefox users. But now, with the recent version upgrade (3.12.0) on 16th July 2019, the Selenium community introduced a Selenium IDE Chrome Add-on, where-in the same integrated development environment in Firefox, is also made available for Chrome users as well.
The screenshot below indicates how the Selenium IDE on Chrome appears after the project name and base URL is entered.

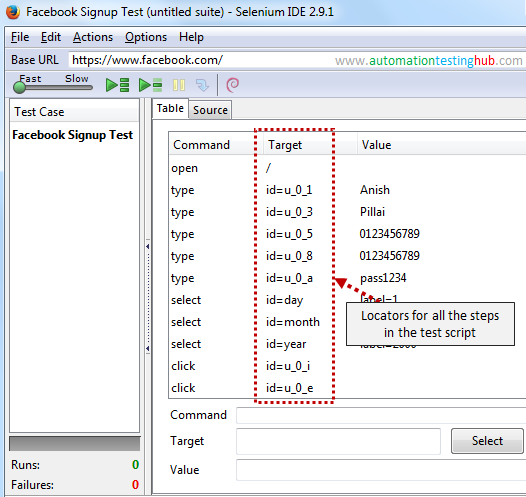
After entering the base URL for the project, the recording begins, and all the interactions with the website are recorded and categorized into three main categories as shown in the above Screenshot:
- Command
- Target
- Value
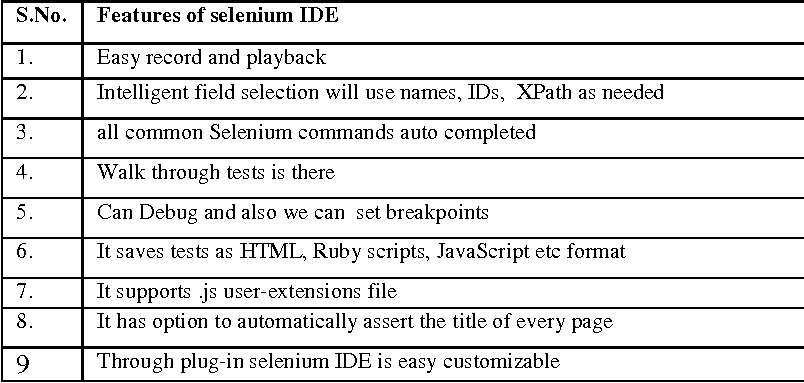
Features of Selenium IDE
There are several features provided in the IDE under the toolbar, using which one can control the execution of test cases:
- Speed Control : Helps control the speed of test cases
- Run All : Allows execution of the entire Test Suite
- Run : Runs the currently selected test
- Pause/Resume : Allows user to pause and resume a particular test case
- Step : Helps step into each specific command in the test script
- Rollup : Helps group all the Selenese Commands together and make them execute as a single operation
Selenium IDE is an easy to use tool that provides instant feedback and lets you run tests on any browser + OS combination using the SIDE (or command-line) runner for the Selenium IDE.
Below are some of the key features:
- Execute tests (and test-suites) : Selenium IDE lets you execute a specific test or a complete test-suite that comprises a group of tests.
- Cross browser testing : It can be used for automated browser testing as cross browser tests can be executed using the SIDE runner.
- Debugging : Setting breakpoints and pausing on exceptions makes it easy to debug tests from the IDE itself.
- Rich command-set : Selenium IDE supports a number of commands that can be used to raise asserts, insert waits, create loops, and more.
- Control Flow : Selenium IDE has an extensive set of commands that enable control flow structure. Commands such as if, if..else, etc. aid in executing conditional tests from the IDE.
- Test case reuse : The run command lets you reuse a particular test case inside another test case (or test suite).
- Grouping of Senseless commands : Selenium IDE supports grouping of Selenese commands (or set of Selenium commands) that lets you run tests. A sequence of Selenese commands makes a test script.
- Easy modification and comparison of test cases : Test scripts created using the Selenium IDE are stored as JSON files. This makes it easy to compare, modify, and inspect tests.
The growing list of questions tagged Selenium IDE on StackOverflow does indicate that testers into Selenium test automation are taking note of the Selenium IDE and there is growing interest in the community. It also helps the development team prioritize the next set of features that should make it in the future releases.
For testers into automated browser testing, Selenium IDE is a worthy option to explore as it lets you export the test cases (created using the IDE) to popular programming languages such as Python, C# with xUnit, and more. With curiosity mounting about the IDE, let us take a look at the positive aspects of the IDE in more detail in this Selenium IDE tutorial.

Selenium has been taken as the most popular automated testing tool by the developers. Selenium IDE (Integrated Development Environment) is a Firefox plug-in that can be downloaded or installed quickly without ant technical assistance. Since we have covered the important steps to download and install Selenium IDE in Firefox and Chrome to make the things easier for you. The best part is that to work with Selenium testing tool, you don’t need any programming background. The basic knowledge of JavaScript, CSS, HTML, and DOMS will help you in creating a plenty of test scripts with the Selenium IDE. Let us see, what are the major advantages and disadvantages of the Selenium IDE. However, we cannot call the drawbacks as disadvantages but the limitations that are expected to modify the future versions.
How to Download and Install Selenium IDE in Firefox?
To ease the process, we have divided the complete download and installation process into six major steps. The most important thing that you should keep with you at the time of installation is Mozilla Firefox.
Open the official website for Selenium on the Firefox browser. Now click on the Download option in Menu Bar on the top and Download the latest version to run all the test scripts more precisely. Here is the quick reference how website and Download option in the Menu Bar would look alike-

As soon as, you open the Download Tab in the browser, it will show you the latest version of Selenium IDE as given in the screenshot. Click on the version and download the latest version of the tool in the repository. For more details, refer the screenshot below for clear details –

Before downloading get started for the Selenium IDE, it will show a security alert box to safeguard your system against the potential risks. As we have given the reference to authentic website only, so you can click on “Allow” option without any further delay.
Now Selenium IDE plug-in is downloaded in the Firefox’s backdrop. As soon as, the installation is completed, the installation window will appear in front of you. Now click on “Install Now” option to start with the installation.
After installation is completed, one pop-up box will ask you to restart the Firefox. This is necessary to restart the browser to reflect the Selenium IDE installation.
Once Firefox is booted and started again, you can see the Selenium IDE indexed under Menu Bar -> Web Developer -> Selenium IDE.

At the end, you just need to click on the Selenium IDE option and window appears to start your work.
How to Download and install Selenium IDE in Chrome?
Even wondered if Selenium IDE can be used in Chrome browser or not? As per our discussion till now, this is clear that Selenium IDE was specifically designed for Firefox browser, and other browsers are out-of-reach if they are not configured well. Here, you will get to know how to download and install Selenium IDE in Chrome. In reality, there is one neat little feature called WebDriver Playback that helps you to run Selenium IDE in Chrome browser. Here, is a quick guide to help you with downloading, installation and running Selenium IDE in Chrome.
- Open the official website for Selenium on the chrome browser. Now click on the Download option in Menu Bar on the top and Download the latest version to run all the test scripts more precisely.
- Once, you open the Download Tab in the browser, it will show you the latest version of Selenium. Now, download the latest version of the tool in the repository.
- Before downloading get started for the Selenium IDE, it will show a security alert box to safeguard your system against the potential risks. As we have given the reference to authentic website only, so you can click on “Allow” option without any further delay.
- Now Selenium IDE plug-in is downloaded in the Firefox’s backdrop. As soon as, the installation will be completed, the installation window will appear in front of you. Now click on “Install Now” option to start with the installation.
- So, you can see that downloading and installation steps are still the same but the question is how to run IDE in Chrome browser. After installation is complete, Launch the selenium IDE and choose “Options” from the drop-down Menu.
- In the Options Menu, you can see the ‘WebDriver’ tab where you need to enable the WebDriver Playback with the checkbox. As soon as, ‘WebDriver Playback’ is enabled, you can see the name of different browsers there. Substitute the Firefox with Chrome or any other particular browser you want to use. You are advised to use latest browser version to run all test scripts perfectly.
- In brief, WebDriver Playback is a feature that makes Selenium IDE compatible with multiple browsers like Chrome, IE, Android, iPhone or iPad etc. In the final step, Download the Selenium standalone JAR file, Chrome Driver and add both files to the same folder on your local computer.Start Selenium server and Chrome Driver server via Terminal as shown in the screenshot below –
Now open the Selenium IDE in Chrome and run test scripts by following the earlier steps.

Wrapping up:
Surely, Selenium IDE is a neat extension to Mozilla Firefox, even more so now with this blog, you know how to use Selenium IDE in Chrome as well. However, the functionalities may be limited when working on large enterprise project but you have expanded your knowledge base for something very useful and interesting today. If you wanted to explore more interesting concepts related to software testing then join the Selenium training program at ACTE right away to embrace yourself something really heavy and worth investment too.
Selenium Commands

Selenium commands are broadly classified into:
1. Actions : Commands that interact directly with the application:
- clickAndWait(),
- typeAndWait()
2. Accessor : Enable the user to store certain values to a user-defined variable:
- storeTitle()
3. Assertions : Verifies the current state of the application along with an expected state. There are different types of assertions:
- Assert command makes sure that the test execution is terminated in case of failure
- Verify command ensures script execution even if the verification has failed
- WaitFor command waits for a specific condition to be met before executing the next test step


