Last updated on 04th Jul 2020| 12471
LabVIEW, developed by National Instruments, is a graphical programming language and development environment widely used for creating applications that acquire, analyze, and present data. It simplifies complex tasks such as instrumentation control, industrial automation, and data acquisition through intuitive graphical icons and wires that resemble a flowchart. LabVIEW’s versatility and extensive library of modules and toolkits make it a preferred choice in various fields including research.
1. What is LabVIEW?
Ans:
LabVIEW is a multipurpose programming language that can be used on various platforms such as Linux, MacIntosh, Windows, and embedded platforms. Laboratory Virtual Instrument Engineering Workbench (A visual programming language’s development environment and platform for system design is called LabVIEW and developed by National Instruments.
2. Describe the LabVIEW environment.
Ans:
The LabVIEW environment is initiated by launching LabVIEW from operating system’s menu system. Upon starting LabVIEW, two primary windows appear: the front panel and the block diagram. The front panel serves as the graphical user interface (GUI) designer, create and arrange controls and indicators to interact with program. The block diagram is the workspace for developing code using graphical programming.
3. How can the front panel be customized in LabVIEW?
Ans:
- Coloring Objects: The coloring tool or the Pane Properties window allows to change the color of controls, indicators, and even the background itself.
- Hiding Grid Lines: To keep the grid lines cleaner, choose to hide them (Tools > Options > Front Panel).
- Using Custom Fonts: Select a different font for labels and Text using the Font tool.
4. What is the block diagram in LabVIEW?
Ans:
The block diagram is a fundamental window in LabVIEW create and organize graphical source code. It serves as the workspace for developing the logic of program using various elements like loops, arrays, functions, numeric operations, and more. The block diagram allows to visually construct and connect these elements to create the desired functionality.
5. How can the block diagram be customized in LabVIEW?
Ans:
- The block diagram can be customized by clicking on the pin always to be in front or to close it.
- Add comments to explain complex sections of code and use labels on wires to clarify data flow.
- Maintain consistent indentation (Tools > Options > Block Diagram) to improve code readability.
- Right-click wires and choose “Hide” to temporarily hide them for better focus on specific sections.
- Arrange wires neatly using the Wiring tool to avoid clutter and improve code comprehension
6. Define VI in LabVIEW.
Ans:
VI stands for Virtual Instruments, which are programs created using LabVIEW. LabVIEW, developed by National Instruments, is primarily an interactive graphical programming environment designed for data acquisition, instrument control, and industrial automation. The primary interface within LabVIEW is called a Virtual Instrument (VI), which serves as the core building block of LabVIEW applications.
7. How to create a simple LabVIEW program?
Ans:
- To create a simple LabVIEW program, can make a program in the front panel, create a numeric control and a code for converting from Celsius to Fahrenheit.
- Launch LabVIEW.
- Open an existing LabVIEW VI or create a new VI.
- Making sure the user is on the block diagram screen.
- Open the NISCOPE palette.
- Build application using the appropriate programming flow steps.
8. Can the values be changed during run time in LabVIEW?
Ans:
The values can be changed during run time by clicking outside the loop and changing the Fahrenheit degrees. LabVIEW RunTime Engine is an executable (.exe) file that must be installed on any system where users plan to run executables or shared libraries built with the LabVIEW Application Builder. Additionally, the RunTime Engine allows a browser to display Virtual Instruments (VI.) embedded in Web pages.
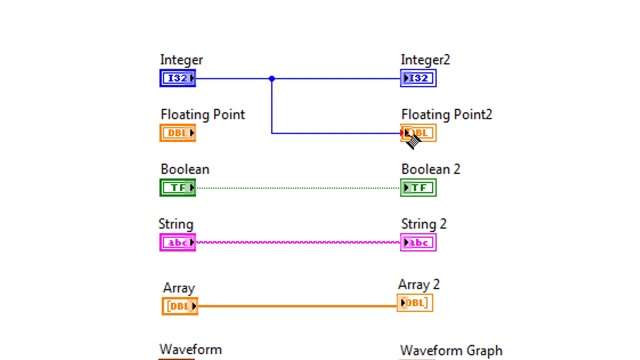
9. What are the data types available in LabVIEW?
Ans:
- LabVIEW offers various data types, including numeric controls, Boolean controls, variables, string controls, indicators, and arrays. Signed integers. int8 8-bit integer. int16 16-bit integer. int32 32-bit integer.
- Unsigned integers. uInt8 8-bit integer. uInt16 16 bit integer. uInt32 32 bit integer.
- Floating Point numbers. float32 32-bit floating point number. float64 64-bit floating point number.
10. What is the difference between charts and graphs in LabVIEW?
Ans:
| Feature | Charts | Graphs |
|---|---|---|
| Purpose | Display time-based or continuous data streams | Plot discrete data points or data sets |
| Data Representation | Continuous data | Discrete data points or intervals |
| Usage | Real-time data monitoring and trends | Static data analysis and relationships |
| Features | Real-time updates, automatic scrolling | Plotting at specific coordinates, statistical analysis |
| Examples | Temperature monitoring, sensor data visualization | XY plots, bar charts, histogram |
11. How to create a temperature simulator in LabVIEW?
Ans:
- Open LabVIEW and create a new VI, adding controls for desired temperature input and indicators for simulated output.
- Use a While Loop to generate temperature values with random number generation and mathematical functions to simulate fluctuations.
- Implement logic to adjust the simulated temperature based on user input or environmental factors.
- Connect the output of your temperature logic to the numeric indicator to visualize the simulated temperature.
12. What are surveyors in Labview?
Ans:
- Surveyors can interface with sensors and instruments to collect real-time data from physical environments.
- They often provide graphical representations of the data, making it easier to interpret results and trends.
- Surveyors can perform calculations and analyses on collected data, enabling informed decision-making.
- Many surveyors include features for generating reports based on the data collected, which can be crucial for documentation and compliance.
- They may include user interface elements that allow operators to interact with the data collection process, adjusting parameters or settings as needed.
13. Tell me about the steps to create a surveyor in Labview.
Ans:
- Open LabVIEW and create a new VI (Virtual Instrument).
- Design the front panel with necessary controls and indicators for data input and output.
- Use the block diagram to wire the functional logic, incorporating data acquisition, analysis, and storage.
- Implement necessary loops and structures to handle data collection and processing.
- Test the VI to ensure accurate data collection and functionality, then deploy for use.
14. How to create a simple program to convert Celsius to Fahrenheit in LabView?
Ans:
To create a simple program to convert Celsius to Fahrenheit in LabView, can create a survey using Labview Surveyor functionality and then make any necessary changes to the code. The program will run until a stop button is pressed, and can convert temperatures from Celsius to Fahrenheit and change the scale. The program can display the converted temperatures in real-time, allowing users to easily monitor the results as they input different Celsius values.
15. How to double-click a survey in LabView to open the block diagram and make changes?
Ans:
To double-click a survey in LabView and open the block diagram to make changes, click on the study in the front panel and then right-click on it. Select “Open Block Diagram” from the context menu. This will open the survey’s block diagram, where one can make any necessary changes to the code. After making changes, remember to save the block diagram to ensure your updates are applied before returning to the front panel.
16. Define a Y loop in Labview.
Ans:
- A Y loop in LabView is a type of loop that runs in the Y direction. It is helpful in performing tasks that require repeating a specific action over some time.
- Used to execute code a set number of times. It is ideal for repetitive tasks where one knows the number of iterations beforehand.
- Executes code as long as a specific condition remains true. It is suitable for situations where they need the loop to continue until a particular event occurs.
17. Explain a case structure in Labview.
Ans:
- Selects Based on Input: It takes an input value to determine which branch of code to execute.
- Multiple Sub Diagrams: It contains several sub-diagrams (like mini-block diagrams).
- Matching Input: Each subdiagram has a label specifying the input value that triggers its execution.
- Only One Executes: Only the subdiagram matching the input value runs at a time.
18. List the types of variables available in Labview.
Ans:
In LabView, can use different types of variables, including scalars, arrays, structures, and user-defined types. Also use different data types, such as integers, floating point numbers, and strings. Signed integers. int8 8-bit integer. int16 16-bit integer. int32 32-bit integer. Unsigned integers. uInt8 8-bit integer. uInt16 16 bit integer. uInt32 32 bit integer. Floating Point numbers. float32 32-bit floating point number. float64 64-bit floating point number.
19. What is a constant in Labview?
Ans:
A constant in LabVIEW is a fixed value that may use to supply other nodes with data in block diagram. Constants remain unchanged while the program is running. They can be used to represent any LabVIEW data type, including strings, Booleans, pathways, and numeric values. To generate constants, simply perform a right-click on the block diagram and choose “Create»Constant.” When initializing controls and indicators or setting configuration values, constants come in handy.
20. Define a timer in Labview.
Ans:
- Use the built-in “Elapsed Time.vi” to measure time duration since the VI started.
- It outputs the elapsed time in milliseconds.
- Employ the “Timer” function block from the Real-Time palette.
- Set a “Preset Time” (milliseconds) for the desired duration.
- The “Done” output turns TRUE when the timer reaches the preset time and remains TRUE until reset.
21. List the five properties of LabVIEW.
Ans:
LabVIEW has five properties: graphical and Compile Nature, Data flow or event-based programming, Multitarget and Platform Capability, and MultiThreading possibilities. Property Nodes are nodes that can use in Block Diagram to GET or SET properties on a local or remote application, VIs, and objects. LabVIEW’s extensive libraries and tools facilitate rapid development and integration with various hardware, enhancing its versatility for engineering applications.
22. How to open a VI in LabVIEW?
Ans:
- Open the top menu bar and select the “File” menu.
- Select “Open” from the File menu.
- A file window will open as a result, and can navigate to the location of the VI want to open.
- Select the VI and click “Open”.
23. What is the purpose of the project explorer in LabVIEW?
Ans:
The project explorer in LabVIEW allows users to add new VIs and structure multiple VIs, making it easier to manage more advanced programs with AI. LabVIEW is commonly used for data acquisition, instrument control, and industrial automation on a variety of operating systems (OSs., including macOS and other versions of Unix and Linux, as well as Microsoft Windows.
24. Point out the difference between a flat sequence structure and a stacked sequence structure in LabVIEW.
Ans:
A flat sequence structure has one frame and two frames, similar to a movie, while a stacked sequence structure runs the code first and then calls to the next frame. The Flat Sequence structure, shown as follows, executes frames from left to right when all data values wired to a frame are available. The data leaves each frame as the frame finishes executing. This means the input of one frame can depend on the output of another frame.
25. What is the purpose of the options window in LabVIEW?
Ans:
- The options window in LabVIEW allows users to customize their environment, such as the front panel and block diagram, making it easier to work with LabVIEW.
- The image shows two LabVIEW windows: the front panel (containing controls and indicators) and block diagrams.
26. How do users create a blog diagram in LabVIEW?
Ans:
- To create a blog diagram in LabVIEW, users need to create a controller and an indicator to display their values.
- Control palettes contain various controls and indicators, organized by data types such as numeric, Boolean, strings, Spark, and cluster.
27. How do users save a VI in LabVIEW?
Ans:
- To save a VI in LabVIEW, users can create a new folder and change its name to “Program file.”
- The file will be saved in a new folder named “Day One” and saved in a new folder called “Day Two.”
- Select the version of LabVIEW to use to create the VI.
- Click Next.
- Select the image source for the VI.
- Click Next and finish.
28. How are VI’s different parts divided in LabVIEW?
Ans:
The parts of a VI are divided into three main parts: the front panel, the blog diagram, and the icon and connector pen. Each VI has a front panel, blog diagram, icon, and connector pen. The VI, or Virtual Instrument, is the basic building block of programs written in the G Language. These components work together to create an intuitive interface for user interaction, data processing, and program organization.
29. How do users reuse the same survey multiple times in the same program in LabView?
Ans:
To reuse the same survey multiple times in the same program in LabView, can create a blank UI with controls and indicators and then copy it four times. Connect the input and output costs, and then run the code. This will allows to use the same survey to convert temperatures in different cities. This approach enhances efficiency by allowing for consistent data processing while minimizing repetitive design work.
30. What are the benefits of using subVIs and project libraries?
Ans:
- Modularity: SubVIs allow you to break down complex programs into smaller, manageable pieces, making it easier to develop, test, and debug.
- Reusability: You can reuse subVIs across different projects, saving time and effort by not having to recreate common functionalities.
- Organization: Project libraries help keep your code organized, making it easier to navigate and maintain large projects.
- Collaboration: SubVIs and libraries facilitate teamwork, as different developers can work on separate components without interfering with one another.
31. How to create a formula for converting Celsius to Fahrenheit in LabView?
Ans:
- Start a new Virtual Instrument.
- Add a Numeric Control for Celsius input and a Numeric Indicator for Fahrenheit output.
- Use the Functions Palette to add Multiply and Add functions.
- Connect the Celsius control to the Multiply function with a constant (1.8) and then to the Add function with a constant (32).
- Link the output of the Add function to the Fahrenheit indicator and run the VI.
32. What is LabVIEW?
Ans:
LabVIEW, developed by National Instruments, is a graphical programming environment primarily used for data acquisition, instrument control, and industrial automation. It employs a visual programming language, allowing users to create programs by connecting functional nodes with wires in a diagram. The core building blocks of LabVIEW applications are called Virtual Instruments (VIs). It simplifies complex system development and facilitates rapid testing and deployment.
33. What is LabVIEW used for?
Ans:
Measurement and control systems are designed, tested, and implemented using LabVIEW. Engineers and scientists can create programs for industrial automation, instrument control, and data collecting using its graphical programming environment. Because of LabVIEW’s versatility in combining hardware and software, ability to quickly prototype, and capacity for real-time data processing and visualization, it is widely utilized in research, educational settings, and industries including aerospace, automotive, and telecommunications.
34. What is the role of the power supply in a PLC system?
Ans:
The power supply in a PLC system is responsible for providing the processor, I/O modules, and communication components with their necessary energy requirements. It typically accepts an AC input of 120 to 230 volts or 24 V DC, and outputs approximately 5 V DC at 25 A to power the system’s operations effectively. This reliable power source is crucial for maintaining system stability and performance.
35. What are the three main parts of a LabVIEW VI?
Ans:
The three main parts of a LabVIEW VI are the Front Panel, where user interface elements like controls and indicators are placed and arranged visually, the Block Diagram, where the graphical code or logic of the VI is developed using various nodes and wires to define functionality and the Connector Pane, which specifies inputs and outputs of the VI, facilitating connections with other VIs or external devices. Together, these parts enable the creation of interactive and intuitive graphical programs for data acquisition, analysis, and control in LabVIEW.
36. What is the purpose of the Run Can Geosly button in LabVIEW?
Ans:
- Without the requirement for manual triggering, the VI (Virtual Instrument) can run continuously in LabVIEW by selecting the “Run Continuously” button.
- It loops over the VI continually, updating outputs in response to time-based events or real-time inputs.
- This functionality is very helpful for real-time control, monitoring, and data collecting applications where it’s essential to execute continuously and react quickly to changes.
37. What is the purpose of the switch in the program described in the Text?
Ans:
- The program’s switch regulates how an expression or variable is used to determine how the program is executed.
- It gives the software the option to select among a variety of courses or actions, each of which could be related to a distinct value or set of circumstances.
- By substituting a more succinct structure for several nested if-else statements, this helps simplify logic and increase readability.
- Furthermore, switching is a useful tool for managing situations in which a program needs to handle multiple unique cases or conditions.
38. What is the purpose of concatenating AZ characters in the string data section of the program?
Ans:
In the program’s string data section, AZ characters are concatenated in order to produce a preset string constant. This constant offers a distinct, immediately recognizable value that is constant throughout the program’s execution, making it suitable for usage as a reference or placeholder. These constants are very helpful for maintaining code maintainability and clarity by storing static text or configuration data that doesn’t change during runtime.
39. What is the purpose of the project explorer window in LabVIEW?
Ans:
- To access and manage files and extensions
- To analyze data flow models
- To connect controls and indicators
- LabVIEW remains a top choice among complex real-time systems developers who strive to follow best practices while staying informed on emerging developments within LabVIEW and related technologies.
- This allows them to produce high-quality apps tailored to users’ needs.
40. What is the purpose of the build specification in LabVIEW?
Ans:
The process of compiling or deploying a LabVIEW project or application is specified in the build specification. It includes information on the target architecture (32- or 64-bit), the target platform (Windows, macOS, Linux), the deployment choices (standalone executable, installer creation), and any extra resources or dependencies to include. This makes it possible for developers to alter the packaging and distribution of their LabVIEW applications, guaranteeing their operation and compatibility in various contexts.

Get JOB LabVIEW Training for Beginners By MNC Experts
- Instructor-led Sessions
- Real-life Case Studies
- Assignments
41. What is the purpose of the “create project” window in LabVIEW?
Ans:
The “create project” window in LabVIEW serves to initiate and organize new projects by allowing users to define project settings, add files and dependencies, and configure project-specific settings like build specifications and target platforms. It provides a structured approach to managing LabVIEW applications, facilitating collaboration and version control while ensuring all components are integrated seamlessly within the project environment.
42. What are the map requirements for LabVIEW code?
Ans:
- Creating a Map: Allocate a new map using the “Create Map” VI.
- Key-Value Pairs: Use the “Add To Map” VI to insert new entries or update existing ones based on the key.
- Looking Up Values: The “Get From Map” VI obtains the value connected to a particular key.
- Size and Existence: Determine the number of entries in a map using the “Size of Map” VI.
43. What are the features of the Lab view?
Ans:
- Builds programs with icons and wires, ideal for visual learners.
- Easily connects to instruments and devices for data acquisition and control.
- Offers tools for data analysis, signal processing, and creating clear visualizations.
- Promotes code reuse with subVIs and project libraries for efficient development.
44. Is it possible to interface Lab view with JAVA GUI?
Ans:
It is feasible to connect LabVIEW to a Java graphical user interface. Through the use of extra tools like the LabVIEW Connectivity Toolkit or its built-in features, LabVIEW offers connectivity options. This enables TCP/IP, UDP, shared variables, and other protocols for communication between LabVIEW and Java programs. Typically, integration entails using LabVIEW’s Web Services or Java Interface to facilitate seamless data and command interchange between the two environments.
45. What kind of files can be used apart from .txt as input in LabView?
Ans:
- Spreadsheets (.xls, .xlsx): Access data from Excel spreadsheets for analysis or configuration.
- Binary Files (.dat, custom formats): Read raw binary data acquired from instruments or sensors.
- Waveforms (.wav): Import audio data for analysis or manipulation.
- Measurement Data Files (.lvm): LabVIEW’s native format for storing measurement data with timestamps and organization.
- Image Files (.bmp, .jpg, etc.): Process and analyze images for applications like machine vision
46. How to add channel names to an LVM file?
Ans:
To add channel names to an LVM file, typically need to modify the header section of the file. Open the LVM file in a text editor and locate the header lines that define the data columns. Add the desired channel names next to each corresponding column. Save the file after making the changes to include the channel names. This allows for easier identification and interpretation of data when analyzing or processing the LVM file in applications like LabVIEW or other data analysis tools.
47. What are some best practices for building user-friendly front panels in LabVIEW?
Ans:
- Organize controls and indicators logically, grouping related items together for intuitive navigation.
- Use consistent colors, fonts, and styles to create a cohesive look, making it easier for users to understand the interface.
- Clearly label all controls and indicators, using concise descriptions to help users quickly grasp their functions.
- Choose the right types of controls based on user needs, ensuring they match the expected input method.
- Provide visual or auditory feedback for user actions to enhance interactivity.
48. Is LabView a recommended platform for live streaming systems?
Ans:
LabVIEW is not typically recommended as a primary platform for live streaming systems. While it excels in data acquisition, instrument control, and industrial automation, it lacks native features for real-time video and audio streaming. Platforms like OBS Studio or specialized streaming software are more suitable due to their focus on multimedia streaming capabilities, providing better performance and compatibility with various streaming protocols and devices.
49. How to modulate AM. Are there any sound or voice files on LabView?
Ans:
- Read Audio: Use the “Read Waveform File.vi” to read sound/voice file data.
- Generate Carrier: Employ the “Sine Wave. vi” to create a carrier signal with the desired frequency and amplitude.
- Modulation: Use the “+” function to perform addition between the scaled sound data and the carrier signal .
- Output: Write the modulated signal to a new file using the “Write Waveform File.vi”.
- Scaling: Consider adding a “Scale” function before the “+” operation to adjust the sound data’s amplitude for optimal modulation.
50. How to normalize the EMG signals with respect to mean by using LabView?
Ans:
To normalize EMG signals with respect to the mean in LabVIEW, start by acquiring the EMG data using the DAQ Assistant. Next, use the Mean VI from the Functions Palette to calculate the average of the signal array. After that, employ the Array Subtract function to subtract the mean value from each element of the original EMG signal. Finally, display the mean-normalized signal on a waveform chart or save it for further analysis.
51. How do Loops and Case Structures help with program flow control?
Ans:
- Loops allow repetitive execution of code, enabling tasks like data processing and continuous monitoring, which enhances efficiency and responsiveness in your program.
- Case Structures enable conditional execution of different code blocks based on specific criteria, improving organization and readability by clearly separating logic for various scenarios.
52. How does LabVIEW handle multithreading and parallel processing?
Ans:
LabVIEW handles multithreading and parallel processing through its built-in support for dataflow programming. It utilizes parallel loops and multithreaded execution models to execute multiple tasks concurrently. LabVIEW’s graphical programming approach allows developers to easily implement parallelism by connecting data paths and controlling execution flow between parallel sections of code. This enables efficient utilization of multicore processors and accelerates performance in applications requiring simultaneous data acquisition, processing, and control.
53. Can LabVIEW applications be deployed on mobile devices?
Ans:
LabVIEW applications can be deployed on mobile devices through the use of additional modules like LabVIEW Mobile Module or LabVIEW Web Module. These modules enable developers to create applications that run on iOS and Android devices, leveraging LabVIEW’s graphical programming capabilities for mobile platforms. This deployment capability allows for data acquisition, monitoring, and control applications to be implemented on smartphones and tablets, extending LabVIEW’s utility beyond traditional desktop and industrial environments.
54. Explain dataflow execution in LabVIEW.
Ans:
- LabVIEW executes code based on dataflow. Data reaching an input triggers the VI.
- Wires represent data flow, with execution proceeding from top to bottom, left to right.
- This model ensures that all data dependencies are resolved before a VI executes, preventing issues related to timing or data integrity.
- Parallel execution is possible, allowing multiple VIs to run simultaneously as long as their data dependencies are satisfied.
55. Describe the Strategies for LabVIEW Code Optimization:
Ans:
- Profile code to identify bottlenecks and optimize accordingly.
- Profiling tools pinpoint areas where code execution takes longer, allowing targeted optimization.
- Choose appropriate data types for the task at hand.
- Using the most efficient data type can improve performance.
56. Define the Version Control for LabVIEW Projects.
Ans:
Version Control for LabVIEW Projects facilitates tracking changes, managing code versions, and collaborating on projects efficiently. It allows developers to maintain a history of revisions, revert to previous states if needed, and merge changes from multiple contributors seamlessly. This ensures consistency in development, improves teamwork, and helps in debugging and maintaining LabVIEW applications across different stages of development and deployment.
57. What is the difference between a VI and a subVI in LabVIEW?
Ans:
- A VI in LabVIEW refers to the main program or module created within the environment, encompassing both its graphical user interface (GUI) and its functional code.
- A subVI, on the other hand, is a smaller, modular VI designed to perform a specific function within a larger VI or application.
- It encapsulates reusable functionality, promoting modular design and enhancing code organization and reusability in LabVIEW programming
58. Explain what all modifications can be done in Virtual Instruments?
Ans:
Modifications in Virtual Instruments (VIs) allow users to customize functionality by altering parameters, adding or removing components, or adjusting data processing algorithms. These modifications can enhance performance, adapt VIs to specific requirements, or integrate new hardware interfaces seamlessly. They empower users to optimize data acquisition, analysis, and control processes within LabVIEW, ensuring flexibility and efficiency in diverse applications across industries such as engineering, research, and automation.
59. Name the types of panels used in LabVIEW.
Ans:
- Front Panel: The user interface of the VI, place controls (for user input) and indicators (for displaying data or results), and adjust properties to enhance usability and appearance.
- Block Diagram: The graphical code representation of the VI, connect icons (functions) and wires (data flow) to define the program’s logic, facilitating a clear understanding of data interactions and execution flow.
60. What is the block diagram panel?
Ans:
The block diagram panel in LabVIEW is a graphical representation where users develop the functionality of their Virtual Instruments (VIs). It consists of nodes, terminals, and wires that depict data flow and logic. Engineers and scientists use the block diagram to implement algorithms, process data, and control hardware. This visual programming approach allows for intuitive design and troubleshooting of complex systems, enhancing productivity and enabling rapid prototyping in various fields such as research, automation, and measurement.

61. What are the features of LabVIEW?
Ans:
- Uses a visual programming language, allowing users to create programs using block diagrams instead of text-based code.
- Provides built-in libraries for various applications, including data acquisition, signal processing, and control systems.
- Supports creating reusable VIs (Virtual Instruments) for modular and scalable programming. Offers tools for developing applications for real-time systems and Field Programmable Gate Arrays (FPGAs).
62. What is the position of I/O modules in PLC?
Ans:
The I/O modules are a crucial part of PLCs. These I/O modules provide digital input and output signals to create a connection between the PLC system hardware and its associated devices. Input modules can detect high, low, or intermediate-level electrical states coming from external switches and sensors, such as temperature senders, etc. Output modules, on the other hand, control external devices like motors, lights, and actuators by sending signals based on the PLC’s programmed logic.
63. Describe how to Building User-Friendly Front Panels:
Ans:
- Emphasise clear organization and labeling of controls and indicators.
- Users should easily understand what each control does and what information indicators display.
- Consider using custom controls for specific functionalities.
- Custom controls can improve user experience by providing specialized features of visual elements.
- Maintain a consistent aesthetic for a professional and intuitive interface.
64. Describe an Interfacing LabVIEW with External Devices.
Ans:
Interfacing LabVIEW with external devices involves using specialized hardware modules, such as data acquisition (DAQ) devices or programmable logic controllers (PLCs), connected to a computer running LabVIEW. LabVIEW provides intuitive graphical programming tools to configure communication protocols, such as RS232, Ethernet, or GPIB, enabling real-time data acquisition and control.
65. Define the Benefits of SubVIs and Project Libraries.
Ans:
SubVIs (Sub Virtual Instruments) and Project Libraries in LabVIEW offer several benefits. They promote modular programming by encapsulating functionality into reusable components (SubVIs), enhancing code organization and readability. Project Libraries provide a centralized repository for storing and managing these reusable components, facilitating collaboration and maintenance across LabVIEW projects. This approach streamlines development, improves efficiency, and ensures consistency in LabVIEW applications.
66. What is a formula node?
Ans:
- A formula node in LabVIEW is a programming element that allows users to define custom mathematical expressions or algorithms directly within a graphical block diagram.
- It enables complex calculations or transformations to be encapsulated within a single node, enhancing code modularity and clarity.
- Formula nodes support various mathematical operations, functions, and constants, providing flexibility in algorithm development.
67. How does Vertical Scaling Time work?
Ans:
Vertical Scaling Time involves upgrading a single server’s resources—like CPU or RAM—to handle increased workloads. It starts with assessing performance metrics, followed by resource upgrades with minimal downtime. While cost-effective and efficient, it has limits on how much a machine can be scaled and may require temporary downtime. Overall, it optimizes server performance to meet growing demands.
68. How are Transit power and power spectrum plotted using LabVIEW software?
Ans:
- Acquire Transit Power Data: Use DAQ (Data Acquisition) tools or instrument drivers to read the transit power signal from the device.
- Calculate Power Spectrum: Employ the “FFT Power Spectrum and PSD” VI to convert the time-domain transmit power signal to the frequency domain (power spectrum).
- Display Power and Spectrum: Use separate numeric indicators to display the average transmit power value and a graph to visualize the power spectrum.
- Configure Graph: Set the graph’s x-axis to represent frequency and the y-axis to represent power spectral density.
69. Define Best Practices for Maintainable LabVIEW Code.
Ans:
- Use clear and descriptive variables and VI names.
- Self-explanatory names make code more accessible for oneself and others to understand.
- Employ proper indentation and formatting for readability.
- Consistent formatting improves code structure and visual clarity.
- Include comments to explain complex sections of code.
70. How to Shift Registers for Data Flow Across Loops:
Ans:
- Shift registers store data across loop iterations, allowing data to flow between loops.
- Imagine a conveyor belt where data is shifted out in each loop iteration.
- Helpful in accumulating data, maintaining state over multiple loops, or passing data between subVIs.
71. How to validate the LabVIEW application?
Ans:
Can validate a LabVIEW application by performing several key steps. First, verify that the user interface functions correctly by interacting with each control and observing the expected responses. Second, conduct unit testing on individual VIs to ensure they perform as intended. Third, simulate various inputs and validate outputs against expected results to confirm accurate data processing. Fourth, perform integration testing to ensure all components work together seamlessly.
72. Discuss strategies for debugging errors in LabVIEW.
Ans:
Strategies for debugging errors in LabVIEW include using probes and indicators to monitor data flow, employing error handling techniques such as error clusters and error handling VIs, utilizing breakpoints to pause execution for inspection, leveraging debugging tools like highlight execution, and systematically narrowing down issues by isolating components or sections of the VI. These approaches help identify and resolve errors efficiently in LabVIEW programs.
73. Explain the concept of shift registers and their use in LabVIEW.
Ans:
- Shift registers store data across loop iterations, allowing data to flow between loops.
- Helpful in accumulating data, maintaining state over multiple loops, or passing data between subVIs.
- They enable you to access previous values during each iteration, making them ideal for tasks like implementing counters or delays.
- Shift registers enhance program efficiency by reducing the need for global variables, promoting better data management and modularity.
74. How do users approach building user interfaces (front panels) in LabVIEW?
Ans:
To build user interfaces in LabVIEW, typically start by selecting and arranging controls and indicators on the front panel. Then, customize their appearance and functionality using properties and methods. Organize elements logically, ensuring clarity and ease of use for the end user. Finally, link front panel elements to corresponding code blocks to establish interaction between user input and program logic.
75. Describe the experience with interfacing LabVIEW with external devices.
Ans:
Interfacing LabVIEW with external devices allows for effective data acquisition and control through hardware connections like USB, serial, or Ethernet. The graphical programming environment simplifies creating block diagrams for device communication and control logic. LabVIEW enables real-time data monitoring and visualization while providing tools for sending commands to automate processes. Its debugging features further ensure smooth integration and troubleshooting.
76. Explain the benefits of using subVIs and project libraries in LabVIEW.
Ans:
- Promote code reusability, modularity, and easier maintenance.
- Organise custom VIs and functions for access across projects, improving efficiency.
- Type Definitions ensure consistent data types and structures across VIs, reducing errors and enhancing clarity.
- Using Virtual Folders, can streamline project organization, making it easier to navigate and manage related files.
77. Discuss strategies for optimizing the performance of LabVIEW code.
Ans:
Optimizing LabVIEW code involves several strategies: minimize data copies by using references and in-place operations, streamline data flow to reduce unnecessary calculations, employ parallelism with parallel loops and multithreading for efficient resource, utilize FPGA hardware for high-speed processing tasks, and profile code using performance tools to identify and address bottlenecks. These approaches enhance LabVIEW code efficiency and ensure optimal performance in data acquisition.
78. What are some best practices for writing maintainable LabVIEW code?
Ans:
Some best practices for writing maintainable LabVIEW code include using consistent naming conventions for controls, indicators, organizing code into subVIs for modularization, documenting VI functionality with comments and documentation strings, using error handling techniques such as error clusters or custom error codes, and regularly refactoring and simplifying complex diagrams to enhance readability and maintainability.
79. What evidence supports the claim that LabVIEW is a high-quality software product?
Ans:
- Industry Adoption: Widely used by engineers and scientists in various sectors, indicating reliability and capability.
- National Instruments Backing: Developed and supported by National Instruments, a reputable company in testing and measurement.
- Extensive Features: Offers a comprehensive feature set for various tasks, fostering efficient development.
- Verified Track Record: A lengthy history of accomplishments use in real-world applications demonstrates its effectiveness.
80. How to perform Static Code Analysis On Labview Vis?
Ans:
- Static code analysis can be performed in LabVIEW in accordance with the NI Style Guide.
- Provides automated code review and static analysis for various aspects of VI quality and readability.
- Manual code review practices identify potential issues and promote best practices.
81. What Is The Difference Between Local Variable And Global Variable In Labview?
Ans:
In LabVIEW, a local variable refers to a variable that is accessible and modifiable only within the scope of a specific VI. It allows data to be passed between different parts of the VI or within a loop without affecting other VIs or the global environment. On the other hand, a global variable in LabVIEW is accessible from any VI within the same project, enabling data sharing across multiple VIs. Global variables should be used cautiously to avoid unintended side effects and ensure data integrity across the application.
82. Describe user experience with version control for LabVIEW projects.
Ans:
- Git is used for version control in various LabVIEW projects. Familiar with branching and merging strategies for managing different development lines.
- Understand the importance of integrating version control with LabVIEW’s built-in revision history for a complete picture.
- This integration ensures that all changes are documented and easily retrievable, enhancing collaboration and minimizing the risk of data loss during project development.
83. Is It Possible to Incorporate Labview Into Current Software Engineering Practices?
Ans:
An increasing number of large, mission-critical Labview applications have been developed in Labview in accordance with software development standards set by regulatory agencies such as the DOD and FDA. The same practices that are applied to text-based development can be used in graphical code with the proper understanding of tools and practices.
84. How to Monitor My Labview Application’s History of Revisions?
Ans:
Iterative development for LabVIEW VIs can be automatically tracked through integration with source code control. Utilize the integrated VI History window to observe user-entered comments and synchronize to any version kept in source code control. when it was edited. This feature enhances collaboration among team members by providing a clear record of changes, making it easier to revert to previous versions if needed.
85. What Are The Features Of Labview?
Ans:
- Visual Programming: Builds programs with icons (VIs) and wires; no text coding is required.
- Hardware Control: Connects to instruments and devices for data acquisition and control.
- Analysis & Display: Offers tools for data analysis, signal processing, and visualization creation.
- Modular Design: Encourages code reuse with subVIs for efficient development.
- Pro Development Tools: These include debugging, version control, and project management features.
86. Define Debugging Techniques in LabVIEW:
Ans:
Utilise debugging tools like probes and breakpoints to examine data values and code execution. Probes display variable values at specific points in the block diagram. Breakpoints pause execution, allowing to inspect variables and step through code line by line. Employ error-handling VIs (“Try” and “Catch”) to trap and handle errors gracefully. These VIs prevent program crashes and provide informative error messages for troubleshooting.
87. What Are The Advantages Of Labview?
Ans:
- Graphical user interface.
- Drag And Drop built-in functions.
- Modular design and hierarchical design.
- Multiple high-level development tools.
- Professional Development Tools.
- Multi platforms.
- Reduces cost and preserves investment.
88. What are the different parts of automation?
Ans:
- Input Devices: These include sensors and data acquisition systems that gather information from the environment or process.
- Processing Units: Automation systems use controllers or programmable logic controllers (PLCs) to interpret input data, make decisions, and execute commands.
- Output Devices: These devices, such as actuators and motors, carry out the actions instructed by the automation system based on processed data.
- Communication Interfaces: Facilitate data exchange between different parts of the system, enabling real-time monitoring, control, and feedback.
89. How to implement PLC automation in different industries?
Ans:
PLC automation is implemented across various industries by first analyzing specific operational requirements. PLC hardware and software are selected to match the application needs, followed by programming the logic to control machinery or processes. Installation involves integrating PLCs with existing systems and devices. Rigorous testing and commissioning validate the automation system’s reliability and efficiency in enhancing industrial operations.
90. What are the programmable languages used in PLC?
Ans:
- Instruction List Programming
- Structured Text Programming
- Functional Block Programming
- Ladder Logic Programming
- Sequential Function Chart