
Last updated on 07th Jun 2020| 3751
Efficient Ways to Handle Windows and Web-based Alerts/Popups in Selenium WebDriver:
In the previous tutorial, we focused our discussion on different types of waits provided by the WebDriver. We also discussed various types of navigation options available in WebDriver.
Moving ahead in the Selenium WebDriver Tutorials, we will discuss different types of alerts available while testing web applications and their handling strategies.
What is an Alert?
Alerts are nothing but small message boxes that are displayed on the screen to give some information or ask permission to perform some operation. Sometimes its also use for warning purposes.
Types of Alerts in Selenium
Mainly we are dealing with two types of alerts that are:
- Windows-based alert pop-ups
- Web-based alert pop-ups
As we know that by using the Selenium WebDriver its is not possible to test window bases applications, that’s why we are using some third-party tools to handle the window-based pop-ups.
There are mainly 3 types of alerts are there that are:
- Simple alert
- Prompt alert
- Confirmation alert
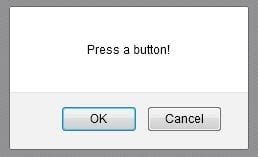
Simple alert: The simple alert has only an Ok button. These types of the alert are mainly used to display some information to the user.
Prompt alert: In this type of alert, you will get a text box with an Ok and cancel button. These types of the alert are mainly used when you need some more information at the time of running your automation script. To enter the information in the alert box, you can you the sendKeys() method.
Confirmation alert: This type of os alerts are coming with an option to accept or dismiss. To accept the alert, you can use the alert.accept(), and to dismiss, you can use the method alert.dismiss().
I hope you have an overall idea about the different types of alerts. Now you can easily understand how you can handle different types of alert easily.
How to handle Alerts in Selenium WebDriver?
Handling alerts is one of the tricky tasks, but Selenium WebDriver provides some of the predefined methods, which makes the handling process so easy.
When we are executing our automation script, we are creating an object of browser class, and that driver object has control over all the browser operations even on alert too. For handling the alert, you can use the alert interface methods to perform required operations.
Alert Methods:
- Void dismiss(): When you call this method it will click on the cancel button.
- driver.switchTo().alert().dismiss();
- Void accept(): When you call this method it will click on the Ok button.
- driver.switchTo().alert().accept();
- String getText(): By using this method you can get the alert message.
- driver.switchTo().alert().getText();
- Void sendKeys(String stringToSend): This method will help you to send data to the alert box.
- driver.switchTo().alert().sendKeys(“Text”);
There are two types of alerts that we would be focusing on majorly:
- Windows-based alert pop-ups
- Web-based alert pop-ups
As we know that handling windows based pop-ups is beyond WebDriver’s capabilities, thus we would exercise some third-party utilities to handle window pop-ups.
Handling pop up is one of the most challenging pieces of work to automate while testing web applications. Owing to the diversity in types of pop ups complexes the situation even more.
What is Alert box/ Pop up box/ confirmation Box/ Prompt/ Authentication Box?
It is nothing but a small box that appears on the display screen to give you some kind of information or to warn you about a potentially damaging operation or it may even ask you for the permissions for the operation.
Example: Let us consider a real-life example for a better understanding; Let us assume that we uploaded a photograph on any of these popular social networking sites. Later on, I wish to delete the uploaded photograph. So in order to delete, I clicked on the delete button. As soon as I click on the delete button, the system warns me against my action, prompting – Do you really want to delete the file? So now we have an option to either accept this alert or reject it.
So ahead of the session, let’s see how we reject or accept the alerts depending on their types. Starting with the web-based pop ups.
What You Will Learn:
Web-Based Popups:
- Let us see how we handle them using WebDriver.
- Handling web-based pop-up box
- WebDriver offers the users a very efficient way to handle these pop ups using the Alert interface.
There are the four methods that we would be using along with the Alert interface.
- void dismiss() – The dismiss() method clicks on the “Cancel” button as soon as the pop up window appears.
- void accept() – The accept() method clicks on the “Ok” button as soon as the pop up window appears.
- String getText() – The getText() method returns the text displayed on the alert box.
- void sendKeys(String stringToSend) – The sendKeys() method enters the specified string pattern into the alert box.
Let us move ahead and look at the actual implementation.
Explanation of Application under Test:
We have designed a web page in a way to include a few fundamental types of web elements. This is the same application we introduced while discussing Select class earlier in this series.
- Hyperlink: The two hyperlinks namely “Google” and “abodeQA” have been provided that redirects the user to “http://www.google.com/” and “http://www.abodeqa.com/” respectively on the click event.
- Dropdown: The three hyperlinks have been created for selecting colours, fruits and animals with a value set to default.
- Button: A “try it” button has been created to show up the pop up box having OK and Cancel buttons on click event.
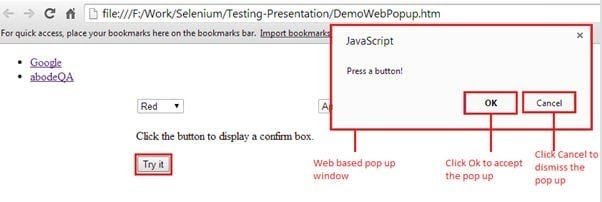
Scenario to be automated
- Launch the web browser and open the webpage
- Click on the “Try it” button
- Accept the alert
- Click on the “Try it” button again
- Reject the alert
Code Walk-through:
Import Statements:
Import org.openqa.selenium.Alert – Import this package prior to the script creation The package references to the Alert class which is required to handle the web-based alerts in WebDriver.

Best Selenium WebDriver Certification Course to Boost UP Your Skills
Weekday / Weekend BatchesSee Batch DetailsObject Creation for Alert class
- Alert alert = driver.switchTo().alert();
We create a reference variable for Alert class and reference it to the alert.
Switch to Alert
- Driver.switchTo().alert();
The above command is used to switch the control to the recently generated pop up window.
Accept the Alert
- alert.accept();
The above command accepts the alert thereby clicking on the Ok button.
Reject the Alert
- alert.dismiss();
The above command closes the alert thereby clicking on the Cancel button and hence the operation should not proceed.
Window Based Pop-Ups
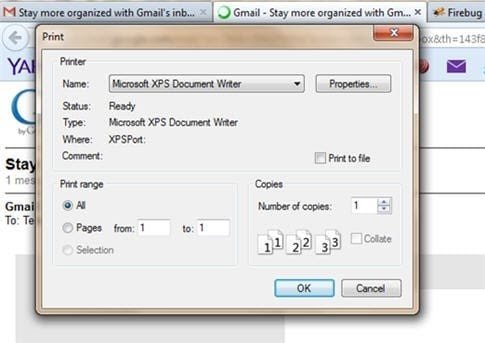
At times while automating, we get some scenarios, where we need to handle pop ups generated by windows like a print pop up or a browsing window while uploading a file.
Handling these pop-ups have always been a little tricky as we know Selenium is an automation testing tool which supports only web application testing, that means, it doesn’t support windows based applications and window alert is one of them. However Selenium alone can’t help the situation but along with some third-party intervention, this problem can be overcome.
There are several third-party tools available for handling window based pop-ups along with the selenium.
- So now let’s handle a window based pop up using Robot class.
- Robot class is a java based utility which emulates the keyboard and mouse actions.
- Before moving ahead, let us take a moment to have a look at the application under test (AUT).
Explanation of Application under Test
As an application under test, we would be using “gmail.com”. I believe the application doesn’t require any more introductions.
Scenario to be automated
- Launch the web browser and open the application – “gmail.com”
- Enter valid username and password
- Click on the sign in button
- Click on the compose button
- Click on the attach icon
- Select the files to be uploaded with the window based pop up.
Handling of Pop-up window in the Selenium WebDriver:
Like Alert handling, Pop-up handling in Selenium is also a tricky task when testing the application. WindowHandle() function is used for handling the pop-up windows. To control the mouse and keyboard functions, the robot class is used. Robot class will be used for closing pop-ups. The integration of Alert and popup in a single Program and executing the program code with Eclipse IDE.
- import org.openqa.selenium.Alert;import org.openqa.selenium.By;
- import org.openqa.selenium.WebDriver;
- import org.openqa.selenium.chrome.ChromeDriver;
- //import org.openqa.selenium.firefox.FirefoxDriver;
- public class AlertHandlingDemo {
- public static void main(String[] args) throws InterruptedException {
- System.setProperty(“webdriver.chrome.driver”, “C:\chromedriver.exe”);
- WebDriver driver =new ChromeDriver();
- driver.get(“http://demo.com/test/customer.php”);
- Thread.sleep(5000);
- driver.findElement(By.name(“username”)).sendKeys(“Besant”);
- driver.findElement(By.name(“submit”)).submit();
- // Switching to Alert
- Alert alert = driver.switchTo().alert();
- // Capturing alert message.
- String alertMessage= driver.switchTo().alert().getText();
- // Displaying alert message
- System.out.println(alertMessage);
- Thread.sleep(5000);
- // Accepting alert
- alert.accept();
- }
- }