Last updated on 08th Jul 2020| 4842
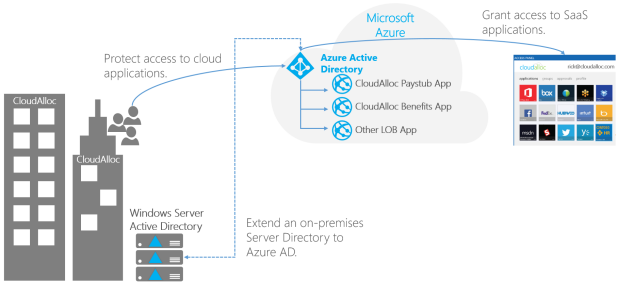
As the name implies AAD is an Active Directory that runs in Azure. This means that you have users and groups in the directory, (and to a limited extent computers), and you can authenticate users against it to provide authentication and authorization for both web-based and native apps. It is managed through an administrative portal rather than the good old “Active Directory Users and Computers” MMC console we’re used to. Other than different tooling it has the same purpose as an on-prem version when it comes to handling users. You need a centralized store for objects and accounts, and AAD is one such store.
Prerequisites
- An active Azure subscription.
- If you don’t have an Azure subscription, create an account.
- An Azure Active Directory tenant associated with your subscription, either synchronized with an on-premises directory or a cloud-only directory.
- If needed, create an Azure Active Directory tenant or associate an Azure subscription with your account.
- You need global administrator privileges in your Azure AD tenant to enable Azure AD DS.
- You need Contributor privileges in your Azure subscription to create the required Azure AD DS resources.
Although not required for Azure AD DS, it’s recommended to configure self-service password reset (SSPR) for the Azure AD tenant. Users can change their password without SSPR, but SSPR helps if they forget their password and need to reset it.
Sign in to the Azure portal
- Create a managed domain
- To launch the Enable Azure AD Domain Services wizard, complete the following steps:
- On the Azure portal menu or from the Home page, select Create a resource.
- Enter Domain Services into the search bar, then choose Azure AD Domain Services from the search suggestions.
- On the Azure AD Domain Services page, select Create. The Enable Azure AD Domain Services wizard is launched.
- Select the Azure Subscription in which you would like to create the managed domain.
- Select the Resource group to which the managed domain should belong. Choose to Create new or select an existing resource group.
When you create a managed domain, you specify a DNS name. There are some considerations when you choose this DNS name:
- Built-in domain name: By default, the built-in domain name of the directory is used (a .onmicrosoft.com suffix). If you wish to enable secure LDAP access to the managed domain over the internet, you can’t create a digital certificate to secure the connection with this default domain. Microsoft owns the .onmicrosoft.com domain, so a Certificate Authority (CA) won’t issue a certificate.
- Custom domain names: The most common approach is to specify a custom domain name, typically one that you already own and is routable. When you use a routable, custom domain, traffic can correctly flow as needed to support your applications.
- Non-routable domain suffixes: We generally recommend that you avoid a non-routable domain name suffix, such as contoso.local. The .local suffix isn’t routable and can cause issues with DNS resolution.
The following DNS name restrictions also apply:
- Domain prefix restrictions: You can’t create a managed domain with a prefix longer than 15 characters. The prefix of your specified domain name (such as aaddscontoso in the aaddscontoso.com domain name) must contain 15 or fewer characters.
- Network name conflicts: The DNS domain name for your managed domain shouldn’t already exist in the virtual network. Specifically, check for the following scenarios that would lead to a name conflict:
- If you already have an Active Directory domain with the same DNS domain name on the Azure virtual network.
- If the virtual network where you plan to enable the managed domain has a VPN connection with your on-premises network. In this scenario, ensure you don’t have a domain with the same DNS domain name on your on-premises network.
- If you have an existing Azure cloud service with that name on the Azure virtual network.
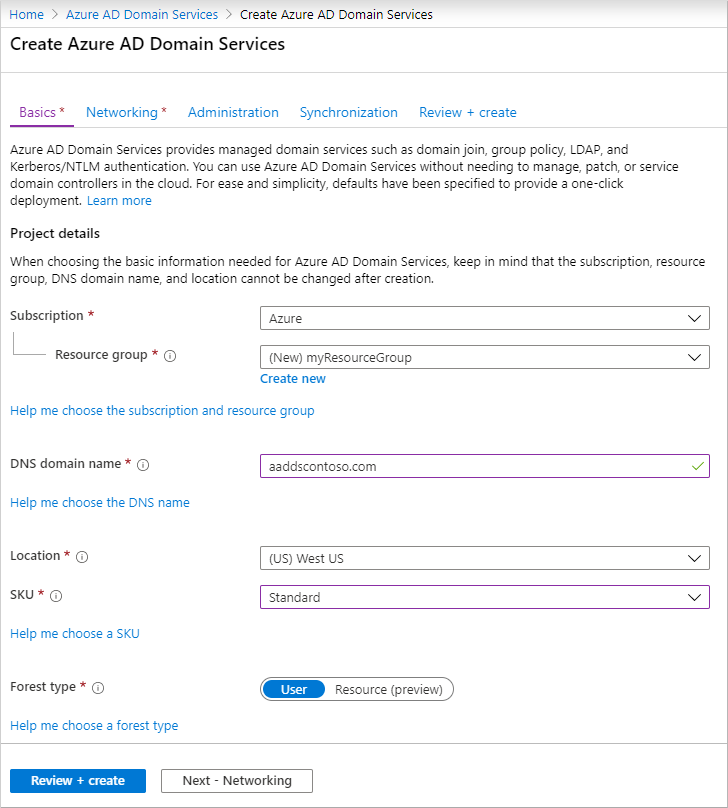
Complete the fields in the Basics window of the Azure portal to create a managed domain:
- Enter a DNS domain name for your managed domain, taking into consideration the previous points.
- Choose the Azure Location in which the managed domain should be created. If you choose a region that supports Azure Availability Zones, the Azure AD DS resources are distributed across zones for additional redundancy.
- The SKU determines the performance, backup frequency, and maximum number of forest trusts you can create. You can change the SKU after the managed domain has been created if your business demands or requirements change. For more information, see Azure AD DS SKU concepts.
For this tutorial, select the Standard SKU. - A forest is a logical construct used by Active Directory Domain Services to group one or more domains. By default, a managed domain is created as a User forest. This type of forest synchronizes all objects from Azure AD, including any user accounts created in an on-premises AD DS environment.
A Resource forest only synchronizes users and groups created directly in Azure AD. Resource forests are currently in preview. For more information on Resource forests, including why you may use one and how to create forest trusts with on-premises AD DS domains, see Azure AD DS resource forests overview.
To quickly create a managed domain, you can select Review + create to accept additional default configuration options. The following defaults are configured when you choose this create option:
- Creates a virtual network named aadds-vnet that uses the IP address range of 10.0.2.0/24.
- Creates a subnet named aadds-subnet using the IP address range of 10.0.2.0/24.
- Synchronizes All users from Azure AD into the managed domain.
Select Review + create to accept these default configuration options.
- Deploy the managed domain
- On the Summary page of the wizard, review the configuration settings for your managed domain. You can go back to any step of the wizard to make changes. To redeploy a managed domain to a different Azure AD tenant in a consistent way using these configuration options, you can also Download a template for automation.
- To create the managed domain, select Create. A note is displayed that certain configuration options such as DNS name or virtual network can’t be changed once the Azure AD DS managed has been created. To continue, select OK.
- The process of provisioning your managed domain can take up to an hour. A notification is displayed in the portal that shows the progress of your Azure AD DS deployment. Select the notification to see detailed progress for the deployment.
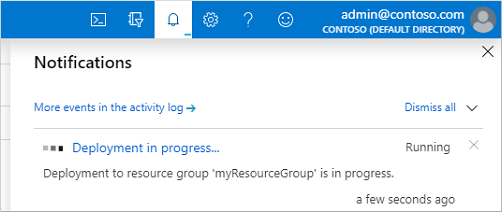
- The page will load with updates on the deployment process, including the creation of new resources in your directory.
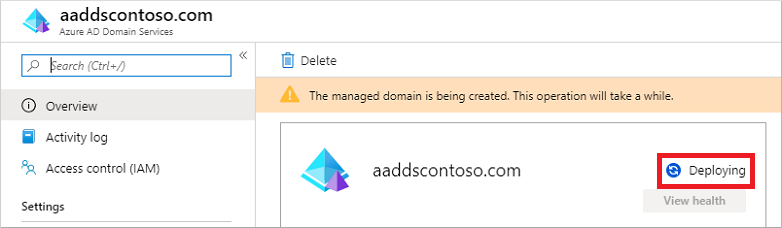
- Select your resource group, such as myResourceGroup, then choose your managed domain from the list of Azure resources, such as aaddscontoso.com. The Overview tab shows that the managed domain is currently Deploying. You can’t configure the managed domain until it’s fully provisioned.
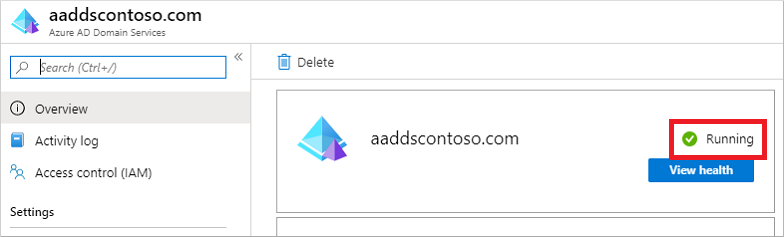
When the managed domain is fully provisioned, the Overview tab shows the domain status as Running.
- Update DNS settings for the Azure virtual network
- With Azure AD DS successfully deployed, now configure the virtual network to allow other connected VMs and applications to use the managed domain. To provide this connectivity, update the DNS server settings for your virtual network to point to the two IP addresses where the managed domain is deployed.

Enroll in Instructor-led Azure Active Directory Training Course to UPGRADE Your Skills
Weekday / Weekend BatchesSee Batch Details- The Overview tab for your managed domain shows some Required configuration steps. The first configuration step is to update DNS server settings for your virtual network. Once the DNS settings are correctly configured, this step is no longer shown.
The addresses listed are the domain controllers for use in the virtual network. In this example, those addresses are 10.0.2.4 and 10.0.2.5. You can later find these IP addresses on the Properties tab.
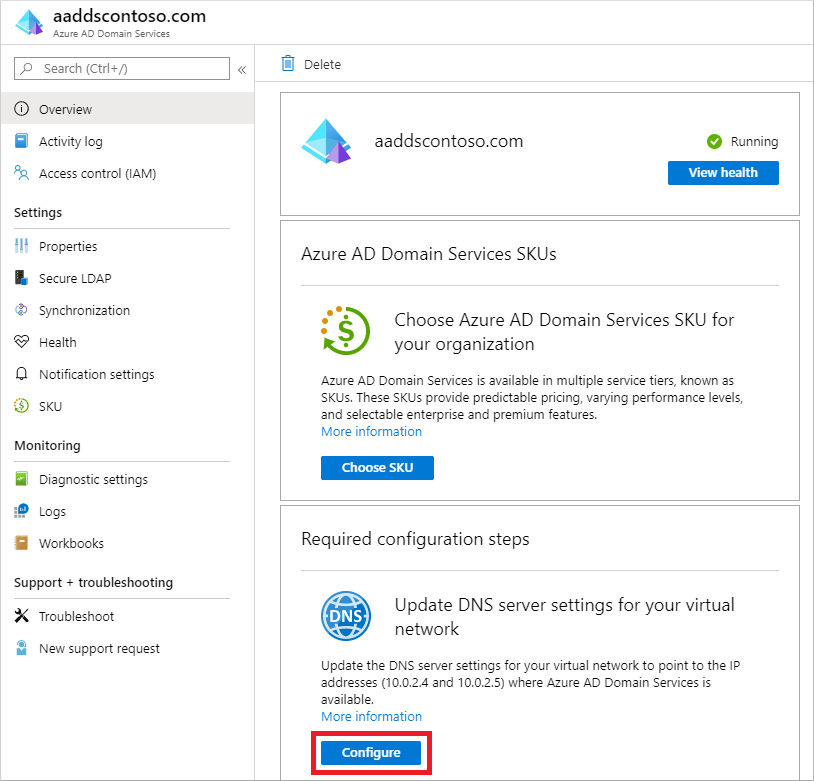
To update the DNS server settings for the virtual network, select the Configure button. The DNS settings are automatically configured for your virtual network.
- Enable user accounts for Azure AD DS
- To authenticate users on the managed domain, Azure AD DS needs password hashes in a format that’s suitable for NT LAN Manager (NTLM) and Kerberos authentication. Azure AD doesn’t generate or store password hashes in the format that’s required for NTLM or Kerberos authentication until you enable Azure AD DS for your tenant. For security reasons, Azure AD also doesn’t store any password credentials in clear-text form. Therefore, Azure AD can’t automatically generate these NTLM or Kerberos password hashes based on users’ existing credentials.
- The steps to generate and store these password hashes are different for cloud-only user accounts created in Azure AD versus user accounts that are synchronized from your on-premises directory using Azure AD Connect.
- A cloud-only user account is an account that was created in your Azure AD directory using either the Azure portal or Azure AD PowerShell cmdlets. These user accounts aren’t synchronized from an on-premises directory.
- For cloud-only user accounts, users must change their passwords before they can use Azure AD DS. This password change process causes the password hashes for Kerberos and NTLM authentication to be generated and stored in Azure AD. The account isn’t synchronized from Azure AD to Azure AD DS until the password is changed. Either expire the passwords for all cloud users in the tenant who need to use Azure AD DS, which forces a password change on next sign-in, or instruct cloud users to manually change their passwords. For this tutorial, let’s manually change a user password.
- Before a user can reset their password, the Azure AD tenant must be configured for self-service password reset.
- To change the password for a cloud-only user, the user must complete the following steps:
- Go to the Azure AD Access Panel page at https://myapps.microsoft.com.
- In the top-right corner, select your name, then choose Profile from the drop-down menu.
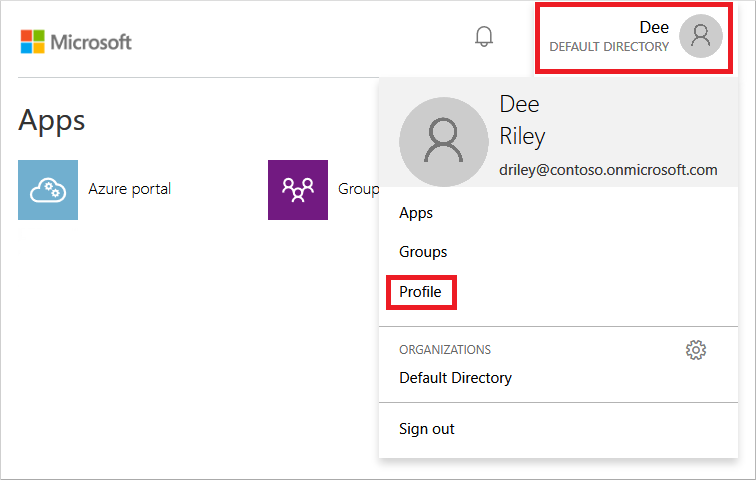
- On the Profile page, select Change password.
- On the Change password page, enter your existing (old) password, then enter and confirm a new password.
- Select Submit.
- It takes a few minutes after you’ve changed your password for the new password to be usable in Azure AD DS and to successfully sign in to computers joined to the managed domain.
Uses Azure AD
Azure AD is intended for:
- IT admins. As an IT admin, you can use Azure AD to control access to your apps and your app resources, based on your business requirements. For example, you can use Azure AD to require multi-factor authentication when accessing important organizational resources. Additionally, you can use Azure AD to automate user provisioning between your existing Windows Server AD and your cloud apps, including Office 365. Finally, Azure AD gives you powerful tools to automatically help protect user identities and credentials and to meet your access governance requirements. To get started, sign up for a free 30-day Azure Active Directory Premium trial.
- App developers. As an app developer, you can use Azure AD as a standards-based approach for adding single sign-on (SSO) to your app, allowing it to work with a user’s pre-existing credentials. Azure AD also provides APIs that can help you build personalized app experiences using existing organizational data. To get started, sign up for a free 30-day Azure Active Directory Premium trial. For more information, you can also see Azure Active Directory for developers.
- Microsoft 365, Office 365, Azure, or Dynamics CRM Online subscribers. As a subscriber, you’re already using Azure AD. Each Microsoft 365, Office 365, Azure, and Dynamics CRM Online tenant is automatically an Azure AD tenant. You can immediately start to manage access to your integrated cloud apps.
Adding Users and Groups to Azure AD
- Users and Groups can be added to a directory in a variety of ways. In no particular order here are some common methods:
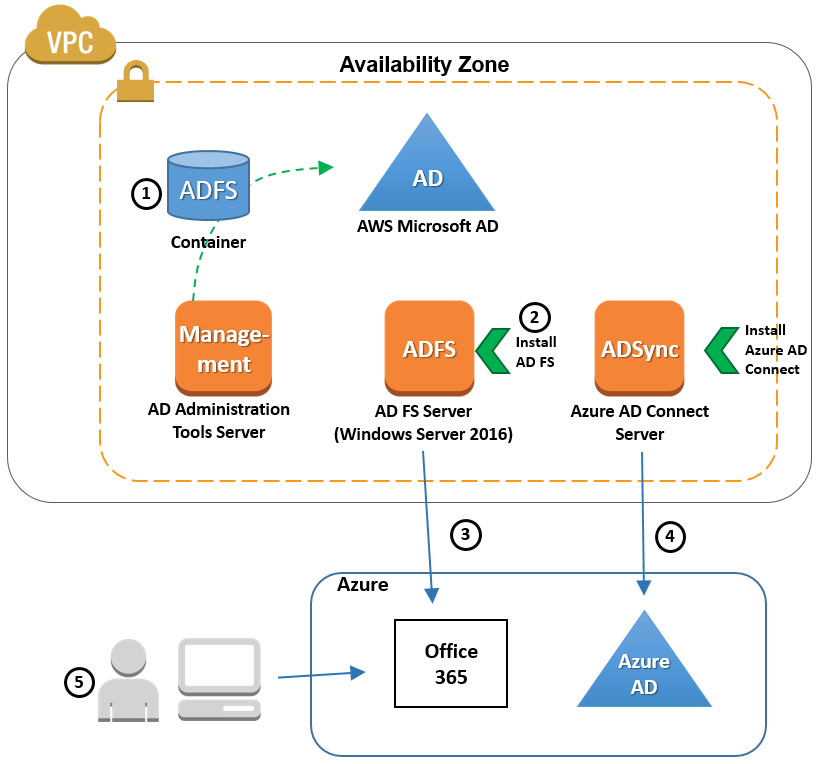
- By syncing from an on-premises Windows Server Active Directory using AAD Sync. This is how most enterprise customers will get their users added to the directory and requires some additional server configuration on-premises to setup.
- Manually using the Azure Management Portal. The portal experience is very easy and intuitive. Organizations that don’t have an on-premises directory may use this approach for its simplicity, provided the number of users is relatively small. This is also very useful during development and test phases of application development.
- Scripted using PowerShell and the Azure Active Directory cmdlets. PowerShell makes automating this task very useful, particularly for large user bases. This too can be very useful during development and testing.
- Programmatically using the Azure AD Graph API. This is an extremely powerful option that essentially gives you full control of how users are added to the directory. We will see examples of this later in the series.
Protocols Supported by Azure AD
As a developer building applications protected by Azure AD you will find that Azure AD provides support for all the common protocols that can be used to secure your applications. Some of these protocols have been around for a really long time and as a result are widely used in the industry today. Others are still emerging as a new (and preferred) way to protect access to cloud applications. The protocols supported are shown here:
- WS-Federation – This is arguably one of the most well-known and used protocol today for authenticating users of web applications. Microsoft uses this when authenticating users for some of their own cloud applications, such as the Microsoft Azure Management portal, Office 365, Dynamics CRM Online, and more. There is fantastic tooling support in Visual Studio 2010, 2012, and 2013 for this protocol making it very easy for developers to protect their applications using Azure AD. The token format used in this protocol is SAML.
- SAML-P – This is also a widely adopted protocol and follows a very similar authentication pattern to WS-Federation. However, it does not get the same level of tooling support that WS-Federation gets. The token format used in this protocol is also SAML.
- OAuth 2.0 – This is an authorization protocol that has been quickly and widely adopted in the industry as a way to sign-in users using their credentials at popular web applications such as Facebook, Twitter, and other “social” applications. Some of the benefits of this protocol is its smaller token format, JSON Web Token (JWT), and application scenarios it simplifies such as accessing Web API’s from a native client with an access token. To do the latter with WS-Federation or SAML-P involves a lot of intricate code and configuration.
- OpenID Connect – This is a protocol that adds an authentication layer on top of the existing OAuth 2.0 protocol. Because it is layered on OAuth 2.0, it benefits from the highly efficient JWT token format that OAuth 2.0 uses.
Installing the Windows Azure AD Module for Windows PowerShell
- The Windows Azure Active Directory Module for Windows PowerShell cmdlets can be used to accomplish many Windows Azure AD tenant-based administrative tasks such as user management, domain management and for configuring single sign-on (see Manage Azure AD using Windows PowerShell).
- The Coveo Office 365 security provider needed by the SharePoint connector when indexing SharePoint Online content uses the Get-MsolGroupMember cmdlet to list users and groups that are members of a specific Office 365 security group (see Get-MsolGroupMember). In this case, you must install the Windows Azure Active Directory Module on your Coveo Master server.
To install the Windows Azure AD Module for Windows PowerShell
- Using an administrator account, connect to the Coveo Master server.
- Referring to the Microsoft documentation:
- Ensure that your Coveo Master server meets the following Windows Azure AD Module for Windows PowerShell requirements:
- Windows 7, Windows 8, Windows Server 2008 R2, or Windows Server 2012.
- Microsoft .NET Framework 3.51 feature.
- Download and install the appropriate Microsoft Online Services Sign-In Assistant version for your operating system (see Microsoft Online Services Sign-In Assistant for IT Professionals RTW).
- Install the Windows Azure Active Directory Module for Windows PowerShell (see Install the Windows Azure AD Module).
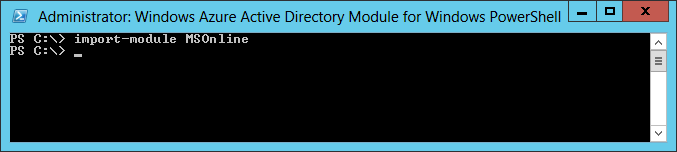
- Connect to Windows Azure AD by running the PowerShell command import-module MSOnline (see Connect to Windows Azure AD).

Get Azure Active Directory Training with Industry Oriented Topics From Real-Time Experts
- Instructor-led Sessions
- Real-life Case Studies
- Assignments
Azure Active Directory Premium Features
Azure Active Directory Premium edition is a paid offering of Azure AD and includes the following features:
Company branding
- To make the end user experience even better, you can add your company logo and color schemes to your organization’s Sign In and Access Panel pages. Once you’ve added your logo, you also have the option to add localized versions of the logo for different languages and locales.
Group-based application access
- Use groups to provision users and assign user access in bulk to over 1200 SaaS applications. These groups can either be created solely in the cloud or you can leverage existing groups that have been synced in from your on-premises Active Directory.
Self-service password reset
- Azure has always provided self-service password reset for directory administrators. With Azure Active Directory Premium, you can now further reduce help desk calls whenever your users forget their password by giving all users in your directory the capability to reset their password using the same sign in experience they have for Office 365.
Self-service group management
- Azure Active Directory Premium simplifies day-to-day administration of groups by enabling users to create groups, request access to other groups, delegate group ownership so others can approve requests and maintain their group’s memberships.
Advanced security reports and alerts
- Monitor and protect access to your cloud applications by viewing detailed logs showing more advanced anomalies and inconsistent access pattern reports. Advanced reports are machine learning-based and can help you gain new insights to improve access security and respond to potential threats.
Multi-Factor Authentication
- Multi-Factor Authentication is now included with Premium and can help you to secure access to Azure, Microsoft Online Services like Office 365 and Dynamics CRM Online, and over 1200 Non-MS Cloud services preintegrated with Azure AD. Simply enable Multi-Factor Authentication for Azure AD identities, and users will be prompted to set up additional verification the next time they sign in.
Forefront Identity Manager (FIM)
- Premium comes with the option to grant rights to use a FIM server (and CALs) in your on-premises network to support any combination of Hybrid Identity solutions. This is a great option if you have a variation of on-premises directories and databases that you want to sync directly to Azure AD. There is no limit on the number of FIM servers you can use, however, FIM CALs are granted based on the allocation of an Azure AD premium user license.
Benefits of Azure Active Directory
- High Availability. Azure AD is highly available by architecture design spread across 28 data centers in different geographies.
- Simplified Access. Through Azure AD access to applications across cloud and on-premises can be simplified.
- Self Service Features.
- Secure Access.
- Collaboration.
- Reporting.
Conclusion
The world of cloud computing is expanding with every passing day; many companies across the globe are shifting to the cloud by leveraging the services that cloud platforms offer. Microsoft Azure is the second-largest cloud service provider, and gaining expertise in it will surely take you ahead in the field of cloud computing. After learning about the Azure active directory, you can learn more about the basics of Azure by opting Simplilearn’s Microsoft Azure Fundamentals Training. The course can help you create Azure web apps, create and configure VMs in Microsoft Azure, and much more.