
Last updated on 09th May 2025| 8982
- Introduction to React Native
- Setting Up React Native Environment
- Understanding React Native Components
- Building the User Interface
- Working with Navigation
- Handling User Input and State Management
- Working with APIs and Networking
- Testing and Debugging in React Native
- Building and Publishing Your App
- Conclusion
Introduction to React Native
React Native is a robust framework developed by Facebook that allows developers to build mobile applications using JavaScript and React. It enables developers to create mobile apps for iOS and Android platforms from a single codebase, making the development process faster and more efficient. React Native bridges the gap between web and mobile app development, offering a seamless experience for developers familiar with React. One of React Native’s main advantages is its ability to use native components. This means that apps built with React Native are not just web views; they have native performance and look and feel like any other native app. This makes it an excellent choice for developers who want to build high-performance mobile applications while saving time and resources.
Excited to Achieve Your Business Analyst Certification? View The Business Analyst Online course Offered By ACTE Right Now!
Setting Up React Native Environment
Before you start building with React Native, setting up the development environment is essential. The setup process can vary depending on whether you use macOS, Windows, or Linux. Here’s a basic overview of the steps involved:
- Install Node.js: React Native requires Node.js, a JavaScript runtime, to execute JavaScript outside the browser. You can download Node.js from the official website and install it on your computer.
- Install npm (Node Package Manager): npm is automatically installed when you install Node.js. It manages the dependencies for your React Native project.
Install the React Native CLI: React Native provides a Command Line Interface (CLI) that simplifies creating, running, and managing React Native projects, making it an essential tool for Web Developer Training. You can install it globally on your machine using npm:
- npm install -g react-native-cli
- Install Android Studio (for Android development): You’ll need to install Android Studio to build and run your app on Android devices. This will also install Android SDK and AVD (Android Virtual Device), which is necessary for running your app on an emulator.
- Install Xcode (for iOS development): If you’re developing for iOS, you’ll need to install Xcode on a Mac. Xcode includes all the necessary tools, including the iOS Simulator, which allows you to test your app on different iPhone models.
Understanding React Native Components
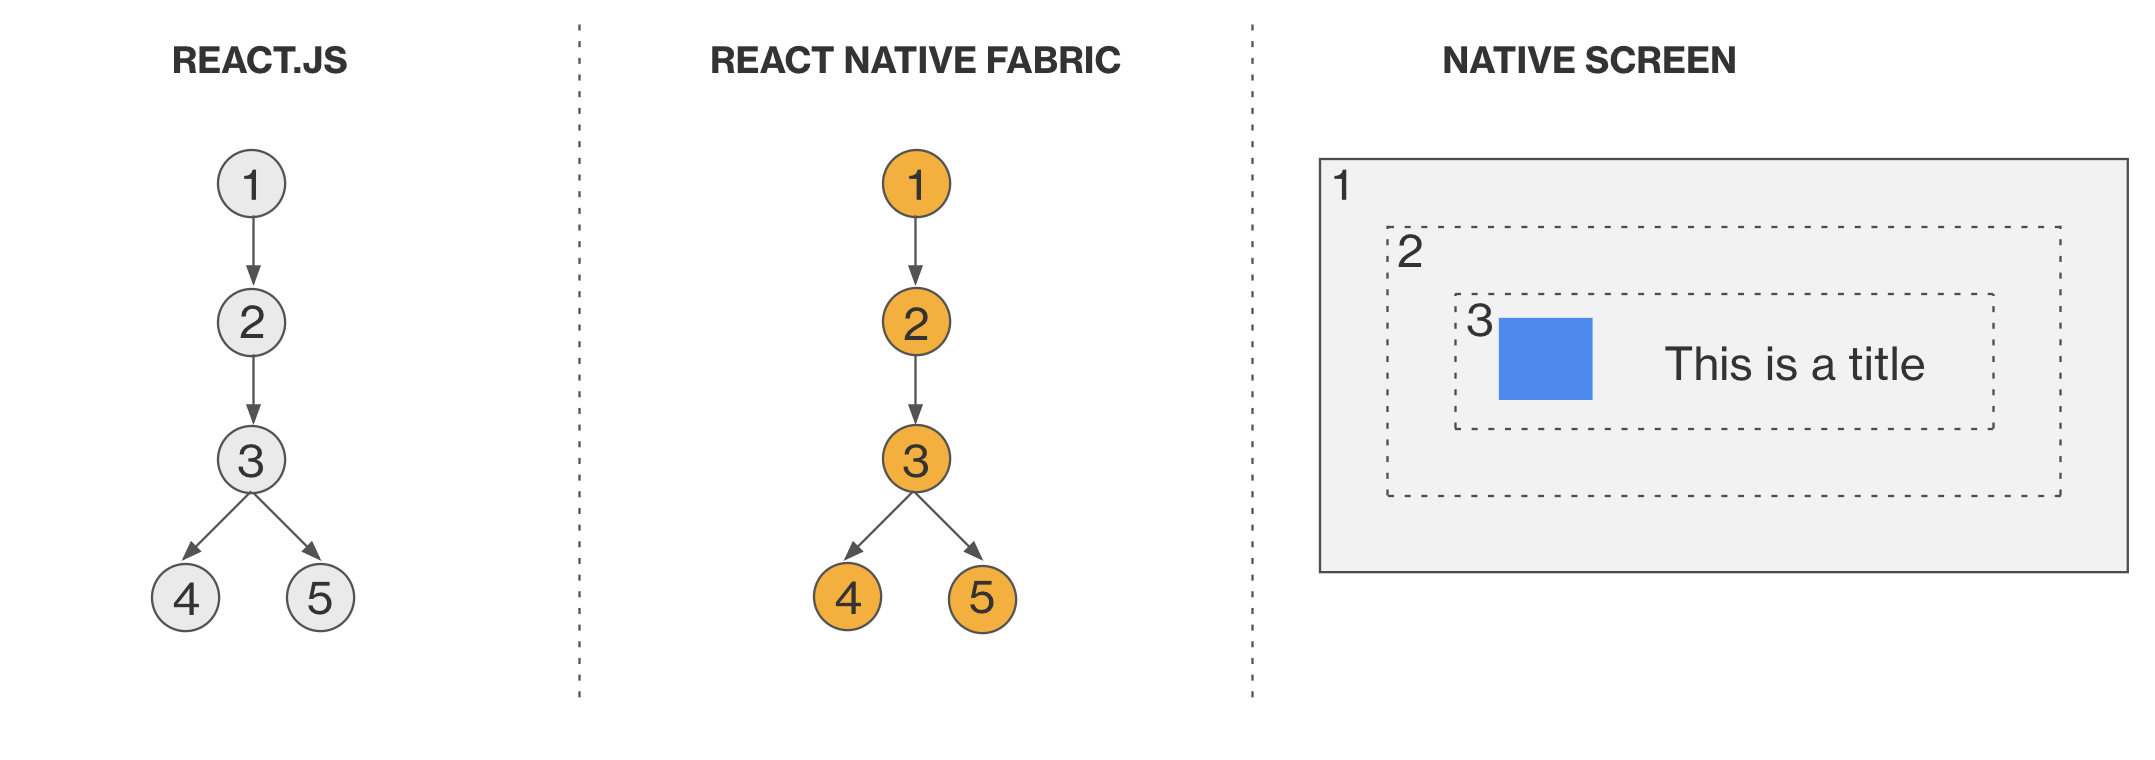
At the heart of any React Native application are components. Components are the building blocks of your app’s user interface (UI). There are two types of components in React Native:
- Functional Components: These are the simplest form of components. They are just JavaScript functions that return JSX, which describes the UI elements. Functional components are usually stateless and rely on props (short for properties) to receive data from their parent components.
- Class Components: These are more traditional components in React. Class components have access to lifecycle methods and internal state. However, with the introduction of Hooks in React 16.8, functional components can now manage state and side effects, making them more popular than class components.
The core components of React Native include:
- View: This is the container component used to define your app’s layout structure. It’s similar to the div element in HTML.
- Text: The Text component is used to display text on the screen. It’s similar to the
or tag in HTML.
- Image: This component displays images in your app. It can load both local and remote images.
- TextInput: This component captures user text input, similar to the element in Web Development.
- Button: This component is used to create a clickable button.
These components are styled using a styling system similar to CSS but adapted to React Native’s needs. The styling is usually done using a JavaScript object, which makes the code more dynamic.
Building the User Interface
Building a user interface (UI) in React Native involves combining components, layout, and styling. React Native provides a flexbox-based layout system, making designing responsive UIs that work well on iOS and Android devices easy, and Node.js Developer can be used to handle backend services for your app.
- Flexbox Layout: Flexbox is a model that allows you to design complex layouts easily. It is highly recommended for creating responsive UIs in React Native. It arranges children’s components in rows or columns and distributes space accordingly.
- Styling: In React Native, styles are defined using a JavaScript object with properties similar to CSS. You can use stylesheets to define and reuse styles across your components.
For example, a simple layout might look like this:
- import React from ‘react’;
- import { View, Text, StyleSheet } from ‘react-native’;
- const App = () => {
- return (
-
Hello, React Native! - );
- };
- const styles = StyleSheet.create({
- container: {
- flex: 1,
- justify-content: ‘center,’
- align-items: ‘center’,
- ,’ background-color: ‘sky blue,’
- },
- text: {
- font-size: 20,
- color: ‘white,’
- },
- });
- export default App;
n this example, we create a View component that contains a Text component. The styles are defined using the StyleSheet.create() method, and we apply them to the components via the style prop.

Working with Navigation
Navigation is crucial in mobile applications, allowing users to move between different screens and parts of the app. React Native provides several libraries to handle navigation, the most popular of which is React Navigation.
React Navigation offers a flexible and extensible navigation solution, which is an important topic in Web Developer Training. It supports various types of navigation, including:
- Stack Navigation: This type of navigation mimics a stack of cards. It allows you to push new screens onto the stack and pop them off when navigating backward.
- Tab Navigation: Tab navigation allows you to switch between different views or screens using tabs, similar to navigating through a mobile app’s bottom or top bar.
- Drawer Navigation: A drawer navigation pattern lets users open a side menu (or drawer) to access different app sections.
To use React Navigation, you must first install it and its dependencies and then configure the navigation in your app.
Excited to Obtaining Your Business Analyst Certificate? View The Business Analyst Training Offered By ACTE Right Now!
Handling User Input and State Management
In React Native, managing user input and state is a crucial aspect of app development. React’s declarative approach allows you to define the state and how it changes over time.
- State Management: Functional components use the useState hook to manage the state. This hook allows you to store and update your components’ variables (such as form inputs, counters, or any dynamic data).
Example:
- style={styles.input}
- placeholder= “Enter your name”
- value={name}
- onChangeText={text => setName(text)}
- />
Interested in Pursuing Business Intelligence Master’s Program? Enroll For Business Intelligence Master Course Today!
Working with APIs and Networking
Most mobile applications rely on remote data from API to fetch content, display information, or submit data to a server. React Native provides various methods to interact with APIs, commonly Fetch API and Axios.
- Fetch API: The fetch() method is built into JavaScript and allows you to request HTTP to fetch or send data to a remote server.
- fetch(‘https://api.example.com/data’)
- .then(response => response.json())
- .then(data => console.log(data))
- .catch(error => console.error(‘Error:’, error));
- Axios: Axios is a popular promise-based HTTP client that simplifies making requests and handling responses.
Example using Axios:
- import axios from ‘axios’;
- axios.get(‘https://api.example.com/data’)
- .then(response => console.log(response.data))
- .catch(error => console.error(‘Error:’, error));
Testing and Debugging in React Native
Testing is vital to app development, and React Native provides several unit and integration testing tools. Some popular testing libraries include Jest, which is used for unit testing, and React Native Testing Library, which helps with testing components in a way that mimics how users interact with them. Debugging in React Native can be done using the built-in Developer tools. You can use the Chrome Developer Tools or React Native Debugger to debug JavaScript, inspect network requests, and manage app state.
Getting Ready for a Business Analyst Job Interview? Check Out Our Blog on Business Analyst Interview Questions & Answer
Building and Publishing Your App
Once your app is developed, you must build and publish it for Android and iOS platforms. React Native provides commands to generate production-ready builds, making it a key concept in Web Designing Training.
- Android: Use react-native run-android to build and run your app on an Android emulator or physical device. To generate a release APK, you can use Android Studio to create a signed APK.
- iOS: Run your app in the iOS simulator using react-native run-ios. To publish it to the App Store, archive it using Xcode and follow the submission process.
Business Analyst Sample Resumes! Download & Edit, Get Noticed by Top Employers! DownloadConclusion
React Native is a robust framework that enables developers to build mobile applications for iOS and Android with a single codebase. By understanding the components, navigation, state management, and networking, you can create robust and high-performance applications. Moreover, with its rich ecosystem of tools and libraries, React Native is a top choice for mobile app development, making it easier to develop and maintain apps across multiple platforms.
Example of a simple GET request: