Last updated on 11th Jan 2022| 4991
- Installation and Configuration
- Setup TM1 Application Server
- Dimensions in TM1
- Cubes in TM1
- Loading Data in TM1 Cubes
- Chores in TM1
- TM1 Perspective
- Conclusion
- TM1 designer – This element is for developers. they’ll use this tool for developing TM1 models. We’d be exploitation this tool the foremost in our tutorials.
- TM1 API, TM1 Java API, TM1 .NET API – As their name suggests, they’re Apis. they’ll be wont to produce tools that move with TM1.
- TM1 net parts – If you wish to access TM1 models exploitation a web (or intranet) web site, you’d need to install TM1 net parts on an online server. During a distributed atmosphere, these parts ar put in on a separate net server. you wish to possess IIS to use TM1web.
- TM1 Perspective Associate in Nursingd TM1 shopper – TM1 perspective is an stand out add-in. In layperson language, it’s a Microsoft stand out element and might be wont to hook up with the TM1 application server exploitation Microsoft stand out. exploitation this tool, a TM1 user will get and send information from and to a TM1 server.
- TM1 Admin server – TM1 admin server is Associate in Nursing body server that keeps track of application servers. It’s sort of a head teacher of a college. Every teacher (application server) must report back to the head teacher before doing something. If you wish to speak to the teacher (application server) you higher raise the head teacher (admin server) whether or not the teacher (application server) is accessible.
- TM1 Server – It’s needed if you wish to form TM1 models on a server. while not the TM1 server element you can’t produce your virtual application server.
- TM1Top – It’s a utility to observe user activity on TM1 application servers.
- TM1 Contributor – It’s needed to line up a TM1 contributor which may be wont to produce and host TM1 contributor applications of models that you simply created in TM1.
- DATABASE_TYPE=TM1 PROPRIETARY
- CLASS=505
- LICENCE=5499da3942a5ee-8,16699,13108
- MAX_USERS=99999
- MAX_READONLY_USERS=99999
- EXPIRE_DT=–
- LOCATION=
- ORGANISATION=Cognos
- LICENSOR=16699
- INSTALL_ID=13108
- PRODUCT=TM1Server eight
- OPTION1=Turbo measuring device
- OPTION2=SAP warfare
- OPTION3=Planning Manager
- OPTION4=Financial coverage
- [TM1S]
- ServerLogging=F
- SecurityPackageName=Kerberos
- IntegratedSecurityMode=1
- UseSSL=T
- ServerName=TM1 Beginner
- DataBaseDirectory=D:\TM1 Beginner\Data
- LoggingDirectory=D:\TM1 Beginner\Logs
- AdminHost=
- PortNumber=22222
- ClientMessagePortNumber=
- Language=ENG
- SaveTime=
- DownTime=
- ProgressMessage=True
- AuditLogOn=F
- AuditLogMaxFileSize= a hundred MB
- AuditLogUpdateInterval=60
- “C:\Program Files\cognos\TM1\bin\tm1s.exe” -z “D:\TM1Beginner\Data”
- Remember, if you’ve put in the TM1 in “C:\Program Files\cognos\TM1\Bin ” directory, solely then your cutoff can work. therefore higher take a glance at this disk location to visualize if tm1s.exe will exist in “C:\Program Files\cognos\TM1\Bin ”. If it doesn’t then you wish to seek out out the disk location of tm1s.exe. perhaps you’ll rummage around for it in your Program Files.
- Once you have got found the tm1s.exe file, offer that disk path rather than the on top of. as an example if you found the tm1s.exe go into D:\Program Files\IBM\TM1\Bin folder, you have got to supply:
- ” D:\Program Files\IBM\TM1\bin\tm1s.exe” -z “D:\TM1Beginner\Data”
- Instructor-led Sessions
- Real-life Case Studies
- Assignments
- Total product
- Soft Drinks
- Pepsi
- Coca cola
- Seven Up
- Chocolate
- Almond Joy
- Amul Chocolate
- Bournville
- Bread
- Wonder Bread
- Britannia
- Months dimension can have following hierarchy:
- FY
- Q1
- Jan
- Feb
- Mar
- Q2
- Apr
- May
- Jun
- Q3
- Jul
- Aug
- Sep
- Q4
- Oct
- Nov
- Dec
- Let’s begin to make these dimensions.
- Right click on the node and click on ‘Create New Dimension’. Dimension editor are opened for you. attend Edit within the menu and click on on Insert component.
- Doing this can open the Dimension component editor. you’ll be able to currently write your element’s name and click on on Add. this can add your component to the list of freshly another (but not saved yet) parts. Write ‘Total Products’ (without quotes) within the Insert component Name box and click on on Add. Notice that component kind is straightforward. this implies that this component are of numeric kind.
- Click Add so click OK. You’ll see the whole product component in your dimension.
- Now right click on Total product and click on Insert kid.
- Again the dimension component editor are opened and you’ll be able to insert immediate kids of Total product (Soft Drinks, Chocolates and Breads) from our hierarchy. Click Ok and you’ll see them as kids of Total product. currently it is time to insert the remaining parts.
- You can even copy associated paste parts from an surpass file. therefore to check this, write all the remaining parts in associate surpass file. Copy them, choose Total product and paste them directly within the dimension editor. Editor can raise you wherever to stick the weather.
- Paste on top of, Paste below and Paste as kid. you must choose the paste below. All parts are another to the dimension.
- Now it is time to maneuver them to their selected places. choose all 3 beverages (Pepsi, Cocacola, Seven Up) and drag them to the Soft Drinks component. after you do this you’ll see mouse indicator modification from pointer to a different pointer (as shown below)
- Drop them and that they are inserted as kids to it component.
- Now choose Chocolates (Almond Joy, Amul Chocolate, Bournville), right click on them and click on Cut. Then right click on Chocolates and click on ‘Paste as child’.
- They can be another to the chocolates component and element’s sign (which is ahead of element) will modification from n to ∑ (sigma). which means the component is currently of kind consolidation.
- Insert the remaining parts like this and you’ll have your hierarchy prepared. currently you’ll notice that soft drinks aren’t in alphabetical order. Therefore i want to maneuver Cocacola on top of Pepsi Cola. excellent click on dope and click on Cut. Then right click on Pepsi Cola and click on Paste on top of. The component are inserted on top of Pepsi Cola.
- This is the simplest way of moving parts within the dimension. There area unit several alternative ways that of composition dimensions however we’ll discuss them in advanced tutorials.
- Now click save and provides the name to your dimension: product.
- Click on OK and OK once more. You’ll see your dimension seem below the size node in creator.
- Now produce the month’s dimension an equivalent method. simply write all parts in associate surpass file and replica paste from there. Then prepare them in Q1, Q2, Q3, Q4 and FY.
- We’ll produce a cube which can store the information for various product for various months. We’ll use the scale that we tend to created within the third tutorial.
- Open your TM1Beginner server that we tend to created within the second tutorial. Login mistreatment Admin as ID and no parole.
- Right click on Cubes node and click on on produce New Cube.
- The produce cube box shows up. currently you’ll be able to one by one choose all 3 dimensions as shown within the following screenshot. keep in mind to stay them within the order nominal.
- Now click on Properties and assign live as live dimension and Months as time dimension. It’s not abundant of a user TM1 however is completed for atomic number 83. Click on OK.
- Now offer the cube a reputation (Products) and click on produce Cube. Your new created cube can show up below Cubes node in creator. Open it. Press F9. You press F9 to load (or reload) the information in an exceedingly cube. Pressing F9 can show you the information (or updated data) of that cube.
- Cube can show up like this:
- Let’s prepare it to indicate the information in an exceedingly higher means.
- Drag the product dimension over Months dimension (notice the inexperienced mark) and leave it. Doing this may swap the month’s dimension with the product’s dimension.
- Similarly swap the months dimension with live dimension so the measures exist in page (on top), months in columns and product in rows.
- Double click on product dimension, expand all nodes and click on on OK.
- Similarly double click on months dimension, expand and choose solely the months. Click on OK. once more double click on months and click on Show all button now.
- Click on FY, copy it (Ctrl+C) and click on Cancel. once more double click on months dimension, click Dec and paste the FY part that we tend to simply traced below Dec. currently choose all parts and click on OK.
- Ready?? Press F9 and a brand new read are opened ahead of you.
- This is far better. currently let’s put it aside as our default read so from consequent time after you open a cube, this read opens.
- Go to file click on Save. A save dialog opens. check Default checkbox and uncheck non-public checkbox. Click on alright to save the read.From consequent time an equivalent read can open.
- 1. Using Turbo measuring device
- 2. Writing rules
- Check our cube and note the columns that we’ll would like in our information.
- Create a csv (comma separated) file of dummy information that we’ve to load to our cube.
- Write a TI to browse that csv file and cargo information to our cube.
- Ok, currently open the products2 cube. the information columns that you just see in it are:
- Products, Months, Versions,MeasuresSo our information ought to be in following format in csv file:Product, Month, Version, Measure, DataVal e.g. Pepsi,Apr,Budget,Quantity,100
- Create a csv file mistreatment samples of knowledge like on top of. I’ve shown below those that I’m getting to load to my TI. you’ll be able to copy it and build your information.csv from this. keep in mind to make your information.csv in D:\TM1 Beginner\InputFiles folder in your app server directory.
- Product,Month,Version,Measure,DataVal
- Pepsi,Jan,Budget,Quantity,10
- Coca Cola,Jan,Budget,Quantity,15
- Coca Cola,Mar,Budget,Quantity,3
- Coca Cola,Sep,Budget,Quantity,2
- Coca Cola,Dec,Budget,Quantity,7
- Seven Up,Jan,Budget,Quantity,20
- Seven Up,Jul,Budget,Quantity,5
- Seven Up,Oct,Budget,Quantity,6
- Almond Joy,Feb,Budget,Quantity,8
- Almond Joy,May,Budget,Quantity,2
- Almond Joy,Jul,Budget,Quantity,5
- Amul Chocolate,Feb,Budget,Quantity,9
- Bournville,Mar,Budget,Quantity,17
- Bournville,Sep,Budget,Quantity,3
- Now launch your TM1 creator, login to your TM1Beginner server, visit Processes node, right click, and click on produce new method.
- Launch your TM1 designer, expand the nodes and right click dutys and click on produce New Chore.
- Chore setup wizard can open. it’ll raise you the method that you simply need to run. you’ll be able to choose one or additional processes. For the processes that have parameters, there’s a button to specify the parameters.
- Chores in tm1 two
- Scheduling chores
- After choosing your method, click next. Second step is to line the time for the duty to run. additionally choose the checkbox to activate the duty. Click end. The Wizard can raise you to save lots of the duty. provide the duty constant name that your method has. If you’ve got chosen multiple processes, provide duty a significant cluster name.
- 1. To use the cube knowledge that you’ve brought into the slice, you wish to stay yourself connected to the TM1 server. Once you get disconnected from the server, the stand out sheet loses the information.
- 2. If new things are other to the rows or column dimensions (such as new merchandise etc.), slices won’t mechanically get those things. you’ll got to either manually add them to your slice, or produce a replacement slice.
- TM1 is unquestionably a valuable extension to the IBM Cognos product stack. The Cognos eight atomic number 83 suite offers ancient Business Intelligence options like question, Reporting, Analysis, Dashboarding, Scorecarding, Alerting and programming. TM1 may be a strong flat engine and application platform for typical monetary PM applications like coming up with, Budgeting and foretelling. it’s also ready to support chop-chop ever-changing monetary and business analytics that need a time period response, like “What-if” situation modelling. during this manner the promise of agile Performance Management is achieved.
- Although TM1 has the potential to counterpoint and complement the present IBM cognos platform, it’s not simply there however. TM1 designer and views are not what you’ll be able to decision smart GUI tools. There are many very little bugs, new windows gap one over another, normal actions that need you to jot down code. Moreover, the combination of the merchandise is much from complete at this moment. Combining the capabilities of TM1 with Cognos eight atomic number 83 and existing monetary applications like Cognos coming up with (Modelling, Workflow, Contribution) and Controller can type the premise of a whole and integrated Performance Management giving. In associate forthcoming unleash we’d already expect Cognos coming up with front-end tools to be hopped-up by the TM1 info.
- Today, TM1 9.4 will be used as a native knowledge affiliation in Cognos eight.4 BI. this suggests that the atomic number 83 front-end tools will already question the TM1 knowledge engine. during this manner, TM1 may be positioned as an alternate to spice up the performance and quantifiability issues of ancient flat data-sources like DMR (Dimensionally Modelled Relational), Cognos Powerplay PowerCubes or Cognos coming up with models.
Installation and Configuration:
TM1 Installation and Configuration is extremely straightforward to try and do. Still, developers realize it tough to believe that it’d be this straightforward. I actually have seen folks drawing blank once the installation wizard asks for sure data. therefore only for the sake of documenting everything, I’ll begin the beginner tutorials with this subject.
For someone with even basic laptop skills, it ought to be a bit of cake to put in TM1. So here go the screenshots of installation:
1. Launch the wizard
2. Then choose the disk location during which you wish to put in your TM1. I hand-picked C:\Program Files\Cognos\TM1 as my disk location.
3. choose the parts that you simply wish to put in.
4. Keep admin host port and SSL port range as they seem on your system. As we’re putting in it on one machine, there’s no got to amendment these settings.
5. give your computer-name\some-admin-name and parole. Here my laptop name is holler. therefore I provided dell\administrator. I might have used dell\amit if i would like to run my services with account amit (which exists on my system/server) or even you’ll produce Associate in Nursing admin service account in your windows installation and supply those credentials here. Anyway you have got to produce some account so TM1 services (admin server and application server) might run exploitation that account.
6. Done. This was a tutorial on tm1 installation and configuration.

Setup TM1 Application Server:
Here’s what you’ll do to setup tm1 application server:
1. produce a directory structure on your disk as below:
That means on your D: drive you’ll produce a folder TM1 Beginner and within the folder, you’ll produce these four folders.
2. Now, produce the subsequent a pair of files within the information folder.
Tm1s.lic. Copy and paste following content during this file:
Tm1s.cfg. Copy and paste following content during this file:
3. produce a cutoff within the TM1Beginner folder and paste following code for it within the Location window of cutoff.
4. Showtime!! Launch your application server by double clicking on the cutoff. Doing this can launch the appliance server on the 22222 port on your laptop.
5. it’ll produce TM1 objects within the information directory and can produce log files in Logs directory. Open these a pair of directories and make sure this. once the entire launch, the launch window can mechanically minimise which implies you’ll begin performing on the Tm1 application server. Keep that window minimised (don’t shut it as long as you work)
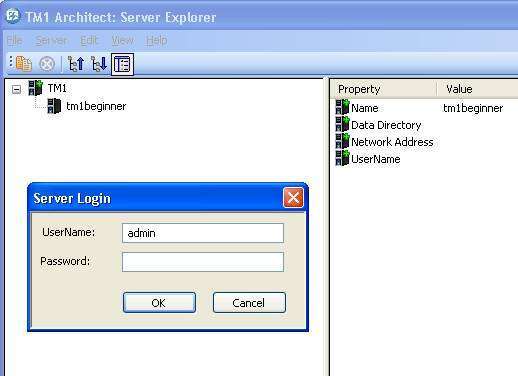
6. currently launch designer from begin > All Programs > IBM Cognos (or the other begin path you provided). it’ll show the server that you {just} just created. Double click thereon and it’ll evoke a username and parole. place Admin as username and press enter.
7. You’ll see the subsequent hierarchy. currently you’re able to produce your tm1 model.
Dimensions in TM1:
What area unit dimensions In TM1 there area unit objects to carry information. These objects area unit known as cubes. Dimensions in TM1 area unit basic building blocks of the cube. therefore if you have got associate surpass file that captures the grocery products’ information for various months you’ll produce one cube in TM1 to stay this information. to try to to that you’ll produce a pair of dimensions one. product and a pair of. Months to make this cube.
How to produce dimensions:
1. Manually
2. Exploitation Turbo measuring system method
3. Exploitation dimension worksheets
Prerequisites:
I hope you’ve followed the previous a pair of tutorials (TM1 Installation and Configuration, Setup TM1 Application Server) and currently acumen to login to a TM1 application server.

Get JOB Oriented Cognos Training for Beginners By MNC Experts
Creating dimension with 1st methodology:
Open your TM1Beginner server that we tend to created within the second tutorial. Login exploitation Admin as ID and no countersign. Expand the tree to ascertain the dimension node.
1. What we’ll produce:
We’ll produce a pair of dimensions.
1. Products
2. Months
Products dimension can contain following elements:
2. Insert parts
3. Prepare parts

Learn Advanced Cognos Certification Training Course to Build Your Skills
Weekday / Weekend BatchesSee Batch DetailsCubes in TM1:
1. Create:
2. Prepare Cube:
Loading Data in TM1 Cubes:
There are two ways that of loading information in TM1 cubes:
1. Loading information mistreatment Turbo measuring device:
Turbo measuring device (TI) is AN ETL (extraction – transformation – load) tool, in common man terms a knowledge loading tool, for loading information into TM1 cubes. though there’s such a lot that you just will do with TI, loading information is simply one a part of that. So let’s load the information into our TM1 cube. We’ll use the Products2 cube that you just created within the last tutorial. you’ll be able to follow this tutorial while not that too, however you’d ought to follow it simply on conception, you’ll not be ready to follow it step by step.
Now, here is what we’ll do to load the data:
Chores in TM1:
Introduction to Chores in TM1:
Chores in TM1 area unit objects that execute one or additional processes of TM1 at a user-defined frequency.
For example, if you’ve got a method referred to as UpdateSalesData and wish to automatize the method of change the sales information (meaning you would like to run the method mechanically while not user intervention from time to time), you’ll be able to produce a duty for it and schedule it to run at a particular time.
Creating chores:
The process that I’ve chosen doesn’t contain any parameters therefore the button is disabled.
Chores in tm1 four
After saving the duty, you’ll see your duty seem within the tree read of the designer. This duty can run when each twelve hours as scheduled however on right clicking the duty, you furthermore may have the choice to run it on demand.
TM1 Perspective:
Introduction to TM1 Perspective:
You can integrate all of your TM1 knowledge with Microsoft stand out and use it in graphs etc. you are doing this by using TM1 Perspective. It’s associate stand out add-in that helps you get connected to your TM1 application server.
1. head to begin > All Programs > IBM Cognos > Perspective For MS stand out (if you’re using Windows seven, make out however you’re planning to open this path, is also simply look for Perspective)
2. MS stand out can open and can raise you to modify macros. enabling macro can launch IBM’s TM1 perspective with stand out.
3. head to the TM1 menu bar, then click Connect and login to your TM1 admin server. You’ll receive a message oral communication that you’re currently connected. Click OK. currently let’s find out how you’ll be able to get the information from cubes into MS stand out.
From TM1, you’ll be able to bring the information into MS stand out using three methods:
1. Slice Slice allows you to update TM1 cubes’ knowledge directly from MS stand out. It’s created using DBRW formulae and retains a true time interaction with TM1 cubes. If you update any knowledge in a very slice, an equivalent knowledge is written back to the corresponding TM1 cube.
To check this practicality, click on mortal on your tm1 menu bar. Browse to your Products2 cube and launch the default read. Cube read opens. From the File menu click on Slice. this may produce a knowledge slice in stand out.
Tm1 perspective one:
Check totally different cells of stand out and spot the formula that has been used. currently modification the amount worth of January from ten to twelve (if you have got the other cube, modification the worth of some input cell. however bear in mind, that cell should not be a calculated cell) and press enter. Now head to the TM1 cube and check the worth of that cell. the worth has been modified to twelve.
Advantages:
1. Using slices you’ll be able to produce input screens for users UN agency don’t have access to design or aren’t terribly conversant in TM1 cubes and connected ideas. they’ll enter knowledge directly in stand out while not bothering concerning cubes etc.2. To update knowledge, you don’t have to be compelled to install TM1 designer. you’ll be able to get your work done by simply using TM1 perspective
Disadvantage:
2. Snapshot
Snapshots also bring TM1 cubes’ knowledge into MS stand out however don’t have real time update capability. Snapshots simply bring the information values (no formula).