Last updated on 10th Jul 2020| 3779
This tutorial provides a very simple and quick introduction to the NetBeans IDE workflow by walking you through the creation of a simple “Hello World” Java console application. Once you are done with this tutorial, you will have a general knowledge of how to create and run applications in the IDE.
After you finish this tutorial, you can move on to the learning trails, which are linked from the Documentation, Training & Support page. The learning trails provide comprehensive tutorials that highlight a wider range of IDE features and programming techniques for a variety of application types. If you do not want to do a “Hello World” application, you can skip this tutorial and jump straight to the learning trails.
Setting Up the Project:
- Start NetBeans IDE.
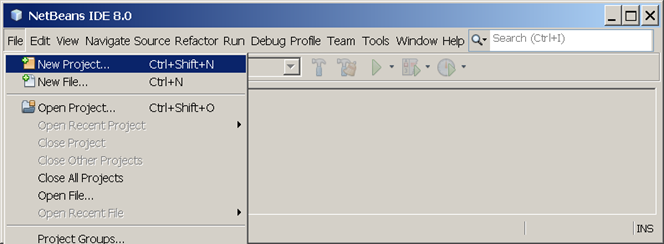
- In the IDE, choose File > New Project, as shown in the figure below.
- In the New Project wizard, expand the Java category and select Java Application as shown in the figure below. Then click Next.In the Name and Location page of the wizard, do the following (as shown in the figure below):
- In the Project Name field, type HelloWorldApp.
- Leave the Use Dedicated Folder for Storing Libraries checkbox unselected.
- In the Create Main Class field, type helloworldapp.HelloWorldApp.
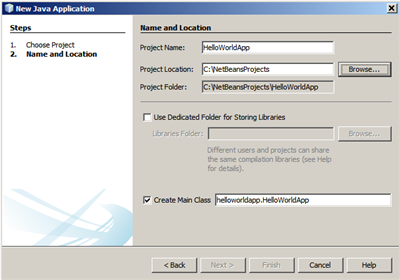
- Click Finish.
The project is created and opened in the IDE. You should see the following components:
- The Projects window, which contains a tree view of the components of the project, including source files, libraries that your code depends on, and so on.
- The Source Editor window with a file called HelloWorldApp open.
- The Navigator window, which you can use to quickly navigate between elements within the selected class.

Building and Deploying the Application
Once you have written and test run your application, you can use the Clean and Build command to build your application for deployment. When you use the Clean and Build command, the IDE runs a build script that performs the following tasks:
Deletes any previously compiled files and other build outputs.
Recompiles the application and builds a JAR file containing the compiled files.
- Creating Your First Application: Your first application, HelloWorldApp, will simply display the greeting “Hello World!” To create this program, you will:
- Create an IDE project: When you create an IDE project, you create an environment in which to build and run your applications. Using IDE projects eliminates configuration issues normally associated with developing on the command line. You can build or run your application by choosing a single menu item within the IDE.
- Add code to the generated source file: A source file contains code, written in the Java programming language, that you and other programmers can understand. As part of creating an IDE project, a skeleton source file will be automatically generated. You will then modify the source file to add the “Hello World!” message.
- Compile the source file into a .class file: The IDE invokes the Java programming language compiler (javac), which takes your source file and translates its text into instructions that the Java virtual machine can understand. The instructions contained within this file are known as byte codes.
- Run the program: The IDE invokes the Java application launcher tool (java), which uses the Java virtual machine to run your application.
Create an IDE Project :
To create an IDE project:
- Launch the NetBeans IDE.
- On Microsoft Windows systems, you can use the NetBeans IDE item in the Start menu.
- On Solaris OS and Linux systems, you execute the IDE launcher script by navigating to the IDE’s bin directory and typing ./netbeans.
- On Mac OS X systems, click the NetBeans IDE application icon.
2. In the NetBeans IDE, choose File | New Project….
NetBeans IDE with the File | New Project menu item selected.
3. In the New Project wizard, expand the Java category and select Java Application as shown in the following figure:
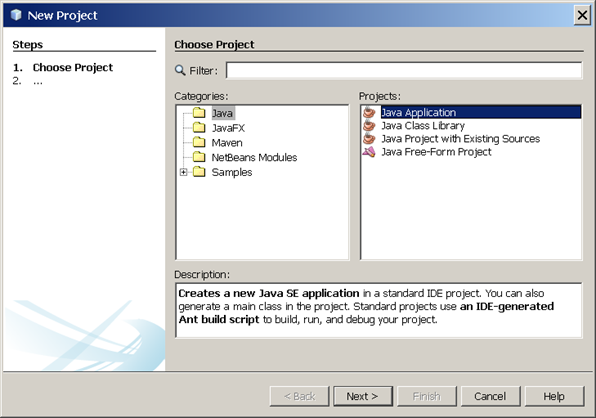
NetBeans IDE, New Project wizard, Choose Project page.
4. In the Name and Location page of the wizard, do the following (as shown in the figure below):
- In the Project Name field, type Hello World App.
- In the Create Main Class field, type helloworldapp.HelloWorldApp.
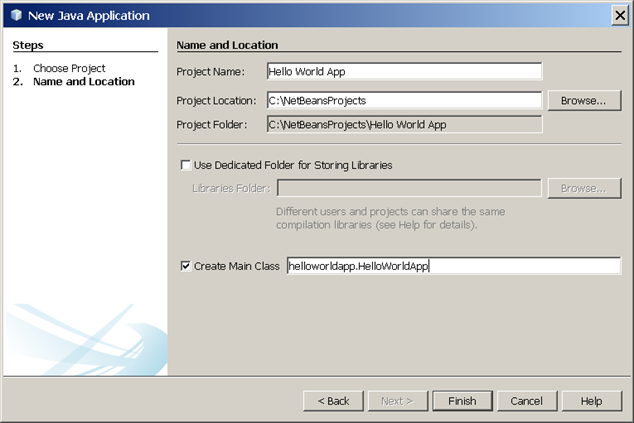
NetBeans IDE, New Project wizard, Name and Location page.
5. Click Finish.
The project is created and opened in the IDE. You should see the following components:
- The Projects window, which contains a tree view of the components of the project, including source files, libraries that your code depends on, and so on.
- The Source Editor window with a file called HelloWorldApp.java open.
- The Navigator window, which you can use to quickly navigate between elements within the selected class.
starting Visual Paradigm in NetBeans
Now, we have to start up Visual Paradigm in NetBeans.
- Right-click on your Java class library project and select Open Visual Paradigm from the popup menu.
- If you see the Memory Requirement dialog box, please keep the option Configure “etc/netbeans.conf” only and click OK to restart NetBeans, and then re-perform the previous step to open Visual Paradigm.
- You may be prompted to specify the location of your Visual Paradigm project. In this case, simply select Create in default path and click OK to proceed.

Configure database for your NetBeans project:
Before the modeling start, we have to specify the database configuration for our project first.
- Select Modeling > ORM > Database Configuration… from the main menu
- Select MS SQL Server from the database list.
- Select 2008 or higher in the Version field.
- Leave the Driver field unchanged (selecting jDTS Driver), then press the green down arrow button to download the required driver. You may need to specify your proxy server for accessing Internet and for downloading the driver.
- Next, fill in the hostname, port number, the Database name as well as your User name and Password to access for the database.
- Click Test Connection to make sure the connection setting we defined is correct.
Generate class model from ERD:
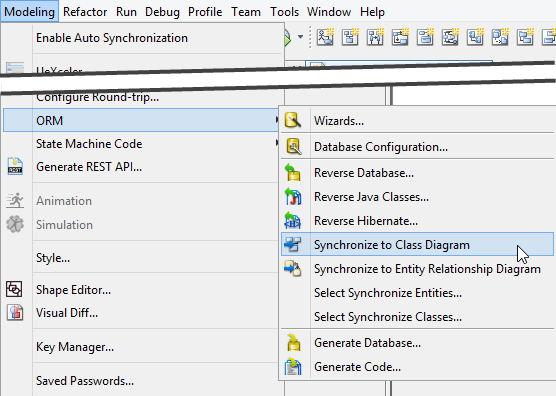
We have finished designing the database with ERD. Now, we can generate a class model from it. To generate the class model out of your ERD:
- Select Modeling > ORM > Synchronize to Class Diagram from the main menu.
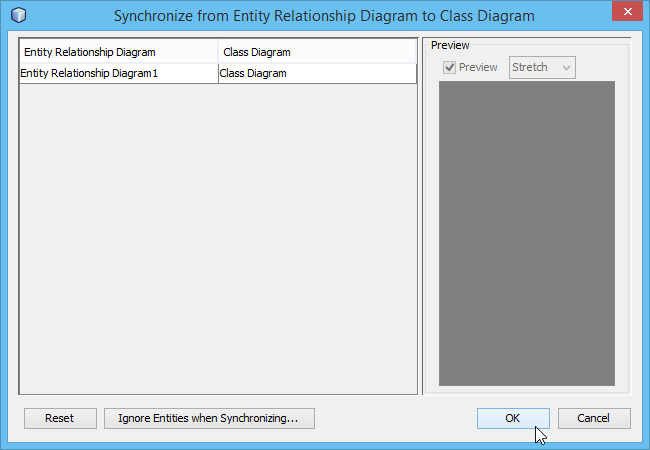
2. Click OK in the Synchronize from Entity Relationship Diagram to Class Diagram window.
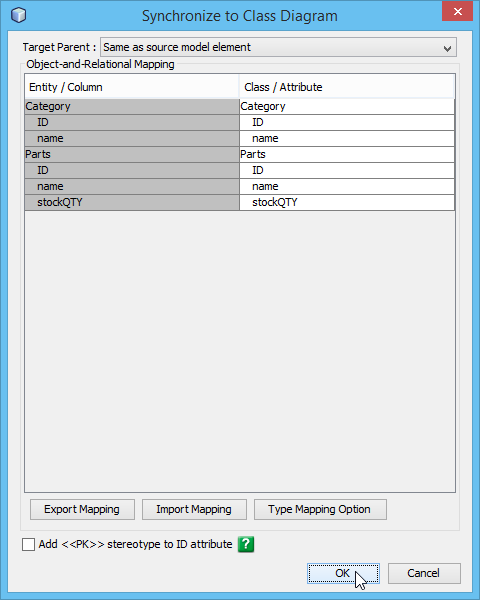
3. Click OK again in the Synchronize to Class Diagram window.
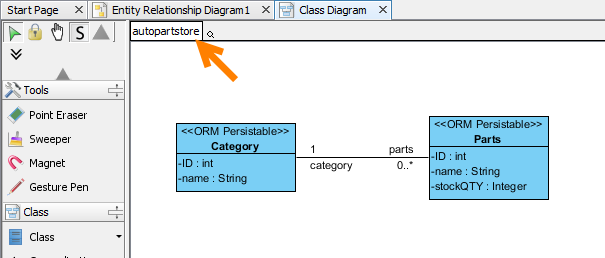
4. The class diagram is generated. Click the package header <default package> and enter the auto part store as the package our class model. Without specifying a package, all the classes will be placed to the project root, which may make it hard to manage.
The data models are ready and we can proceed to generating Hibernate source code as well as the database.
Conclusion
In Apache, NetBeans continues to provide the community with an absolute abundance of features, both for Java developers as well as for those working on other languages, especially JavaScript, PHP, and C/C++. The NetBeans Platform provides a reliable and flexible application architecture. Your application does not have to look anything like an IDE. It can save you years of development time. The NetBeans Platform gives you a time-tested architecture for free. An architecture that encourages sustainable development practices. Because the NetBeans Platform architecture is modular, it’s easy to create applications that are robust and extensible.