
Hive is a data warehousing infrastructure based on Apache Hadoop. Hadoop provides massive scale out and fault tolerance capabilities for data storage and processing on commodity hardware.
Hive is designed to enable easy data summarization, ad-hoc querying and analysis of large volumes of data. It provides SQL which enables users to do ad-hoc querying, summarization and data analysis easily. At the same time, Hive’s SQL gives users multiple places to integrate their own functionality to do custom analysis, such as User Defined Functions (UDFs).
Hive Partitions
- Apache Hive organizes tables into partitions. Partitioning is a way of dividing a table into related parts based on the values of particular columns like date, city, and department. Each table in the hive can have one or more partition keys to identify a particular partition. Using partition it is easy to do queries on slices of the data.
i. Hive Static Partitioning
- Insert input data files individually into a partition table is Static Partition.
- Usually when loading files (big files) into Hive tables static partitions are preferred.
- Static Partition saves your time in loading data compared to dynamic partition.
- You “statically” add a partition in the table and move the file into the partition of the table.
- We can alter the partition in the static partition.
- You can get the partition column value from the filename, day of date etc without reading the whole big file.
- If you want to use the Static partition in the hive you should set property set hive.mapred.mode = strict This property set by default in hive-site.xml
- Static partition is in Strict Mode.
- You should use where clause to use limit in the static partition.
- You can perform Static partition on Hive Manage table or external table.
ii. Hive Dynamic Partitioning
- Single insert to partition table is known as a dynamic partition.
- Usually, dynamic partition loads the data from the non-partitioned table.
- Dynamic Partition takes more time in loading data compared to static partition.
- When you have large data stored in a table then the Dynamic partition is suitable.
- If you want to partition a number of columns but you don’t know how many columns then also dynamic partition is suitable.
- Dynamic partition there is no required where clause to use limit.
- we can’t perform alter on the Dynamic partition.
- You can perform dynamic partition on hive external table and managed table.
- If you want to use the Dynamic partition in the hive then the mode is in non-strict mode.
- Here are Hive dynamic partition properties you should allow
Partitioning in Hive
- The partitioning in Hive means dividing the table into some parts based on the values of a particular column like date, course, city or country. The advantage of partitioning is that since the data is stored in slices, the query response time becomes faster.
- As we know that Hadoop is used to handle the huge amount of data, it is always required to use the best approach to deal with it. The partitioning in Hive is the best example of it.
- Let’s assume we have a data of 10 million students studying in an institute. Now, we have to fetch the students of a particular course. If we use a traditional approach, we have to go through the entire data. This leads to performance degradation. In such a case, we can adopt the better approach i.e., partitioning in Hive and divide the data among the different datasets based on particular columns.
Static Partitioning
- In static or manual partitioning, it is required to pass the values of partitioned columns manually while loading the data into the table. Hence, the data file doesn’t contain the partitioned columns.
Example of Static Partitioning
- First, select the database in which we want to create a table.
- hive> use test;
- Create the table and provide the partitioned columns by using the following command: –
- hive> create table student (id int, name string, age int, institute string)
- partitioned by (course string)
- row format delimited
- fields terminated by ‘,’;

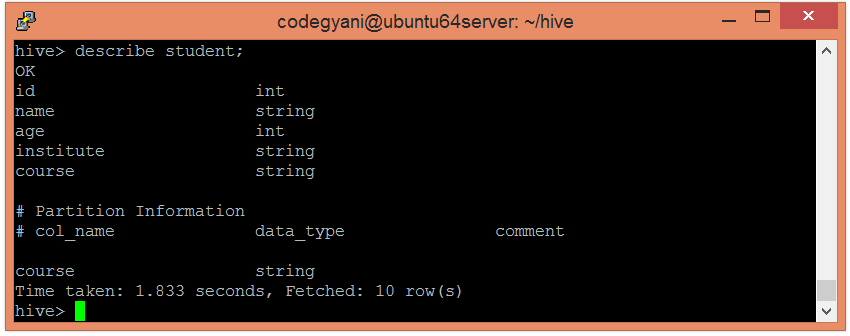
- Let’s retrieve the information associated with the table.
- hive> describe student;
- Load the data into the table and pass the values of partition columns with it by using the following command: –
- hive> load data local inpath ‘/home/codegyani/hive/student_details1’ into table student
- partition(course= “java”);

Here, we are partitioning the students of an institute based on courses.
- Load the data of another file into the same table and pass the values of partition columns with it by using the following command: –
- hive> load data local inpath ‘/home/codegyani/hive/student_details2’ into table student
- partition(course= “hadoop”);

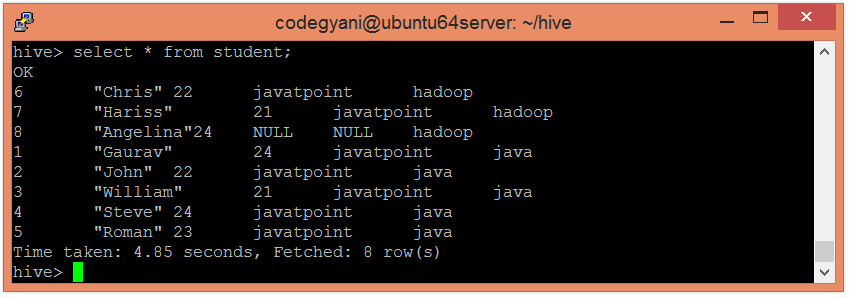
- Let’s retrieve the entire data of the able by using the following command: –
- hive> select * from student;
- Now, try to retrieve the data based on partitioned columns by using the following command: –
- hive> select * from student where course=”java”;
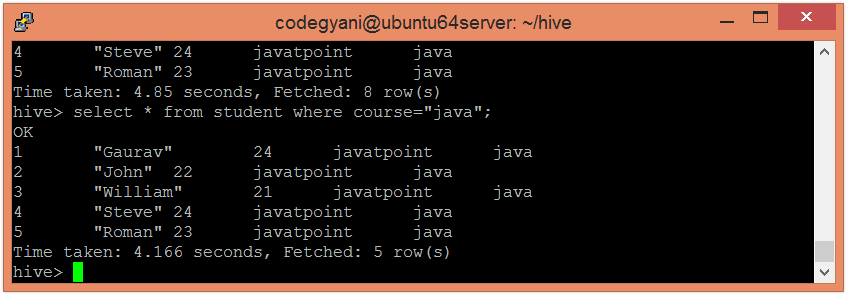
In this case, we are not examining the entire data. Hence, this approach improves query response time.
- Let’s also retrieve the data of another partitioned dataset by using the following command: –
- hive> select * from student where course= “hadoop”;

Installation
Step 1: Verifying JAVA Installation
- Java must be installed on your system before installing Hive. Let us verify java installation using the following command:
- $ java –version
- If Java is already installed on your system, you get to see the following response:
- java version “1.7.0_71”
- Java(TM) SE Runtime Environment (build 1.7.0_71-b13)
- Java HotSpot(TM) Client VM (build 25.0-b02, mixed mode)
- If java is not installed in your system, then follow the steps given below for installing java.
Installing Java
Step I:
- Download java (JDK <latest version> – X64.tar.gz) by visiting the following link http://www.oracle.com/technetwork/java/javase/downloads/jdk7-downloads-1880260.html.
- Then jdk-7u71-linux-x64.tar.gz will be downloaded onto your system.
Step II:
- Generally you will find the downloaded java file in the Downloads folder. Verify it and extract the jdk-7u71-linux-x64.gz file using the following commands.
- $ cd Downloads/
- $ ls
- jdk-7u71-linux-x64.gz
- $ tar zxf jdk-7u71-linux-x64.gz
- $ ls
- jdk1.7.0_71 jdk-7u71-linux-x64.gz
Step III:
- To make java available to all the users, you have to move it to the location “/usr/local/”. Open root, and type the following commands.
- $ su
- password:
- # mv jdk1.7.0_71 /usr/local/
- # exit
Step IV:
- For setting up PATH and JAVA_HOME variables, add the following commands to ~/.bashrc file.
- export JAVA_HOME=/usr/local/jdk1.7.0_71
- export PATH=$PATH:$JAVA_HOME/bin
- Now apply all the changes into the current running system.
- $ source ~/.bashrc
Step V:
- Use the following commands to configure java alternatives:
- # alternatives –install /usr/bin/java/java/usr/local/java/bin/java 2
- # alternatives –install /usr/bin/javac/javac/usr/local/java/bin/javac 2
- # alternatives –install /usr/bin/jar/jar/usr/local/java/bin/jar 2
- # alternatives –set java/usr/local/java/bin/java
- # alternatives –set javac/usr/local/java/bin/javac
- # alternatives –set jar/usr/local/java/bin/jar
- Now verify the installation using the command java -version from the terminal as explained above.
Step 2: Verifying Hadoop Installation
- Hadoop must be installed on your system before installing Hive. Let us verify the Hadoop installation using the following command:
- $ hadoop version
- If Hadoop is already installed on your system, then you will get the following response:
- Hadoop 2.4.1 Subversion https://svn.apache.org/repos/asf/hadoop/common -r 1529768
- Compiled by hortonmu on 2013-10-07T06:28Z
- Compiled with protoc 2.5.0
- From source with checksum 79e53ce7994d1628b240f09af91e1af4
- If Hadoop is not installed on your system, then proceed with the following steps:
Downloading Hadoop
- Download and extract Hadoop 2.4.1 from Apache Software Foundation using the following commands.
- $ su
- password:
- # cd /usr/local
- # wget http://apache.claz.org/hadoop/common/hadoop-2.4.1/
- hadoop-2.4.1.tar.gz
- # tar xzf hadoop-2.4.1.tar.gz
- # mv hadoop-2.4.1/* to hadoop/
- # exit
Installing Hadoop in Pseudo Distributed Mode
- The following steps are used to install Hadoop 2.4.1 in pseudo distributed mode.
Step I: Setting up Hadoop
- You can set Hadoop environment variables by appending the following commands to ~/.bashrc file.
- export HADOOP_HOME=/usr/local/hadoop
- export HADOOP_MAPRED_HOME=$HADOOP_HOME
- export HADOOP_COMMON_HOME=$HADOOP_HOME
- export HADOOP_HDFS_HOME=$HADOOP_HOME
- export YARN_HOME=$HADOOP_HOME
- export HADOOP_COMMON_LIB_NATIVE_DIR=$HADOOP_HOME/lib/native export
- PATH=$PATH:$HADOOP_HOME/sbin:$HADOOP_HOME/bin
- Now apply all the changes into the current running system.
- $ source ~/.bashrc
Step II: Hadoop Configuration
- You can find all the Hadoop configuration files in the location “$HADOOP_HOME/etc/hadoop”. You need to make suitable changes in those configuration files according to your Hadoop infrastructure.
- $ cd $HADOOP_HOME/etc/hadoop
- In order to develop Hadoop programs using java, you have to reset the java environment variables in hadoop-env.sh file by replacing JAVA_HOME value with the location of java in your system.
- export JAVA_HOME=/usr/local/jdk1.7.0_71
- Given below are the list of files that you have to edit to configure Hadoop.
- core-site.xml
- The core-site.xml file contains information such as the port number used for Hadoop instance, memory allocated for the file system, memory limit for storing the data, and the size of Read/Write buffers.
Open the core-site.xml and add the following properties in between the <configuration> and </configuration> tags.
- <configuration>
- <value>hdfs://localhost:9000</value>
- </property>
- </configuration>
- hdfs-site.xml
- The hdfs-site.xml file contains information such as the value of replication data, the namenode path, and the datanode path of your local file systems. It means the place where you want to store the Hadoop infra.
- Let us assume the following data.
- dfs.replication (data replication value) = 1
- (In the following path /hadoop/ is the user name.
- hadoopinfra/hdfs/namenode is the directory created by hdfs file system.)
- namenode path = //home/hadoop/hadoopinfra/hdfs/namenode
- (hadoopinfra/hdfs/datanode is the directory created by hdfs file system.)
- datanode path = //home/hadoop/hadoopinfra/hdfs/datanode
- Open this file and add the following properties in between the <configuration>, </configuration> tags in this file.
- <configuration>
- <property>
- <name>dfs.replication</name>
- <value>1</value>
- </property>
- <property>
- <name>dfs.name.dir</name>
- <value>file:///home/hadoop/hadoopinfra/hdfs/namenode </value>
- </property>
- <property>
- <name>dfs.data.dir</name>
- <value>file:///home/hadoop/hadoopinfra/hdfs/datanode </value >
- </property>
- </configuration>
- Note: In the above file, all the property values are user-defined and you can make changes according to your Hadoop infrastructure.
- yarn-site.xml
- This file is used to configure yarn into Hadoop. Open the yarn-site.xml file and add the following properties in between the <configuration>, </configuration> tags in this file.
- <configuration>
- <property>
- <name>yarn.nodemanager.aux-services</name>
- <value>mapreduce_shuffle</value>
- </property>
- </configuration>
- mapred-site.xml
- This file is used to specify which MapReduce framework we are using. By default, Hadoop contains a template of yarn-site.xml. First of all, you need to copy the file from mapred-site,xml.template to mapred-site.xml file using the following command.
- $ cp mapred-site.xml.template mapred-site.xml
- Open mapred-site.xml file and add the following properties in between the <configuration>, </configuration> tags in this file.
- <configuration>
- <property>
- <name>mapreduce.framework.name</name>
- <value>yarn</value>
- </property>
- </configuration>
Verifying Hadoop Installation
- The following steps are used to verify the Hadoop installation.
Step I: Name Node Setup
Set up the namenode using the command “hdfs namenode -format” as follows.
- $ cd ~
- $ hdfs namenode -format
The expected result is as follows.
- 10/24/14 21:30:55 INFO namenode.NameNode: STARTUP_MSG:
- /************************************************************
- STARTUP_MSG: Starting NameNode
- STARTUP_MSG: host = localhost/192.168.1.11
- STARTUP_MSG: args = [-format]
- STARTUP_MSG: version = 2.4.1
- …
- …
- 10/24/14 21:30:56 INFO common.Storage: Storage directory
- /home/hadoop/hadoopinfra/hdfs/namenode has been successfully formatted.
- 10/24/14 21:30:56 INFO namenode.NNStorageRetentionManager: Going to
- retain 1 images with txid >= 0
- 10/24/14 21:30:56 INFO util.ExitUtil: Exiting with status 0
- 10/24/14 21:30:56 INFO namenode.NameNode: SHUTDOWN_MSG:
- /************************************************************
- SHUTDOWN_MSG: Shutting down NameNode at localhost/192.168.1.11
- ************************************************************/
Step II: Verifying Hadoop dfs
- The following command is used to start dfs. Executing this command will start your Hadoop file system.
- $ start-dfs.sh
- The expected output is as follows:
- 10/24/14 21:37:56
- Starting namenodes on [localhost]
- localhost: starting namenode, logging to /home/hadoop/hadoop-2.4.1/logs/hadoop-hadoop-namenode-localhost.out
- localhost: starting datanode, logging to /home/hadoop/hadoop-2.4.1/logs/hadoop-hadoop-datanode-localhost.out
- Starting secondary namenodes [0.0.0.0]
Step III: Verifying Yarn Script
- The following command is used to start the yarn script. Executing this command will start your yarn daemons.
- $ start-yarn.sh
The expected output is as follows:
- starting yarn daemons
- starting resourcemanager, logging to /home/hadoop/hadoop-2.4.1/logs/yarn-hadoop-resourcemanager-localhost.out
- localhost: starting nodemanager, logging to /home/hadoop/hadoop-2.4.1/logs/yarn-hadoop-nodemanager-localhost.out
Step IV: Accessing Hadoop on Browser
- The default port number to access Hadoop is 50070. Use the following url to get Hadoop services on your browser.
Step V: Verify all applications for cluster
- The default port number to access all applications of cluster is 8088. Use the following url to visit this service.
Step 3: Downloading Hive
- We use hive-0.14.0 in this tutorial. You can download it by visiting the following link http://apache.petsads.us/hive/hive-0.14.0/. Let us assume it gets downloaded onto the /Downloads directory. Here, we download Hive archive named “apache-hive-0.14.0-bin.tar.gz” for this tutorial. The following command is used to verify the download:
- $ cd Downloads
- $ ls
- On successful download, you get to see the following response:
- apache-hive-0.14.0-bin.tar.gz
Step 4: Installing Hive
- The following steps are required for installing Hive on your system. Let us assume the Hive archive is downloaded onto the /Downloads directory.
- Extracting and verifying Hive Archive
- The following command is used to verify the download and extract the hive archive:
- Copying files to /usr/local/hive directory
- On successful download, you get to see the following response:
apache-hive-0.14.0-bin apache-hive-0.14.0-bin.tar.gz
- Copying files to /usr/local/hive directory
- We need to copy the files from the super user “su -”. The following commands are used to copy the files from the extracted directory to the /usr/local/hive” directory.
- $ su –
- passwd:
- # cd /home/user/Download
- # mv apache-hive-0.14.0-bin /usr/local/hive
- # exit
Setting up environment for Hive
- You can set up the Hive environment by appending the following lines to ~/.bashrc file:
- export HIVE_HOME=/usr/local/hive
- export PATH=$PATH:$HIVE_HOME/bin
- export CLASSPATH=$CLASSPATH:/usr/local/Hadoop/lib/*:.
- export CLASSPATH=$CLASSPATH:/usr/local/hive/lib/*:.
- The following command is used to execute ~/.bashrc file.
- $ source ~/.bashrc
Step 5: Configuring Hive
- To configure Hive with Hadoop, you need to edit the hive-env.sh file, which is placed in the $HIVE_HOME/conf directory. The following commands redirect to Hive config folder and copy the template file:
- $ cd $HIVE_HOME/conf
- $ cp hive-env.sh.template hive-env.sh
- Edit the hive-env.sh file by appending the following line:
- export HADOOP_HOME=/usr/local/hadoop
- Hive installation is completed successfully. Now you require an external database server to configure Metastore. We use Apache Derby database.
Step 6: Downloading and Installing Apache Derby
- Follow the steps given below to download and install Apache Derby:
Downloading Apache Derby
- The following command is used to download Apache Derby. It takes some time to download.
- $ cd ~
- $ wget http://archive.apache.org/dist/db/derby/db-derby-10.4.2.0/db-derby-10.4.2.0-bin.tar.gz
- The following command is used to verify the download:
- $ ls
- On successful download, you get to see the following response:
- db-derby-10.4.2.0-bin.tar.gz
- Extracting and verifying Derby archive
- The following commands are used for extracting and verifying the Derby archive:
- $ tar zxvf db-derby-10.4.2.0-bin.tar.gz
- $ ls
- On successful download, you get to see the following response:
- db-derby-10.4.2.0-bin db-derby-10.4.2.0-bin.tar.gz
- Copying files to /usr/local/derby directory
- We need to copy from the super user “su -”. The following commands are used to copy the files from the extracted directory to the /usr/local/derby directory:
- $ su –
- passwd:
- # cd /home/user
- # mv db-derby-10.4.2.0-bin /usr/local/derby
- # exit
Setting up environment for Derby
- You can set up the Derby environment by appending the following lines to ~/.bashrc file:
- export DERBY_HOME=/usr/local/derby
- export PATH=$PATH:$DERBY_HOME/bin
- Apache Hive
- 18
- export CLASSPATH=$CLASSPATH:$DERBY_HOME/lib/derby.jar:$DERBY_HOME/lib/derbytools.jar
- The following command is used to execute ~/.bashrc file:
- $ source ~/.bashrc
Create a directory to store Metastore
- Create a directory named data in $DERBY_HOME directory to store Metastore data.
- $ mkdir $DERBY_HOME/data
- Derby installation and environmental setup is now complete.
Step 7: Configuring Metastore of Hive
- Configuring Metastore means specifying to Hive where the database is stored. You can do this by editing the hive-site.xml file, which is in the $HIVE_HOME/conf directory. First of all, copy the template file using the following command:
$ cd $HIVE_HOME/conf
- $ cd $HIVE_HOME/conf
- $ cp hive-default.xml.template hive-site.xml
- Edit hive-site.xml and append the following lines between the <configuration> and </configuration> tags:
- <property>
- > <name>javax.jdo.option.ConnectionURL</name>
- <value>jdbc:derby://localhost:1527/metastore_db;create=true </value>
- <description>JDBC connect string for a JDBC metastore </description>
- </property>
- Create a file named jpox.properties and add the following lines into it:
- javax.jdo.PersistenceManagerFactoryClass =
- org.jpox.PersistenceManagerFactoryImpl
- org.jpox.autoCreateSchema = false
- org.jpox.validateTables = false
- org.jpox.validateColumns = false
- org.jpox.validateConstraints = false
- org.jpox.storeManagerType = rdbms
- org.jpox.autoCreateSchema = true
- org.jpox.autoStartMechanismMode = checked
- org.jpox.transactionIsolation = read_committed
- javax.jdo.option.DetachAllOnCommit = true
- javax.jdo.option.NontransactionalRead = true
- javax.jdo.option.ConnectionDriverName = org.apache.derby.jdbc.ClientDriver
- javax.jdo.option.ConnectionURL = jdbc:derby://hadoop1:1527/metastore_db;create = true
- javax.jdo.option.ConnectionUserName = APP
- javax.jdo.option.ConnectionPassword = mine
Step 8: Verifying Hive Installation
- Before running Hive, you need to create the /tmp folder and a separate Hive folder in HDFS. Here, we use the /user/hive/warehouse folder. You need to set write permission for these newly created folders as shown below:
- chmod g+w
- Now set them in HDFS before verifying Hive. Use the following commands:
- $ $HADOOP_HOME/bin/hadoop fs -mkdir /tmp
- $ $HADOOP_HOME/bin/hadoop fs -mkdir /user/hive/warehouse
- $ $HADOOP_HOME/bin/hadoop fs -chmod g+w /tmp
- $ $HADOOP_HOME/bin/hadoop fs -chmod g+w /user/hive/warehouse
- The following commands are used to verify Hive installation:
- $ cd $HIVE_HOME
- $ bin/hive
- On successful installation of Hive, you get to see the following response:
Logging initialized using configuration in
- jar:file:/home/hadoop/hive-0.9.0/lib/hive-common-0.9.0.jar!/hive-log4j.properties
- Hive history file=/tmp/hadoop/hive_job_log_hadoop_201312121621_1494929084.txt
- ………………….
- hive>
- The following sample command is executed to display all the tables:
- hive> show tables;
- OK
- Time taken: 2.798 seconds
- hive>
Partitions
- Hive Partitions is a way to organizes tables into partitions by dividing tables into different parts based on partition keys.
- Partition is helpful when the table has one or more Partition keys. Partition keys are basic elements for determining how the data is stored in the table.
For Example: –
- “Client having Some E –commerce data which belongs to India operations in which each state (38 states) operations mentioned in as a whole. If we take state column as partition key and perform partitions on that India data as a whole, we can able to get Number of partitions (38 partitions) which is equal to number of states (38) present in India. Such that each state data can be viewed separately in partitions tables.
Sample Code Snippet for partitions
- Creation of Table all states
- create table all states(state string, District string,Enrolments string)
- row format delimited
- fields terminated by ‘,’;
- Loading data into created table all states
- Load data local inpath ‘/home/hduser/Desktop/AllStates.csv’ into table allstates;
- Creation of partition table
- create table state_part(District string,Enrolments string) PARTITIONED BY(state string);
- For partition we have to set this property
- style=”font-weight: 400;”>set hive.exec.dynamic.partition.mode=nonstrict
- Loading data into partition table
- INSERT OVERWRITE TABLE state_part PARTITION(state)
- SELECT district,enrolments,state from allstates;
- Actual processing and formation of partition tables based on state as partition key
- There are going to be 38 partition outputs in HDFS storage with the file name as state name. We will check this in this step
The following screen shots will show u the execution of above mentioned code


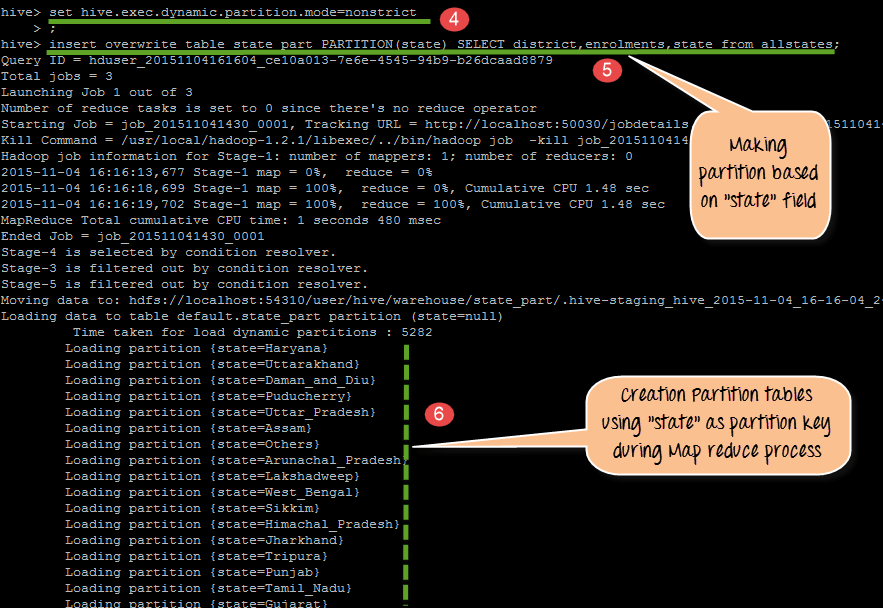
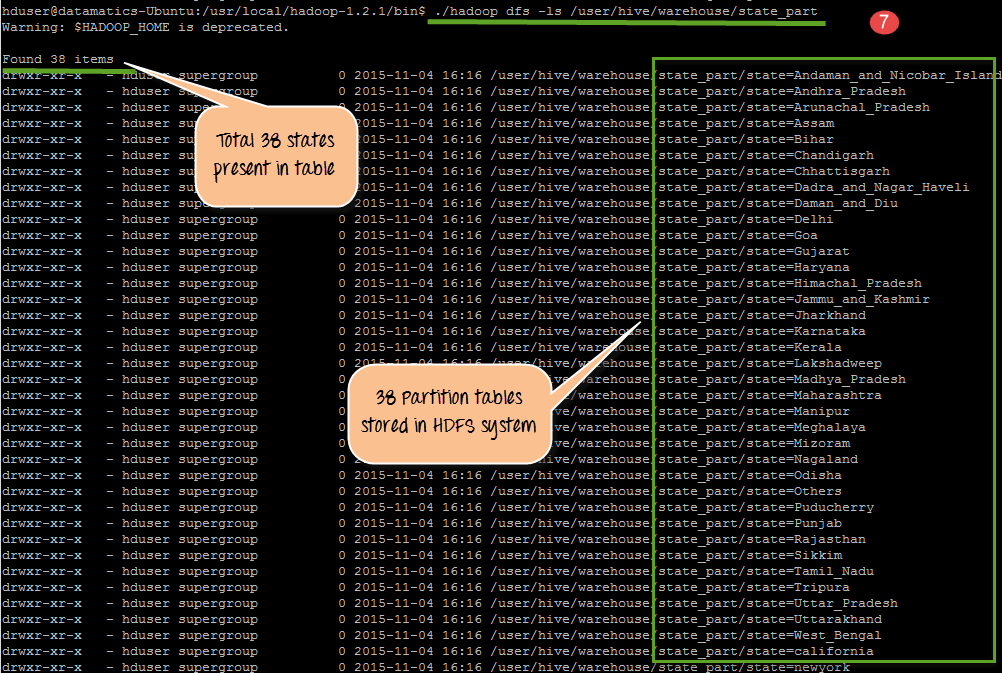
From the above code, we do following things
- Creation of table all states with 3 column names such as state, district, and enrollment
- Loading data into table all states
- Creation of partition table with state as partition key
- In this step Setting partition mode as non-strict( This mode will activate dynamic partition mode)
- Loading data into partition tablestate_part
- Actual processing and formation of partition tables based on state as partition key
- There is going to 38 partition outputs in HDFS storage with the file name as state name. We will check this in this step. In This step, we seeing the 38 partition outputs in HDFS
Buckets
Buckets in hive is used in segregating of hive table-data into multiple files or directories. it is used for efficient querying.
- The data i.e. present in that partitions can be divided further into Buckets
- The division is performed based on Hash of particular columns that we selected in the table.
- Buckets use some form of Hashing algorithm at back end to read each record and place it into buckets
- In Hive, we have to enable buckets by using the set.hive.enforce.bucketing=true;
Step 1) Creating Bucket as shown below.

From the above screen shot
- We are creating sample_bucket with column names such as first_name, job_id, department, salary and country
- We are creating 4 buckets over here.
- Once the data get loaded it automatically, place the data into 4 buckets
Step 2) Loading Data into table sample bucket
- Assuming that”Employees table” already created in Hive system. In this step, we will see the loading of Data from employees table into table sample bucket.
- Before we start moving employees data into buckets, make sure that it consist of column names such as first_name, job_id, department, salary and country.
- Here we are loading data into sample bucket from employees table.

Step 3)Displaying 4 buckets that created in Step 1

Advantages
- Partitioning is used for distributing execution load horizontally.
- As the data is stored as slices/parts, query response time is faster to process the small part of the data instead of looking for a search in the entire data set.
- For example, In a large user table where the table is partitioned by country, then selecting users of country ‘IN’ will just scan one directory ‘country=IN’ instead of all the directories.
Conclusion
Hope this tutorial will help you a lot to understand what exactly is partition in Hive, what is Static partitioning in Hive, What is Dynamic partitioning in Hive. We have also covered various advantages and disadvantages of Hive partitioning. If you have any query related to Hive Partitions, so please leave a comment. We will be glad to solve them.


