
Last updated on 09th Jul 2020| 4070
- Pig is a high-level programming language useful for analyzing large data sets. A pig was a result of development effort at Yahoo!

- In a MapReduce framework, programs need to be translated into a series of Map and Reduce stages. However, this is not a programming model which data analysts are familiar with. So, in order to bridge this gap, an abstraction called Pig was built on top of Hadoop.
Apache Pig
- Apache Pig is an abstraction over MapReduce. It is a tool/platform which is used to analyze larger sets of data representing them as data flows. Pig is generally used with Hadoop; we can perform all the data manipulation operations in Hadoop using Pig.
Apache Pig architecture
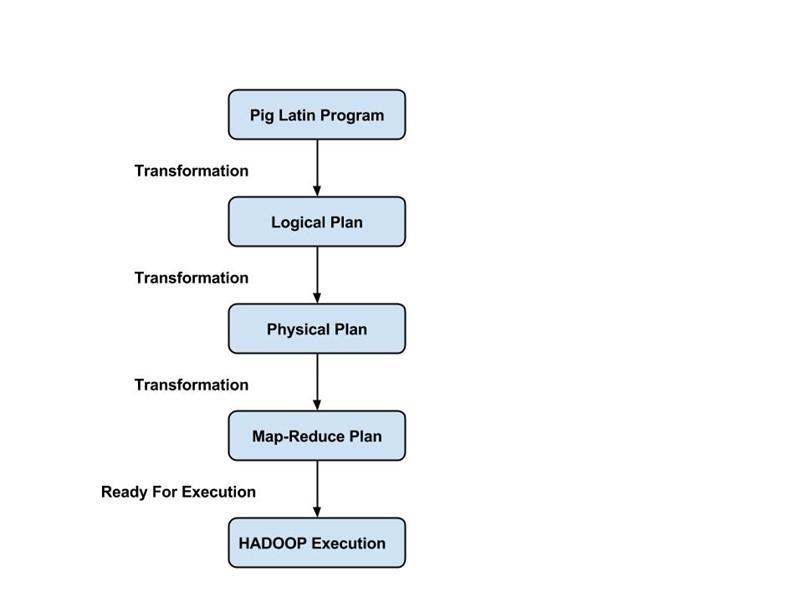
- Apache Pig architecture consists of a Pig Latin interpreter that uses Pig Latin scripts to process and analyze massive datasets. Programmers use Pig Latin language to analyze large datasets in the Hadoop environment. Apache pig has a rich set of datasets for performing different data operations like join, filter, sort, load, group, etc.
- Programmers must use Pig Latin language to write a Pig script to perform a specific task. Pig converts these Pig scripts into a series of Map-Reduce jobs to ease programmers’ work. Pig Latin programs are executed via various mechanisms such as UDFs, embedded, and Grunt shells.
Source
- Apache Pig architecture is consisting of the following major components:
- Parser
- Optimizer
- Compiler
- Execution Engine
- Execution Mode
Download and Install Pig
- Before we start with the actual process, ensure you have Hadoop installed. Change user to ‘hduser’ (id used while Hadoop configuration, you can switch to the userid used during your Hadoop config)
Downloading Apache Pig
To download the Apache Pig, you should go to the following link:
- https://downloads.apache.org/pig/
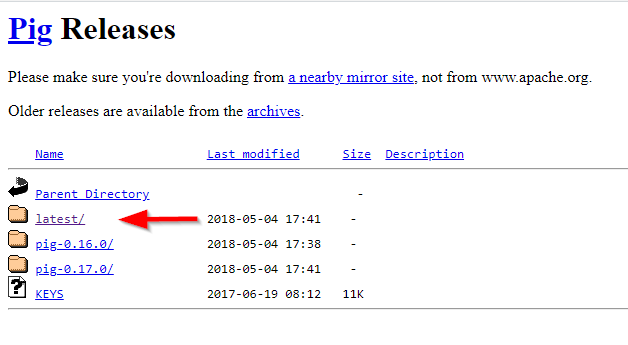
Figure 1 — Apache Pig releases directory
If you are looking for the latest version, navigate to “latest” directory, then download the pig-x.xx.x.tar.gz file.
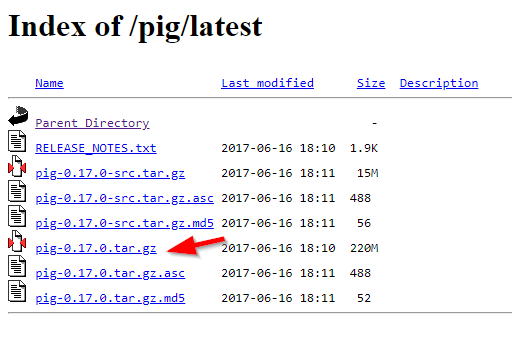
Figure 2 — Download Apache Pig binaries
After the file is downloaded, we should extract it twice using 7zip (using 7zip: the first time we extract the .tar.gz file, the second time we extract the .tar file). We will extract the Pig folder into “E:\hadoop-env” directory as used in the previous articles.
3. Setting Environment Variables
After extracting Derby and Hive archives, we should go to Control Panel > System and Security > System. Then Click on “Advanced system settings”.

Figure 3 — Advanced system settings
In the advanced system settings dialog, click on “Environment variables” button.
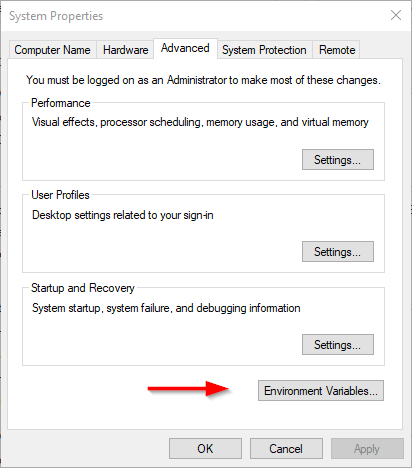
Figure 4 — Opening environment variables editor
Now we should add the following user variables:
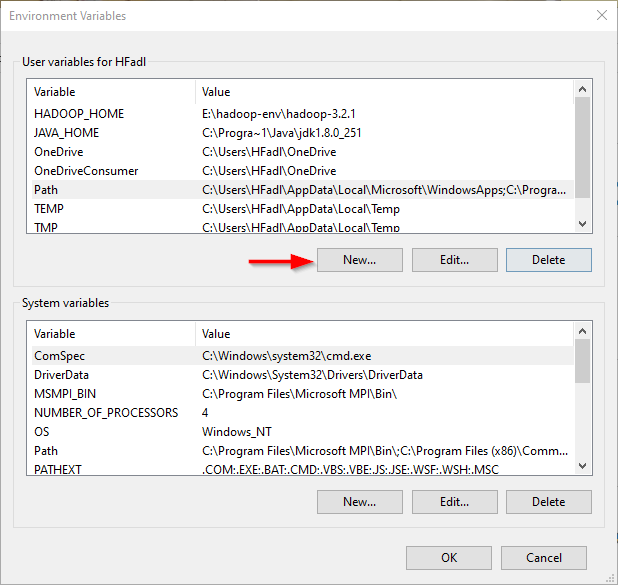
Figure 5 — Adding user variables
- PIG_HOME: “E:\hadoop-env\pig-0.17.0”
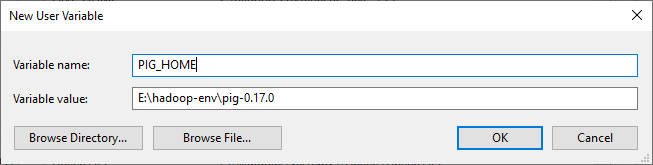
Figure 6 — Adding PIG_HOME variable
Now, we should edit the Path user variable to add the following paths:
- %PIG_HOME%\bin
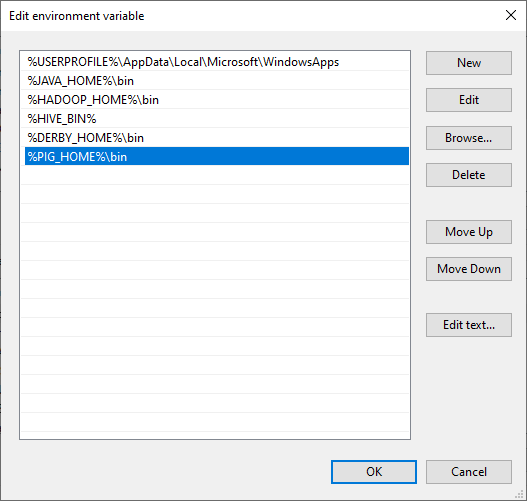
Figure 7 — Editing Path variable
4. Starting Apache Pig
After setting environment variables, let’s try to run Apache Pig.
Note: Hadoop Services must be running
Open a command prompt as administrator, and execute the following command
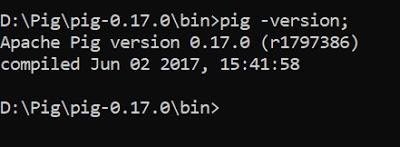
pig -version
You will receive the following exception:
‘E:\hadoop-env\hadoop-3.2.1\bin\hadoop-config.cmd’ is not recognized as an internal or external command,
operable program or batch file.
‘-Xmx1000M’ is not recognized as an internal or external command,
operable program or batch file.

Figure 8 — Pig exception
To fix this error, we should edit the pig.cmd file located in the “pig-0.17.0\bin” directory by changing the HADOOP_BIN_PATH value from “%HADOOP_HOME%\bin” to “%HADOOP_HOME%\libexec”.
Now, let’s try to run the “pig -version” command again:

Figure 9 — Pig installation validated
The simplest way to write PigLatin statements is using Grunt shell which is an interactive tool where we write a statement and get the desired output. There are two modes to involve Grunt Shell:

Best Apache Pig Training with UPDATED Syllabus By Industry Experts
- Instructor-led Sessions
- Real-life Case Studies
- Assignments
- Local: All scripts are executed on a single machine without requiring Hadoop. (command: pig -x local)
- MapReduce: Scripts are executed on a Hadoop cluster (command: pig -x MapReduce)
Since we have installed Apache Hadoop 3.2.1 which is not compatible with Pig 0.17.0, we will try to run Pig using local mode.
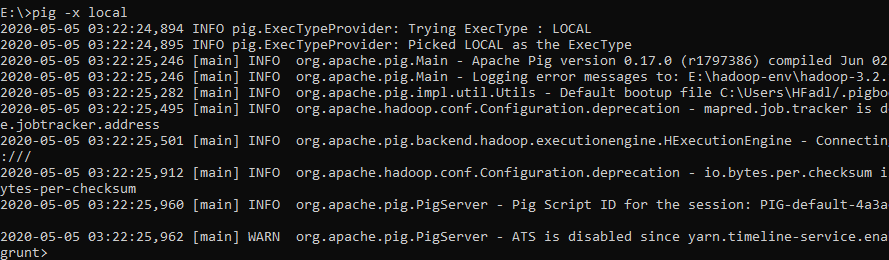
Figure 10 — Starting Grunt Shell in local mode
Pig Installation
Pig is a layer of abstraction on top of Hadoop to simplify its use by giving a SQL –like interface to process data on Hadoop. Before moving ahead, it is essential to install Hadoop first, I am considering Hadoop is already installed, if not, then go to my previous post how to install Hadoop on Windows environment.
I went through Pig 0.17.0 version, though you can use any stable version.
Download Pig 0.17.0
- https://pig.apache.org/
STEP – 1 : Extract the Pig file
Extract file pig-0.17.0.tar.gz and place under “D:\Pig”, you can use any preferred location –
[1] You will get again a tar file post extraction –

[2] Go inside of pig-0.17.0.tar folder and extract again –
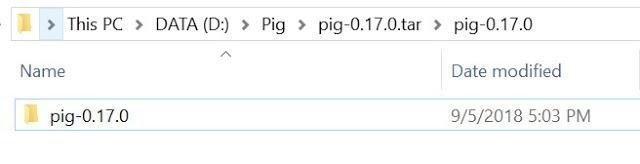
[3] Copy the leaf folder “pig-0.17.0” and move to the root folder “D:\Pig” and removed all other files and folders –


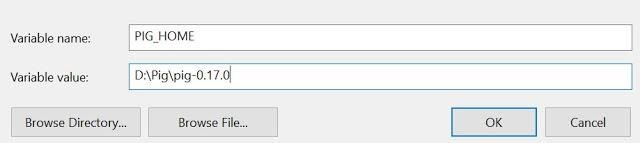
STEP – 2: Configure Environment variable
Set the path for the following Environment variable (User Variables) on windows 10 –
- PIG_HOME – D:\Pig\pig-0.17.0
This PC – > Right Click – > Properties – > Advanced System Settings – > Advanced – > Environment Variables
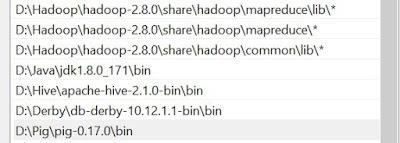
STEP – 3: Configure System variable
Next onward need to set System variable, including Hive bin directory path –
Variable: Path
Value:
- D:\Pig\pig-0.17.0\bin
STEP – 4: Working with Pig command file
Now need to do a cross check with Pig command file for Hadoop executable details –
Pig.cmd
[1] Edit file D:/Pig/pig-0.17.0/bin/pig.cmd, make below changes and save this file.
Set HADOOP_BIN_PATH=%HADOOP_HOME%\libexec

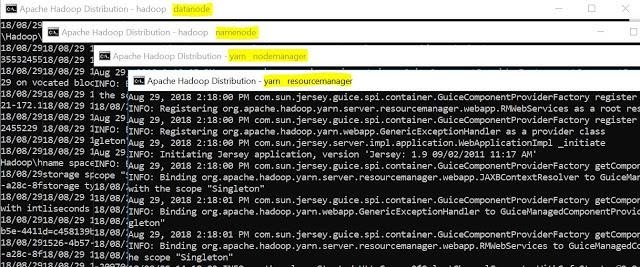
STEP – 5: Start the Hadoop
Here need to start Hadoop first –
Open command prompt and change directory to “D:\Hadoop\hadoop-2.8.0\sbin” and type “start-all.cmd” to start apache.

It will open four instances of cmd for following tasks –
- Hadoop Datanaode
- Hadoop Namenode
- Yarn Nodemanager
- Yarn Resourcemanager
It can be verified via browser also as –
- Namenode (hdfs) – http://localhost:50070
- Datanode – http://localhost:50075
- All Applications (cluster) – http://localhost:8088 etc.

Since the ‘start-all.cmd’ command has been deprecated so you can use below command in order wise –
- “start-dfs.cmd” and
- “start-yarn.cmd”
STEP – 6: Validate Pig installation
Post successful execution of Hadoop, change directory to “D:\Pig\pig-0.17.0\bin” and verify the installation.

STEP – 7: Execute Pig (Modes)
Pig has been installed and ready to execute so time to execute, you can run Apache Pig in two modes, namely –
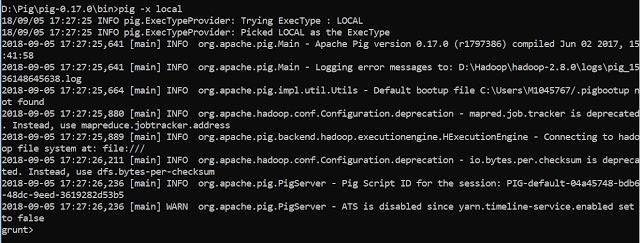
[1] Local Mode In this mode, all the files are installed and run from your local host and local file system. There is no need of Hadoop or HDFS. This mode is generally used for testing purpose.
[2] HDFS mode
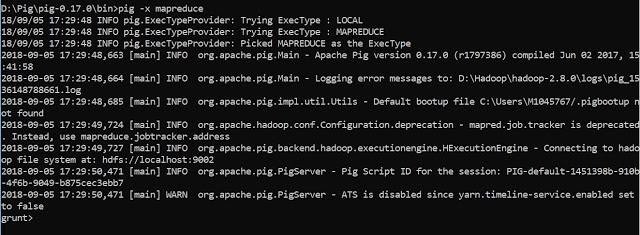
MapReduce mode is where we load or process the data that exists in the Hadoop File System (HDFS) using Apache Pig. In this mode, whenever we execute the Pig Latin statements to process the data, a MapReduce job is invoked in the back-end to perform a particular operation on the data that exists in the HDFS.
Apache Pig Execution Mechanisms
Apache Pig scripts can be executed in three ways, namely –
[1] Interactive Mode (Grunt shell)
You can run Apache Pig in interactive mode using the Grunt shell. In this shell, you can enter the Pig Latin statements and get the output (using Dump operator).
[2] Batch Mode (Script)
You can run Apache Pig in Batch mode by writing the Pig Latin script in a single file with .pig extension.
[3] Embedded Mode (UDF)
Apache Pig provides the provision of defining our own functions (User Defined Functions) in programming languages such as Java, and using them in our script.
STEP – 8: Invoke Grunt shell
Now you can invoke the Grunt shell in a desired mode (local/MapReduce) using the −x option as shown below.
Local Mode
pig -x local

Map Reduce
pig -x mapreduce

Either of these commands gives you the Grunt shell prompt as shown below.

Congratulations, Pig installed !!?
Apache Pig Features
Apache Pig offers the following features:
- Allows programmers to write fewer lines of codes. Programmers can write 200 lines of Java code in only ten lines using the Pig Latin language.
- Apache Pig multi-query approach reduces the development time.
- Apache pig has a rich set of datasets for performing operations like join, filter, sort, load, group, etc.
- Pig Latin language is very similar to SQL. Programmers with good SQL knowledge find it easy to write Pig script.
- Allows programmers to write fewer lines of codes. Programmers can write 200 lines of Java code in only ten lines using the Pig Latin language.
- Apache Pig handles both structured and unstructured data analysis.
Apache Pig Applications
A few of the Apache Pig applications are:
- Processes large volume of data
- Supports quick prototyping and ad-hoc queries across large datasets
- Performs data processing in search platforms
- Processes time-sensitive data loads
- Used by telecom companies to de-identify the user call data information.
Conclusion
- Hence, we have seen the whole concept of Hadoop Pig in this Hadoop Pig Tutorial. Apart from its usage, we have also seen where we can not use it. Also, we have seen its prerequisites to learn it well.