
Last updated on 26th Jan 2022| 3119
- Introduction of HTML Images
- The Image Tag
- The Image Tag Is An Inline Element
- Image Attributes
- Image Formats
- Compressing Images
- Insert image
- Insert images easily
- Set Image Width/Height
- Set Image Border
- Set Image Alignment
- HTML Image
- HTML tag attributes img
- Supported image formats
- How to link an image in HTML
- Conclusion
- By giving a full way or address (URL) to get to a web document.
- By giving the document way comparative with the area of the current site page record.
- We will initially talk about embedding the Image to the site page and all the while, we will comprehend both the above approaches.
- <'img src="/Images/building.jpg" alt="a huge structure on a radiant day in a city centre">
- <'img src="/Images/building.jpg" alt="a huge structure on a radiant day in a downtown area" width="300" height="200" >
- WebP is a cutting edge Image design that gives magnificent lossless and lossy pressure for Images on the web. Utilizing WebP, website admins and web engineers can make more modest, more extravagant Images that make the web quicker.
- WebP lossless Images are 26% more modest in size contrasted with PNGs. WebP lossy Images are 25-34% more modest than tantamount JPEG Images at comparable SSIM quality list.
- Created by Google, Webp is a brilliant document design for the web, in spite of the fact that WebP’s program similarity is not exactly other record organizations, for example, .jpg and .png.
- The AVIF Image design is the most recent Image codec to be utilized on the web. AVIF is an upgraded Image design which was made to make Images more modest while keeping a similar lossless quality. The AVIF Image design is gotten from the AV1 video design created by the Alliance for Open Media (AOM). Very much like with the WebP Image design you should stay up with the latest with AVIF’s program similarity.
- The record size reserve funds with AVIF are great, with serviceable documents being up to 75% more modest than their .jpg or .png reciprocals and this will most likely turned into a central part with web Images once program similarity increments. The record augmentation for AVIF will be .avif.
- For web engineers enormous Images are a central point nearby execution and can make your site endure a genuine shot with regards to stack times. Albeit some record arrangements can deliver little documents (for example designs work done in SVG), visual Images can create some issues. The most effective way for a website specialist to address this is to pack the Images.
- You can pack Images in programming bundles like Affinity Photo or Photoshop, or with online devices like Squoosh by Google. Utilizing an instrument where you can screen the visual nature of a Image during pressure provides you with the additional advantage of having the option to pack Image record sizes with almost no visual loss of value.
- The image cannot be displayed.
- Set Image Location
- Usually we keep our all the images in a separate directory.
- So let’s keep HTML file test.htm in our home directory and create a subdirectory images inside the home directory where we will keep our image test.png.
- src=”smiley.gif” alt=”Smiley face” width=”42″ height=”42″ style=”verticalalign:bottom”>
- Example: Add image border (with CSS):
- Example: Add left and right margins to image (with CSS):
- Example: Add top and bottom margins to image (with CSS):
- Example: How to insert images from another folder or from another web site:
- Example: How to add a hyperlink to an image:
- Example: How to create an image map, with clickable regions. Each region is a hyperlink:
- <'area shape="rect" coords="34,44,270,350" alt="Computer" href="computer.htm">
- <'area shape="rect" coords="290,172,333,250" alt="Phone" href="phone.htm">
- Instructor-led Sessions
- Real-life Case Studies
- Assignments
- >>>>>>>>>) />).
- >>
- <'>
- <'>
- <'>>
- <'>
- <'>>
- <'>>
- & lt; / body & gt;
- & Lt; / html & gt;
- Try it for yourself. ”
- >
- <'>
- <'>
- <'>>
- <'>
- >
- & lt; />
- <'>
- <'>
- & lt; / body & gt;
- & Lt; / html & gt;
- Try it for yourself. ”
- >>
- <''>
- <''>
- <''>>
- <''>
- & lt; / body & gt;
- & Lt; / html & gt;
- Try it for yourself. ”
- There is a new HTML loading attribute that allows you to defer loading images and iframes until they are displayed.
- The WHATWG has a pull request for this feature and is already part of Chromium (v76 and above). The supported values for the load attribute are:
- Lazy. Delay loading the image or iframe until it reaches the threshold distance from the viewport. “Avid”. Load the resource immediately.
- The default behavior, “auto”, loads the resource. You can use the delay value to take advantage of browser-native lazy loading. Lazy loading is a set of web and application development techniques that defer loading resources to a page until they are needed later, rather than loading them in advance. These techniques help improve device resource performance and utilization and reduce associated costs.
- Abbreviation File Format MIME Type File Extension Browser Compatibility
- APNG Animation Portable Network Graphics image / apng .apng Chrome, Edge, Firefox, Opera, Safari
- BMP bitmap file image / bmp .bmp Chrome, Edge, Firefox, Opera, Safari
- GIF graphics exchange format image / gif .gif Chrome, Edge, Firefox, Opera, Safari
- ICO Microsoft Icon image / xicon .ico, .cur Chrome, Edge, Firefox, Opera, Safari
- JPEG Joint Photo Expert Group Image image / jpeg .jpg, .jpeg, .jfif, .pjpeg, .pjp Chrome, Edge, Firefox, Opera, Safari
- PNG Portable Network Graphics image / png .png Chrome, Edge, Firefox, Opera, Safari
- SVG scalable vector graphics image / svg + xml .svg Chrome, Edge, Firefox, Opera, Safari
- Image file format with TIFF tag image / tiff .tif, .tiff No built-in. Required add-ons
- WebP Web image format image / webp .webp Chrome, Edge, Firefox, Opera
- Linking an image in HTML requires a few more steps, especially if you want to change certain attributes and details.
- Here’s a complete step-by-step that covers all you’ll need. You’ll start with the link tag, which is <'a>. The href is where you’ll place the URL.
- Next, you’ll need the image tag, which is <'img>. As stated above, the src is where you’ll include the image file.
- Now to change the attributes, you’ll need to know the following. First, the title attribute is title =”(your title)”. Next, set your alt attribute, which explains the image in detail.
- <'img src=”(your title)” alt=”Image” height=”(your image height)” width=”(your image width)”>
Introduction of HTML Images:
In this Tutorial, we will realize the HTML Image, how to add the Image in HTML, alongside knowing its execution and utilization through the models. In prior times, the site pages just holds back text based substance, which caused them to show up very exhausting and tedious. Luckily, it wasn’t long sufficient that the capacity to insert Images on pages was added for clients. In this article, we will know how to add Images to the site page that will make the site alluring and different strategies to embed the Images. Images are very important for decorating many complex concepts and presenting them in an easy way. On your website. This tutorial will walk you through the simple steps of how to use images on the web page.
There are 2 methods for embedding the Images into a website page:
Including Images a page:
The <'img> tag is utilized to add or implant the Images to a page/site. The “img” tag is a vacant tag, and that implies it can contain just a rundown of characteristics and it has no end tag. The expansion of the Images works on the quality alongside improving the plan structure, appearance of the website page. These days, a site doesn’t straightforwardly add Images to a page, as the Images are connected to pages by utilizing the <'img> label which holds space for the Image.
The Image Tag
The HTML Image tag is the thing is known as an ‘vacant’ tag since it is a solitary label element and just holds back credits. You may in some cases see a forward cut in the Image label like this: <'img/> rather than this: <'img> and in such cases the program will simply disregard this forward cut and treat it as a <'img> tag. The <'img/> label rendition is utilized to submit the label question with XHTML and XML, however for standard HTML, and for this instructional exercise, we will utilize the <'img> form.
The Image Tag Is An Inline Element
The <'img> component is the thing is know as an inline component, and that implies when you use it, the component will show on a similar level as the parent component in the archive stream. To transform it to a square level component you should utilize ‘display:block’ or ‘display:inline-block;’ on the applicable Images in your CSS. A ton of designers will change the <'img> component to a square level component so it acts all the more naturally and takes into account more noteworthy control with CSS.
Image Attributes
The four most significant traits for a <'img> tag are the ‘src’, ‘alt’, ‘width’ and ‘tallness’ ascribes. Each of the four ascribes ought to be remembered for each <'img> component.
src
The ‘src’ characteristic contains the record way to the Image, without it no Image will show.
alt
The ‘alt’ property contains the text portrayal of the Image, which is utilized by assistive innovations like screen perusers.
When utilizing the ‘alt’ trait there is no compelling reason to utilize expressions, for example, ‘Image of… ‘ or ‘Image of… ‘ in light of the fact that the screen peruser will do that undertaking for you.
In the event that the Image being utilized is only for show, and not a critical piece of your substance, you should set the alt property to be vacant for example alt=” “
Width and Height
Setting the ‘width’ and ‘tallness’ credits further develops site execution and forestalls the design outwardly hopping. When utilizing the ‘width’ and ‘stature’ ascribes we preclude the ‘px’ or some other unit esteem.
You should intend to set the width and tallness trait esteems to those of the first Image, or a similar viewpoint proportion.
Inscribing Images
Assuming you wish to add a Image subtitle, the most semantic method for doing this is to wrap the <'img> tag in a <'figure> component and use<'figcaption>.
You can position the <'figcaption> either above or beneath the <'img> component. This is especially helpful is you are showing a Image that addresses an idea or data that needs a clarification. In the model underneath we have set the <'figcaption> beneath the Image in the HTML, then, at that point, changed the situating in CSS so the inscription sits in the upper right corner.
Image Formats
JPEG
The JPEG (Joint Photographic Experts Group) Image design is the most ideal to visual Images and is the most well known Image design on the web. JPEG documents can utilize either the .jpeg or .jpg record augmentation.
SVG
SVG (Scalable Vector Graphics) are great for symbols and graphical work on the web. They use maths to draw vectors and line workmanship and keep up with their high goal when increased to bigger sizes. SVGs can be made in programming applications like Affinity Designer or Adobe Illustrator and can bring about shockingly little record sizes.
PNG
PNG (Portable Network Graphics) records are most frequently utilized for graphical work like symbols and logos. With the approach of SVGs on the web they are utilized not exactly previously, yet are as yet a go-to organize for some originators.
WebP
AVIF
GIF
GIF (Graphics Interchange Format) documents have an extremely restricted shading range (256 tones), contrasted with JPEG Images (16,777,216 tones). What they really do offer however is the capacity to show energized Images and brief video cuts.

Learn Advanced HTML Certification Training Course to Build Your Skills
Weekday / Weekend BatchesSee Batch DetailsCompressing Images
Insert image
You can add any image to your web page using.
Insert images easily
You can use PNG, JPEG, or GIF image files as needed, but specify the correct one. Image file name of src attribute. Image names are always case sensitive. The alt attribute is a required attribute that specifies the text alternative for the image.
Set Image Width/Height
You can set image width and height based on your requirement using width and height attributes. You can specify width and height of the image in terms of either pixels or percentage of its actual size.
Set Image Border
By default image will have a border around it, you can specify border thickness in terms of pixels using border attribute. A thickness of 0 means, no border around the Image.
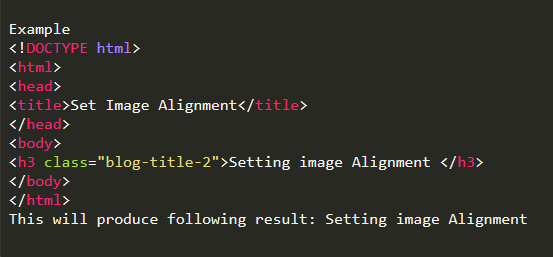
Set Image Alignment
By default image will align at the left side of the page, but you can use align attribute to set it in the center or right.
Free Web Graphics
For Free Web Graphics including patterns you can look into Free Web Graphics.
Global Attributes
HTML Image
The HTML img tag is used to display an image on a web page. The HTML tag img is an empty tag that contains only attributes and the end tag is not used in HTML image elements. Let’s look at an example of a HTML image.

Get JOB Oriented HTML Training for Beginners By MNC Experts
HTMLtag attributes img
src and alt are important attributes of the HTML img tag. All the attributes of the HTML image tag are shown below.
1) src
This is a required attribute that describes the source or path of the image. Tells the browser where to look for the image on the server. The location of the image may be in the same directory or on a different server.
2) alt
The alt attribute defines alt text when the image cannot be displayed. The value of the alt attribute represents the image in words. The alt attribute is considered suitable for SEO prospects.
3) Width
This is an optional attribute used to specify the width to display the image. Currently not recommended. You need to apply CSS instead of the width attribute.
You can use CSS to change the initial appearance of the image.
Example ofSrc and Alt attributes
The src (source) attribute indicates the source of the image. This is required as it defines the path to the image. The value of the href attribute is either the file name or its URL. The alt attribute defines an alternative name for the image. Required for.
New load attribute
Supported image formats
Image file formats are a standardized way to organize and store digital images. Image file formats allow you to save data in uncompressed, compressed (lossless or irreversible), or vector formats.
Each user agent supports different image formats. The following is a list of common image formats.
An error occurred while loading the image:
An error may occur while loading the image. If the error event has an onerror event handler set, that event handler is called. The situations in which this can occur are:
src: The attribute is empty (“”) or null. The srcurl and the URL of the page the user is currently viewing are the same.
If the image is damaged, it cannot be loaded. The image’s metadata is so corrupted that its dimensions cannot be obtained and the dimensions are not specified in the attribute.
How to link an image in HTML
Finally, set the height and width of your image. Use the code.
Conclusion
HTML is pretty straightforward language but it’s okay if you don’t want to learn it in-depth. Just make sure you have the basics down so you can survive when creating digital works.