
AngularJS is an open source JavaScript MVC framework for web application or web sites. It extends the HTML and makes it dynamic. AngularJS can be used to create Single Page Applications.
These tutorials will help you learn the essentials of AngularJS starting from the basics to an advanced level. These tutorials are broken down into sections, where each section contains a number of related topics that are packed with easy to understand explanations, real-world examples, useful tips, informative notes and a “points to remember” section.
Each tutorial includes practical examples. You can edit and see the result real time with Code Editor. Click on ‘Try it’ button at the bottom of each example to edit and see the actual result in the browser.These tutorials are designed for beginners and professionals who want to learn AngularJS step by step.
Prerequisites
Basic knowledge of HTML, JavaScript, CSS and web application is required.
Advantages of AngularJS :
- Open source JavaScript MVC framework.
- Supported by Google
- No need to learn another scripting language. It’s just pure JavaScript and HTML.
- Supports separation of concerns by using MVC design pattern.
- Built-in attributes (directives) makes HTML dynamic.
- Easy to extend and customize.
- Supports Single Page Application.
- Uses Dependency Injection.
- Easy to Unit test.
- REST friendly.
Setup AngularJS Development Environment
We need the following tools to setup a development environment for AngularJS:
- AngularJS Library
- Editor/IDE
- Browser
- Web server
AngularJS Library
To download AngularJS library, go to angularjs.org -> click download button, which will open the following popup.
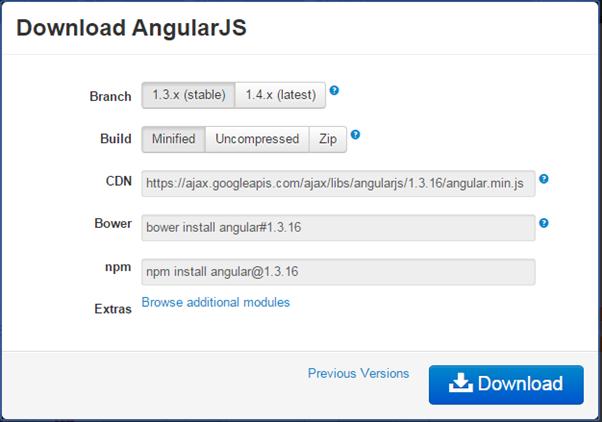
Download AngularJS Library
Select the required version from the popup and click on download button in the popup.
CDN: You can include AngularJS library from CDN url – https://ajax.googleapis.com/ajax/libs/angularjs/1.3.16/angular.min.js
Editor
AngularJS is eventually HTML and JavaScript code. So you can install any good editor/IDE as per your choice.
The following editors are recommended:
- Sublime Text
- Aptana Studio 3
- Ultra Edit
- Eclipse
- Visual Studio
Online Editor
You can also use the following online editors for learning purpose.
- plnkr.co
- jsbin.com
We are using our own online code editor for all the AngularJS examples in these tutorials.
Web server
Use any web server such as IIS, apache etc., locally for development purpose.
Browser
You can install any browser of your choice as AngularJS supports cross-browser compatibility. However, it is recommended to use Google Chrome while developing an application.
Angular Seed
Use Angular seed project to quickly get started on AngularJS application. The Angular-seed is an application skeleton for a typical AngularJS web application. You can use it to quickly bootstrap your angular webapp projects and development environment for your project.
Download angular-seed from GitHub
Let’s setup Angular project in Visual Studio 2013 for web. Setup AngularJS Project in Visual Studio
You can create AngularJS application in any version of Visual Studio. Here, we will use Visual Studio 2013 for web.
First, create new project by clicking on New Project link on start page. This will open New Project dialog box, as shown below.
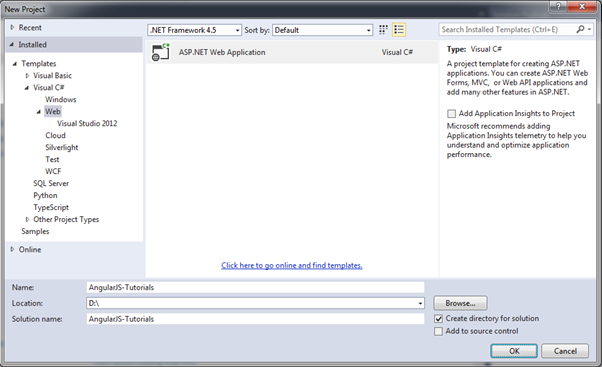
AngularJS in Visual Studio
Select Web in the left pane and ASP.NET Web Application in the middle pane and then click OK.
In the New ASP.NET Project dialog box, select Empty template and then click OK.
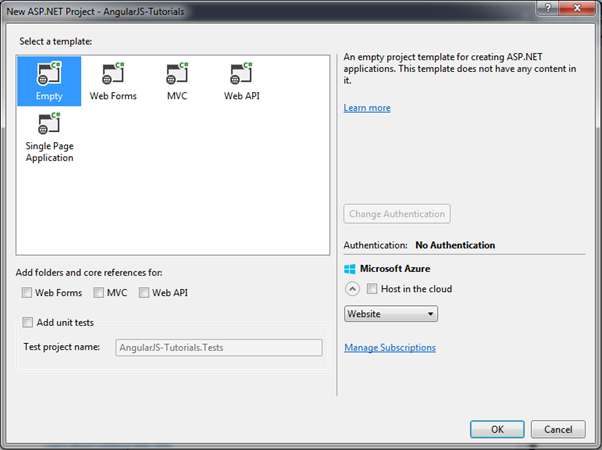
AngularJS in Visual Studio
This will create an empty website project in Visual Studio.
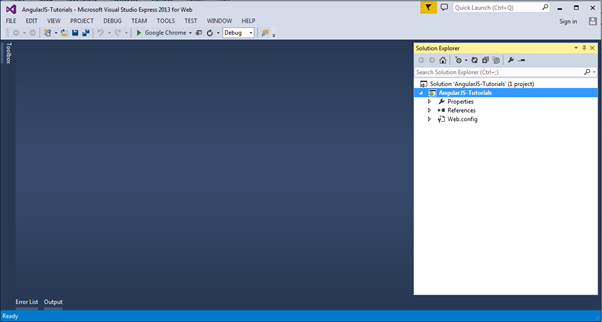
AngularJS in Visual Studio
Now, install AngularJS library from NuGet package manager. Right click on the project in Solution Explorer and select Manage NuGet Packages..
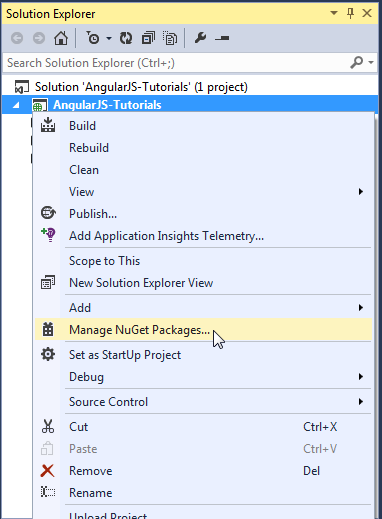
AngularJS in Visual Studio
Search for “angular” in the Manage NuGet Packages dialog box and install AngularJS Core.
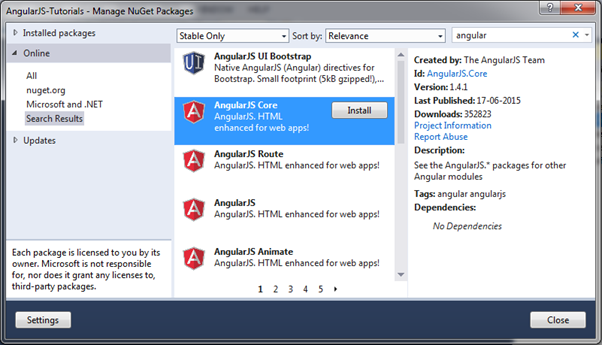
AngularJS in Visual Studio
This will add AngularJS files into Scripts folder such as angular.js, angular.min.js, and angular-mocks.js, as shown below.
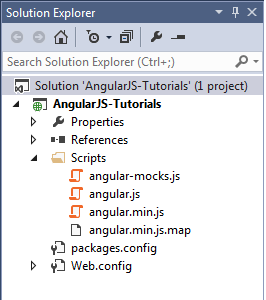
AngularJS in Visual Studio
What is DOM in AngularJS?
The logical structure of documents and documents are accessed and manipulated are defined using DOM elements. It defines events, methods, properties for all HTML elements as objects. DOM in AngularJS acts as an API (programming interface) for javascript.
Whenever a web page is loaded, the browser creates a Document Model Object (DOM) of that page.
Why DOM is used?
A programmer can use DOM in AngularJS for the following purposes:
- Documents are built using DOM elements.
- A Programmer can navigate documents structure with DOM elements.
- A programmer can add elements and content with DOM elements.
- Programmer can modify elements and content with DOM elements.
Directives for AngularJS HTML DOM
We can use various directives to bind the application data to the attributes of DOM elements. Some of them are:
- ng-disabled
- ng-hide
- ng-click
- ng-show
i. ng-disabled
We can use ng-disabled for disabling a given control. Attributes of HTML elements can be disabled using ng-disabled directive.
We can use it by adding it to an HTML button and pass it to model
The Syntax od ng-disabled:
- <input type = “checkbox” ng-model = “enableDisableButton”>To disable a button
- <button ng-disabled = “enableDisableButton”>Click</button>
Example of ng-disabled:
- <!DOCTYPE html>
- <html>
- <script src=”https://ajax.googleapis.com/ajax/libs/angularjs/1.6.9/angular.min.js”></script>
- <body>
- <div ng-app=”” ng-init=”value=true”>
- <p><button ng-disabled=”value”>Click Here!!</button></p>
- <p><input type=”checkbox” ng-model=”value”/>Button</p>
- <p>{{ value }}</p>
- </div>
- </body>
- </html>
Output:
Click Here!!
(checked) Button
true
Recommended reading – MVC Architecture & Working
The ng-disabled directive binds the application data value to the HTML button’s disabled attribute.
The ng-model directive binds the value of the HTML checkbox element to the value of value (In the above code value is the name of application data).
If the value of value evaluates to true, the button will disable and if the value of value evaluates to false, the button will not disable
Output-
Click Here!!
Button
false
ii. ng-show
We can use ng-show for showing a given control.
We can use it by adding it to an HTML button and pass it to model
The syntax of ng-show
- <input type = “checkbox” ng-model = “showHide1”>To show a Button
- <button ng-show = “showHide1”>Click </button>
Example of ng-show-
- <!DOCTYPE html>
- <html>
- <script src=”https://ajax.googleapis.com/ajax/libs/angularjs/1.6.9/angular.min.js”></script>
- <body>
- <div ng-app=””>
- <input type = “checkbox” ng-model = “showhiddenbutton”>Show button
- <button ng-show = “showhiddenbutton”>Click Here!</button>
- </div>
- </body>
- </html>
Output-
Show button
When the checkbox is checked the output displays a button of click here! also.
Output-
(checked) Show button Click Here!
iii. ng-hide
We can use ng-hide for hiding a given control.
We can use it by adding it to an HTML button and pass it to model
The syntax of ng-hide-
- <input type = “checkbox” ng-model = “showHide2”>To hide a Button
- <button ng-hide = “showHide2”>Click</button>
Example of ng-hide-
- <!DOCTYPE html>
- <html>
- <script src=”https://ajax.googleapis.com/ajax/libs/angularjs/1.6.9/angular.min.js”></script>
- <div ng-app=””>
- <input type = “checkbox” ng-model = “hidebutton”>Hide Button
- <button ng-hide = “hidebutton”>Click Here!</button>
- </div>
- </body>
- </html>
Output-
Hide Button Click Here!
When you checked the checkbox, the button click here! will get hidden
Output:
(checked) Hide Button
Also, learn – Types of Modules in AngularJS
iv. ng-click
We can use ng-click for representing an angularjs click event.
We can use it by adding it to an HTML button and pass it to model
The syntax of ng-click:
- <p>Number of click: {{ clickCounter }}</p>
- <button ng-click = “clickCounter = clickCounter + 1”>Click </button>
Example of ng-click:
- <!DOCTYPE html>
- <html>
- <script src=”https://ajax.googleapis.com/ajax/libs/angularjs/1.6.9/angular.min.js”></script>
- <div ng-app=””>
- <p>Total number of Clicks: {{ Counts }}</p>
- <button ng-click = “Counts = Counts+ 1”>Click Here!</button>
- </div>
- </body>
- </html>
Output:
Total number of Clicks: 4
Click Here!
The number of times you will click on the button Click Here! will get displayed corresponding to the total number of clicks.
So, this was all about DOM in AngularJS. Hope you liked our explanation.
Conclusion
A document object model is used for manipulating and accessing the contents in documents created using HTML or XML. In the above article, we have discussed the directives that are used to bind the application data to the attributes of DOM elements such as ng-disabled, ng- show, ng-hide, ng-click.


