Last updated on 25th Jan 2022| 3074
- Introduction
- Material or DOM
- DOM Based UI
- The Main Menu
- The Game Over Screen
- The Loading Screen
- Advantages
- Disadvantages
- Conclusion
Introduction :-
It would be hard to have missed the “HTML5 versus Flash” articles that have jumped up all around the web, especially since Steve Jobs’ Thoughts on Flash last year, and Microsoft’s declaration this week that Windows 8’s internet browser won’t uphold Flash on tablets as a matter of course. I’m not going to get into that discussion here; whatever your viewpoint, there’s no mischief in learning HTML5. Regardless of whether you know Flash, it doesn’t damage to have one more apparatus in your unit.
This instructional exercise doesn’t need you realize know Flash, or to have had any insight of programming previously. Indeed, all that you want to know before you begin is clarified in this single article: Get Up to Speed With HTML. That is it! Assuming you can follow that, you can follow this.I’m putting together this series with respect to my Flash instructional exercise series, which thusly depended on a much more seasoned Flash instructional exercise by a person named FrozenHaddock (to whom I am extremely appreciative for allowing me to utilize his thoughts).
This is certifiably not an immediate port of one or the other instructional exercise, in any case; I’ll be totally revising the code and the clarifications to suit HTML5.Cross-program similarity is a genuine and significant issue in web advancement, yet we will be somewhat self centered and spotlight on ensuring our game works in precisely one program: Chrome. Have confidence, we will manage different programs (counting portable) in other Activetuts+ instructional exercises, yet for the present, we’ll stay with Chrome, so we don’t need to part our concentration.
Clean code is more significant in HTML5 than in a great deal of different stages, in light of the fact that the fundamental programming language (JavaScript) will allow you to pull off a ton. Thus, we will ensure that you start composing good code… in the long run. We’ll be somewhat chaotic toward the beginning, just to get things moving and try not to make you look through a large number of words on “accepted procedures” before really getting to do anything.
- DOM handles all the intuitiveness of UI for you
- DOM based UI fits less code
- UI is discrete from your activity circle making your code quicker
- To show these focuses, we’ll make a straightforward button with drift and dynamic states in both DOM and material.
- DOM based UI additionally fits writting less code.
- All the excess code you need to compose for button states when utilizing the material clearly expands the record size.
- The material button nearly significantly increases the minified size of the DOM button and about pairs the gzipped size.
- Because DOM based UI doesn’t have to be updated and redraw inside the animation loop, it also doesn’t slow down the FPS as much as canvas based UI.
- As a simple test, we’ll add 100 buttons to the screen in both DOM and canvas and see what happens to the frame rate. I’ll move my mouse around the screen and interact with the buttons to trigger repaints and animation events.
- As a final test, we’ll draw 100 DOM buttons on top of the canvas with 100 canvas buttons and see what that does. This should let us see what happens when a game uses DOM based UI while running a game.
- The FPS didn’t really change that much over 2 seconds from just the 100 canvas buttons. The browser still had to use on average 4 ms to run the animation loop, but the DOM buttons didn’t really change the rendering or repainting of the screen.
- Granted, you probably won’t have 100 canvas UI elements on the page at a time. However, it’s good to know that creating UI elements in the canvas does come with a small price.
- Despite the fact that making the UI with DOM components might seem like the better arrangement, it has it’s own hardships.
- It’s Harder to Match Style
- On the off chance that we take a gander at the button we utilized for the past models, it presumably doesn’t actually match the style of any game. It’s somewhat straightforward and doesn’t look too great.
- More often than not, you’ll need your UI to match the topic and style of your game. A great deal of the time, this style has effectively been made in the code for your game, and you should simply change the code to involve it for the UI.
- For instance. In a new game I made, I previously had the code to produce a button that could appear to be like this one:
- This sort of UI isn’t possible with CSS and only one DOM component, it’s simply extremely intricate. To attempt to make this button in the DOM, I would need to utilize a ton of mind boggling methods that most likely wouldn’t be worth the effort.
- So how might we utilize the code to make a UI that matches our games style without utilizing material based UI? I’m happy you inquired.
Material or DOM :-
Everybody is by all accounts split on whether or not to make the UI for a game utilizing material or local DOM components. It appears to be the response generally floats towards it depends. I wasn’t content with that response, so I will offer an authoritative response regarding the matter of material versus DOM UI. Here it is:That’s right, that is the authoritative response. The justification for this is that the way in which you render your UI generally relies upon how you need to manage your game.
Assuming you’re anticipating utilizing a structure to port your game to a local application (like Cocoonjs), it may necessitate that all your UI be material based.If you somehow happened to utilize DOM components, your UI wouldn’t appear. Be that as it may, assuming you are simply anticipating having your game played in the web, or your structure doesn’t have a limitation, then, at that point, you can involve either material or DOM components for your UI.To assist you with concluding which course you should take, we’ll examine the two methodologies exhaustively.
DOM Based UI :
There are a few justifications for why utilizing DOM based UI is superior to utilizing the material:
UI Interactivity:
If you somehow managed to make the button in material, you would need to deal with all the button occasions yourself. This implies that you want to compose all the code to deal with any drift, concentration, dynamic, or snap occasions.
Document Size:
Performance:
We’ll start with 100 DOM buttons:
Canvas Based UI :
Material to DOM UI :-
The response is to make your UI in the material and afterward save them as a spritesheet so the DOM components can involve it as a foundation picture. We initially make the three button states in the material sitting one next to the other (illustrated in red). Notice that the Button work doesn’t have any update or draw capacities. This is on the grounds that we will simply attract the button to the screen and rehash do nothing with it.There are two different ways you can produce the foundation picture. The first is the least complex. Spot on click on the material and pick “Save Image As.”
This will permit you to save the whole material as a picture. When you have the picture, you can utilize it to make a CSS decide that involves it as a foundation picture for your UI. The subsequent methodology is to utilize the implicit JavaScript work canvas.toDataURL() to save the material as a base64 encoded picture string. We can then make a new template on the page and add a standard for the button to involve the dataURI as the foundation picture.
When we have the style for the button, we can then utilize CSS to counterbalance the place of the spritesheet for each state. Also now we have a functioning DOM based UI while as yet matching the style of our game. Even better, whenever you’ve created the template with the spritesheet dataURI, you can simply save the standard into your ordinary template and erase all the code that produced the spritesheet.
This implies that you don’t need to invest energy while the game is stacking creating the UI without fail. The drawback to this approach is that you’ll add a resource that the client should download. The picture made for that button is around 19KB though the baes64 encoded string is incredibly long and furthermore adds an extra 19KB to your CSS document.It Doesn’t Scale.
At the point when you make a UI utilizing the material, it’s truly simple to scale that UI with the game to fit different screen sizes. You should simply utilize CSS to scale the material and the UI consequently scales with it.This is the place where material based UI beats DOM based UI. It is far more straightforward to scale material based UI than it is proportional DOM based UI. There’s a smidgen seriously arranging and intricacy associated with attempting to do this in the DOM.
To scale the DOM, you can either utilize media inquiries to change the size of the DOM at certain breakpoints or you can work in rates (like utilizing a CSS matrix procedure).To get a similar vibe as scaling the material UI, you’ll most likely wan’t to attempt the framework based methodology, yet even that won’t have a similar vibe.

Learn HTML Certification Training Course to Build Your Skills
Weekday / Weekend BatchesSee Batch Details- Since we’ve talked about the advantages and disadvantages to each UI approach, it’s an ideal opportunity to make our games UI.
- The primary menu we’ll make is the principle menu that players will see when they need to play the game.
- The menu is somewhat basic, simply the title and two buttons in addition to the foundation picture.
- Since the buttons are additionally basic, I can make them either utilizing the material or utilizing DOM components. I’m not anticipating making the game responsive, so I’ve decided to make them in the DOM to save some coding time.
The Main Menu :-

- The primary menu sits inside it’s own div so we can limit it’s size to match the material. I like to make menus involving unordered records as this is a propensity for mine from making sites.
- They aren’t required here and you can undoubtedly utilize the anchor labels without them.
- Both the anchor labels have javascript:void(0); as the href. Programs permit you to make href’s that utilization javascript code by introducing the code with the word javascript:.
- By utilizing void(0); we are telling javascript to sit idle, in this manner causing the connection to sit idle.
- We could likewise utilize a button here rather than an anchor tag, however I find superseding the default styling of buttons to be a touch more monotonous than anchor labels.
- Next up is the CSS for the menu.
kandi.css
*, *:before, *:after {
box-sizing: border-box;
}
#menu.main {
background-image: url(‘imgs/menu-bg.png’);
}
#main {
display: none;
height: 60%;
overflow: auto;
margin: auto;
position: absolute;
top: 0; left: 0; bottom: 0; right: 0;
}
#main h1 {
color: white;
text-shadow: -1px -1px 0 #000, 1px -1px 0 #000, -1px 1px 0 #000, 1px 1px 0 #000;
}
.button {
display: block;
width: 150px;
margin: 0 auto;
height: 30px;
line-height: 30px;
border: 1px solid #AA2666;
color: white;
font-weight: bold;
text-shadow: -1px -1px 0 #000, 1px -1px 0 #000, -1px 1px 0 #000, 1px 1px 0 #000;
background-color: #FB1886;
background-image: -webkit-linear-gradient(bottom, #FB1886 0%, #B30D5D 100%);
background-image: linear-gradient(to bottom, #FB1886 0%, #B30D5D 100%);
border-radius: 5px;
}
.button:hover {
background-color: #B30D5D;
background-image: -webkit-linear-gradient(bottom, #B30D5D 0%, #FB1886 100%);
background-image: linear-gradient(to bottom, #B30D5D 0%, #FB1886 100%);
}
- In the first place, we give each component on the page box-estimating: line box. This guarantees that the sizes we proclaim in CSS stay that size, which is extremely useful.
- After we set the foundation picture for the menu, we set the size of the menu div to about a large portion of the size of the material and use position: outright; left: 0; right: 0; top: 0; base: 0; to in an upward direction place the menu to the game.
- In conclusion, we make the styling for the title of the game and the buttons. The text-shadow property is being utilized to give the white text a dark line so it sits better against the purple angle.
- With the menu set up, we currently need to compose the JavaScript to begin the game when the player taps on the Play button. kandi.js
/**
* Load the main menu
*/
assetLoader.finished = function() {
mainMenu();
}
/**
* Show the main menu after loading all assets
*/
function mainMenu() {
$(‘#main’).show();
}
/**
* Click handlers for the different menu screens
*/
$(‘.play’).click(function() {
$(‘#menu’).hide();
startGame();
});
- Since we are done beginning the game once all resources have stacked, we really want to change what capacity is brought in assetLoader.finished().
- The new mainMenu work shows the menu when all resources are stacked so we can’t hit the play button before the game is prepared.
- We then, at that point, make a tick controller on the play button which conceals the menu and afterward begins the game.
- For this game, I’m utilizing jQuery to control the DOM. Be that as it may, this was likely a terrible choice since everything I’m doing with jQuery is stowing away and showing DOM components and adding click controllers.
- This should be possible in local JavaScript straightforwardly and without the need of an additional a library. Tragically, jQuery was somewhat of a prop for myself thus I generally included it in any event, when I didn’t have to.
- Assuming you’re considering what that would resemble in local JavaScript, this is the way I would make it happen.
var main = document.getElementById(‘main’);
/**
* Hide element
*/
function hide(el) {
el.style.display = ‘hide’;
}
/**
* Show element
*/
function show(el) {
el.style.display = ‘block’;
}
/**
* Show the main menu after loading all assets
*/
function mainMenu() {
show(main);
}
/**
* Click handlers for the different menu screens
*/
document.querySelectorAll(‘.play’)[0].addEventListener(‘click’, function() {
hide(main);
startGame();
});
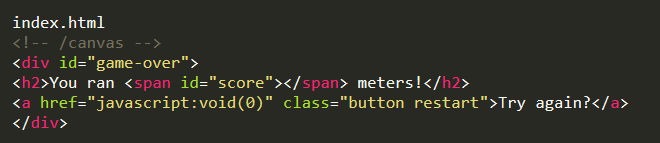
- In the game over screen, we’ll tell the player how far they got and afterward let the restart the game. By utilizing a range tag, we can place the score from the game into the text when the player kicks the bucket.
- Not at all like the menu screen, we would rather not in an upward direction adjust the game over screen to the game. This is on the grounds that the text is simpler to peruse assuming it’s before the light blue sky and not before the one of the green foundation slopes.
- So we’ll simply adding cushioning to the top until it’s at a level that looks decent.
- Instructor-led Sessions
- Real-life Case Studies
- Assignments
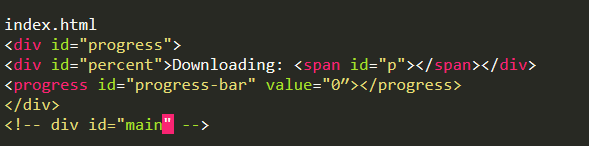
- It’s great to tell the player that the game is stacking resources so they don’t think the game is simply split when firing it up.
- It’s far and away superior to show the player the advancement of this stacking with the goal that they can judge what amount of time it will require.
- To do this, we’ll make a straightforward stacking screen with an advancement bar to show the number of resources have presently stacked. We’ll add it just before the principle menu div.
- Since we need to know when a resource has stacked, we’ll alter the assetLoaded() work inside the resource loader to call the advancement() work on the off chance that it exists.
- Inside this capacity, we’ll decide the percent of resources stacked to add up to resources and set the advancement bar esteem and the text to this worth.
- We additionally need to conceal the stacking screen once all resources have stacked, so we’ll adjust the mainMenu() capacity to do that before we show the menu.
- Finally, we add the class principle to the menu div which shows the fundamental menu’s experience picture rather than the dark stacking screen picture.
- The Credit Screen
- The last screen we will add is the credit screen.
- HTML is generally utilized.
- Each program upholds HTML Language.
- Simple to learn and utilize.
- HTML is light weighted and quick to stack.
- Try not to get to buy any additional product since it’s as a matter of course in each window.
- Simple to utilize
- Free sentence structure (in spite of the fact that, being too adaptable won’t suit norms).
- HTML is adequately simple to compose
- HTML is that it is not difficult to code in any event, for amateur developers.
- HTML additionally permits the usage of layouts, which makes planning a website page simple.
- Extremely valuable for novices in the web planning field.
- HTML can be upheld to every single program, in the event that not upheld to every one of the programs.
- HTML is based on pretty much every site, in the event that not all sites.
- HTML is progressively utilized for information stockpiling as like XML sentence structure.
- Free – You want not buy any product.
- HTML is available in each window as a matter of course so you not have to purchase the product which cost excessively.
- HTML has many tag and qualities which can short your line of code.
- It can’t create dynamic result alone, since it’s a static language.
- Making the construction of HTML reports becomes extreme to comprehend.
- Mistakes can be exorbitant.
- It is the tedious as the time it consume to keep up with on the shading plan of a page and to make records, tables and structures.
- It can make just static and plain pages so in the event that we’d like unique pages then HTML isn’t valuable.
- Needed to compose a great deal of code for making a basic site page.
- We need to check up the censured labels and affirm not to utilize them to seem on the grounds that one more language that works with HTML has supplanted the primary work of the tag, and henceforth the contrary language should be perceived and educated.
- Security highlights presented by HTML are restricted.
- In the event that we really want to record long code for making a website page, it delivers some intricacy.
- HTML can make just static and plain pages so on the off chance that we’d like unique pages then HTML isn’t helpful.
- I really want to record huge loads of code for making a simple website page.
- Security highlights are bad at HTML.
- On the off chance that we might want to record long code for making a site page, it delivers some intricacy.
The Game Over Screen :-
Then, we’ll make the game over screen that will allow the player to restart the game assuming they kick the bucket. We’ll put it just after the material tag.
kandi.css
#game-over {
display: none;
text-align: center;
padding-top: 92px;
z-index: 1;
width: 600px;
height: 360px;
overflow: auto;
margin: auto;
position: absolute;
}
kandi.js
/**
* End the game and restart
*/
function gameOver() {
stop = true;
$(‘#score’).html(score);
$(‘#game-over’).show();
}
/**
* Click handlers for the different menu screens
*/
// …
$(‘.restart’).click(function() {
$(‘#game-over’).hide();
startGame();
});

Get JOB Oriented HTML Training for Beginners By MNC Experts
The Loading Screen :-
kandi.css
#progress {
height: 12%;
margin: auto;
position: absolute;
top: 0; left: 0; bottom: 0; right: 0;
}
#percent {
color: white;
font-weight: bold;
text-shadow: -1px -1px 0 #000, 1px -1px 0 #000, -1px 1px 0 #000, 1px 1px 0 #000;
}
#progress-bar {
width: 200px;
}
We’re utilizing a HTML5 progress component to get a straightforward advancement bar. This current we should us get a straightforward advancement loader without a lot of work.
kandi.js
// assetLoader
/**
* Ensure all assets are loaded before using them
* @param {number} dic – Dictionary name (‘imgs’, ‘sounds’, ‘fonts’)
* @param {number} name – Asset name in the dictionary
*/
function assetLoaded(dic, name) {
// don’t count assets that have already loaded
if (this[dic][name].status !== ‘loading’) {
return;
}
this[dic][name].status = ‘loaded’;
assetsLoaded++;
// progress callback
if (typeof this.progress === ‘function’) {
this.progress(assetsLoaded, this.totalAssest);
}
// finished callback
if (assetsLoaded === this.totalAssest && typeof this.finished === ‘function’) {
this.finished();
}
}
// before assetLoader.finished()
/**
* Show asset loading progress
* @param {integer} progress – Number of assets loaded
* @param {integer} total – Total number of assets
*/
assetLoader.progress = function(progress, total) {
var pBar = document.getElementById(‘progress-bar’);
pBar.value = progress / total;
document.getElementById(‘p’).innerHTML = Math.round(pBar.value * 100) + “%”;
}
/**
* Show the main menu after loading all assets
*/
function mainMenu() {
$(‘#progress’).hide();
$(‘#main’).show();
$(‘#menu’).addClass(‘main’);
}
Advantages :-
Disadvantages :-
Conclusion :-
In this tutorial, we have demonstrated how to combine some built-in SixtyFPS elements with C++ code to build a little game. There are many more features that we have not talked about, such as layouts, widgets, or styling. Have a look at the examples in the SixtyFPS repo to see how these look like and can be used, such as the todo example.A slightly more polished version of this memory puzzle game is available in the SixtyFPS repository. And you can play the wasm version in your browser.