Last updated on 27th Jan 2022| 2806
- Introduction
- What is an HTML Textbox?
- What is text confining HTML structure?
- All structure components should be inside a structure
- Making a text box
- The most effective method to Create Text Box in Html
- Add a bound text box
- Scopes
- Comprehend text box properties
- Pre-Requisites
- Conclusion
Introduction :-
A textbox is a typical info control in HTML, yet it has different secret credits. An HTML text box is a region on the screen wherein the client can enter the text input. It is a generally expected information component found in numerous product programs, like internet browsers, email customers, and word processors. At the point when you click on the text box, a cursor is empowered, demonstrating the client can start composing.
What is an HTML Textbox?
The HTML textbox is an information control that permits the client to enter the text input on the page. The <'input type = "text"> is utilized to make a textbox.
What is text confining HTML structure?
The <'textarea'> tag characterizes a multi-line text input control. The <'textarea'> component is frequently utilized in a structure, to gather client inputs like remarks or surveys.The name property is expected to reference the structure information after the structure is submitted (assuming you discard the named trait, no information from the text region will be submitted).
- Create a variable for the name. This is a conventional string variable.
- Copy the worth of the textbox into the variable
- Create a message for the user.
- Send the message to the output textbox.
All structure components should be inside a structure :-
This code handles the information info and result:
- Short Text
- Long Text
- Number
- Date/Time
- Money
- Hyperlink
- Determined
- Instructor-led Sessions
- Real-life Case Studies
- Assignments
Specific Atributes of a Textbox :-
The HTML textbox supports the following attributes:
|
| ||
|---|---|---|
| Autofocus | Autofocus | It specifies that the text box should automatically get focused when the page loads. |
| Cols | Number | It specifies that the text box should automatically get focused when the page loads. |
| Rows | Number | It specifies the width of the text box. |
| Wrap | Hard soft | It specifies the height of the text box. |
| Disabled | Disabled | It specifies the text to be wrapped in a text box. |
| Form | Form_id | It specifies the width of the text box based on the number of visible characters. |
| Maxlength | Number | It specifies one or more forms. |
| Name | Text | It specifies the maximum number of characters in a text box. |
| Placeholder | Text | It specifies the short hint about the text box |
Making a text box :-
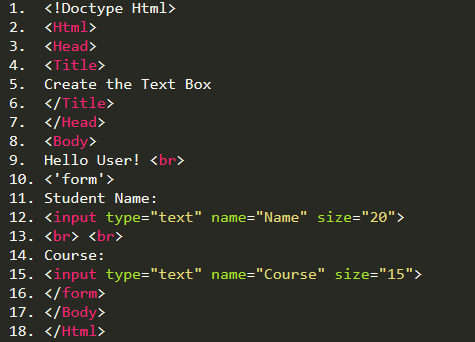
To make a text box (additionally called input box), utilize the <'input'> tag and set the sort trait to “text”. See table 3 for two models. In the main model, our HTML code begins the structure with the <'form'> tag. Inside this structure tag, we set an infobox by utilizing the <'input'> tag. The result of this HTML code is displayed on the right-hand side. In correlation, our subsequent model is more useful as we let the client in on what the client should type inside the information box. We request that the client enter their first name. If we don’t let the client know what we are requesting that the client type inside the infobox (like in the primary model), the client could not type anything or anything! So to keep away from that, utilization a little depiction for your text boxes.
Controlling the size of a text box :
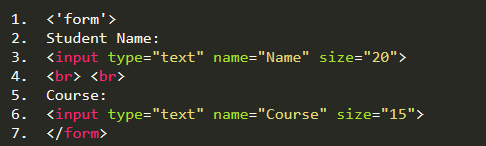
Naturally, text boxes have a similar size – 20 characters wide. This default size may not work in all circumstances. When, for instance, the client is assumed to enter the phone region code into a message box, that message box should be wide to the point of entering just the initial three digits (for US region codes). In different cases, the default text box size may not be sufficiently wide. So to determine these issues, you can add the size quality to your feedback box, as Region code : <'input type="text" size="3" >
Of course, text boxes have a similar size – 20 characters wide. This default size may not work in all circumstances. When, for instance, the client is assumed to enter the phone region code into a message box, that message box should be wide to the point of entering just the initial three digits (for US region codes). In different cases, the default text box size may not be sufficiently wide. So to determine these issues, you can add the size quality to your feedback box, as Region code : <'input type="text" size="3" >
Setting the greatest width for a text box :
As you might have seen before, the size property just influences the showed width of a text box yet it doesn’t restrict the number of characters that could be gone into the text box. So assuming we are expecting all things considered three characters for info, set the size of the text box to 3 and the max length of the text box to 3 also. On the off chance that you don’t utilize the max length property to restrict the number of characters to be placed into the text box, any text longer than the planned text box will consequently begin to look to one side. The accompanying HTML code Region code : <'input type="text" size="3" maxlength="3" >
Setting a default an incentive for a text box :
With esteem quality, you can set a default incentive for your text box. Assuming you set a default incentive for a text box, when the structure is stacked, that default esteem inside the text box is shown. Yet, how could you need to involve the worth characteristic to set a default incentive for a specific text box? All things considered, the thought is to utilize default esteem when you are sure for some specific information the worth is practically the equivalent 100% of the time. A model could be setting the default worth to 57464 for a postal district field, assuming we realize that most guests who finish up the web-based structure are from that postal division. The accompanying HTML code.

Learn Advanced HTML Certification Training Course to Build Your Skills
Weekday / Weekend BatchesSee Batch DetailsThe most effective method to Create Text Box in Html :-
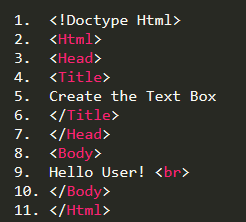
To make the text enclose an Html report for embedding the characters by the client on the site page then we need to follow the means which are given below. Utilizing these means, any client can without much of a stretch make a text box.
Stage 1: Firstly, we need to type the Html code in any content tool or open the current Html document in the word processor in which we need to make the text box.
Stage 2: For making the text box, right off the bat we need to characterize the <'form'> tag, if not characterized in the code. Presently, we need to put the cursor by then in the <'form'> label where we need to make the message box. Furthermore, then, at that point, we need to type the <'input'> tag by then.
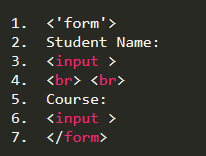
Stage 3: After composing the <'input'> tag, we need to utilize its characteristic whose name is typed. This property indicates what kind of information is to be entered. Thus, to make the text box we need to give the worth “text” in the sort characteristic.

Stage 4: If we need to characterize the width of the text box, then, at that point, we can characterize it with the assistance of the size characteristic.
Stage 5: And, finally, we need to save the Html document and afterward run the record in the program.
Add a bound text box :-
Abound text box shows information from a field in a table or inquiry. On a structure, you can utilize a text box that is bound to an updatable record source to enter or alter information in a field. The progressions that you make in the text box will be reflected in the hidden table. A speedy method for making a bound text box is by hauling a field from the Field List sheet onto your structure or report. Access consequently makes a text box for fields of the accompanying information types:
Hauling fields of different information types make various sorts of controls. For instance, on the off chance that you drag a Yes/No field from the Field List sheet to a structure or report, Access makes a look at the box. Assuming you drag an OLE Object field to a structure or report, Access makes a bound article outline, and if you drag a connection field to a structure or report, Access makes a connection control.
Add a bound text box to a structure or report by hauling a field from the Field List sheet:
1. Open the structure or report in Layout view or Design view by right-tapping the structure or report in the Navigation Pane, and afterward tap the view you need.
2. On the Design tab, in the Tools bunch, click Add Existing Fields.
3. In the Field List sheet, grow the table containing the field that you need to be bound to your text box.
4. Drag the field from the Field List sheet to the report or structure.
For more data about working with the Field List sheet, see the article Add a field to a structure or report. You can likewise add a bound text box to a structure or report by first adding an unbound text box, and afterward setting the Control Source property of the text box to the field you need to tie it to.

Get JOB Oriented HTML Training for Beginners By MNC Experts
Add an unbound text box:
An unbound text box isn’t associated with a field in a table or inquiry. You can utilize an unbound text box to show the consequences of estimation or to acknowledge input that you would rather not store straightforwardly in a table. It is most straightforward to add an unbound text confine Design view.
1. Open the structure or report in Design view by right-tapping the structure or report in the Navigation Pane, and afterward clicking Design View.
2. On the Design tab, in the Controls bunch, click Text Box.
3. Position the pointer where you need the text box to be put on the structure or report, and afterward snap to embed the message box.
One more method for making an unbound text box is by first making a bound text box by hauling a field from the Field List sheet onto the structure or report and afterward erasing the worth in its Control Source property. Assuming you do this in Design view, the text box will show “Unbound” rather than the field name. In Layout view, the text box will never again show information – indeed, it will be clear.
Add a determined text box:
1. Open the structure or report in Design view by right-tapping the structure or report in the Navigation Pane, and afterward clicking Design View.
2. On the Design tab, in the Controls bunch, click Text Box.
3. Position the pointer where you need the text box to be put on the structure or report, and afterward snap to embed the message box.
4. Do one of the accompanying’s: Place the cursor in the text box, and afterward type an articulation that works out an aggregate. Select the text box, press F4 to show the property sheet, and type the articulation in the Control Source property box. To utilize the Expression Builder to make the articulation, click close to the Control Source property box.
5. Save the structure or report and afterward change to Form view or Report view to take a look at the outcomes. For more data about making articulations, see the article Learn to assemble an articulation.
- If you want more space to type an articulation in the ControlSource property box, press SHIFT+F2 to open the Zoom box.
- On the off chance that your structure or report depends on an inquiry, you should place the articulation in the question rather than in a determined control. Doing this can further develop execution, and if you will compute sums for gatherings of records, it is simpler to involve the name of a determined field in a total capacity.
Scopes :-
- Name You should give your text box a short, significant name with the goal that you can without much of a stretch determine what information it contains. This makes it simple to allude to the text enclose articulations that you may use in other text boxes. A few information base designers like to add a prefix, for example, txt, to message box names with the goal that they can undoubtedly recognize message boxes from different sorts of controls-for instance, txtFirstName or TX Address.
- At the point when you make a bound text box by hauling a field from the Field List sheet, Access utilizes the field name as the text box name. This normally functions admirably, however assuming you intend to alter the Control Source property and make an articulation, it is smart to initially change the text box name so it is unique about the field name.
- Any other way, Access may not be able to decide if you are alluding to the text enclosed or to the field of the table. For instance, assume you have a report containing a text box named First Name, which is bound to a table field named First Name. To manage any spaces that may go before the worth in the First Name field, you may set the Control Source property of the text box to:Trim([First Name]). Nonetheless, this outcome in #Error shows up in the text box, since Access can’t decide if the articulation is alluding to the field or the text box. To fix this issue, rename the text boxes so they have interesting names.
- Control Source This property decides if the text box is bound, unbound, or determined.
- Assuming the worth in the Control Source property box is the name of a field in a table, the text box is bound to that field.
- On the off chance that the worth in Control Source is clear, the text box is unbound.
- On the off chance that the worth in Control Source is an articulation, the text box is determined.
- Text Format If the text box is bound to a Long Text field, you can set the worth in the Text Format property box to Rich Text. Doing this permits you to apply various arranging styles to the text contained in the text box. For instance, you can apply intense designing to a single word and underlining to another.
- Can Grow This property is especially useful on reports for text boxes that will undoubtedly be Short Text or Long Text fields. The default setting is No. Assuming there is a lot of text to show in the text box, the text is shortened (cut off). Nonetheless, assuming you set the worth of the Can Grow property box to Yes, the text box consequently changes its upward size to print or review every one of the information that it contains.
Comprehend text box properties :-
Despite how you make a text box, certain properties should be set so the text box works and seems the way that you need. The accompanying rundown shows a couple of the more significant and ordinarily utilized text box properties:
Pre-Requisites :-
We genuinely trust that this article on HTML textbox offered you a short knowledge of how you can enter the text input on your website pages. Albeit this is instructive, to look into web improvement completely, a suitable confirmation is enthusiastically suggested for kicking off your coding profession. Sampliner’s Full Stack Java Developer will assist you with dominating web advancement and assist you with improving your abilities.
Conclusion :-
The course investigates a wide scope of pertinent subjects, that cover front-end, middleware, and back-end innovations of web improvement utilizing Java. You will figure out how to fabricate a start to finish application, test and send code, store information utilizing MongoDB, and significantly more.