
Last updated on 10th Jul 2020| 1972
What is Spark-Java?

In simple terms, Spark-Java is a combined programming approach to Big-data problems. Spark is written in Java and Scala uses JVM to compile codes written in Scala. Spark supports many programming languages like Pig, Hive, Scala and many more. Scala is one of the most prominent programming languages ever built for Spark applications.
The Need for Spark-Java

Majority of the software developers feel comfortable working with Java at an enterprise level where they hardly prefer Scala or any such other type of languages. Spark-Java is one such approach where the software developers can run all the Scala programs and applications in the Java environment with ease.
Now we have a brief understanding of Spark Java, Let us now move on to our next stage where we shall learn about setting up the environment for Spark Java. I have lined up the procedure in the form of steps.
Installation Procedure
Step 1: Go to the below official download page of Apache Spark and choose the latest release. For the package type, choose ‘Pre-built for Apache Hadoop’.
The page will look like below.

Step 2: Once the download is completed unzip the file, to unzip the file using WinZip or WinRAR or 7-ZIP.
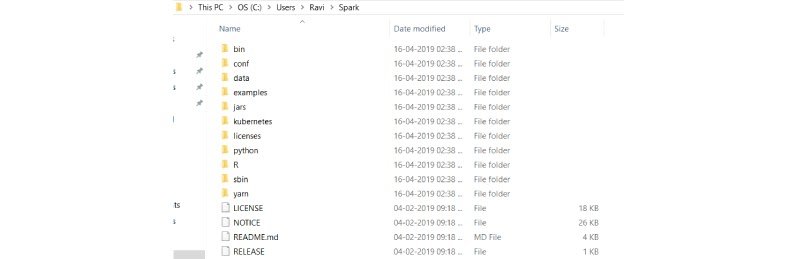
Step 3: Create a folder called Spark under your user Directory like below and copy paste the content from the unzipped file.
- C:\Users\\Spark
It looks like below after copy-pasting into the Spark directory.
Step 4: Go to the conf folder and open log file called, log4j.properties. template. Change INFO to WARN (It can be ERROR to reduce the log). This and next steps are optional.
Remove. template so that Spark can read the file.
Before removing. template all files look like below.

After removing. template extension, files will look like below

Step 5: Now we need to configure path.
Go to Control Panel -> System and Security -> System -> Advanced Settings -> Environment Variables
Add below new user variable (or System variable) (To add new user variable click on New button under User variable for )

Click OK.
Add %SPARK_HOME%\bin to the path variable.
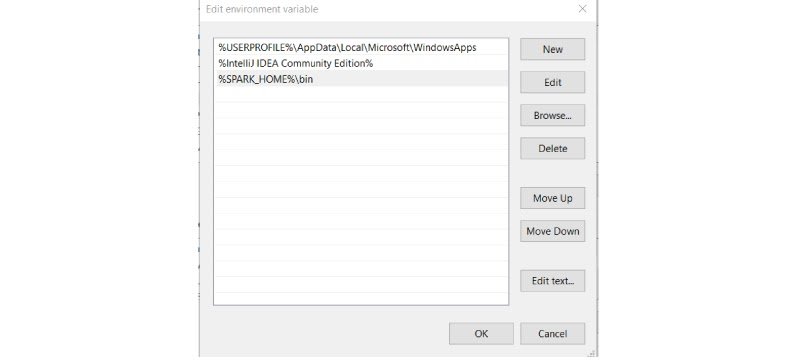
Click OK.
Step 6: Spark needs a piece of Hadoop to run. For Hadoop 2.7, you need to install winutils.exe.
You can find winutils.exe from below page
Download it.
Step 7: Create a folder called winutils in C drive and create a folder called bin inside. Then, move the downloaded winutils file to the bin folder.
- C:\winutils\bin

Add the user (or system) variable %HADOOP_HOME% like SPARK_HOME.

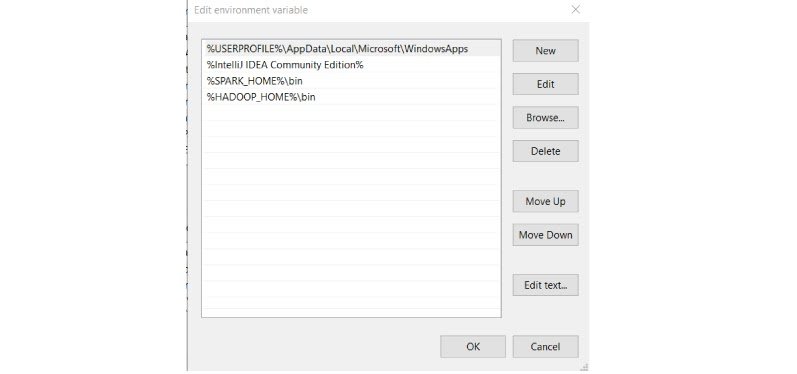
Click OK.
Step 8: To install Apache Spark, Java should be installed on your computer. If you don’t have java installed in your system. Please follow the below process
Java Installation Steps:
- Go to the official Java site mentioned below the page.
Accept Licence Agreement for Java SE Development Kit 8u201
- Download jdk-8u201-windows-x64.exe file
- Double Click on Downloaded .exe file, you will the window shown below.

- Click Next.
- Then below window will be displayed.
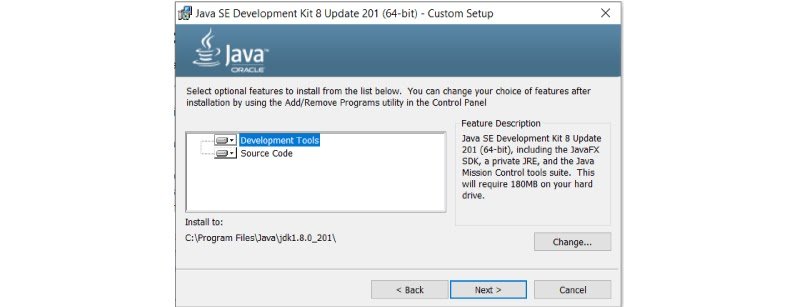
- Click Next.
- Below window will be displayed after some process.
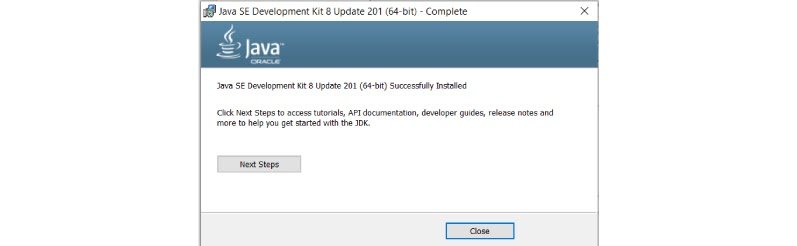
- Click Close.
Test Java Installation:
Open Command Line and type java -version, then it should display installed version of Java
You should also check JAVA_HOME and path of %JAVA_HOME%\bin included in user variables (or system variables)
1. In the end, the environment variables have 3 new paths (if you need to add Java path, otherwise SPARK_HOME and HADOOP_HOME).

2. Create c:\tmp\hive directory. This step is not necessary for later versions of Spark. When you first start Spark, it creates the folder by itself. However, it is the best practice to create a folder.
- C:\tmp\hive
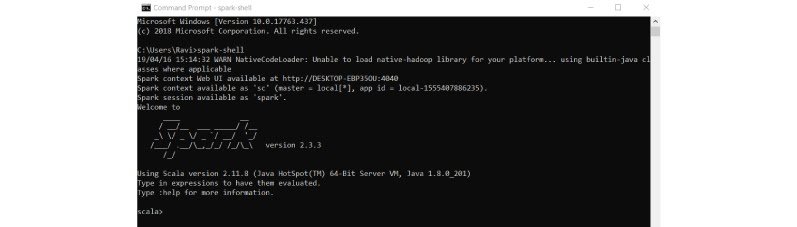
Test Installation:
Open command line and type spark-shell, you get the result as below.
We have completed spark installation on Windows system. Let’s create RDD and Data frame
We create one RDD and Data frame then will end up.
1. We can create RDD in 3 ways, we will use one way to create RDD.
Define any list then parallelize it. It will create RDD. Below is code and copy paste it one by one on the command line.
- val list = Array(1,2,3,4,5)
- val rdd = sc.parallelize(list)
Above will create RDD.
2. Now we will create a Data frame from RDD. Follow the below steps to create Dataframe.
- import spark.implicits._
- val df = rdd.toDF(“id”)
Above code will create Dataframe with id as a column.
To display the data in Dataframe use below command.
- Df.show()
It will display the below output.

Simple Spark Job Using Java
We have discussed a lot about Spark and its architecture, so now let’s take a look at a simple Spark job which counts the sum of space-separated numbers from a given text file:
32 23 45 67 2 5 7 9
12 45 68 73 83 24 1
12 27 51 34 22 14 31
…
We will start off by importing the dependencies for Spark Core which contains the Spark processing engine. It has no further requirements as it can use the local file-system to read the data file and write the results:
- <dependency>
- <groupId>org.apache.spark</groupId>
- <artifactId>spark-core_2.10</artifactId>
- <version>2.2.3</version>
- </dependency>
With the core setup, let’s proceed to write our Spark batch!
- public class CalculateFileSum {
- public static String SPACE_DELIMITER = ” “;
- public static void main(String[] args) {
- SparkConf conf = new parkConf().setMaster(“local[*]”).setAppName(“SparkFileSumApp”);
- JavaSparkContext sc = new JavaSparkContext(conf);
- JavaRDD<String> input = sc.textFile(“numbers.txt”);
- JavaRDD<String> numberStrings = input.flatMap(s -> Arrays.asList(s.split(SPACE_DELIMITER)).iterator()); JavaRDD<String> validNumberString = numberStrings.filter(string -> !string.isEmpty()) JavaRDD<Integer> numbers = validNumberString.map(numberString -> Integer.valueOf(numberString));
- int finalSum = numbers.reduce((x,y) -> x+y);
- System.out.println(“Final sum is: ” + finalSum);
- sc.close();
- }
- }
Running this piece of code should yield:
Final sum is: 687
The JavaSparkContext object we have created acts as a connection to the cluster. The Spark Context we have created here has been allocated all the available local processors, hence the *.
The most basic abstraction in Spark is RDD, which stands for Resilient Distributed Datasets. It is resilient and distributed since the data is replicated across the cluster and can be recovered if any of the nodes crash.

Get Practical Spark Java Training to UPGRADE Your Skills
- Instructor-led Sessions
- Real-life Case Studies
- Assignments
Another benefit of distributing data is that it can be processed in parallel thus promoting horizontal scaling. Another important feature of RDDs is that they are immutable. If we apply any action or transformation to a given RDD, the result is another set of RDDs.
In this example, we have read the words from the input file as RDDs and converted them into numbers. Then we have applied the reduce function on them to sum up the values of each of the RDDs before displaying them on the console.
Examples in Spark-Java
Before we get started with actually executing a Spark example program in a Java environment, we need to achieve some prerequisites which I’ll mention below as steps for better understanding of the procedure.
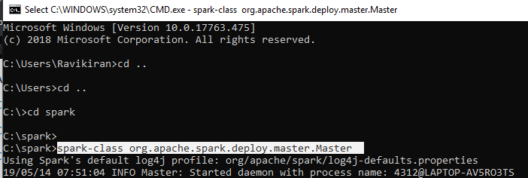
Step 1:
Open the command prompt and start Spark in command prompt as a master.
Step 2:
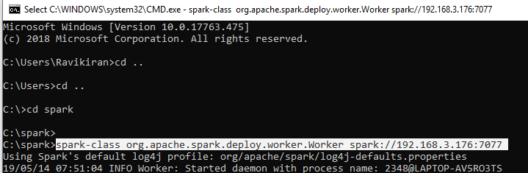
Open a new command prompt and start Spark again in the command prompt and this time as a Worker along with the master’s IP Address.
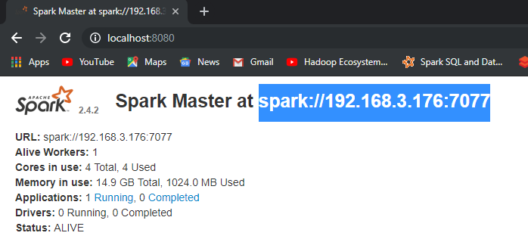
The IP Address is available at Localhost:8080.
Step 3:
Open a new command prompt and now you can start up the Spark shell along with the master’s IP Address.

Step 4:
Now you can open up the Eclipse Enterprise IDE and set up your workplace and start with your project.
Step 5:
- Set Scala nature on your Eclipse IDE and create a new maven project.
- First, we shall begin with POM.XML
- The following code is the pom.xml file
- <project xmlns=”http://maven.apache.org/POM/4.0.0″ xmlns:xsi=”http://www.w3.org/2001/XMLSchema-instance” xsi:schemaLocation=”http://maven.apache.org/POM/4.0.0 http://maven.apache.org/xsd/maven-4.0.0.xsd”>
- <modelVersion>4.0.0</modelVersion>
- <groupId>Edureka</groupId>
- <artifactId>ScalaExample</artifactId>
- <version>0.0.1-SNAPSHOT</version>
- <dependencies><!– https://mvnrepository.com/artifact/org.apache.spark/spark-core > <dependency>
- <groupId>org.apache.spark</groupId>
- <artifactId>sparkcore_2.12</artifactId>
- <version>2.4.2</version>
- </dependency> </dependencies>
- </project>
Step 6:
- Begin with your Scala application.
- The following code is for the Scala application file.
- package ScalaExample
- import org.apache.spark.SparkConfimport org.apache.spark.SparkContext
- import org.apache.spark.SparkContext._
- import org.apache.spark.sql.SparkSessionimport org.apache.spark.sql.SQLContextimport org.apache.spark.sql._
- import org.apache.spark.sql.types.{StructType, StructField, StringType, IntegerType};
- object EdurekaApp {
- def main(args: Array[String]) {
- val logFile = “C:/spark/README.md” // Should be some file on your system
- val conf = new SparkConf().setAppName(“EdurekaApp”).setMaster(“local[*]”)
- val sc = new SparkContext(conf)
- val spark = SparkSession.builder.appName(“Simple Application”).getOrCreate()
- val logData = spark.read.textFile(logFile).cache()
- val numAs = logData.filter(line => line.contains(“a”)).count()
- val numBs = logData.filter(line => line.contains(“b”)).count()
- println(s”Lines with a: $numAs, Lines with b: $numBs”)
- spark.stop()
- }
- }
Output:
Lines with a: 62, Lines with b: 31
Now that we have a brief understanding of Spark Java, Let us move into our use case on Students academic performance so as to learn Spark Java in a much better way.
Students Performance in the Examination: Use Case
Similar to our previous example Let us set up our prerequisites and then, we shall begin with our Use Case. Our use case will about Students performance in the examinations conducted on a few important subjects.

This is how our code looks like, now let us perform one by one operation upon our use case.
The following code is the pom.xml file
- <project xmlns=”http://maven.apache.org/POM/4.0.0″ xmlns:xsi=”http://www.w3.org/2001/XMLSchema-instance” xsi:schemaLocation=”http://maven.apache.org/POM/4.0.0 http://maven.apache.org/xsd/maven-4.0.0.xsd”>
- <modelVersion>4.0.0</modelVersion>
- <groupId>ScalaExample3</groupId>
- <artifactId>Edureka3</artifactId>
- <version>0.0.1-SNAPSHOT</version>
- <dependencies>
- <!– https://mvnrepository.com/artifact/org.apache.spark/spark-core –>
- <dependency>
- <groupId>org.apache.spark</groupId>
- <artifactId>spark-core_2.12</artifactId>
- <version>2.4.3</version>
- </dependency>
- <!– https://mvnrepository.com/artifact/org.apache.spark/spark-sql –>
- <dependency>
- <groupId>org.apache.spark</groupId>
- <artifactId>spark-sql_2.12</artifactId>
- <version>2.4.3</version>
- </dependency>
- <!– https://mvnrepository.com/artifact/com.databricks/spark-csv –>
- <dependency>
- <groupId>com.databricks</groupId>
- <artifactId>spark-csv_2.11</artifactId>
- <version>1.5.0</version>
- </dependency>
- </dependencies>
- </project>
The following code is for the Scala application file.
- package ScalaExample
- import org.apache.spark.SparkConfimport org.apache.spark.SparkContextimport org.apache.spark.SparkContext.
- _import org.apache.spark.sql.SparkSessionimport org.apache.spark.sql.SQLContextimport org.apache.spark.sql.
- _import org.apache.spark.sql.types.{StructType, StructField, StringType, IntegerType};
- object EdurekaApp {
- def main(args: Array[String]) {
- val conf = new SparkConf().setAppName(“EdurekaApp3”).setMaster(“local[*]”)
- val sc = new SparkContext(conf)</pre>
- val sqlContext = new SQLContext(sc)
- val spark = SparkSession.builder.appName(“Simple Application”).getOrCreate()
- val customizedSchema = StructType(Array(StructField(“gender”, StringType, true),StructField(“race”, StringType, true),StructField(“parentalLevelOfEducation”, StringType, true),StructField(“lunch”, StringType, true),StructField(“testPreparationCourse”, StringType, true),StructField(“mathScore”, IntegerType, true),StructField(“readingScore”, IntegerType, true),StructField(“writingScore”, IntegerType, true)))
- val pathToFile = “C:/Users/Ravikiran/Downloads/students-performance-in-exams/StudentsPerformance.csv”
- val DF = sqlContext.read.format(“com.databricks.spark.csv”).option(“header”, “true”).schema(customizedSchema).load(pathToFile)
- print(“We are starting from here…!”)
- DF.rdd.cache()
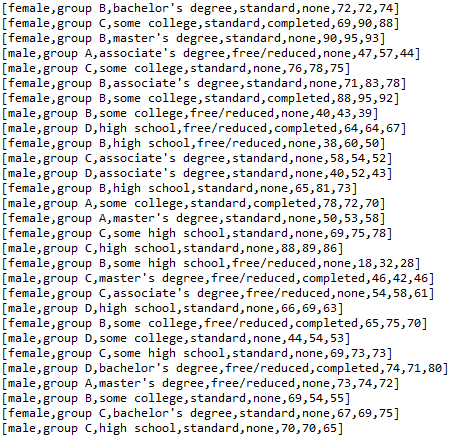
- DF.rdd.foreach(println)
- println(DF.printSchema)
- DF.registerTempTable(“Student”)
- sqlContext.sql(“SELECT * FROM Student”).show()
- sqlContext.sql(“SELECT gender, race, parentalLevelOfEducation, mathScore FROM Student WHERE mathScore > 75”).show()
- sqlContext.sql(“SELECT race, count(race) FROM Student GROUP BY race”).show()
- sqlContext.sql(“SELECT gender, race, parentalLevelOfEducation, mathScore, readingScore FROM Student”).filter(“readingScore>90”).show()
- sqlContext.sql(“SELECT race, parentalLevelOfEducation FROM Student”).distinct.show()
- sqlContext.sql(“SELECT gender, race, parentalLevelOfEducation, mathScore, readingScore FROM Student WHERE mathScore> 75 and readingScore>90”).show()
- sqlContext<span>(“SELECT gender, race, parentalLevelOfEducation, mathScore, readingScore”).dropDuplicates().show()</span>
- println(“We have finished here…!”)
- spark.stop()
- }
- }
The Output for the SparkSQL statements executed above are as follows:
Printing out data using println function.
- DF.rdd.foreach(println)
Printing the schema that we designed for our data.
- println(DF.printSchema)

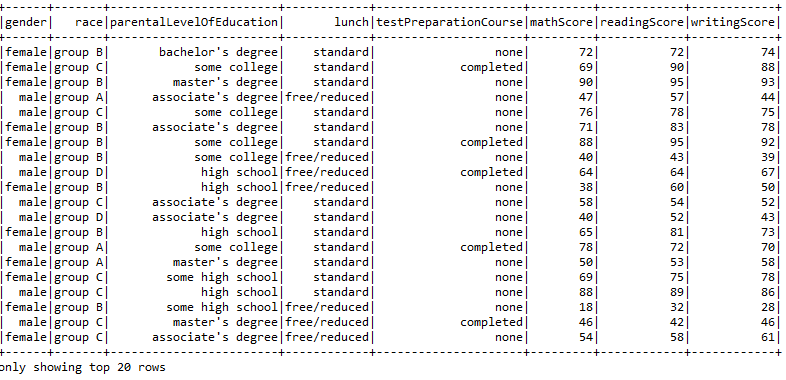
Printing our Dataframe using the select command.
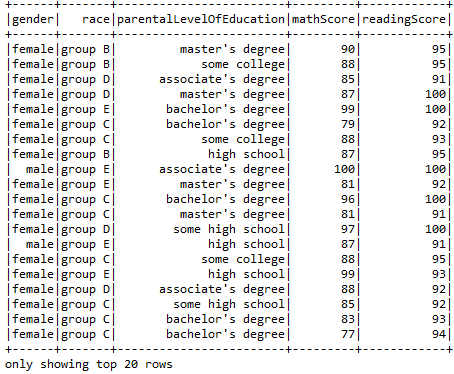
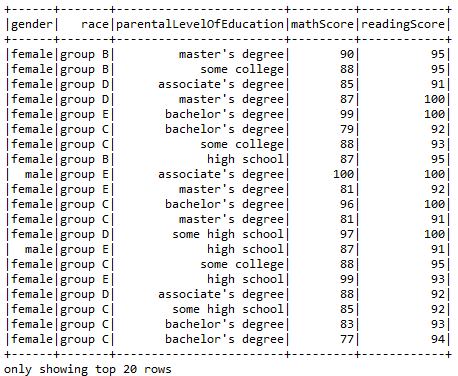
- sqlContext.sql(“SELECT * FROM Student”).show()
Applying the function WHERE to print the data of the students who scored more than 75 in maths.
- sqlContext.sql(“SELECT gender, race, parentalLevelOfEducation, mathScore FROM Student WHERE mathScore > 75”).show()

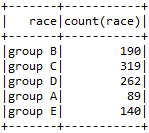
Using Group By and Count operation to find out the number of students in each group.
- sqlContext.sql(“SELECT race, count(race) FROM Student GROUP BY race”).show()
Using filter operation to find out the students who are proven to be the best in reading.
- sqlContext.sql(“SELECT gender, race, parentalLevelOfEducation, mathScore, readingScore FROM Student”).filter(“readingScore>90”).show()
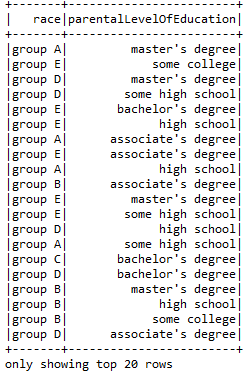
Using Distinct function to find out the distinct values in our data.
- sqlContext.sql(“SELECT race, parentalLevelOfEducation FROM Student”).distinct.show()
Using And function to compare multiple entities.
- sqlContext.sql(“SELECT gender, race, parentalLevelOfEducation, mathScore, readingScore FROM Student WHERE mathScore> 75 and readingScore>90”).show()
Using DropDuplicates function to remove duplicate entries.
- sqlContext(“SELECT gender, race, parentalLevelOfEducation, mathScore, readingScore”).dropDuplicates().show()

CONCLUSION:
So, with this, we come to an end of this Spark Java Tutorial article. I hope we sparked a little light upon your knowledge about Spark, Java and Eclipse their features and the various types of operations that can be performed using them.