
Last updated on 09th Jul 2020| 2846
- Python is the most popular programming language or nothing wrong to say that it is the next-generation programming language. In every emerging field in computer science, Python makes its presence actively.
- Python has vast libraries for various fields such as Machine Learning (Numpy, Pandas, Matplotlib), Artificial intelligence (Pytorch, TensorFlow), and Game development (Pygame,Pyglet).
- In this tutorial, we are going to learn about game development using the Pygame (Python library)
Pygame
- Pygame is a cross-platform set of Python modules which is used to create video games.
- It consists of computer graphics and sound libraries designed to be used with the Python programming language.
- Pygame was officially written by Pete Shinners to replace PySDL.
- Pygame is suitable to create client-side applications that can be potentially wrapped in a standalone executable.
Prerequisites for Pygame:
Before learning about pygame, we need to understand what kind of game we want to develop.
- To learn pygame, it is required to have basic knowledge of Python.
Pygame Installation
Install pygame in Windows
- Before installing Pygame, Python should be installed in the system, and it is good to have 3.6.1 or above version because it is much friendlier to beginners, and additionally runs faster. There are mainly two ways to install Pygame, which are given below:
1. Installing through pip: The good way to install Pygame is with the pip tool (which is what python uses to install packages). The command is the following:
- py -m pip install -U pygame –user
2. Installing through an IDE: The second way is to install it through an IDE and here we are using Pycharm IDE. Installation of pygame in the pycharm is straightforward. We can install it by running the above command in the terminal or use the following steps:
- Open the File tab and click on the Settings option.
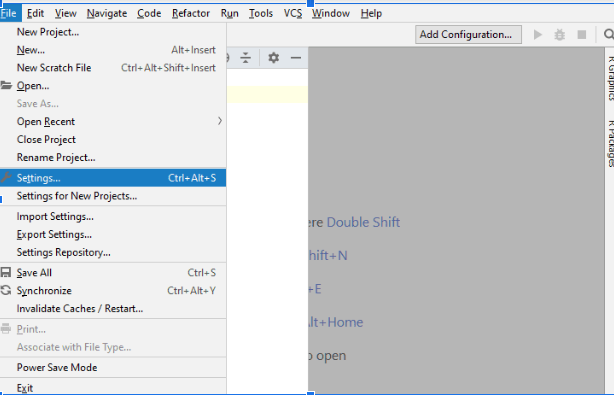
- Select the Project Interpreter and click on the + icon.
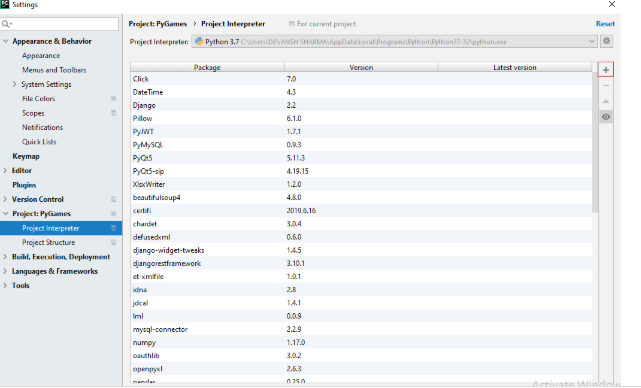
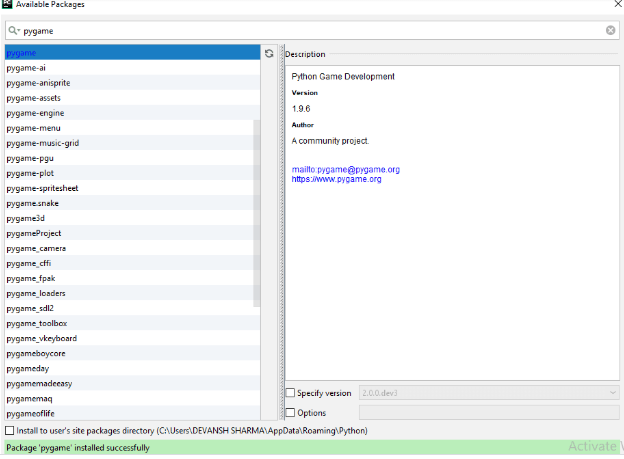
- It will display the search box. Search the pygame and click on the install package button.
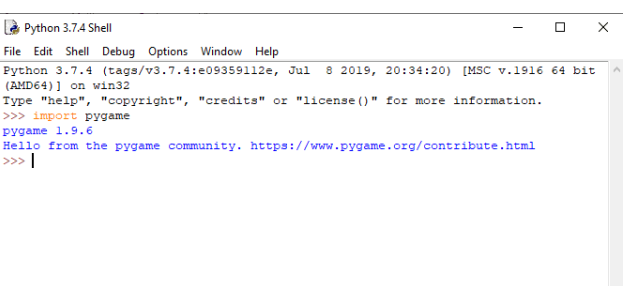
To check whether the pygame is properly installed or not, in the IDLE interpreter, type the following command and press Enter:
- import pygame
If the command runs successfully without throwing any errors, it means we have successfully installed Pygame and found the correct version of IDLE to use for pygame programming.
Install pygame in Mac
The steps are following to install pygame in Mac
- Visit the official site of pygame pygame.org and, it will display the following window, download the pygame-1.9.1release-python.org-32bit-py2.7-macosx10.3.dmg:

- Double click on the downloaded file and unzip it. Now double click on the unzipped mpkg file that appears to run the installer. Follow the instructions to install pygame.
- Start the terminal (Cmd+Space, then enter ‘terminal‘ in the search box). In the terminal, type ‘python2.7’ and press enter.
- Python should start up, display the version as 2.7.2 (2.7.1 is fine too), and give you a prompt. At the Python prompt, type ‘import pygame’. If you don’t get any errors, everything is working fine.
Simple pygame Example
Here is the simple program of pygame which gives a basic idea of the syntax.
- import pygame
- pygame.init()
- screen = pygame.display.set_mode((400,500))
- done = False
- while not done:
- for event in pygame.event.get():
- if event.type == pygame.QUIT:
- done = True
- pygame.display.flip()
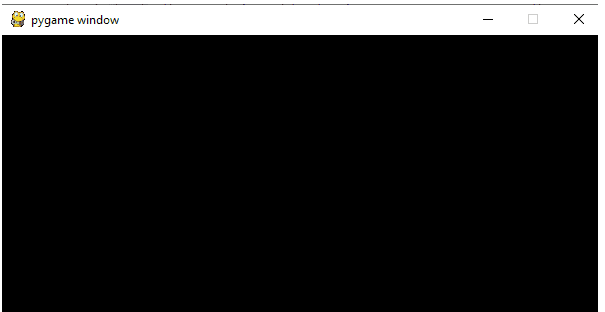
Output:
After successful execution it will give the following window as an output:
Let’s understand the basic syntax of the above program line by line:
import pygame – This provides access to the pygame framework and imports all functions of pygame.
pygame.init() – This is used to initialize all the required module of the pygame.
pygame.display.set_mode((width, height)) – This is used to display a window of the desired size. The return value is a Surface object which is the object where we will perform graphical operations.
pygame.event.get()- This is used to empty the event queue. If we do not call this, the window messages will start to pile up and, the game will become unresponsive in the opinion of the operating system.
pygame.QUIT – This is used to terminate the event when we click on the close button at the corner of the window.
pygame.display.flip() – Pygame is double-buffered, so this shifts the buffers. It is essential to call this function in order to make any updates that you make on the game screen to make visible.
Pygame Surface
- The pygame Surface is used to display any image. The Surface has a pre-defined resolution and pixel format. The Surface color is by default black. Its size is defined by passing the size argument.
- Surfaces can have the number of extra attributes like alpha planes, color keys, source rectangle clipping, etc. The blit routines will attempt to use hardware acceleration when possible; otherwise, they will use highly enhanced software blitting methods.
Pygame Clock
- Times are represented in millisecond (1/1000 seconds) in pygame. Pygame clock is used to track the time. The time is essential to create motion, play a sound, or, react to any event. In general, we don’t count time in seconds. We count it in milliseconds. The clock also provides various functions to help in controlling the game’s frame rate. The few functions are the following:
tick()
This function is used to update the clock. The syntax is the following:
- tick(framerate=0)
This method should be called once per frame. It will calculate how many milliseconds have passed since the previous call. The framerate argument is optional to pass in the function, and if it is passed as an argument then the function will delay to keep the game running slower than the given ticks per second.
- tick_busy_loop()
The tick_busy_loop() is same as the tick(). By calling the Clock.tick_busy_loop(20) once per frame, the program will never run at more than 20 frames per second. The syntax is the following:
- tick_busy_loop()
get_time()
The get_time() is used to get the previous tick. The number of a millisecond that isdra passed between the last two calls in
- get_time()
The pygame blit is the process to render the game object onto the surface, and this process is called blitting. When we create the game object, we need to render it. If we don’t render the game objects and run the program, then it will give the black window as an output.
Blitting is one of the slowest operations in any game so, we need to be careful to not to blit much onto the screen in every frame. The primary function used in blitting is blit(), which is:
blit()
- blit(source,dest,area=None,special_flags=0)
This function is used to draw one image into another. The draw can be placed with the dest argument. The dest argument can either be a pair of coordinates representing the upper left corner of the source.
Pygame Adding Image
To add an image on the window, first, we need to instantiate a blank surface by calling the Surface constructor with a width and height tuple.
- surface = pygame.Surface((100,100))
The above line creates a blank 24-bit RGB image that’s 100*100 pixels with the default black color.
For the transparent initialization of Surface, pass the SRCALPHA argument.
- surface = pygame.Surface((100,100), pygame.SRCALPHA)
Consider the following example to display image on the surface:
- import pygame
- pygame.init()
- white = (255, 255, 255)
- # assigning values to height and width variable
- height = 400
- width = 400
- # creating the display surface object
- # of specific dimension..e(X, Y).
- display_surface = pygame.display.set_mode((height, width))
- # set the pygame window name
- pygame.display.set_caption(‘Image’)
- # creating a surface object, image is drawn on it.
- image = pygame.image.load(r’C:\Users\DEVANSH SHARMA\Desktop\download.png’)
- # infinite loop
- while True:
- display_surface.fill(white)
- display_surface.blit(image, (0, 0))
- for event in pygame.event.get():
- if event.type == pygame.QUIT:
- pygame.quit()
- # quit the program.
- quit()
- # Draws the surface object to the screen.
- pygame.display.update()
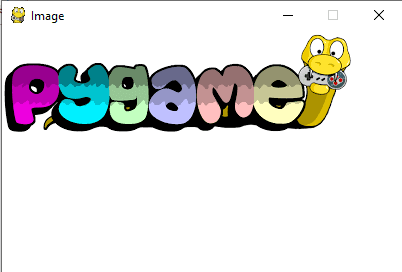
Output:
Pygame Rect
Rect is used to draw a rectangle in Pygame. Pygame uses Rect objects to store and manipulate rectangular areas. A Rect can be formed from a combination of left, top, width, and height values. It can also be created from Python objects that are already a Rect or have an attribute named “rect”.
The rect() function is used to perform changes in the position or size of a rectangle. It returns the new copy of the Rect with the affected changes. No modification happens in the original rectangle.
The Rect object has various virtual attributes which can be used to move and align the Rect:
- x,y
- top, left, right, bottom
- topleft, bottomleft, topright, bottomright
- midtop, midleft, midbottom, midright
- center, centerx, centery
- size, width, height
- w,h
The dimension of the rectangle can be changed by assigning the size, width, or height. All other assignment moves the rectangle without resizing it.
If the width or height is a non-zero value of Rect, then it will return True for a non-zero test. Some methods return a Rect with 0 sizes to represent an invalid rectangle.
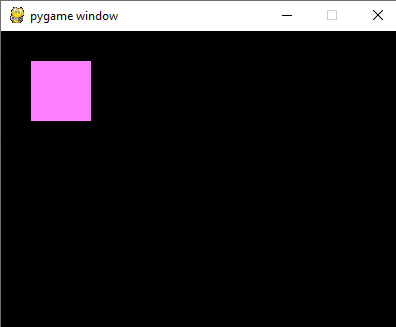
Let’s create a Rectangle on the pygame window using the Rect:
- import pygame
- pygame.init()
- screen = pygame.display.set_mode((400, 300))
- done = False
- while not done:
- for event in pygame.event.get():
- if event.type == pygame.QUIT:
- done = True
- pygame.draw.rect(screen, (0, 125, 255), pygame.Rect(30, 30, 60, 60))
- pygame.display.flip()
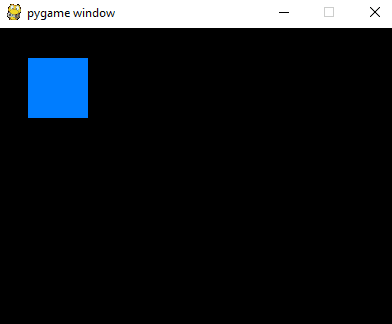
After execution of the above code, it will display the rectangle on the pygame window.
Pygame Keydown
Pygame KEYDOWN and KEYUP detect the event if a key is physically pressed and released. KEYDOWN detects the key press and, KEYUP detects the key release. Both events (Key press and Key release) have two attributes which are the following:
- key: Key is an integer id which represents every key on the keyword.
- mod: This is a bitmask of all the modifier keys that were in the pressed state when the event occurred.

Best Hands-on Advanced PyGame Training Course to Develop Your Technical Skills
Weekday / Weekend BatchesSee Batch DetailsConsider the following example of the key press and key release.
- import pygame
- pygame.init()
- # sets the window title
- pygame.display.set_caption(u’Keyboard events’)
- # sets the window size
- pygame.display.set_mode((400, 400))
- while True:
- # gets a single event from the event queue
- event = pygame.event.wait()
- # if the ‘close’ button of the window is pressed
- if event.type == pygame.QUIT:
- # stops the application
- break
- # Detects the ‘KEYDOWN’ and ‘KEYUP’ events
- if event.type in (pygame.KEYDOWN, pygame.KEYUP):
- # gets the key name
- key_name = pygame.key.name(event.key)
- # converts to uppercase the key name
- key_name = key_name.upper()
- # if any key is pressed
- if event.type == pygame.KEYDOWN:
- # prints on the console the key pressed
- print(u'”{}” key pressed’.format(key_name))
- # if any key is released
- elif event.type == pygame.KEYUP:
- # prints on the console the released key
- print(u'”{}” key released’.format(key_name))
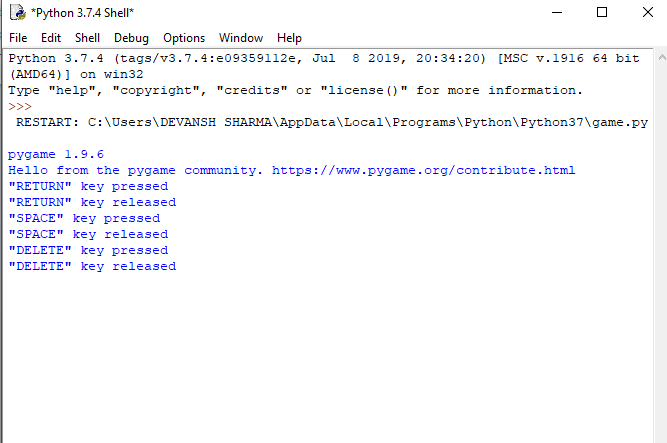
Output:
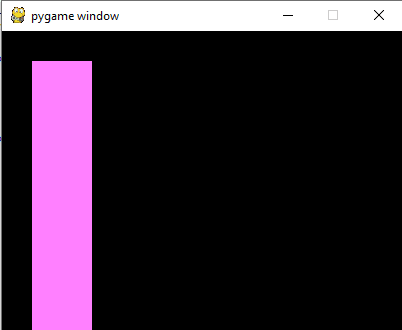
Let’s have a look the another example
- import pygame
- pygame.init()
- screen = pygame.display.set_mode((400, 300))
- done = False
- is_blue = True
- x = 30
- y = 30
- while not done:
- for event in pygame.event.get():
- if event.type == pygame.QUIT:
- done = True
- if event.type == pygame.KEYDOWN and event.key == pygame.K_SPACE:
- is_blue = not is_blue
- pressed = pygame.key.get_pressed()
- if pressed[pygame.K_UP]: y -= 3
- if pressed[pygame.K_DOWN]: y += 3
- if pressed[pygame.K_LEFT]: x -= 3
- if pressed[pygame.K_RIGHT]: x += 3
- if is_blue:
- color = (0, 128, 255)
- else:
- color = (255, 100, 0)
- pygame.draw.rect(screen, color, pygame.Rect(x, y, 60, 60))
- pygame.display.flip()
In the above code, the rectangle will be displayed on the pygame window.
When we press the Down key, the rectangle is reshaped in the downwards. The output is the following:
Pygame Draw
Pygame provides geometry functions to draw simple shapes to the surface. These functions will work for rendering to any format to surfaces. Most of the functions accept a width argument to signify the size of the thickness around the edge of the shape. If the width is passed 0, then the shape will be solid(filled).
All the drawing function takes the color argument that can be one of the following formats:
- A pygame.Color objects
- An (RGB) triplet(tuple/list)
- An (RGBA) quadruplet(tuple/list)
- An integer value that has been mapped to the surface’s pixel format
Draw a rectangle
The following functions are used to draw a rectangle on the given surface.
- pygame.draw.rect(surface, color, rect)
- pygame.draw.rect(surface, color, rect, width=0)
Parameters:
- surface – Screen to draw on.
- color- This argument is used to color the given shape. The alpha value is optional if we are using a tuple.
- rect(Rect)- Draw rectangle, position, and dimensions.
- width(int)- This is optional to use the line thickness or to indicate that the rectangle is filled.
- if width == 0, (default) fill the rectangle
- if width > 0, used for line thickness
- if width < 0, nothing will be drawn
Draw a polygon
The following functions are used to draw a polygon on the given surface.
- pygame.draw.polygon(surface,color,points)
- pygame.draw.polygon(surface, color, points, width=0)
Parameters:
- surface – Screen to draw on.
- color- This argument is used to color the given shape. The alpha value is optional if we are using a tuple.
- points(tuple(coordinate) or list(coordinate)): A sequence of 3 or more (x,y) coordinates that make up the vertices of the polygon. Each coordinate in the sequence must be tuple/list.
Note: – If the len(points) < 3 or points is not a sequence or points does not contain number pair, then it will raise the Value Error
Draw an ellipse
The following functions are used to draw an ellipse on the given surface.
- pygame.draw.ellipse(surface, color, rect)
- pygame.draw.ellipse(surface, color, rect, width=0)
Parameters:
- surface – Screen to draw on.
- color- This argument is used to color the given shape. The alpha value is optional if we are using a tuple.
- rect(Rect)- Draw rectangle, position, and dimensions.
Draw a straight line
This method is used to draw a straight line on the given surface. There are no endcaps.
- pygame.draw.line(surface,color,start_pos,end_pos,width)
- pygame.draw.line(surface,color,start_pos,end_pos,width=1)
Parameters:
- surface – Screen to draw on.
- color- This argument is used to color the given shape. The alpha value is optional if we are using a tuple.
- start_pos- start position of the line(x,y)
- end_pos- End position of the line
Draw a Circle
Below are the functions, which are used to draw a circle on the given surface.
- circle(surface, color, center, radius)
- circle(surface, color, center, radius, width=0)
Parameters:
- surface – Screen to draw on.
- color- This argument is used to color the given shape. The alpha value is optional if we are using a tuple.
- center – The center point of the circle as a sequence of two int/float, e.g. (x,y)
- radius(int or float)- radius of the circle, measured from the center parameter, if the radius is zero, then it will only draw the center pixel.
Draw an elliptical arc
Below functions are used to draw an elliptical arc on the given surface.
- arc(surface, color, rect, start_angle, stop_angle)
- ? arc(surface, color, rect, start_angle, stop_angle, width=1)
Parameters:
- surface – Screen to draw on.
- color- This argument is used to color the given shape. The alpha value is optional if we are using a tuple.
- rect(Rect)- Draw rectangle, position, and dimensions.
- start_angle- Start angle of the arc in radians.
- stop_angle- Stop angle of the arc in radians.
There are three conditions for start_angle and stop_angle parameter:
- If start_angle < stop_angle then the arc will be drawn in a counter-clock direction from the start_angle to end_angle.
- If start_angle>stop_angle then tau(tau=2*pi) will be added to the stop angle.
- If start_angle==stop_angle, nothing will be drawn.
Let’s consider an example:
- import pygame
- from math import pi
- pygame.init()
- # size variable is using for set screen size
- size = [400, 300]
- screen = pygame.display.set_mode(size)
- pygame.display.set_caption(“Example program to draw geometry”)
- # done variable is using as flag
- done = False
- clock = pygame.time.Clock()
- while not done:
- # clock.tick() limits the while loop to a max of 10 times per second.
- clock.tick(10)
- for event in pygame.event.get(): # User did something
- if event.type == pygame.QUIT: # If user clicked on close symbol
- done = True # done variable that we are complete, so we exit this loop
- # All drawing code occurs after the for loop and but
- # inside the main while done==False loop.
- # Clear the default screen background and set the white screen background
- screen.fill((0, 0, 0))
- # Draw on the screen a green line which is 5 pixels wide.
- pygame.draw.line(screen, (0, 255, 0), [0, 0], [50, 30], 5)
- # Draw on the screen a green line which is 5 pixels wide.
- pygame.draw.lines(screen, (0, 0, 0), False, [[0, 80], [50, 90], [200, 80], [220, 30]], 5)
- # Draw a rectangle outline
- pygame.draw.rect(screen, (0, 0, 0), [75, 10, 50, 20], 2)
- # Draw a solid rectangle
- pygame.draw.rect(screen, (0, 0, 0), [150, 10, 50, 20])
- # This draw an ellipse outline, using a rectangle as the outside boundaries
- pygame.draw.ellipse(screen, (255, 0, 0), [225, 10, 50, 20], 2)
- # This draw a solid ellipse, using a rectangle as the outside boundaries
- pygame.draw.ellipse(screen, (255, 0, 0), [300, 10, 50, 20])
- # Draw a triangle using the polygon function
- pygame.draw.polygon(screen, (0, 0, 0), [[100, 100], [0, 200], [200, 200]], 5)
- # This draw a circle
- pygame.draw.circle(screen, (0, 0, 255), [60, 250], 40)
- # This draw an arc
- pygame.draw.arc(screen, (0, 0, 0), [210, 75, 150, 125], 0, pi / 2, 2)
- # This function must write after all the other drawing commands.
- pygame.display.flip()
- # Quite the execution when clicking on close
- pygame.quit()
Output:

Pygame Text and Font
Pygame also provides facilities to render the font and text. We can load fonts from the system by using the pygame.font.SysFont() function. Pygame comes with the built-in default font which can be accessed by passing the font name or None. There are many functions to help to work with the font.
The font objects are created with pygame.font.Font().The actual font objects do most of the works done with fonts. Font objects are generally used to render the text into new Surface objects. Few important font functions are the following:
render()
This function is used to draw text on a new Surface. Pygame has no facility to draw text on the existing Surface. This creates a new Surface with the specified text render on it. The syntax is the following:
- render(text, antialias, color, background=None)
size()
This function is used to determine the number of space or positioning needed to render text. It can also be used for word-wrapping and other layout effects. The syntax is the following:
- size(bool)
set_bold()
This function is used for bold rending of text. The syntax is following:
- set_bold(bool)
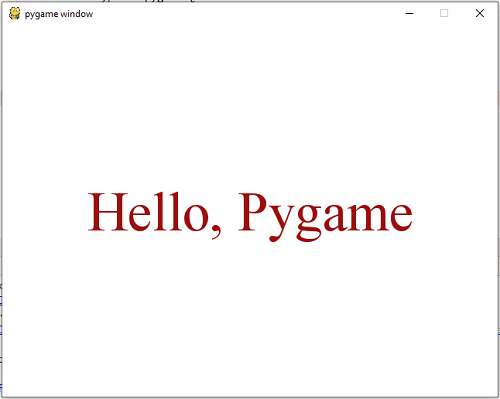
Let’s consider the following example:
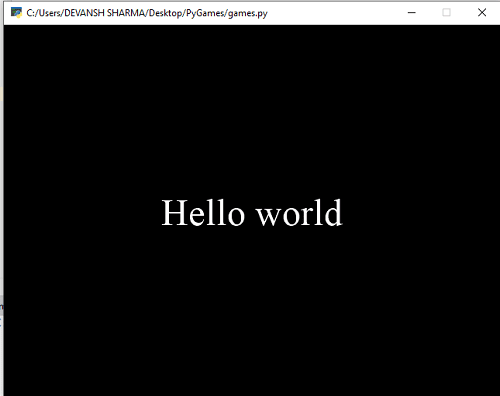
- import pygame
- pygame.init()
- screen = pygame.display.set_mode((640, 480))
- done = False
- #load the fonts
- font = pygame.font.SysFont(“Times new Roman”, 72)
- # Render the text in new surface
- text = font.render(“Hello, Pygame”, True, (158, 16, 16))
- while not done:
- for event in pygame.event.get():
- if event.type == pygame.QUIT:
- done = True
- if event.type == pygame.KEYDOWN and event.key == pygame.K_ESCAPE:
- done = True
- screen.fill((255, 255, 255))
- #We will discuss blit() in the next topic
- screen.blit(text,(320 – text.get_width() // 2, 240 – text.get_height() // 2))
- pygame.display.flip()

Get On-Demand PyGame Training with Instructor-led Classes
- Instructor-led Sessions
- Real-life Case Studies
- Assignments
Output:
Note- It is necessary to remember that the certain font must be installed on the user’s computer. If you don’t know whether fonts install or not, pygame has the following function to enumerate all the fonts available on the machine:
- all_font = pygame.font.get_fonts()
There is another function to instantiate the default system font:
- font = pygame.font.Font(None,size)
Using any above functions, we can work with the attractive font in game.
Pygame Sprite and Collision detection
A pygame sprite is a two-dimensional image that is part of the large graphical scene. Usually, a sprite will be some object in the scene.
One of the most advantages of working with sprites is the ability to work with them in groups. We can easily move and draw all the sprites with the one command if they are in the group.
The Sprite module contains the various simple classes to be used within the games. It is optional to use Sprite classes and different group classes when using pygame.
Pygame provides sprites and sprite groups that help for collision detection. Collision detection is the process when two objects on the screen collide each other. For example, if a player is hit by the enemy’s bullet, then it may lose a life or, the program need to know when the player touches a coin so that they automatically picked up.
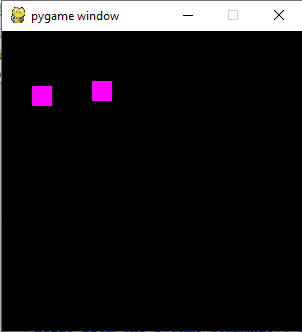
Let’s consider the following example:
- import pygame
- import sys
- #Sprite class
- class Sprite(pygame.sprite.Sprite):
- def __init__(self, pos):
- pygame.sprite.Sprite.__init__(self)
- self.image = pygame.Surface([20, 20])
- self.image.fill((255, 0, 255))
- self.rect = self.image.get_rect()
- self.rect.center = pos
- def main():
- pygame.init()
- clock = pygame.time.Clock()
- fps = 50
- bg = [0, 0, 0]
- size =[300, 300]
- screen = pygame.display.set_mode(size)
- player = Sprite([40, 50])
- # Define keys for player movement
- player.move = [pygame.K_LEFT, pygame.K_RIGHT, pygame.K_UP, pygame.K_DOWN]
- player.vx = 5
- player.vy = 5
- wall = Sprite([100, 60])
- wall_group = pygame.sprite.Group()
- wall_group.add(wall)
- player_group = pygame.sprite.Group()
- player_group.add(player)
- while True:
- for event in pygame.event.get():
- if event.type == pygame.QUIT:
- return False
- key = pygame.key.get_pressed()
- for i in range(2):
- if key[player.move[i]]:
- player.rect.x += player.vx * [-1, 1][i]
- for i in range(2):
- if key[player.move[2:4][i]]:
- player.rect.y += player.vy * [-1, 1][i]
- screen.fill(bg)
- # first parameter takes a single sprite
- # second parameter takes sprite groups
- # third parameter is a kill command if true
- hit = pygame.sprite.spritecollide(player, wall_group, True)
- if hit:
- # if collision is detected call a function to destroy
- # rect
- player.image.fill((255, 255, 255))
- player_group.draw(screen)
- wall_group.draw(screen)
- pygame.display.update()
- clock.tick(fps)
- pygame.quit()
- sys.exit
- if __name__ == ‘__main__’:
Output:
After pressing the arrow keys, one rectangle will collide with another rectangle then output is:
Python provide another game library named pyglet which is cross-platform windowing and multimedia library for Python. It is used to developing games and other visually rich applications. It supports user interface event handling, windowing, OpenGL graphics, loading images and videos, and playing sounds and music.
Few features of pyglet are the following:
- No external installation requirements or dependencies.
- Take benefit of multiple windows and multi-monitor.
- It can load images, sound, music, and video in any format.
- Pyglet is provided under the BSD open-source license.
- It supports both Python 2 and 3.
Installation of pyglet is simple; it can be installed by typing the following command.
- pip install pyglet
Consider the following example.
- import pyglet
- window = pyglet.window.Window()
- lable = pyglet.text.Label(‘Hello world’, font_name=’Times New Roman’, font_size=36,
- x= window.width//2,y=window.height//2,anchor_x=’center’, anchor_y=’center’)
- @window.event
- def on_draw():
- window.clear()
- lable.draw()
- pyglet.app.run()
Output:
Comparison between Pygame and Pyglet
| Pyglet | Pygame |
|---|---|
| 3d supportSince pyglet is so firmly merged with OpenGL. It allows the support of drawing in 3D. | Easy Python syntaxPygame uses Python as its scripting language. Python is widely treated one of the most natural languages to grasp even for beginners. |
| Cross-platformIt can work with Window, Linux, and OS X. | Usage APIThe API is very straightforward. |
| Written in pure PythonIt can be compiled using the other Python interpreters. | Best canvas systemPygame provides a drawing system that allows the user to create and draw an unlimited number of the canvas. |
| Less PopularityPyglet is less popularee because it has small community support. | More popularPygame is more popular than the pyglet. |
CONCLUSION:
In this tutorial, we have discussed the simple game development programming approach by installing the open-source module pygame into Python 3 programming environment.