
Last updated on 10th Jul 2020| 3012
A website can be defined as a collection of several web pages that are all related to each other and can be accessed by visiting a homepage, using a browser like Internet Explorer, Mozilla, Google Chrome or Opera. In this tutorial, we will explain the concept of website development, from the simplest to the most advanced. It will help novice users to learn all about websites and how they are designed and maintained. At the same time, this tutorial has enough material to help even system administrators to broaden their knowledge about websites.
Who is a web developer?
A web developer is at heart an interactive artist. They’re someone driven by a deep desire to create things. A web developer’s canvas is a user’s web browser.
Much like how a curious child takes pleasure in making toys by joining LEGO blocks—and then experiences a similar joy in taking things apart to see how they’re made, a web developer’s job is to use the basic building blocks of the web (like HTML, CSS and JavaScript) to create something complex like a webpage. Don’t sweat it! We’ll get into all of those terms soon.
It is also the web developer’s job to diagnose problems in a website’s functionality, to understand how something works by reading the code behind it, and to make changes to fix any issues. That essentially makes web developers the physicians of the world wide web. When we talk about the world wide web, we’re mainly referring to websites and web applications. At this point, the curious aspiring developer in you might be wondering, “What’s the difference between the two?”
Well, we’re glad you asked! A website is usually a simple page or a group of pages (the popular web comic site, xkcd, for example). However, modern websites are much more than that. Take Google Docs, for example. It has a nice interface that, once opened, looks very much like a desktop software like Microsoft Office. Such complex websites are often termed web applications. A web developer today is expected to know how to create and work with web applications. Having said that, most people use the terms interchangeably, so don’t get too hung up on the terminology!
Types of web developers
There are different types of web developers who focus on different areas. These include:
Frontend developers:
Frontend developers implement web page designs using HTML and CSS. They make sure the website looks pretty on different devices, and that the forms and buttons work.
Backend developers:
Backend developers create the backbone of the web application. They write code logic that handles a user’s input (for example, what should happen when you click the signup button after filling in a form).
Full stack developers:
Full stack developers do bits of both backend and frontend. Depending on the problem at hand, they can switch capes to move stacks. You can learn more about the differences between frontend and backend development in this guide.
There are many other specific roles in web development, like system architects, AI, machine learning and security engineers. These roles require more specialized knowledge of one or more of the above types of development, so many professionals in these roles will start by gaining some general web development experience.
Why Do We Need Websites?
Websites primarily act as a bridge between one who wants to share information and those who want to consume it. If you are running a business, then it is almost imperative for you to have a website to broadcast your offerings and reach out to potential clients at a global stage.
The following points explain why it is important to have a website
- A website is an online brochure where you can advertise your business offers.
- It gives you a platform to reach out to a far-and-wide global customer base.
- If you are a blogger, you have the possibility to influence your readers.
- You can show all your ideas and publish them on a website.
- If you have a business idea, then you don’t have to wait. You can straightaway open an online shop and sell your products or services online. An added advantage is that the online shop will be open 24/7 for your clients, throughout the year.
- You can communicate with your customers, giving them an opportunity to express themselves.
- You can provide valuable customer support by having a trouble-ticket system.
- If you have an official website with a domain, then you can have your personalized email. For example, info@tutorialspoint.com (it is much better than florjan.llapi@yahoo.com).
What are the skills required to become a web developer?
What does it take to become a web developer? Essentially, just three things: HTML, CSS and JavaScript—the three pillars of the web, which we’ll be learning about over the next few days. Together, these three pillars make every website work, defining the content to be displayed (HTML), telling a browser how to display that content (CSS), and making the content interactive (JavaScript), respectively.
A web developer is well versed in these three technologies. They can read other people’s code and make changes to it. They can find and debug bugs (shortcomings in existing code). A web developer might, at times, work on a new project (a new website) from scratch, or may have to work on an existing website and make it better. A typical day in the life of a web developer involves fixing bugs, developing new features (that is, enhancements) and webpages, and working with other developers to discuss ways to solve problems.
Don’t be overwhelmed by all of these details. You’ll soon see that they’re all very connected, and learning one of these automatically makes you good at a few others!
What’s the job outlook like for web developers?
In short, very good. Employment of web developers is projected to grow 13 percent from 2018 to 2028, much faster than the average for all occupations. Demand will be driven by the growing popularity of mobile devices and ecommerce (Bureau of Labor Statistics). It is a great time to be a web developer as startups are flourishing, which results in above average salaries for web developers in most parts of the world.
Also given the nature of the job, finding a remote job as a web developer is easier than many other domains. As a result, it opens up the entire world’s job market to everyone irrespective of where they’re physically located.
How to Setup a Website?
A website is composed of several elements and while setting up a website, you would have to take care of each of them.
- To set up a website and make it live, you should first purchase a hosting plan.
- Select a domain name for this website.
- Point the DNS records to the server or the hosting provider.
- Develop the content that you want to publish on the website.
- Check if you need to purchase a public certificate and install it.
- Publish the webpage on the Internet.
After understanding most of the important factors of Website Development, it is now time to set up a webpage. For setting up a webpage, we should adhere to all the steps given below.
Step 1 − Firstly, we purchased a domain name at GODADDY.
Step 2 − We chose the hosting provider based on the analysis of the hosting plans that we needed.
Step 3 − We configured the DNS records and the DNS servers of the registrar that in our case was GODADDY again.
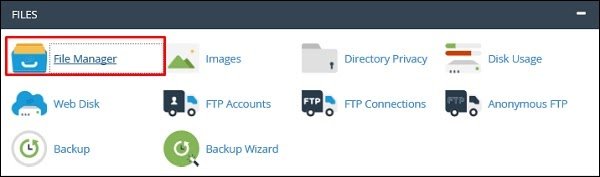
Step 4 − Now that we are done with all the above-mentioned steps, it is time to upload the files of the webpage through CPanel → File Manager.
Step 5 − After opening it, upload the files in the folder named public_html as shown in the following screenshot.
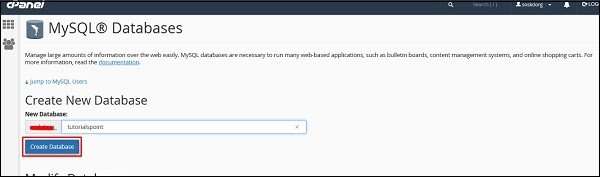
Step 6 − If you have a dynamic website, then you must configure the database too. To do it, go to MySQL Databases.

Step 7 − Click on Create New Database and then write the database name that your website will have and then click on Create Database as shown in the screenshot given below.
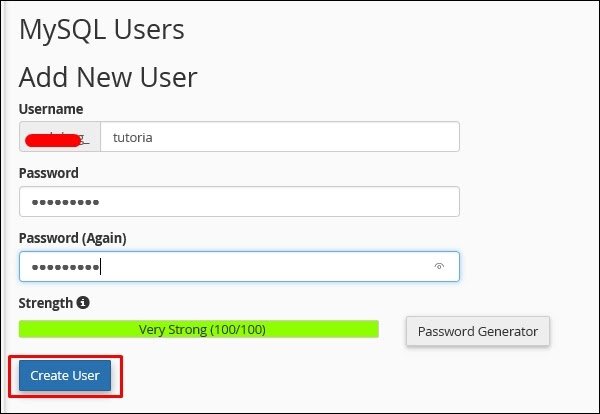
Step 8 − In the Add New User section type the Username and the password and then click on Create User.
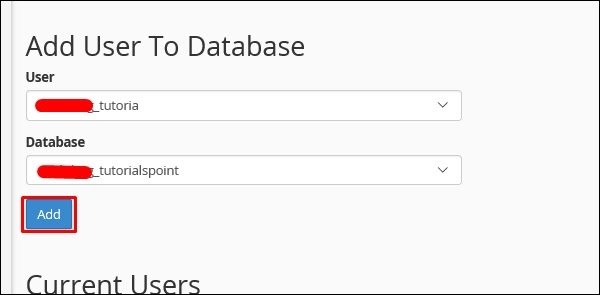
Step 9 − We must add the user that we created for this database to give rights or permissions to manage it.
Types of Validations
There are three types of validations, which are as follows −
- Domain validation SSL Certificate.
- Organization Validated SSL Certificates.
- Extended Validation SSL Certificates.
Let us now discuss each of them in detail.
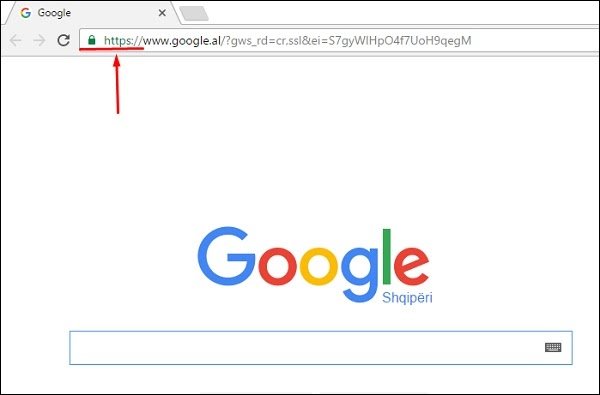
Domain validation SSL certificate
It validates the domain that is registered by a system administrator and he has the administrator rights (authorization or permission) to approve the certificate request. This validation is generally done by an email request or by DNS record.
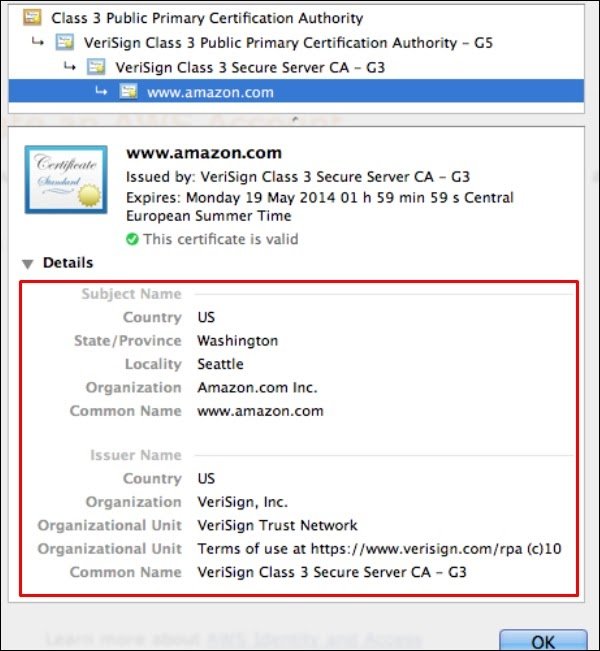
Organization Validated SSL Certificates
It validates the domain ownership and business information like the official name, City, Country. Validation is done also by email or DNS record entering. The certificate authority also needs some genuine documents to verify your Identity. The Organization Validated SSL Certificates display the company information in the certificate details as shown in the following screenshot.
Extended Validation SSL Certificates
It validates the domain ownership, organization information and the legal existence of the organization. It also validates that the organization is aware of the SSL certificate request and approves it. The validation requires documentation to certify the company identity plus a set of additional steps and checks. The Extended Validation SSL Certificates are generally identified with a green address bar in the browser containing the company name like the one shown in screenshot below.

Web Page Migration
Webpage Migration is a process of moving a webpage from one host to another. This process is done for various reasons, some of which are −

- You are not satisfied anymore with the support of the Hosting Company
- Prices are cheaper to another hosting
- Your actual hosting plan doesn’t fulfill your needs anymore
- Technology offered is not competitive anymore, etc.
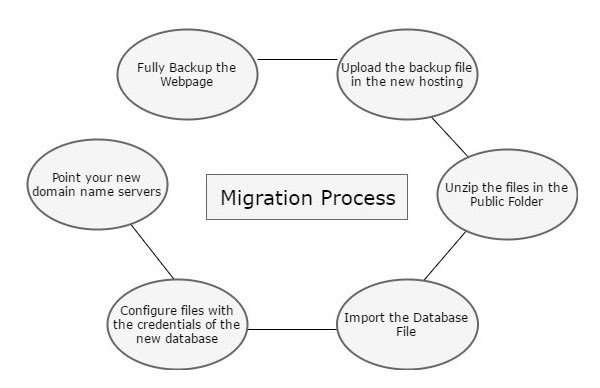
As migration is a process, the following steps are needed to complete it in a minimal downtime of your webpage.
- We must fully backup our webpage as discussed in the previous chapters.
- Upload the backup file in the new hosting.
- Unzip files in the Public folder.
- Import the database file.
- Configure files with the credentials of the new database.
- Point your new domain name servers with your current registrar and wait for the new records to be propagated.
Web Development Security
Securing your web pages is as important as developing it, because any threat which can compromise the security can harm your business reputation, damage you financially (by stealing your online deposits), damage your clients that visit your website, etc.
As per security experts, they will suggest doing the website security check based on the OWASP TOP 10, which is a powerful awareness document for web application security. The OWASP Top 10 represents a broad consensus about what the most critical web application security flaws are.
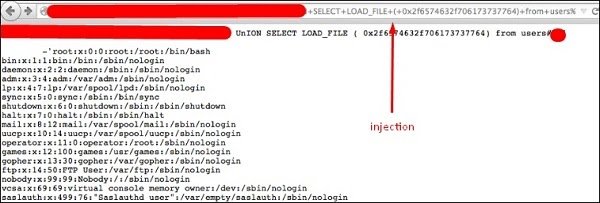
SQL Injections
Injection flaws, such as SQL, OS and LDAP injection occur when untrusted data is sent to an interpreter as part of a command or a query. The attacker’s hostile data can trick the interpreter into executing unintended commands or accessing data without proper authorization.
Solution − To secure your webpage from iSQL, you must validate inputs and filtering symbols.
Broken Authentication and Session Management
Application functions related to authentication and session management are often not implemented correctly, which allows attackers to compromise passwords, keys, session tokens or even to exploit other implementation flaws to assume other users’ identities.
Solution − To secure your site from this flaw, you must make cookies and sessions with expiration time.
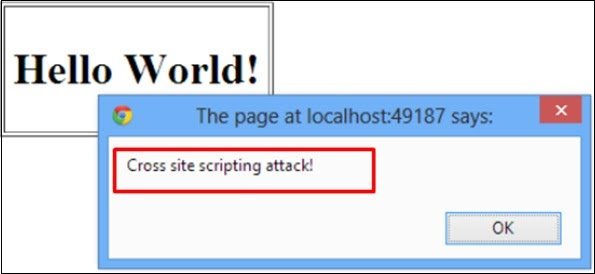
Cross-Site Scripting (XSS)
XSS flaws occur whenever an application takes untrusted data and sends it to a web browser without proper validation or escaping. XSS allows attackers to execute scripts in the victim’s browser, which can then hijack user sessions, deface websites or redirect the user to malicious sites.
Solution − Protection from this is on the same lines as it is for iSQL.
Insecure Direct Object Reference
A direct object reference occurs when a developer exposes a reference to an internal implementation object, such as a file, directory or a database key. Without an access control check or other protection, attackers can manipulate these references to access unauthorized data.
Solution − You should implement specific protection mechanisms such as passwords to safeguard such files.
Security Misconfiguration
Good security requires having a secure configuration defined and deployed for the application, frameworks, application server, web server, database server and the platform. Secure settings should be defined, implemented and maintained, as the defaults are often insecure.
Solution − Software should be kept up to date.
Sensitive Data Exposure
Many web applications do not properly protect sensitive data, such as credit cards, tax IDs and authentication credentials. Attackers may steal or modify such weakly protected data to conduct credit card fraud, identity theft or other crimes.
Solution − Sensitive data deserves extra protection such as encryption at rest or in transit, as well as special precautions when exchanged with the browser.
Missing Function Level Access Control
Most web applications verify function level access rights before making that functionality visible in the UI. However, applications need to perform the same access control checks on the server when each function is accessed. If requests are not verified, attackers will be able to forge requests to access functionality without proper authorization.
Solution − You should check the levels of authentication.
Cross-Site Request Forgery (CSRF)
A CSRF attack forces a logged-on victim’s browser to send a forged HTTP request, including the victim’s session cookie and any other automatically included authentication information, to a vulnerable web application. This allows the attacker to force the victim’s browser to generate requests which the vulnerable application thinks are legitimate requests from the victim.
Solution − The most commonly used prevention is to attach some unpredictable challenge based tokens to each request that comes from a website and associate them with the user’s session.
Using Components with Known Vulnerabilities
Components, such as libraries, frameworks and other software modules almost always run with full privileges. If a vulnerable component is exploited, such an attack can facilitate serious data loss or server takeover. Applications using components with known vulnerabilities may undermine application defenses and enable a range of possible attacks and impacts.
Solution − Check if that component version has vulnerabilities and try to avoid or change with another version.
Invalidated Redirects and Forwards
Web applications frequently redirect and forward users to other pages and websites. These applications use untrusted data to determine the destination pages. Without proper validation, attackers can redirect victims to phishing or malware sites or use forwards to access unauthorized pages.
Solution − Always validate a URL.
Secure Used Protocols
This is the case where you have a VPS plan and you manage everything on your own. When the services are installed they use default ports. This makes the job easier to a hacker because he knows where to look at.
Some of the main service ports which are used in hosting of websites are given below −
- SSH – port 22
- FTP – port 21
- MySQL – port 3306
- DNS – port 53
- SMTP – port 25
The port changing of those services varies depending on the Operating System and its different versions. In addition to this, you have to install a firewall. If it is a Linux OS, we will recommend IPtables and block all the other unneeded ports. In case your OS is Windows, you can use its incorporated firewall.
To block brute force logins in your services, you can use Fail2ban, which is a Linux based software and block all the IP addresses which makes many failed login attempts.
How to open the devtools in your browser
The devtools live inside your browser in a subwindow that looks roughly like this, depending on what browser you are using:
How do you pull it up? Three ways:
- Keyboard: Ctrl + Shift + I, except
- Internet Explorer and Edge: F12
- macOS: ⌘ + ⌥ + I
- Menu bar:
- Firefox: Menu ➤ Web Developer ➤ Toggle Tools, or Tools ➤ Web Developer ➤ Toggle Tools
- Chrome: More tools ➤ Developer tools
- Safari: Develop ➤ Show Web Inspector. If you can’t see the Develop menu, go to Safari ➤ Preferences ➤ Advanced, and check the Show Develop menu in menu bar checkbox.
- Opera: Developer ➤ Developer tools

Learn Web Development Training with Advanced Concepts By Industry Experts
- Instructor-led Sessions
- Real-life Case Studies
- Assignments
- Context menu: Press-and-hold/right-click an item on a webpage (Ctrl-click on the Mac), and choose Inspect Element from the context menu that appears. (An added bonus: this method straight-away highlights the code of the element you right-clicked.)
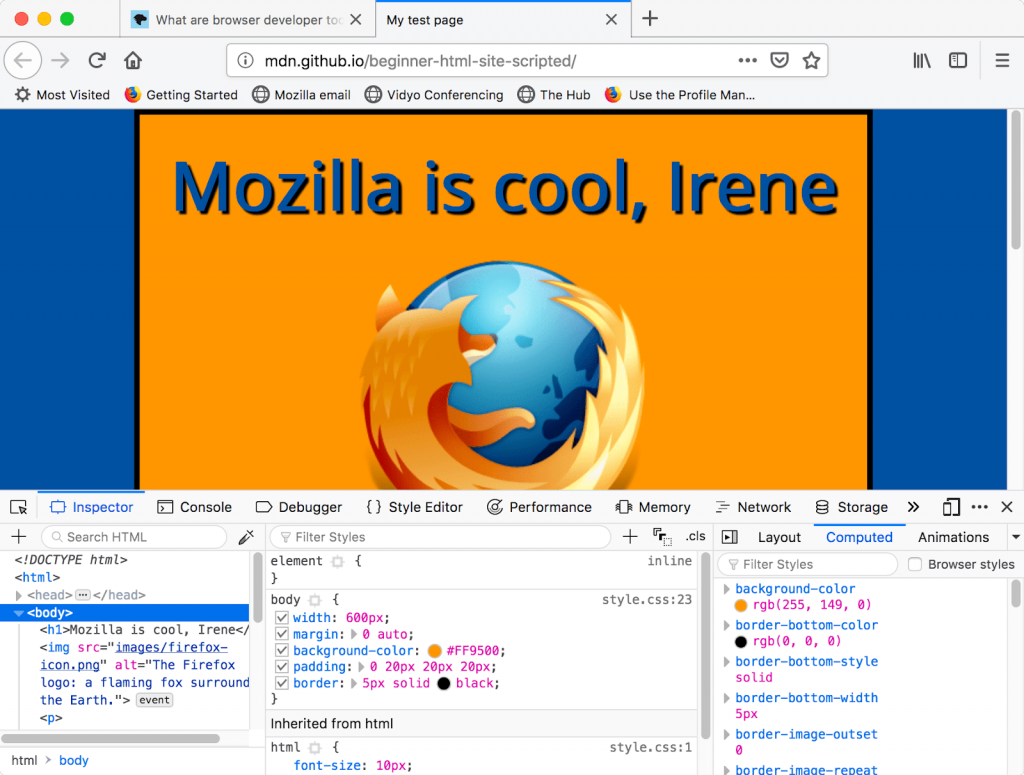
The Inspector: DOM explorer and CSS editor
The developer tools usually open by default to the inspector, which looks something like the following screenshot. This tool shows what the HTML on your page looks like at runtime, as well as what CSS is applied to each element on the page. It also allows you to instantly modify the HTML and CSS and see the results of your changes reflected live in the browser viewport.
If you don’t see the inspector,
- Tap/click the Inspector tab.
- In Internet Explorer, tap/click DOM Explorer, or press Ctrl + 1.
- In Microsoft Edge, or Opera, tap/click Elements.
- In Safari, the controls are not so clearly presented, but you should see the HTML if you haven’t selected something else to appear in the window. Press the Style button to see the CSS.
Exploring the DOM inspector
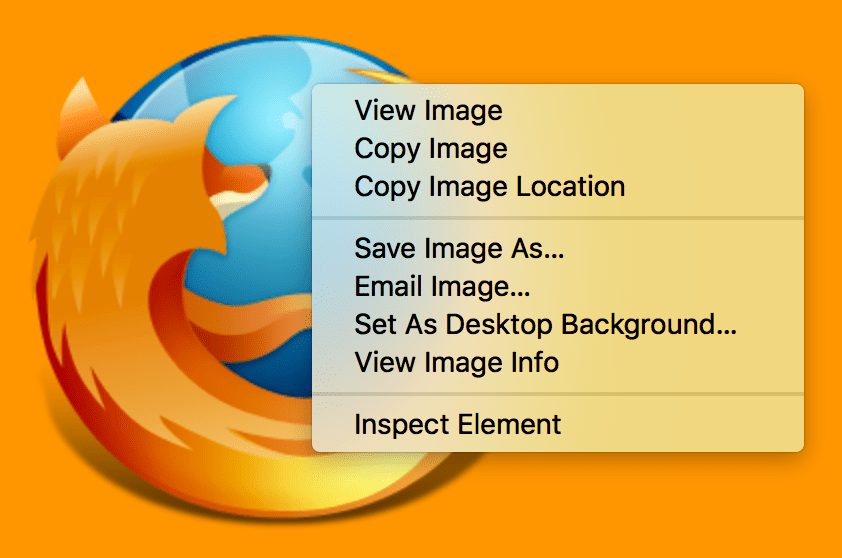
For a start, right-click (Ctrl-click) an HTML element in the DOM inspector and look at the context menu. The available menu options vary among browsers, but the important ones are mostly the same:
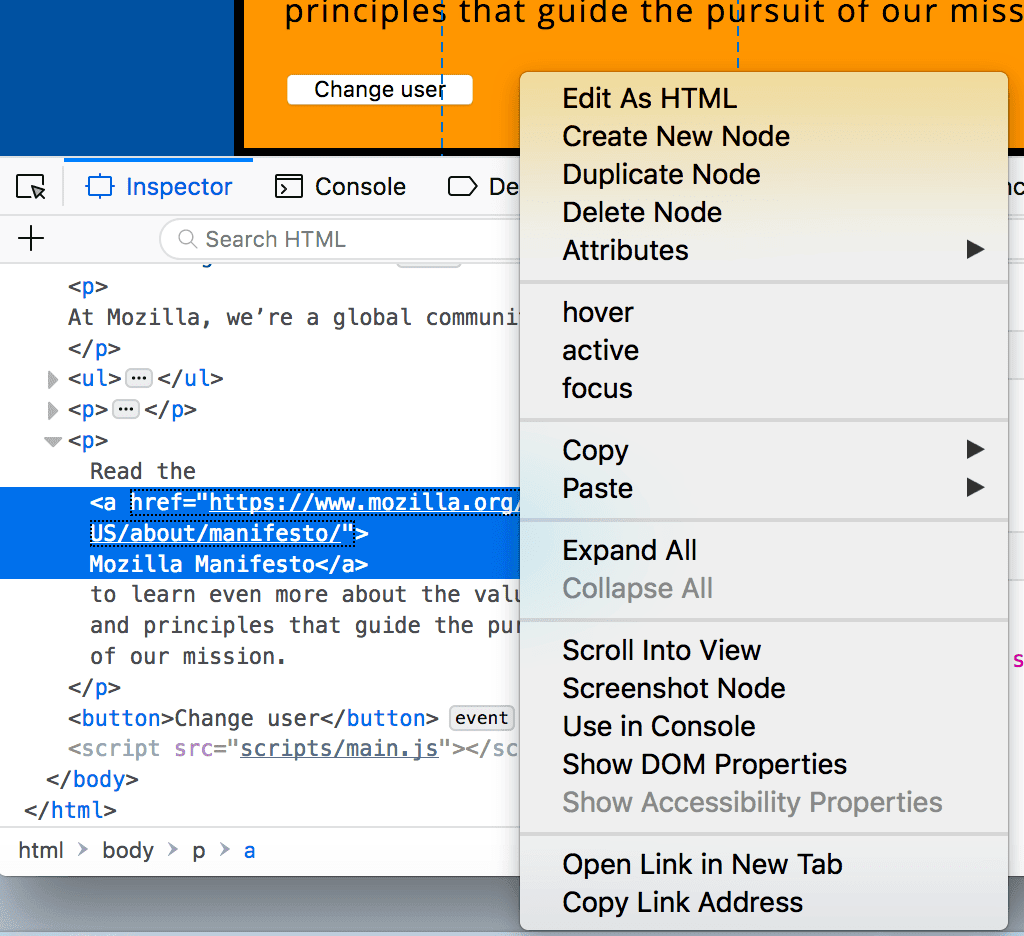
- Delete Node (sometimes Delete Element). Deletes the current element.
- Edit as HTML (sometimes Add attribute/Edit text). Lets you change the HTML and see the results on the fly. Very useful for debugging and testing.
- :hover/:active/:focus. Forces element states to be toggled on, so you can see what their styling would look like.
- Copy/Copy as HTML. Copy the currently selected HTML.
- Some browsers also have Copy CSS Path and Copy XPath available, to allow you to copy the CSS selector or XPath expression that would select the current HTML element.
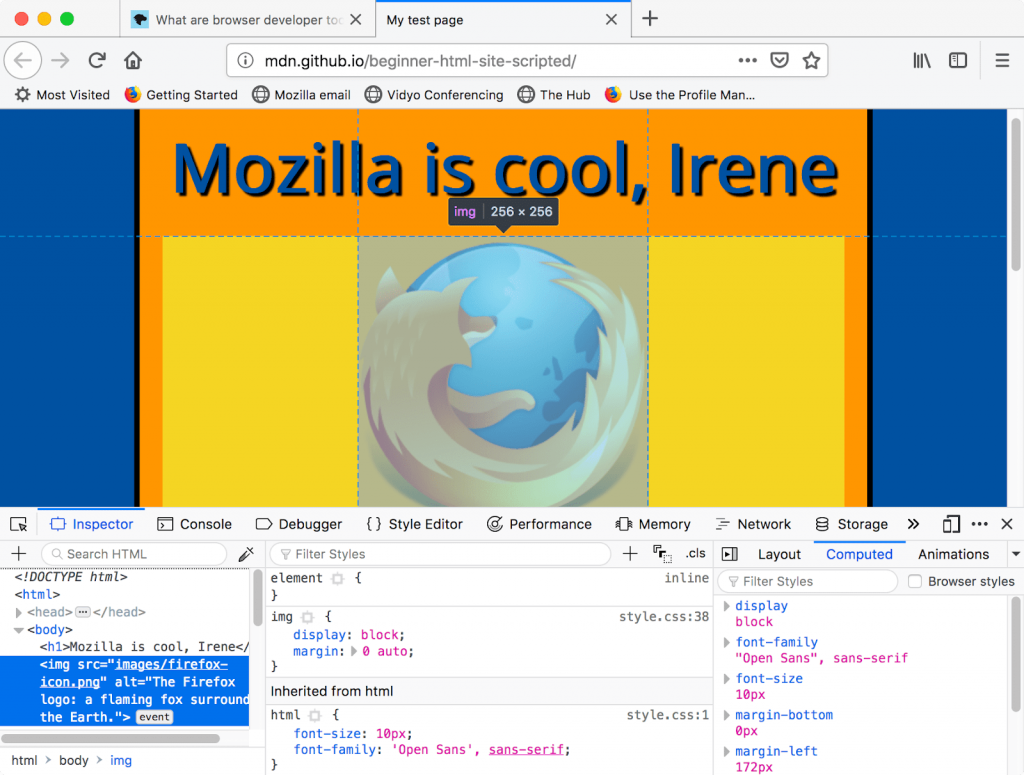
Try editing some of your DOM now. Double-click an element, or right-click it and choose Edit as HTML from the context menu. You can make any changes you’d like, but you cannot save your changes.
Exploring the CSS editor
By default, the CSS editor displays the CSS rules applied to the currently selected element:
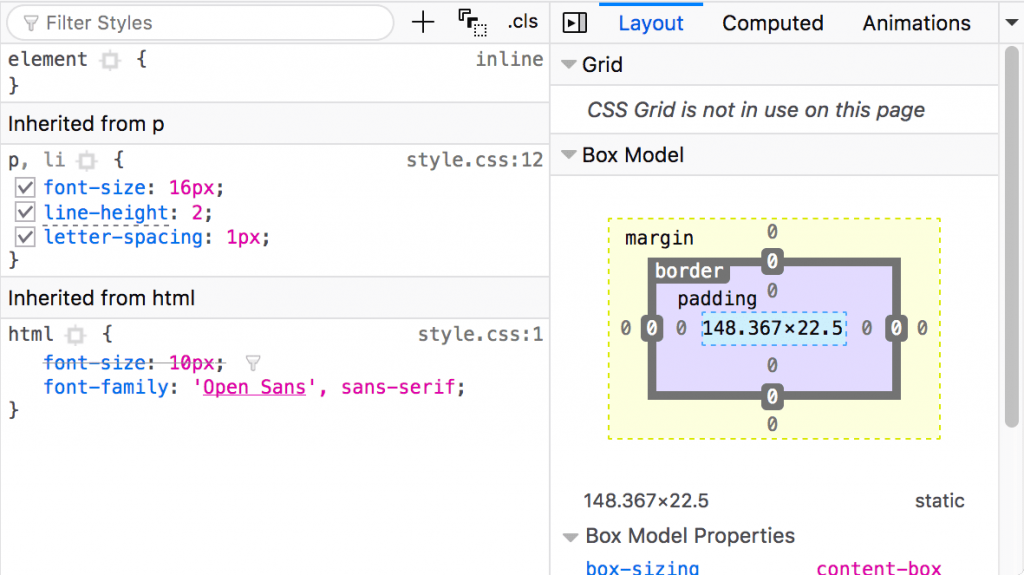
These features are especially handy:
- The rules applied to the current element are shown in order of most-to-least-specific.
- Click the checkboxes next to each declaration to see what would happen if you removed the declaration.
- Click the little arrow next to each shorthand property to show the property’s longhand equivalents.
- Click a property name or value to bring up a text box, where you can key in a new value to get a live preview of a style change.
- Next to each rule is the file name and line number the rule is defined in. Clicking that rule causes the dev tools to jump to show it in its own view, where it can generally be edited and saved.
- You can also click the closing curly brace of any rule to bring up a text box on a new line, where you can write a completely new declaration for your page.
You’ll notice a number of clickable tabs at the top of the CSS Viewer:
- Computed: This shows the computed styles for the currently selected element (the final, normalized values that the browser applies).
- Layout: In Firefox, this area includes two sections: Box Model: represents visually the current element’s box model, so you can see at a glance what padding, border and margin is applied to it, and how big its content is. Grid: If the page you are inspecting uses CSS Grid, this section allows you to view the grid details.
- Fonts: In Firefox, the Fonts tab shows the fonts applied to the current element.
Find more out about the Inspector in different browsers:
- Firefox Page inspector
- IE DOM Explorer
- Chrome DOM inspector (Opera’s inspector works the same as this)
- Safari DOM inspector and style explorer
The JavaScript debugger
The JavaScript debugger allows you to watch the value of variables and set breakpoints, places in your code that you want to pause execution and identify the problems that prevent your code from executing properly.
To get to the debugger:
Firefox:
- Select ➤ Web Developer ➤ Debugger or press Ctrl + Shift + S
to open the JavaScript Debugger. If the tools are already displayed, click on the Debugger tab.
Chrome: Open the Developer tools and then select the Sources tab. (Opera works the same way.)
Edge and Internet Explorer 11: Press F12 and then, Ctrl + 3, or if the tools are already displayed, click on the Debugger tab.
Safari: Open the Developer Tools and then select the Debugger tab.
Exploring the debugger
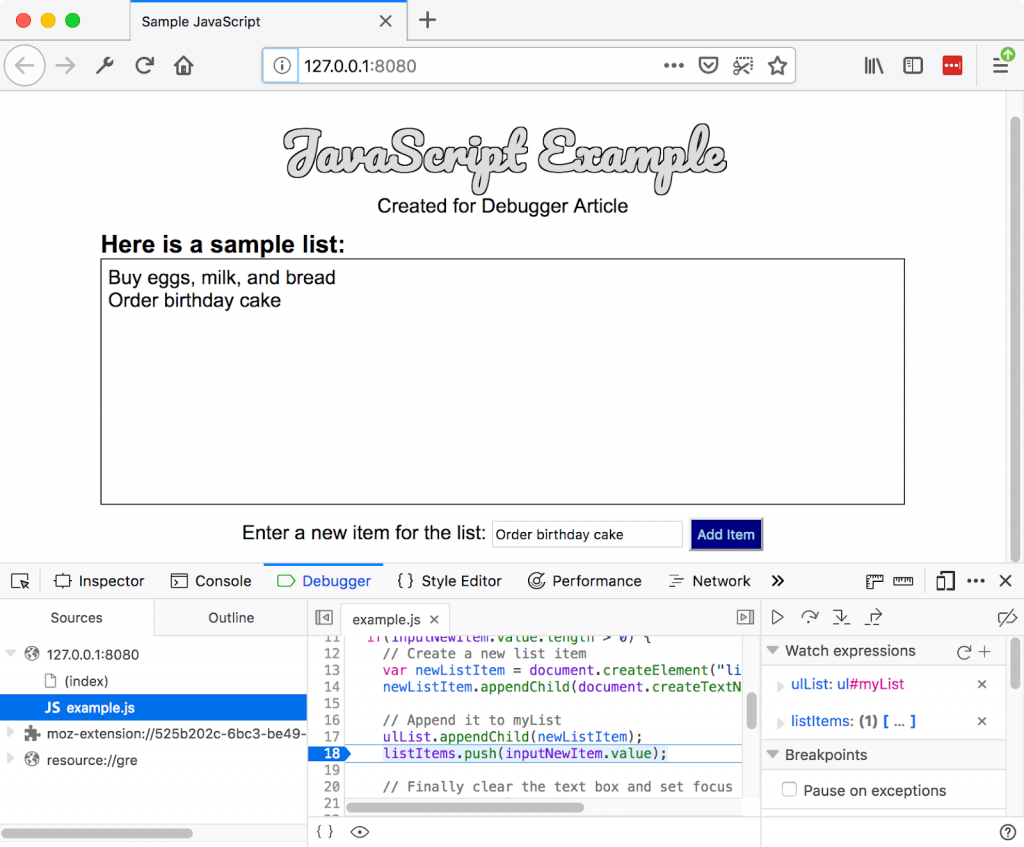
There are three panes in the JavaScript Debugger on Firefox.
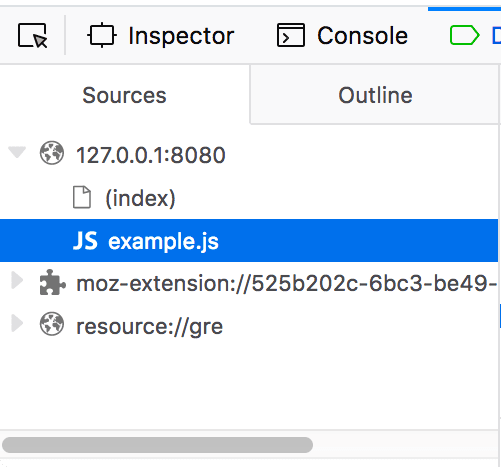
File list
The first pane on the left contains the list of files associated with the page you are debugging. Select the file you want to work with from this list. Click on a file to select it and view its contents in the center pane of the Debugger.
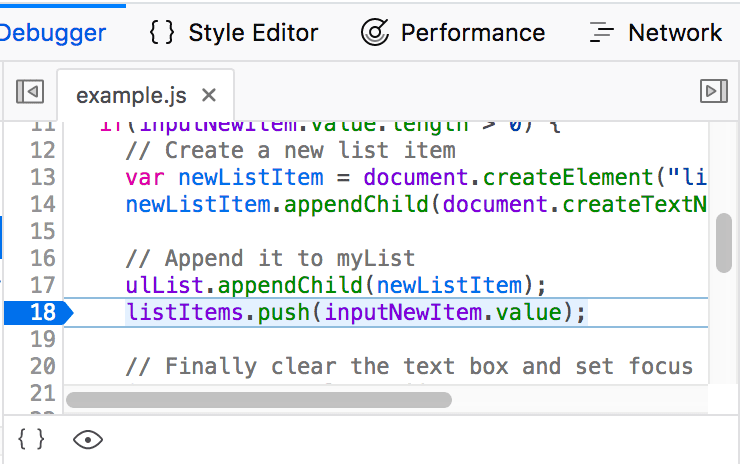
Source code
Set breakpoints where you want to pause execution. In the following image, the highlight on the number 18 shows that the line has a breakpoint set.
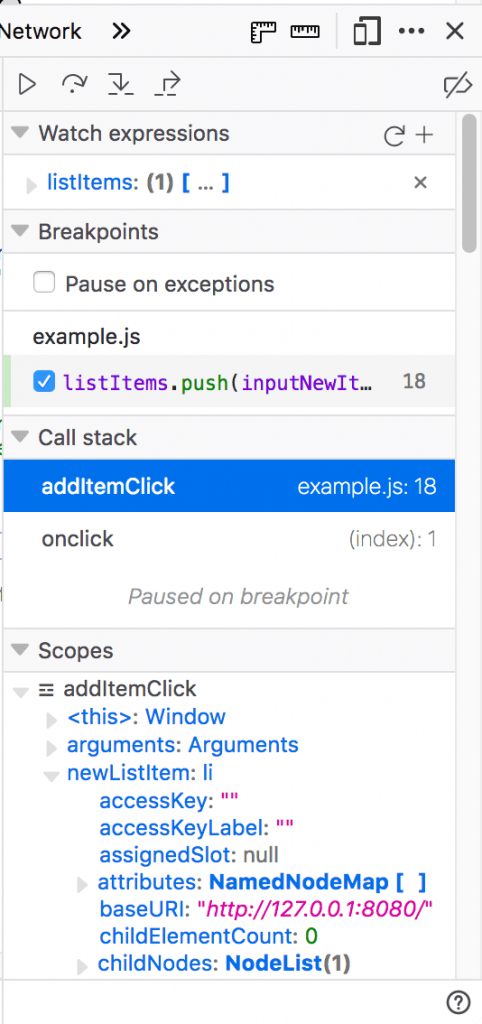
Watch expressions and breakpoints
The right-hand pane shows a list of the watch expressions you have added and breakpoints you have set.
In the image, the first section, Watch expressions, shows that the listItems variable has been added. You can expand the list to view the values in the array.
The next section, Breakpoints, lists the breakpoints set on the page. In example.js, a breakpoint has been set on the statement listItems.push(inputNewItem.value);
The final two sections only appear when the code is running.
The Call stack section shows you what code was executed to get to the current line. You can see that the code is in the function that handles a mouse click, and that the code is currently paused on the breakpoint.
The final section, Scopes, shows what values are visible from various points within your code. For example, in the image below, you can see the objects available to the code in the addItemClick function.
Find out more
Find more out about the JavaScript debugger in different browsers:
- Firefox JavaScript Debugger
- Microsoft Edge Debugger
- Chrome Debugger
- Safari Debugger
The JavaScript console
The JavaScript console is an incredibly useful tool for debugging JavaScript that isn’t working as expected. It allows you to run lines of JavaScript against the page currently loaded in the browser, and reports the errors encountered as the browser tries to execute your code. To access the console in any browser:
If the developer tools are already open, click or press the Console tab.
If not, Firefox allows you to open the console directly using Ctrl + Shift + K or using the menu command:
- Menu ➤ Web Developer ➤ Web Console, or Tools ➤ Web Developer ➤ Web Console.
On other browser, open the developer tools and then click the Console tab.
This will give you a window like the following:
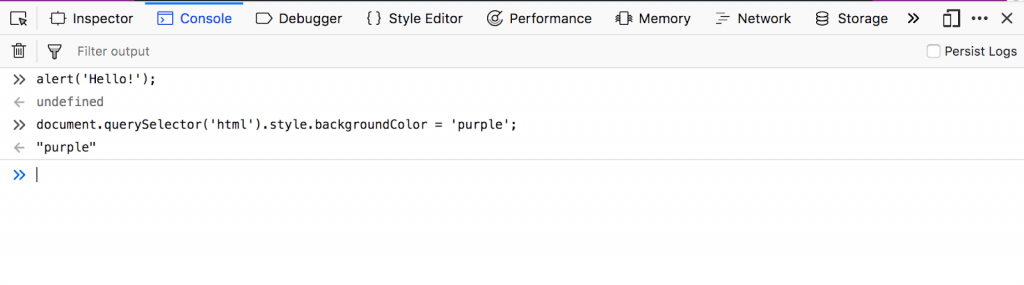
To see what happens, try entering the following snippets of code into the console one by one (and then pressing Enter):
- alert(‘hello!’);
- document.querySelector(‘html’).style.backgroundColor = ‘purple’;
- const myWordmark = document.createElement(‘img’); myWordmark.setAttribute(‘src’,’https://blog.mozilla.org/press/wp-content/themes/OneMozilla/img/mozilla-wordmark.png’);
- document.querySelector(‘h1’).appendChild(myWordmark);
Now try entering the following incorrect versions of the code and see what you get.
- alert(‘hello!);
- document.cheeseSelector(‘html’).style.backgroundColor = ‘purple’;
- const myWordmark = document.createElement(‘img’); myBanana.setAttribute(‘src’,’https://blog.mozilla.org/press/wp-content/themes/OneMozilla/img/mozilla-wordmark.png’);
- document.querySelector(‘h1’).appendChild(myWordmark);
You’ll start to see the kind of errors that the browser returns. Often these errors are fairly cryptic, but it should be pretty simple to figure these problems out!
Conclusion
Today we learned what being a web developer means and the different sub-roles in web development. We also got a bird’s eye view of the web development technologies that we’re going to study later in the course. Then we installed the necessary tools and got our computers ready for the next couple of days of this course. We also created our first webpage, made edits to it and learned how to ‘run’ our code. That’s really good progress for day one! Tomorrow, we’ll dive into some syntactic aspects related to HTML, talk about all the HTML elements that we’ll be using in our course and create a basic structure of our portfolio page in HTML.