Last updated on 25th Sep 2025| 12623
- What is Gradle?
- Introduction to Build Automation Tools
- Overview of Gradle
- How Gradle Works
- Understanding Dependencies and Repositories
- Tasks and Lifecycle Basics
- Gradle Wrapper Usage
- Using Plugins in Gradle
- Gradle vs Maven
- IDE Integration (e.g. IntelliJ, Eclipse)
- Performance Tips for Builds
- Learning Resources for Gradle
What is Gradle?
Gradle is a powerful open-source build automation tool used primarily for Java projects but capable of handling many languages and platforms. It automates repetitive tasks like compiling code, running tests, packaging applications, and managing dependencies. Unlike traditional build tools such as Apache Ant and Maven, Gradle combines the flexibility of scripting with a strong convention-over-configuration model, making it ideal for automating complex build processes. It also integrates well with Software testing frameworks, allowing for seamless execution of unit tests, integration tests, and other quality assurance processes as part of the build pipeline. This ensures that code is tested consistently and reliably as part of the continuous integration process. making it highly adaptable to various project needs. One of Gradle’s strongest points is its incremental build feature , which rebuilds only what has changed, saving time during development. It also offers deep integration with development environments and CI/CD pipelines, making it a preferred choice for modern software teams.
To Earn Your Web Developer Course Certification, Gain Insights From Leading Web Developer Experts And Advance Your Career With ACTE’s Web Developer Certification Course Today!
Introduction to Build Automation Tools
Before diving into Gradle, it’s important to understand the purpose of build automation tools. In software development, “building” is the process of transforming source code into executable applications.G. Tools like Ant, Maven, Make, and Gradle allow developers to automate builds, manage dependencies, and integrate with version control systems, ultimately improving efficiency and reliability. To optimize resource usage and solve complex problems with overlapping sub-tasks, exploring Dynamic Programming Explained reveals how breaking problems into smaller, memoized solutions leads to faster execution and smarter algorithm design in real-world applications. The gradle build in tool makes it simple to apply plugins to manage operations like source code compilation, test execution, and application packaging. The versatility and effectiveness of the Gradle build tool in automating software builds are well known. The gradle build tool is preferred by developers due to its multilingual support and robust domain-specific scripting language. The incremental build feature of the Gradle build tool is one of its main advantages, it expedites the build process by only compiling modified components.
Overview of Gradle
Gradle stands out among build tools because it uses a Groovy- or Kotlin-based DSL (Domain-Specific Language) instead of XML configuration files. This makes Gradle builds more readable and maintainable compared to XML-heavy tools like Maven. It supports both declarative and imperative programming styles, allowing developers to combine configuration with logic. To ensure these build processes run smoothly even when errors occur, exploring Exception Handling reveals how structured error management helps developers catch, respond to, and debug issues effectively maintaining stability across complex software pipelines. The Overview of Gradle explains why it’s a great option for Java and Android development due to its versatile scripting and extensive integration into well-known IDEs.

Gradle is also designed to be extensible, meaning you can customize tasks and plugins to fit unique project requirements. Furthermore, Gradle is not limited to Java it supports multiple languages such as C/C++, Python, and Scala, making it versatile for cross-platform builds.
How Gradle Works
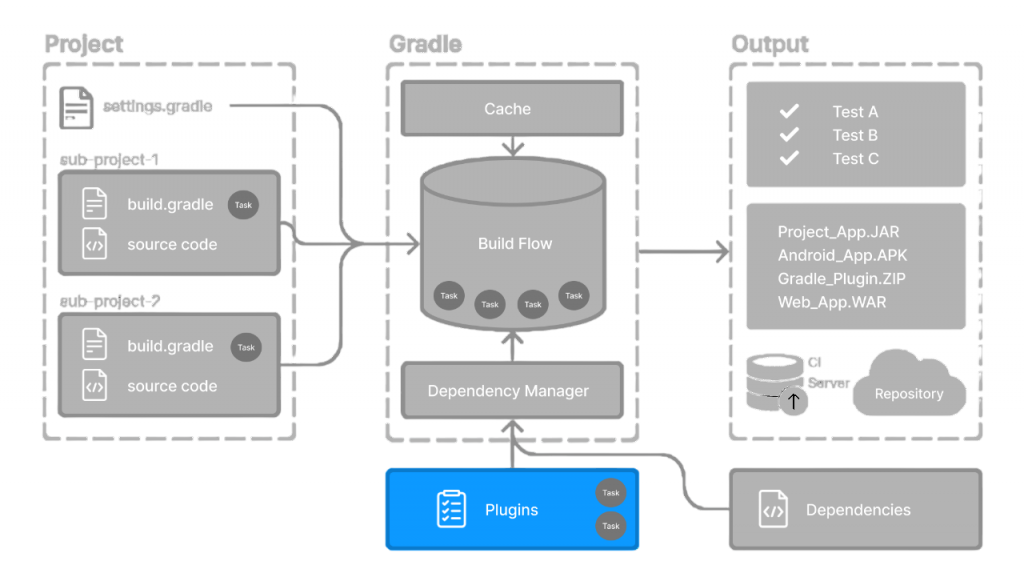
At its core, Gradle operates on the concept of tasks. A task is a piece of work that Gradle performs, such as compiling classes, running tests, or packaging applications. These tasks are organized into directed acyclic graphs (DAGs) where dependencies between tasks are resolved automatically. When you run Gradle, it first evaluates the build.gradle script to configure tasks and their relationships. Then, it executes tasks in the correct order, ensuring dependencies are met. To understand how data is retrieved efficiently within such structured systems, exploring Searching in Data Structure Explained reveals how linear and binary search techniques help locate elements quickly forming the backbone of task resolution, indexing, and optimization. Gradle also supports incremental builds, meaning if nothing has changed in a certain part of the project, that part will be skipped, speeding up the build process significantly.Knowing How Gradle Works enables developers to use its robust plugin system and task-based paradigm to expedite builds.

Develop Your Skills with Cloud Computing Course Certification Course
Weekday / Weekend BatchesSee Batch DetailsUnderstanding Dependencies and Repositories
Dependency management is a crucial part of modern software development, and Gradle makes it easy. Dependencies are external libraries or modules your project needs to run. Gradle automatically downloads these dependencies from repositories, such as Maven Central or JCenter. You can define dependencies with different scopes, such as implementation for runtime and compile-time needs or testImplementation for test-only libraries. To master these concepts and more, enrolling in a Top Online Course can provide hands-on experience with dependency management and build tools like Maven and Gradle, helping you efficiently manage libraries and dependencies in real-world projects. Gradle also handles transitive dependencies, meaning if a library you depend on also depends on other libraries, Gradle will automatically download them too.Developers may manage the origins of artifacts and their resolution throughout the build process by using Understanding Dependencies and Repositories.
Gain Your Master’s Certification in Web Developer by Enrolling in Our Web Developer Master Program Training Course Now!
Tasks and Lifecycle Basics
In Gradle, everything revolves around tasks. A task represents a single atomic piece of work, and tasks can depend on each other. For example, the build task depends on compileJava, processResources, test, and jar.Gradle enables developers to automate different steps in the construction process by defining a Gradle tasks. It is possible to modify each Gradle task to execute particular scripts or commands. When you run gradle build, Gradle ensures all dependent tasks run in the correct order. You can also create custom tasks using Groovy or Kotlin, allowing for complex build logic tailored to your project. This flexibility is useful in Grey Box Testing where you can design specific tasks to automate testing processes that combine both internal knowledge of the system and external behavior, ensuring thorough testing during the build process. Gradle comes with a default lifecycle for Java projects, but you can modify or extend it as needed.In the build process, a gradle task is a single unit of work, such executing tests or generating code. To automate repetitive operations unique to your project, you can create custom gradle tasks. The secret to writing effective and adaptable build scripts is knowing how to configure and chain gradle tasks.Understanding how to create and manage a Gradle task is essential for efficient project automation. Proper use of the Gradle task system streamlines builds and improves productivity.
Are You Interested in Learning More About Web Developing Course? Sign Up For Our Web Developing Course Today!
Gradle Wrapper Usage
The Gradle Wrapper is a feature that ensures consistent Gradle versions across different environments. Instead of requiring every developer to install Gradle manually, the wrapper comes with scripts (gradlew for Unix, gradlew.bat for Windows) and a configuration file specifying the Gradle version. When the wrapper is run, it downloads the correct version automatically, ensuring consistent environments across different systems. Similarly, in Inheritance in CPP a derived class can inherit properties and behaviors from a base class, allowing for easier code reuse and ensuring consistency in object-oriented design. This ensures builds are reproducible and eliminates “works on my machine” issues. The wrapper is especially useful for CI/CD environments, where version consistency is critical.Gradle does not need to be installed on the system in order to conduct a Gradle build thanks to the Gradle wrapper.
Preparing for Web developing Job Interviews? Have a Look at Our Blog on Web developing Interview Questions and Answers To Ace Your Interview!
Using Plugins in Gradle
Gradle’s functionality can be extended with plugins.The gradle build in tool makes it simple to add functionality and maintain clean, maintainable build logic, whether you’re using third-party or built-in plugins. Plugins can add tasks, configure default settings, and provide specialized build logic for different project types. Gradle offers a variety of official plugins, such as the java plugin for Java builds, the application plugin for packaging executables, and the war plugin for web applications. There is also a rich ecosystem of third-party plugins for everything from code quality checks to Docker integration. You can apply plugins by their ID in the plugins block or by referencing them in the buildscript section.
With the help of robust tools called Gradle plugins, you can increase the functionality of your build scripts and automate processes like code compilation, test execution, application packaging, and more. You can avoid writing repeated code by implementing a plugin, which encapsulates reusable logic. Both custom or third-party plugins that are accessible through repositories like the Gradle Plugin Portal and built-in plugins (like Java or applications) are supported by Gradle. One of the main features of the gradle build in tool is its Gradle plugins, which let developers effectively automate and modify their build process.
Gradle vs Maven
Gradle and Maven are two of the most popular build tools in the Java ecosystem. Maven uses XML configuration and follows strict conventions, which makes it easy for beginners but less flexible for custom build logic. Gradle also tends to be faster due to its incremental build capabilities and build caching. However, Maven’s structured approach can be beneficial for projects that value strict conventions over flexibility, especially in the context of Software testing . Maven’s predefined lifecycle and standard directory structure make it easier to integrate with various testing frameworks, ensuring consistent execution of unit tests, integration tests, and other quality checks across the development process. Maven plugins are crucial parts that increase Maven’s capability by handling things like code compilation, test execution, and application packaging. Although a lot of Maven plugins are already set up, developers can also add their own to customize the build process to meet the demands of a particular project.
IDE Integration (e.g., IntelliJ, Eclipse)
Gradle integrates seamlessly with popular IDEs like IntelliJ IDEA, Eclipse, and Visual Studio Code. In IntelliJ, for instance, you can import a Gradle project directly, and the IDE will automatically detect tasks, dependencies, and configurations. Changes in the build.gradle file can be reloaded easily, ensuring your IDE always reflects the current build setup. For students aiming to deepen their knowledge of software engineering and development practices, an MTech Course in CSE can provide advanced insights into build automation, project management, and integration techniques like Gradle, preparing them for complex real-world software projects. Gradle’s integration with IDEs also allows running tasks directly from the interface without using the command line.
Performance Tips for Builds
While Gradle is already optimized for performance, there are several ways to make builds even faster. Enable the Gradle Daemon, which keeps Gradle running in the background to avoid startup costs. Use parallel task execution with parallel to run independent tasks simultaneously, improving build efficiency. For those looking to explore similar concepts in-depth, enrolling in an After 12th Engineering Course can provide a strong foundation in software development, including topics like task automation, parallel computing, and efficient resource management. Enable build caching so Gradle can reuse outputs from previous builds. Keeping dependencies and plugins up to date can also improve performance, as newer versions often come with optimizations.
Learning Resources for Gradle
For developers who want to master Gradle, there are plenty of resources available. The official Gradle documentation is the best starting point, offering tutorials, API references, and example projects.Websites like Baeldung and DZone have detailed Gradle guides for beginners and advanced users, covering everything from basic build automation to advanced configurations. These resources are also valuable for Software testing offering insights into integrating Gradle with popular testing frameworks, running automated tests, and ensuring high-quality, bug-free software throughout the development lifecycle. You can also explore Gradle’s GitHub repository to understand how community plugins and scripts are written. Video courses on platforms like Udemy, Coursera, and Pluralsight provide hands-on learning experiences.