Last updated on 31st May 2025| 11222
- Introduction to Salesforce CLI
- Installing and Setting Up CLI
- Basic Commands and Syntax
- Authenticating with Salesforce Org
- Managing Salesforce DX Projects
- Using the Metadata API with CLI
- Deploying and Retrieving Components
- Automating Tasks with CLI
- Debugging and Error Handling
- Salesforce CLI Best Practices
- Advanced CLI Features
- Troubleshooting Salesforce CLI Issues
Introduction to Salesforce CLI
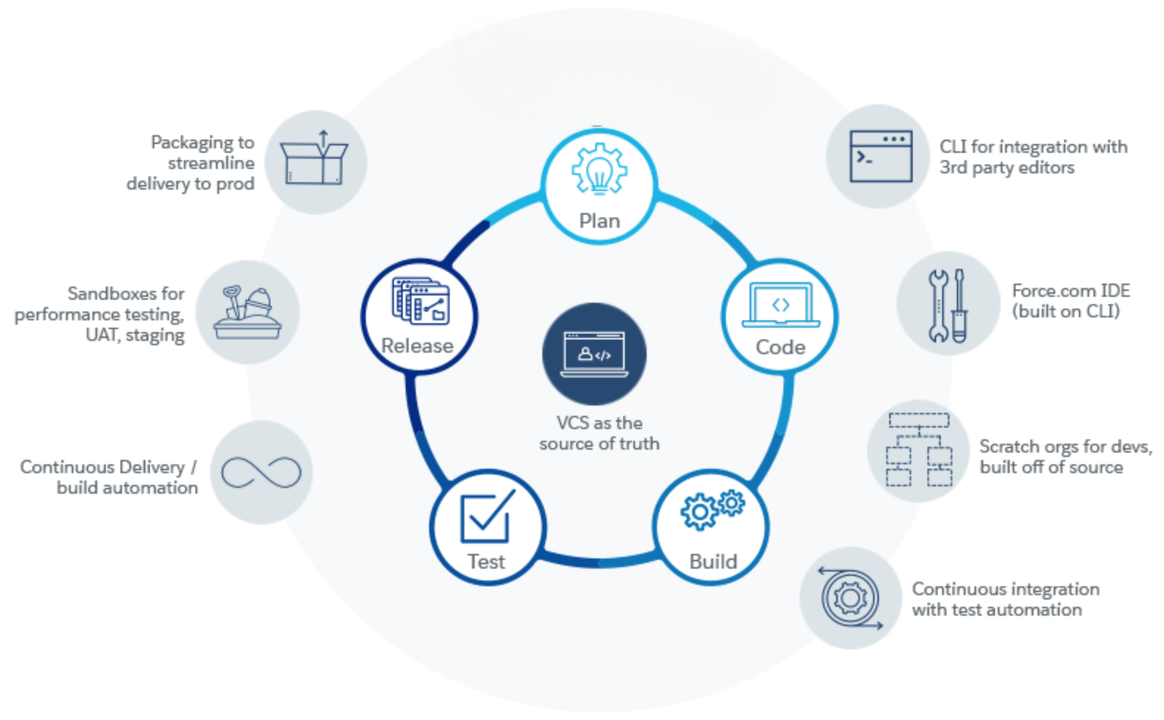
Salesforce CLI (Command-Line Interface) is a robust tool designed to help developers and administrators interact with Salesforce organizations through the command line. It simplifies development tasks, automates repetitive workflows, and boosts productivity by integrating seamlessly with Salesforce DX (Developer Experience), enhancing your with our Salesforce training experience. With Salesforce CLI, users can manage metadata, create and deploy applications, and automate deployment pipelines more efficiently. This tool allows a range of operations, such as retrieving and deploying metadata, executing SOQL queries, importing and exporting data, and handling user authentication. Its ability to streamline these processes is particularly valuable in continuous integration and continuous deployment (CI/CD) pipelines, making it an essential tool for modern Salesforce development and DevOps workflows. By providing a command-based interface, Salesforce CLI enables faster and more effective management of Salesforce environments, saving time and reducing manual effort. Its integration with CI/CD pipelines further enhances its utility for automated testing, deployment, and version control, making it a cornerstone for efficient, high-quality Salesforce development.
To Explore Salesforce in Depth, Check Out Our Comprehensive Salesforce Training To Gain Insights From Our Experts!
Installing and Setting Up CLI
-
Download the Installer
- Visit the official Salesforce CLI download page: Salesforce CLI Download.
- Select the correct installer based on your operating system (Windows, macOS, or Linux). Install Salesforce CLI
- For Windows: Run the .exe installer.
- For macOS: Use the .pkg file.
- For Linux: Download and extract the .tar.gz package, then follow the installation instructions. Verify Installation
- After installation, verify the Salesforce CLI setup by running the command: sfdx –version
- The command should return the installed version of Salesforce CLI. Update Salesforce CLI
- To ensure you’re using the latest version of Salesforce CLI, run the following command: sfdx update
- This will update your CLI to the most recent version, ensuring you have access to the latest features and improvements. Authenticate to Your Salesforce Org
- Once Salesforce CLI is installed and updated, authenticate your Salesforce org using the command: sfdx force:auth:web: login
- This allows you to securely connect your local CLI to your Salesforce environment. Start Managing Projects
- After authentication, you’re ready to manage your Salesforce projects directly from the command line, including tasks like retrieving metadata, deploying applications, and running SOQL queries.
Authenticating with Salesforce Org
Authenticating with a Salesforce Org using Salesforce CLI is a crucial step that enables secure access and interaction between your local development environment and your Salesforce instance. This process establishes a trusted connection, allowing you to perform tasks such as deploying metadata, retrieving configuration, running SOQL queries, managing users, and executing a variety of other commands directly from the command line. To begin authentication, use the command sfdx force:auth:web: login, which opens a browser window prompting you to log in to your Salesforce Org. Once you log in successfully, Salesforce CLI stores the authentication token locally, enabling future interactions without repeated logins. You can specify an alias for the org during authentication using the -a flag (e.g., -a DevOrg), making it easier to reference in future commands. Additionally, if you’re working with different types of orgs, such as sandboxes or scratch orgs, you can include the –instanceurl flag to point to the correct environment (e.g., https://test.salesforce.com for sandboxes), which is also covered in our Salesforce Visualforce Tutorial Series for a deeper understanding of org management and customization. For security-conscious environments or CI/CD pipelines, CLI also supports JWT-based authentication, which eliminates the need for browser-based login by using a digital certificate and connected app credentials. After successful authentication, you can confirm connected orgs by running sfdx force:org: list, which displays active and expired sessions. Managing multiple orgs becomes easier with CLI aliases and environment-specific configurations. Whether you’re deploying code, syncing metadata, or testing automation scripts, authenticating your org is the foundational step that grants Salesforce CLI the necessary permissions to execute tasks efficiently and securely, ensuring seamless integration between your local tools and your Salesforce environments.
Do You Want to Learn More About Salesforce? Get Info From Our Salesforce Training Today!
Managing Salesforce DX Projects
- Start by creating a new DX project using the command:sfdx force:project:create –projectname YourProjectName
- This initializes a structured project directory with default folders like force-app, config, and scripts. Configure the Project
- Modify the sfdx-project.json file to define your package directories, namespace, and other project settings.
- This file helps CLI understand your project’s structure and guides metadata deployments and retrievals. Connect and Authorize Orgs
- Use sfdx force:auth:web:login or JWT-based auth to connect your development, staging, or production orgs.
- Assign aliases for easier management (e.g., -a DevOrg), and check connected orgs using sfdx force:org:list. Retrieve and Push Metadata
- Retrieve metadata from an org using:sfdx force:source:retrieve -m ApexClass,CustomObject
- Push changes to a scratch org using: sfdx force:source:push, and pull changes back with sfdx force:source:pull. Manage Scratch Orgs
- Scratch orgs are temporary, disposable Salesforce environments perfect for testing and development.
- Create one using sfdx force:org:create -f config/project-scratch-def.json -a ScratchOrgName and open it with sfdx force:org:open. Deploy and Track Changes
- Use sfdx force:source:deploy to deploy metadata to other environments. Track changes using source control (e.g., Git) to maintain version history and collaborate with team members efficiently.
- Use the sfdx force:source:deploy command to deploy components in source format directly to a Salesforce org.
- Retrieve specific metadata components from an org using the sfdx force:source:retrieve command.
- For working with traditional orgs, use the Metadata API commands like sfdx force:mdapi:retrieve and sfdx force:mdapi:deploy.
- Convert source format to Metadata API format using sfdx force:source:convert when needed for deployment.
- Monitor the status of deployments using sfdx force:source:deploy:report or sfdx force:mdapi:deploy:report.
- Use version control tools to track metadata changes and maintain deployment history for rollback or collaboration.
- Use sfdx –version to confirm the CLI is installed correctly and up to date. If issues persist, try reinstalling or updating using sfdx update. Check for Incorrect Org Authentication
- Use sfdx force:org:list to view authenticated orgs. If an org is missing or expired, re-authenticate using sfdx force:auth:web:login. Use the –verbose or –loglevel Flags
- Add –verbose or –loglevel debug to commands to get detailed output and better understand where a process may be failing. Resolve Path and Directory Errors
- Ensure you’re running commands from the correct project directory and that paths to metadata or configuration files are valid. Check for Conflicting Plugins or Extensions
- Run sfdx plugins to list installed plugins. Uninstall or update outdated or conflicting plugins that may interfere with standard CLI behavior. Review Error Messages and Logs
- Pay close attention to CLI error messages. For Apex or deployment issues, retrieve detailed logs using sfdx force:apex:log:get or sfdx force:source:deploy:report to identify the root cause.
Managing Salesforce DX (Developer Experience) projects effectively is essential for streamlined development, version control, and collaboration in modern Salesforce environments. Salesforce DX introduces a source-driven development approach, enabling teams to manage org configurations, metadata, and code in a structured, scalable way. Here’s how you can manage Salesforce DX projects efficiently:
-
Create a Salesforce DX Project

Using the Metadata API with CLI
Using the Metadata API with Salesforce CLI enables developers and administrators to perform robust, fine-grained control over Salesforce metadata across different environments. Unlike the source-driven approach of Salesforce DX, the Metadata API is ideal for working with traditional orgs, large metadata sets, or when managing components that are not fully supported by the source format. Salesforce CLI provides specific commands under the force:mdapi namespace to leverage the Metadata API for operations such as retrieving, deploying, and converting metadata. To retrieve metadata, you can use the command sfdx force:mdapi:retrieve, specifying a manifest file (package.xml) that defines which metadata components to extract. The retrieved data is packaged in a ZIP file, which can be unzipped and examined before deployment. Deployment to another org is done using sfdx force:mdapi:deploy, which takes the ZIP file as input and pushes the metadata to the target org, providing hands-on experience in Salesforce training for efficient metadata management and deployment. You can track the status of the deployment using the wait flag or the sfdx force:mdapi:deploy: report command. Additionally, metadata retrieved via the Metadata API can be converted to the source format compatible with Salesforce DX using sfdx force:mdapi:convert, allowing smoother integration into DX projects. Conversely, DX projects can be converted back into Metadata API format using sfdx force:source: convert for deployment to orgs that require the traditional metadata structure. This flexibility makes the Metadata API with CLI particularly valuable for legacy projects, full org migrations, and automation within CI/CD pipelines. By incorporating Metadata API commands into your workflow, you gain powerful capabilities for precise metadata handling, enabling scalable and efficient Salesforce development and deployment strategies.
Deploying and Retrieving Components
Automating Tasks with CLI
Automating tasks with Salesforce CLI significantly enhances development efficiency, reduces manual errors, and streamlines the deployment process across various environments. By leveraging CLI commands within scripts or integrating them into CI/CD pipelines, teams can automate repetitive and time-consuming tasks such as metadata deployment, data import/export, org authentication, testing, and more. Salesforce CLI supports scripting through shell scripts, batch files, or integration with automation tools like Jenkins, GitHub Actions, and Azure DevOps. For example, you can create a script that authenticates to an org, pushes code, runs Apex tests, and deploys metadata, all with a single execution. Commands like sfdx force:source:deploy, sfdx force:data:soql:query, and sfdx force:apex:test:run can be chained together in scripts to execute complex workflows automatically, showcasing The Future of Salesforce in streamlining and automating processes for enhanced productivity and efficiency. Additionally, tasks like creating and deleting scratch orgs can be automated using sfdx force:org:create and sfdx force:org:delete, which is particularly useful for temporary development environments or automated testing. You can also schedule these scripts to run at specific times or trigger them based on events like pull requests or code merges. By incorporating CLI automation into your development lifecycle, you ensure consistency, accelerate delivery, and improve collaboration across teams. Whether it’s setting up a new project, synchronizing metadata, running tests, or deploying to production, automating with Salesforce CLI transforms these manual processes into efficient, repeatable workflows that save time and ensure higher quality in Salesforce development and release management.
Preparing for a Salesforce Job Interview? Check Out Our Blog on Salesforce Interview Questions and Answers
Debugging and Error Handling
Debugging and error handling in Salesforce CLI are essential for identifying issues, improving code quality, and ensuring successful execution of commands across development and deployment workflows. Salesforce CLI provides detailed error messages, exit codes, and logging options to help developers and administrators troubleshoot problems effectively. When a command fails, the CLI returns a clear error message along with suggestions or documentation links to guide resolution. Using the verbose or loglevel flags, users can access more detailed output, which is particularly useful for diagnosing issues during deployments, metadata retrieval, or Apex test execution. The loglevel flag supports multiple levels, such as ERROR, WARN, INFO, and DEBUG, allowing developers to customize the level of detail they receive during execution, providing deeper insights into processes, which can be valuable when integrating with tools like Salesforce Pardot Marketing Automation Tool for tracking and optimizing marketing workflows. Additionally, Apex logs from scratch orgs or sandboxes can be retrieved using sfdx force:apex:log: get and viewed using sfdx force:apex:log: tail, providing insights into runtime behavior, unhandled exceptions, and performance bottlenecks. For deployment failures, sfdx force:source:deploy: report or sfdx force:mdapi:deploy : report commands can be used to fetch detailed error reports and deployment status, including the specific metadata components that failed and why. When working with scripts or automation, checking CLI exit codes helps determine success or failure programmatically, enabling conditional flows and better control. By combining CLI’s built-in error messages, detailed logs, and custom log levels, Salesforce developers can efficiently debug and handle errors, ensuring smoother development cycles, faster issue resolution, and more reliable automation processes across their Salesforce environments.
Salesforce CLI Best Practices
Adopting Salesforce CLI best practices is crucial for maintaining efficient, scalable, and error-free development workflows in any Salesforce environment. A well-structured approach to using CLI ensures consistent results, reduces technical debt, and enhances collaboration across teams. One of the core best practices is to use project-based structures with Salesforce DX, allowing for modular development and easier management of metadata. Always keep your sfdx-project.json file clean and properly configured to reflect the correct paths and settings.Version control should be tightly integrated with CLI workflows, commit only validated changes, and use meaningful commit messages to track metadata modifications over time an essential practice for scaling and managing Business with Salesforce effectively and ensuring long-term project maintainability. Use CLI aliases for different orgs to avoid confusion and ensure commands are executed against the correct environment. When working with scratch orgs, define reusable and well-documented project-scratch-def.json files to standardize org configurations across the team. Automate repetitive tasks such as deployments, test execution, and org setup using shell scripts or CI/CD tools like Jenkins or GitHub Actions, and incorporate proper error handling and logging into these scripts. Take advantage of command flags like verbose, loglevel, and json to debug and gather detailed feedback when needed. Regularly update the CLI using sfdx update to access new features and security patches. Always validate deployments with checkonly before pushing to production to catch errors early. Additionally, clean up unused scratch orgs and keep environments tidy to avoid hitting org limits. By following these best practices, teams can fully leverage Salesforce CLI to drive more reliable, automated, and collaborative development and deployment processes within Salesforce projects.
Advanced CLI Features
Salesforce CLI offers a range of advanced features that go beyond basic commands, enabling power users and teams to build more robust, automated, and scalable Salesforce development workflows. One of the most powerful capabilities is the use of plugins, which extend CLI functionality to support specialized tasks. Salesforce CLI supports both official and custom plugins, allowing developers to tailor the CLI to their project needs. You can explore available plugins using sfdx plugins and install them via npm or the CLI directly. Another advanced feature is the ability to output results in JSON format using the json flag, which is particularly useful for integrating CLI commands into automated scripts and CI/CD pipelines, as it allows for structured data handling, programmatic error checking, and enhances Salesforce training for efficient workflow management. Scratch org management can also be enhanced with advanced configuration files, where settings like features, edition, and object settings are fine-tuned in project-scratch-def.json. CLI also supports environment variables and aliasing to simplify org access and avoid manual re-authentication. Additionally, CLI users can create custom commands or scripts that chain multiple operations together, such as authenticating, deploying code, running tests, and generating reports in a single execution sequence. For teams using CI/CD, CLI integrates seamlessly with DevOps tools like Jenkins, GitHub Actions, and Azure DevOps, supporting full automation of testing and deployment processes. Developers can also tap into Apex logs, test results, and code coverage reports using commands like sfdx force:apex:test: run resultformat human codecoverage. With proper use of these advanced features, Salesforce CLI becomes a central tool for managing complex development lifecycles, improving collaboration, accelerating delivery, and ensuring greater accuracy and quality across Salesforce projects.
Would You Like to Know More About Salesforce? Sign Up For Our Salesforce Training Now!
Troubleshooting Salesforce CLI Issues
Troubleshooting Salesforce CLI Issues is essential for maintaining smooth development workflows and resolving errors quickly. Here are six key points to help you effectively identify and fix common Salesforce CLI problems:
Verify CLI Installation and Version