
Last updated on 16th May 2025| 9402
- Overview of React Rendering
- How the Render Method Works in React
- Functional and Class Component Rendering Distinctions
- Virtual DOM and Rendering Optimization
- Conditional Rendering in React
- JSX and Rendering in React
- State and Props in React Rendering
- Using Keys in React List Rendering
- Render Props Pattern in React
- Error Boundaries and Rendering
- Performance Optimization in React Rendering
- Debugging Rendering Issues in React
Overview of React Rendering
In React, rendering is a core concept that drives how the user interface (UI) reflects changes in data, ensuring the application remains dynamic and responsive. Rendering refers to the process by which React transforms component state, props, and other data into visible UI elements. Whenever the state or props of a component are updated, React automatically triggers a re-render, regenerating the component or its children to reflect the most current information. To deepen your understanding of front-end technologies, including Web Designing & Development Courses can be an excellent step. This mechanism allows React applications to stay up to date without manual DOM manipulation. One of React’s key advantages is its declarative nature. Developers simply define how the UI should look based on the current state, and React handles the implementation behind the scenes. This results in a streamlined development process, as the UI consistently updates in response to data changes without requiring imperative code. The declarative rendering model not only improves code readability and maintainability but also enhances performance by enabling efficient UI updates through techniques like virtual DOM diffing. Overall, React’s rendering process is essential for creating modern, interactive web applications that deliver smooth and reliable user experiences.
How React’s Render Method Operates
In React, every component contains a render method (for class components) or a return statement (for functional components). This method specifies how the component is to be displayed on the screen depending on the current state and props.
Class Components: In class components, render is the building block of rendering. Render is a method that returns JSX, which is an extension to syntax that closely looks like HTML but has JavaScript features. The render method is called each time the state or props of the component change.
- class MyComponent extends React.Component
- {
- render()
- {
- return Hello,
- {this.props.name}
- }
- }
- Functional Components: In functional components, React uses the return statement to render JSX. While they don’t have a render method like class components, the return statement serves the same purpose. Exploring the Scope of Web Development can provide valuable context for understanding why functional components have become the preferred approach in modern React development. Functional components are simpler and don’t require the complexity of a class structure.
- function MyComponent(props)
- {
- return Hello,
- {props.name}
- }
- Class Components have this. State objects that hold local component states and state changes are made using this.setState(). When the state changes, React triggers a re-render.
- Functional Components were initially stateless, but with the introduction of React Hooks in React 16.8, they can now use useState and other hooks to manage state. As a result, functional components become more potent and adaptable. Lifecycle Methods:
- ClassComponentshave lifecycle methods (e.g., componentDidMount, componentDidUpdate, componentWillUnmount) that allow for more control over the component’s life cycle, such as fetching data, updating the DOM, or cleaning up resources. If you’re wondering about the long-term prospects in the field, exploring is web development a good career can provide valuable insights into the opportunities and growth in this industry.
- Functional Components do not have traditional lifecycle methods, but they can achieve similar behavior with hooks-like effects. The effect hook can run code when the component mounts, updates, or unmounts. Performance:
- Class Components tend to have more overhead due to their complex structure and the need for managing state and lifecycle methods.
- Functional Components are generally more lightweight, as they lack the class-based boilerplate, and React’s hooks API allows them to manage state and side effects efficiently.
- Performance Optimization: By minimizing direct DOM manipulation, React reduces the number of expensive reflows and repaints in the browser. Updating the Virtual DOM is much faster than manipulating the real DOM.
- Efficient Updates: React uses an efficient diffing algorithm to compare the previous and current Virtual DOM trees, allowing it to update only the changed elements.
- const element = Hello, World!
- const element = React.createElement(‘h1’, null, ‘Hello, World!’);
- class MouseTracker extends React.Component
- {
- state = { x: 0, y: 0 };
- handleMouseMove = (event)
- {
- this.setState({ x: event.clientX, y: event.clientY });
- };
- render()
- {
- return
- (
- onMouseMove={this.handleMouseMove}
- {this.props.render(this.state)}
- );
- }
- }
- function App()
- {
- return
- (
- MouseTracker render={(state)
- (
- The mouse position is ({state.x}, {state.y})
- )
- }
- );
- }
- Memoization: Using React.memo() for functional components can prevent unnecessary re-renders by shallowly comparing the previous and current props.
- Pure Components: In class components, React.PureComponent performs a similar optimization by automatically implementing shouldComponentUpdate() to check if the component’s props or state have changed.
- Lazy Loading: Use React.lazy() and Suspense to dynamically load components only when they are needed, reducing initial load times.
- React Developer Tools: Examine component hierarchies, properties, and state using React DevTools.
- Console Logs: To monitor data flow and rendering activity, include console.log() lines in lifecycle or render methods.
- React Profiler: To find performance snags and enhance component rendering, use the Profiler.
When the component’s state or props change, React re-executes the render method, recalculating the output. This is the core of React’s reactivity, enabling the UI to be updated with new data.
Functional and Class Component Rendering Distinctions
Although rendering for functional and class components in React functions similarly, the two have some significant differences, particularly in how they manage state, lifecycle methods, and performance.
State Management:In conclusion, both functional and class components use rendering in React. Still, functional components with hooks are now the preferred method for new codebases due to their simplicity and performance benefits.

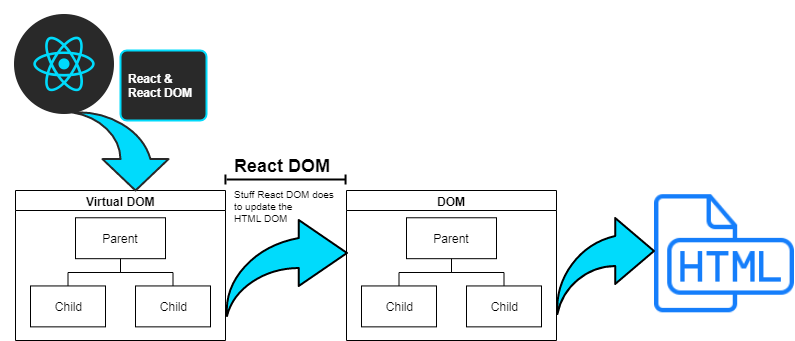
Virtual DOM and Rendering Optimization
The Virtual DOM is one of the most critical components of React’s rendering. The actual DOM elements are represented in memory via the Virtual DOM. React does not instantly update the browser’s DOM when a component’s state or properties change. Instead, it starts by updating the Virtual DOM. To better understand how this process works, refer to the Render in ReactJS guide React then compares the Virtual DOM with the previous version (a process called reconciliation) to determine the minimal set of changes required to update the real DOM.
This process offers several advantages:Complex user interfaces run much better thanks to React’s Virtual DOM framework, particularly when handling frequent updates. However, it is crucial to avoid superfluous renders and oiavoidrendering components when props or states have not changed; memomemorizationhniques like React’s React.memo() for functional components or shouldComponentUpdate() for class components can be used.
Advance your Web Development career by joining this Web Developer Certification Courses now.
Conditional Rendering in React
Conditional rendering in React is a powerful technique that enables components to display different UI elements depending on specific conditions, such as whether a user is authenticated, if data has been successfully fetched, or any other logical scenario based on application state or props. To explore more about software engineering types and how they influence development practices, understanding conditional rendering is essential for building interactive, user-friendly interfaces that adapt in real time to varying states of data or user interaction. React offers several methods for implementing conditional rendering, each suited for different complexity levels. One common approach involves using JavaScript operators, such as the ternary operator or standard if statements, to render content conditionally. For example, a component might use a ternary expression to greet a user differently based on their login status: return{props.isLoggedIn ? ‘Welcome Back!’ : ‘Please Log In’};. Another technique is short-circuit evaluation using the logical AND (&&) operator, which is particularly useful when you want to render something only if a condition is true, for instance, return props.hasMessages && ‘You have new messages!’;. For more complex conditional logic, developers can use switch statements to render different components or messages based on multiple conditions. These various methods of conditional rendering make React components more flexible and efficient, allowing them to respond intelligently to changes in state or props. As a result, the UI stays consistent with the underlying data, enhancing the overall user experience by ensuring that users always see the most relevant content based on their interactions and the current application state.

JSX and Rendering in React
JSX (JavaScript XML) is a syntax extension for JavaScript that allows you to write HTML-like code inside JavaScript. It is a central feature of React, making the UI definition more intuitive and concise. JSX is used to describe what the UI should look like, and it gets compiled to React.createElement calls by a JavaScript compiler like Babel.
For example, this JSX code:JSX makes rendering more powerful by allowing developers to embed expressions, invoke functions, and dynamically generate UI elements. You can use JSX inside the render method of a class component or in the return statement of a functional component. JSX is not required in React; you can use React.createElement directly, but JSX provides a much more readable and easier-to-manage syntax.
State and Props in React Rendering
In React, state and props are the foundational mechanisms used to manage and pass data within components, playing a crucial role in determining how and when components render. State refers to the internal data managed within a component, which can change over time based on user interaction or other logic. When the state is updated using setState, React automatically re-renders the component to reflect the new data. For example, in a simple counter component, the state holds a count value that updates when the user interacts: this.state = { count: 0 }; and updating it via this.setState({ count: this.state.count + 1 }); causes the component to display the updated count. In contrast, props (short for “properties”) are read-only values passed from a parent component to a child. These allow for dynamic and reusable components, as the child can render different outputs based on the props it receives, but it cannot modify them internally. Enhancing your skills with a Web Developer Certification can help you master these essential concepts and apply them effectively in real-world projects. An example is a greeting component where props.name determines the displayed message: return Hello, {props.name};. React components re-render automatically when either state or props change, ensuring the user interface is always in sync with the current data. This reactive update mechanism is central to React’s design, allowing developers to focus on describing the UI based on data at any point in time. Proper management of state and props is critical not only for maintaining application logic but also for optimizing performance by preventing unnecessary re-renders and maintaining clean, maintainable component structures
Preparing for Web Development interviews? Visit our blog for the best Web Development Interview Questions and Answers!
Using Keys in React List Rendering
In React, when rendering a list of elements, it is crucial to assign a unique key prop to each item to help React efficiently identify which elements have changed, been added, or been removed. This improves performance and ensures accurate UI updates during re-renders. To gain deeper insights into this and other important concepts, exploring Web Development Technologies can help you better understand the best practices involved. A common way to render lists is by using the .map() function to iterate over an array and generate JSX for each item. For example, if you have an array like [‘Apple’, ‘Banana’, ‘Cherry’], you can use .map() to create a list of elements, assigning each one a key prop such as the array index. While this approach using the index as a key can work in some simple scenarios, it’s generally discouraged for dynamic lists where items might be reordered, added, or deleted. This is because indices are not stable identifiers, and using them as keys can lead to rendering issues where React misinterprets which items have changed. Instead, it’s recommended to use a unique and stable identifier from the data itself, such as a product ID or another distinct value, to ensure React can correctly manage updates. Proper use of keys in list rendering is a best practice that leads to smoother performance and more predictable UI behavior.
Render Props Pattern in React
The render props pattern is a technique used to share code between components in React. A component that uses this pattern accepts a function (the “render prop”) as a prop, and that function returns the UI to be rendered.
This pattern allows components to share logic without duplicating code and provides flexibility in rendering content.
Error Boundaries and Rendering
In React, an error boundary is a class component that helps to catch JavaScript errors in its child components during rendering, in lifecycle methods, and in constructors. It ensures that when an error occurs, the app doesn’t crash but instead displays a fallback UI. The error boundary component manages an internal state to track whether an error has occurred. Exploring concepts like Web Designing Training can further strengthen your grasp of building resilient interfaces. It uses the getDerivedStateFromError method, which is a static method that gets called when an error is thrown in a child component and updates the state to reflect that an error has been encountered. Additionally, the componentDidCatch lifecycle method is used to log the error details for debugging purposes. In the render method, if the state indicates an error has occurred, the component will return a fallback UI, such as a message saying, “Something went wrong.” Otherwise, it simply renders the child components as usual. This approach helps prevent the entire app from crashing, improving both the app’s stability and the user experience by displaying a graceful error message when issues arise.
Troubleshooting React Rendering Issues
React rendering problems can be debugged using a number of techniques: