Last updated on 13th Jun 2025| 10597
- Introduction
- What is a Linear Gradient?
- Why Use Linear Gradients in React Native?
- Setting Up React Native for Linear Gradients
- Installing Dependencies for Linear Gradient in React Native
- Creating a Basic Linear Gradient in React Native
- Customizing the Gradient: Angle and Colors
- Animating Linear Gradients
- Practical Example: Gradient Background for a Button
- Best Practices for Using Linear Gradients
- Performance Considerations
- Conclusion
Introduction
Gradients have become a staple in modern mobile app design. They add depth, dimension, and visual appeal to UI elements, making apps look more dynamic and polished. One of the most commonly used gradients is the linear gradient, where colors gradually change from one to another in a straight line. In this blog, we’ll guide you through creating linear gradients in React Native using the popular react-native-linear-gradient library, step by step.Gradients are used in a variety of uses such as mathematics, machine learning, physics, and design. In mathematics, gradients refer to the direction and magnitude of the steepest rise of a multivariable function. In machine learning, gradients are used to adjust model parameters during training so that models can learn from examples and improve accuracy. In physics and engineering, gradients are used to solve differential equations and understand how systems evolve over time. Gradients are applied in design to create visually striking effects that add depth and dimension to things like backgrounds, logos and icons. Whether you’re a beginner or an experienced developer, you’ll learn how to apply linear gradients effectively in your React Native projects.
What is a Linear Gradient?
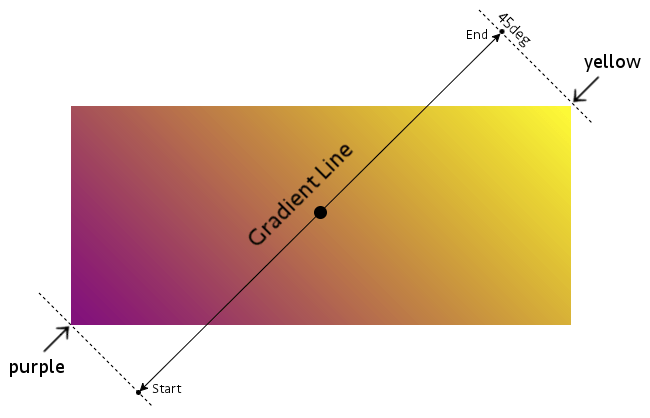
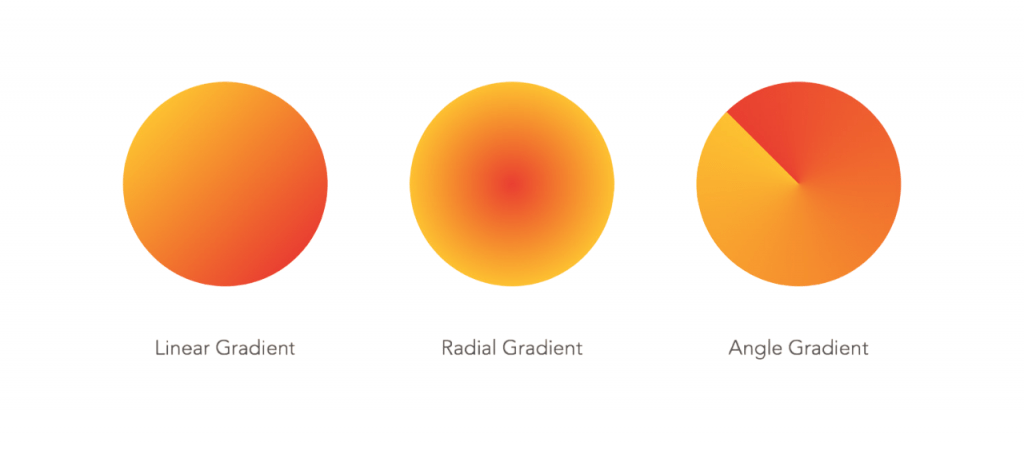
A linear gradient is a graphical effect where colors blend along a straight line, creating a smooth transition from one color to another. The line could be horizontal, vertical, or at any angle, offering flexibility in design.Linear gradients transition in a linear fashion, as against radial or conic gradients. Changing the line orientation is done by setting an angle or direction of the gradient (e.g., from top-to-bottom or left-to-right). For creating smooth transition, CSS calculates and blends the colors between the color stops automatically.
Linear Gradient Example:Imagine a gradient starting from red on the left and transitioning smoothly to blue on the right. This would create a horizontal linear gradient from left to right.

Why Use Linear Gradients in React Native?
Linear gradients can make your React Native app’s user interface more visually appealing by:
- Enhancing aesthetics:Adding a gradient can elevate the design, making buttons, backgrounds, and other UI elements more attractive.
- Providing depth: Gradients can create the illusion of depth, helping elements stand out from the transparent background.
- Brand consistency: Many brands use gradient colors as part of their brand identity, and adding them to mobile apps ensures consistency across platforms.
React Native doesn’t natively support gradients, which is why we use third-party libraries to easily add this feature.
Excited to Obtaining Your web developer Certificate? View The web developer course Offered By ACTE Right Now!
Setting Up React Native for Linear Gradients
Before you can start using linear gradients in React Native, you need to ensure that your development environment is set up properly.
- Ensure you have Node.js installed.
- Install the React Native CLI if you haven’t already.
- Make sure you have either an Android or iOS emulator running or a physical device connected for testing.
- import React from ‘react’;
- import { View, Text, StyleSheet } from ‘react-native’;
- import LinearGradient from ‘react-native-linear-gradient’;
- const GradientExample = () => {
- return (
-
- colors={[‘#FF7E5F’, ‘#FEB47B’]} // Colors for the gradient
- style={styles.container}>
Hello, Gradient! - );
- };
- const styles = StyleSheet.create({
- container: {
- flex: 1,
- justifyContent: ‘center’,
- alignItems: ‘center’,
- },
- text: {
- fontSize: 24,
- color: ‘#fff’,
- },
- });
- LinearGradient:The component that creates the gradient effect.
- colors:An array of colors that will be used for the gradient. The gradient smoothly transitions from the first color to the last.
- style:The style applied to the container that holds the gradient.
- start={{ x: 0, y: 0 }} // Starting point of the gradient
- end={{ x: 1, y: 1 }} // Ending point of the gradient
- colors={[‘#FF7E5F’, ‘#FEB47B’]}
- style={styles.container}>
Diagonal Gradient - colors={[‘#FF7E5F’, ‘#FEB47B’, ‘#6A82FB’]}
- style={styles.container}>
Multiple Color Gradient - import React, { useState, useEffect } from ‘react’;
- import { View, Text, Animated } from ‘react-native’;
- import LinearGradient from ‘react-native-linear-gradient’;
- const AnimatedGradient = () => {
- const [colorValue] = useState(new Animated.Value(0));
- useEffect(() => {
- Animated.loop(
- Animated.sequence([
- Animated.timing(colorValue, { toValue: 1, duration: 3000,
- useNativeDriver: false }),
- Animated.timing(colorValue, { toValue: 0, duration: 3000,
- useNativeDriver: false }),
- ])
- ).start();
- }, [colorValue]);
- const interpolateColor = colorValue.interpolate({
- inputRange: [0, 1],
- outputRange: [‘#FF7E5F’, ‘#FEB47B’], // Transition between two colors
- });
- return (
- colors={[interpolateColor, ‘#6A82FB’]}
- style={{ flex: 1, justifyContent: ‘center’, alignItems: ‘center’ }}>
Animated Gradient - );
- };
- import React from ‘react’;
- import { TouchableOpacity, Text, StyleSheet } from ‘react-native’;
- import LinearGradient from ‘react-native-linear-gradient’;
- const GradientButton = ({ title, onPress }) => {
- return (
-
- colors={[‘#FF7E5F’, ‘#FEB47B’]}
- style={styles.button}>
{title} - );
- };
- const styles = StyleSheet.create({
- button: {
- paddingVertical: 15,
- paddingHorizontal: 40,
- borderRadius: 5,
- },
- buttonText: {
- fontSize: 18,
- color: ‘#fff’,
- textAlign: ‘center’,
- },
- });
- Use gradients sparingly: While gradients are visually appealing, excessive use of them can overwhelm the user. Apply gradients where they make sense, transparent backgrounds or buttons.
- Maintain consistency:Ensure that the gradients align with your app’s design language. Stick to your brand colors for a unified look.
- Optimize performance:Gradients can be resource-intensive. Draw and image avoid using gradients on large sections of your app.
- Avoid using heavy gradients on large areas like full-screen backgrounds.
- Use static gradients in places where performance is critical, such as in list items or fast-scrolling components.
- Consider using images or vector assets for complex gradient patterns if animations are not necessary.
Interested in Pursuing Web Developer Master’s Program? Enroll For Web developer course Today!
Installing Dependencies for Linear Gradient in React Native
To use linear gradients in React Native, you’ll need to install a third-party library called react-native-linear-gradient. This library provides the functionality to create linear gradients in React Native apps.
Install the package:npm install react-native-linear-gradient
Link the package (if using React Native below version 0.60):react-native link react-native-linear-gradientFor versions of React Native 0.60 and above, auto-linking will handle this for you, so no manual linking is necessary.
Creating a Basic Linear Gradient in React Native
Once the Node.js library is installed, you can now use the LinearGradient component to create gradients Css. Here’s a basic example of how to use a linear gradient in React Native:
Customizing the Gradient: Angle and Colors
Gradients in React Native and Node.js can be customized in a number of ways to fit your design. You can adjust the angle and CSS colors to create unique effects.
By default, the gradient will be applied vertically (top to bottom). However, you can customize the angle at which the gradient is applied by using the start and end props.
In this example, the gradient will start from the top-left corner (0,0) and end at the bottom-right corner (1,1), giving it a diagonal look.
Using Multiple ColorsYou can also use more than two colors in your gradient. Just add more colors to the colors array.
This will create a gradient that smoothly transitions between three colors: #FF7E5F, #FEB47B, and #6A82FB.
Animating Linear Gradients
Animating Linear gradients can also be animated to create dynamic and interactive effects. For example, you could animate the colors or the direction of the gradient. Here’s a simple animation example using React Native’s Animated API along with the LinearGradient component:
In this example, the gradient transitions between two colors (#FF7E5F and #FEB47B) using an animation loop.
Practical Example: Gradient Background for a Button
A great use case for linear gradients is for enhancing the appearance of buttons in your React Native app. Below is an example of how to apply a gradient to a button component:
This button has a gradient background and can be used to enhance the UI of your app. The gradient colors will change depending on the design.
Best Practices for Using Linear Gradients
When using linear gradients in React Native, here are a few best practices to follow:
Performance Considerations
When using linear gradients in React Native, here are a few best practices to follow:
Conclusion
Linear gradients are a fantastic way to add depth and visual image appeal to your React Native apps, and with the help of the react-native-linear-gradient library, integrating gradients into your UI is simple and effective.A CSS linear gradient is a method of creating a gradual change between two or more colors in a straight line. It is one of CSS’s gradient forms, along with radial and conic gradients. Linear gradients are achieved with the linear-gradient() function and may be modified with direction, angles, and color stops. In this guide, we covered everything from basic gradient usage to customizing transparent colors, angles, and even animating gradients. By following the best practices and considering performance optimization, you can enhance the look and feel of your React Native app while maintaining css user experience.