
Last updated on 20th Jun 2025| 11419
- Introduction to React Table
- Installing React Table
- Basic Table Setup
- Adding Sorting
- Adding Filtering
- Pagination with React Table
- Customizing Table Columns
- Conclusion
Introduction to React Table
React Table is a lightweight and highly flexible library designed to help developers build dynamic, interactive, and customizable tables in React applications. It provides a powerful set of tools for managing table functionality such as sorting, filtering, pagination, grouping, and more, without imposing rigid structures or styles. One of the main strengths of React Table lies in its declarative programming model. Developers can define their table logic using plain JavaScript and React hooks, which makes the codebase more readable and maintainable. This approach, often emphasized in Web Designing Training, separates concerns by allowing developers to focus on data and behavior, while the library manages state and logic behind the scenes. A key feature that sets React Table apart is its minimalistic and unopinionated design. It does not include any default styling, which gives developers full control over how their tables look and behave. This flexibility is especially useful in projects that require custom designs or need to conform to strict branding guidelines. React Table is also optimized for performance and scalability. It can efficiently manage large datasets through techniques such as lazy loading, virtualization, and server-side data fetching. These capabilities help maintain smooth performance even when dealing with thousands of records. Whether you’re building a simple data grid or a complex table with advanced features, React Table provides the tools and extensibility needed to meet a wide range of requirements. In this guide, we will explore how to set up a basic table, enhance it with interactivity such as sorting and filtering, and apply performance optimizations for handling larger datasets effectively.
Interested in Obtaining Your Web Developer Certificate? View The Web Developer Courses Offered By ACTE Right Now!
Installing React Table
Installing React Table is a straightforward process that allows developers to quickly integrate powerful table functionalities into their React applications. React Table is distributed as an open-source package via npm, the Node package manager, and can be added to any React project with a single command. To begin, make sure you have Node.js and npm or Yarn installed on your development machine. If you’re using npm, you can install React Table by running the command npm install @tanstack/react-table. Alternatively, if you prefer Yarn, you can use yarn add @tanstack/react-table, a method comparable to AngularJS CDN Integration for managing dependencies. This command will fetch the latest version of React Table and add it to your project’s dependencies. Once installed, React Table can be imported and used within your components. The library uses a headless utility-first design, which means it provides the logic and hooks for creating tables but leaves the rendering and styling completely up to the developer. This gives you full control over how your table appears and behaves. After importing the necessary functions from the library, such as useTable, usePagination, or useSortBy, you can configure your table by passing in columns and data objects.
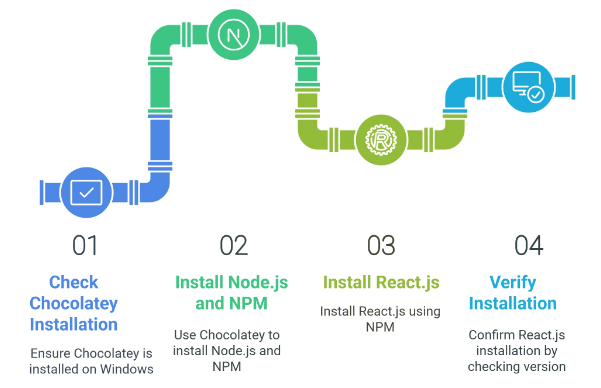
React Table is built with a modular and hook-based architecture, making it ideal for React projects that emphasize reusable, component-driven development. Before you begin building your first table, it is recommended to read the official documentation for guidance on best practices, setup examples, and performance considerations. Proper installation is the first step toward leveraging the full capabilities of this versatile table management library.
Basic Table Setup
- Choose Table Structure: Begin by deciding the structure of your table, including the number of columns and what data each column will display. This will guide how you set up your headers and rows.
- Create Table Element: Use the HTML table tag as the container for your data. Inside the table, use thead for the header section and tbody for the main data rows.
- Define Table Headers: Inside thead, add a tr (table row) containing th (table header) elements. These headers describe the content of each column and provide context for the data.
- Add Table Rows: Within tbody, add multiple tr elements representing each row of data. Inside each row, add td (table data) elements to hold individual cell values, similar to how you handle errors like What are Python KeyError Exceptions in programming.
- Populate Data Dynamically: In React or other frameworks, map over an array of data to dynamically generate rows and cells. This avoids hardcoding rows and makes the table scalable and easy to update.
- Apply Basic Styling: Use CSS to add borders, padding, and alignment to your table elements. Styling improves readability by distinguishing headers from data and separating rows and columns clearly.
- Enhance Accessibility: Add attributes like scope=”col” to header cells and use semantic HTML to improve screen reader compatibility. This ensures your table is usable by all users, including those relying on assistive technologies.
- Enable Sorting Feature: React Table supports sorting out of the box by enabling the sorting plugin hook. This adds sorting capabilities to your table columns, allowing users to sort data by clicking on column headers.
- Define Sortable Columns: When setting up your columns configuration, specify which columns are sortable. This is often done by adding a property like enableSorting: true or simply allowing sorting on all columns by default.
- Use the useSortBy Hook: This hook manages sorting state internally and provides props and methods needed to attach sorting behavior to your table headers, a technique commonly taught in Web Designing Training.
- Attach Sorting Props to Headers: Apply the sorting props returned by the useSortBy hook to the
elements in your table header. This includes event handlers like onClick that toggle sorting order when the header is clicked. 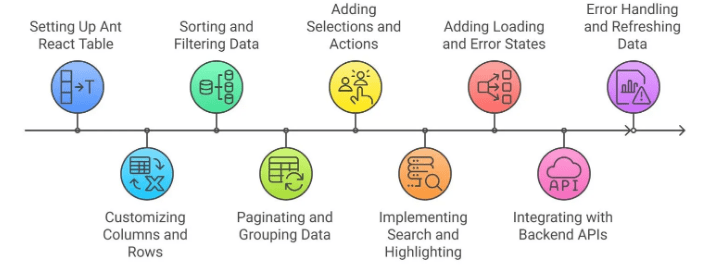
- Indicate Sort Direction: Provide visual feedback to users by showing sort indicators such as arrows pointing up or down. React Table exposes properties that tell you if a column is sorted and in which direction, enabling you to conditionally render these icons.
- Sorting Logic: React Table internally manages the sorting logic and applies it to your data array, rearranging rows according to the selected column and sort order (ascending or descending).
- Custom Sort Functions: For complex data types like dates or nested objects, you can supply custom sorting functions. This ensures sorting behaves correctly beyond simple text or numeric values.

Develop Your Skills with Web Developer Certification Course
Weekday / Weekend BatchesSee Batch DetailsAdding Filtering
Adding filtering to a table in a React application significantly enhances the user experience by allowing users to narrow down large datasets and find relevant information quickly. React Table provides a powerful and flexible way to implement both global and column-specific filtering. With its hook-based architecture, developers can easily integrate filtering functionality without adding unnecessary complexity to their codebase. To get started, React Table offers a useFilters hook, which can be combined with the useTable hook to enable column-level filtering. Each column definition can include a Filter property, which determines how the filter UI is rendered and how the filtering logic is applied to that column’s data. Global filtering, which allows users to search across all columns at once, can be added using the useGlobalFilter hook, an important feature to understand when studying Web Development Languages To Learn. This hook provides a unified input field that filters rows based on a search term matched across the entire dataset. Developers can create custom filter components or use default text input fields depending on the application’s design requirements. React Table does not include built-in styles or input components, which gives developers complete control over the user interface and behavior of the filters. When implementing filtering, it is important to manage performance by ensuring filters are applied efficiently, especially with large datasets. Debouncing input values and considering server-side filtering for extensive data can help maintain responsiveness. Overall, React Table’s filtering capabilities are highly customizable and integrate seamlessly with other features like sorting and pagination, providing a rich and user-friendly data exploration experience.
Are You Interested in Learning More About Web Developer? Sign Up For Our Web Developer Courses Today!
Pagination with React Table
- Enable Pagination Hook: React Table offers built-in pagination through the usePagination hook. To implement pagination, import and include this hook alongside others like useSortBy in your table setup. This hook manages the state and logic for paginating table data.
- Set Page Size: Define how many rows should be displayed per page by setting a pageSize option. This controls the number of items visible at once, helping improve readability and performance when dealing with large datasets.
- Access Pagination Properties: The usePagination hook provides properties and methods such as page, canNextPage, canPreviousPage, nextPage, and previousPage, which are essential concepts to learn when exploring How to Become a Front End Developer.
- Render Paginated Data: Instead of rendering all rows, display only the rows available on the current page by using the page array returned from the hook. This array contains only the subset of data relevant to the current page.
- Create Navigation Controls: Build pagination controls like “Previous,” “Next,” and page numbers using the provided methods and state. Disable “Previous” when on the first page and “Next” when on the last to prevent invalid navigation.
- Handle Page Changes: Use the provided functions such as gotoPage to jump to a specific page programmatically. This allows you to create page number buttons or dropdowns for direct page selection.
- Customizing Pagination: You can customize pagination behavior by controlling page size dynamically, adding page size selectors, or implementing server-side pagination by fetching data as pages change.
Web Development Sample Resumes! Download & Edit, Get Noticed by Top Employers! DownloadCustomizing Table Columns
React Table provides a highly flexible system for customizing columns, allowing developers to tailor the table’s behavior and appearance to meet specific application requirements. One of the key advantages of using React Table is its support for custom rendering within columns. Each column can be defined with a Cell property, which accepts a function to control how the cell content is displayed. This feature is useful for formatting values, embedding components, or displaying dynamic content such as buttons, icons, or links within individual table cells. In addition to custom rendering, developers can modify column values before display. For example, you might want to format a date, truncate long text, or convert numeric values into percentages or currency. By using accessor functions or applying formatting logic within the Cell function, developers have full control over how each data value appears to the user, which is also relevant when understanding roles like What is PHP Developer. Styling is another area where React Table excels in flexibility. Because the library does not include any default styles, it encourages developers to use their own CSS, CSS frameworks, or styling libraries to control the appearance of each column and cell. You can apply conditional styles based on the cell content, use classes for consistent theming, or integrate with component libraries like Tailwind CSS or Material UI for a polished look. This level of customization makes React Table a powerful solution for applications that require interactive, feature-rich tables. Whether you’re building a simple data grid or a complex admin dashboard, React Table gives you the tools to fully customize column behavior and presentation.
Conclusion
React Table is an extremely flexible and powerful library designed specifically for building tables in React applications. It is capable of handling a wide range of table use cases, from simple static tables to highly dynamic and interactive data grids. One of the core strengths of React Table is its hook-based architecture, which aligns seamlessly with modern React development practices. By utilizing hooks such as useTable, useSortBy, useFilters, usePagination, and others, developers gain fine-grained control over how data is handled, displayed, and interacted with inside the table. The library supports essential table features including sorting, filtering, pagination, grouping, and column resizing, without enforcing any rigid styling or structure, which is a key topic in Web Designing Training. This headless design approach gives developers complete freedom to define how the table looks and behaves. You can easily integrate React Table with UI libraries like Tailwind CSS, Bootstrap, or Material UI, or apply custom styles using traditional CSS or styled-components. This makes it suitable for everything from minimal table components to fully responsive, feature-rich dashboards. React Table is also optimized for performance. It supports techniques like lazy loading, virtualization, and server-side data handling, making it ideal for applications that need to manage large datasets efficiently. The ability to handle data dynamically allows developers to integrate with real-time APIs or back-end systems with ease. Whether you are building a simple admin panel or a complex analytics platform, React Table provides the flexibility, scalability, and power needed to deliver a seamless user experience and maintainable codebase.
Upcoming Batches
Name Date Details Web Developer Certification Course 22 - Jun - 2026
(Weekdays) Weekdays Regular
View Details Web Developer Certification Course 24 - Jun - 2026
(Weekdays) Weekdays Regular
View Details Web Developer Certification Course 27 - Jun - 2026
(Weekends) Weekend Regular
View Details Web Developer Certification Course 28 - Jun - 2026
(Weekends) Weekend Fasttrack
View Details Recommended Articles
To Earn Your Web Developer Certification, Gain Insights From Leading Data Science Experts And Advance Your Career With ACTE’s Web Developer Courses Today!