Last updated on 03rd Jul 2025| 10092
- React Router
- Installing React Router
- Basic Routing Setup
- Switch and Routes
- Link and NavLink
- Nested Routing
- Programmatic Navigation
- URL Parameters
- Redirects
- Protected Routes
- React Router v6 Changes
- Conclusion
React Router
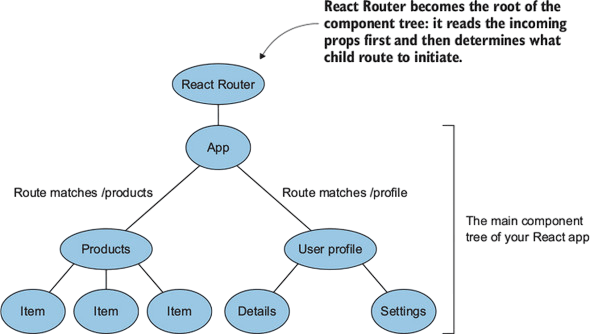
What is routing in ReactJS? It is a powerful feature that enables navigation and dynamic routing in React applications. Unlike traditional multi-page apps, React apps are often single-page applications (SPAs), where moving between views doesn’t require a full page reload. React Router handles these transitions seamlessly, allowing developers to map specific URL paths to different components in a declarative way. This simplifies route management and helps maintain the application’s state across various views. Understanding what is routing in ReactJS is essential for building responsive, user-friendly interfaces where navigation feels smooth and instantaneous. Routing in ReactJS has become the standard for routing in React, supported by an active community and continuous updates. It provides core components like Route, Link, BrowserRouter, and Switch to help manage application views. With React Router, developers can build complex navigation systems, manage URL parameters, create protected routes, and handle redirects efficiently.
Are You Interested in Learning More About Web Developer Certification? Sign Up For Our Web Developer Certification Courses Today!
Installing React Router
To get started with Routing in ReactJS, you need to install it in your React project. You can do this using npm or yarn, depending on your package manager preference.npm install react-router-dom or yarn add react-router-dom. After installation, you’ll need to wrap your main application component with BrowserRouter to enable routing. Typically, this is done in the index.js or App.js file.
- import { BrowserRouter } from ‘react-router-dom’;
- ReactDOM.render(
- <BrowserRouter>
- <App />
- </BrowserRouter>,
- document.getElementById(‘root’)
- );
Basic Routing Setup
Setting up basic routing involves defining different Route components that render specific components based on the URL path. Here’s a simple example:
- import { Routes, Route } from ‘react-router-dom’;
- import Home from ‘./Home’;
- import About from ‘./About’;
- function App() {
- return (
- <Routes>
- <Route path=”/” element={<Home />} />
- <Route path=”/about” element={<About />} />
- </Routes>
- );
- }
In this example, when the user navigates to /, the Home component is rendered. When they navigate to /about, the About component is rendered. This declarative approach makes route management straightforward.

Switch and Routes
In previous versions of Route in React (v5 and below), Switch was used to render only the first matching Route. In React Router v6, Switch has been replaced with Routes, which is more intuitive and avoids common pitfalls related to the order of declaration.
- import { Routes, Route } from ‘react-router-dom’;
- <Routes>
- <Route path=”/” element={<Home />} />
- <Route path=”/about” element={<About />} />
- </Routes>
The Routes component ensures only one Route is rendered at a time, improving performance and predictability. If no route matches, you can include a fallback Route with the path *.
Excited to Obtaining Your web developer Certificate? View The web developer course Offered By ACTE Right Now!
Link and NavLink
Route in React provides two components, Link and NavLink, for navigation. These replace traditional anchor () tags to prevent full-page reloads and enable SPA behavior.
- import { Link, NavLink } from ‘react-router-dom’;
- <Link to=”/about”>Go to About</Link>
- <NavLink
- to=”/about”
- className={({ isActive }) => isActive ? ‘active’ : ”}
- >
- About
- </NavLink>
NavLink is particularly useful for navigation menus, as it automatically adds an active class to the link when the current URL matches the to prop. This allows for easy styling of active navigation items.
Nested Routing
Route in React supports nested routing, allowing you to define child routes inside parent components. This is useful for structuring applications with a hierarchical view.
- <Routes>
- <Route path=”/dashboard” element={<Dashboard />}>
- <Route path=”stats” element={<Stats />} />
- <Route path=”settings” element={<Settings />} />
- </Route>
- </Routes>
Inside the Dashboard component, you need to use the Outlet component to render the child components.
- import { Outlet } from ‘react-router-dom’;
- function Dashboard() {
- return (
- <div>
- <h2>Dashboard</h2>
- <Outlet />
- </div>
- );
- }
This setup keeps your code modular and enhances the user experience by nesting views without losing context.
Interested in Pursuing web developer certification Program? Enroll For Web developer course Today!
Programmatic Navigation
React Router allows navigation via code using the useNavigate hook. This is especially useful after form submissions or login actions.
- import { useNavigate } from ‘react-router-dom’;
- function Login() {
- const navigate = useNavigate();
- const handleLogin = () => {
- // logic to validate login
- navigate(‘/dashboard’);
- };
- return <button onClick={handleLogin}>Login</button>;
- }
This programmatic approach gives you full control over navigation logic, enabling conditional redirects and dynamic routes.
URL Parameters
URL parameters let you pass data via the URL, useful for user profiles, blog posts, etc. You define parameters with a colon (:) in the route path.
- <Route path=”/user/:id” element={<UserProfile />} />
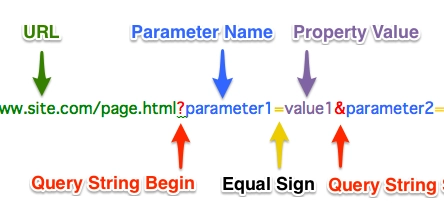
To access the parameter, use the useParams hook inside the component:
- import { useParams } from ‘react-router-dom’;
- function UserProfile() {
- const { id } = useParams();
- return <div>User ID: {id}</div>;
- }
This technique makes routing dynamic and helps in rendering content based on unique identifiers.
Redirects
Redirects are used to navigate users from one route to another. In React Router v6, use the Navigate component.
- import { Navigate } from ‘react-router-dom’;
- function ProtectedRoute({ isAuthenticated }) {
- return isAuthenticated ? <Dashboard /> : <Navigate to=”/login” />;
- }
This method is commonly used for authentication and access control, ensuring users only see authorized pages.
Protected Routes
Protected routes prevent unauthorized access to certain parts of an app. This is achieved by checking the authentication state and conditionally rendering content or redirecting.
- function ProtectedRoute({ isAuthenticated, children }) {
- if (!isAuthenticated) {
- return <Navigate to=”/login” />;
- }
- return children;
- }
You can wrap any route with ProtectedRoute to ensure only logged-in users can access it. This is vital for apps with sensitive data or admin panels.
React Router v6 Changes
Route in React v6 brought several improvements over v5:
- Switch replaced with Routes
- Route nesting with Outlet
- Element prop instead of component or render
- Better support for TypeScript
- Simpler and more powerful navigation with useNavigate
- Route ranking has been removed for better performance
These changes make React Router v6 more intuitive and developer-friendly, reducing boilerplate and improving code clarity.
Conclusion
Routing in ReactJS is an essential tool for modern React development. It provides a declarative and flexible way to handle navigation, dynamic routing, and user access. From basic routing to nested paths, URL parameters, protected routes, and redirects, Routing in ReactJS supports all use cases for building sophisticated web apps. The improvements in version 6 further simplify routing logic, making it more powerful and efficient. In conclusion, understanding what is routing in ReactJS is crucial for building smooth, scalable, and user-friendly single-page applications. It not only manages navigation and dynamic views efficiently but also enhances the overall structure and flow of a React app. From handling simple paths to implementing advanced features like nested routes and protected views, what is routing in ReactJS becomes the foundation for delivering seamless user experiences in modern web development.