Last updated on 29th Dec 2021| 1930
When the page is loaded, JavaScript makes an array forms in which it puts all the forms that are on the page. The first form is forms[0] , the second is forms[1] etc. Each form has another array in which JavaScript puts all the elements in the form. The first elements is elements[0] , the second elements[1] etc.
- Introduction to JavaScript
- Creating the form
- Getting a value from a form object
- Setting a value in a form object
- Reading other form object values
- Using Hidden Text Boxes & Using Radio Buttons
- Using Selection Lists
- Other events you can trigger in a form
- Conclusion
- JavaScript wears many hats. You can use JavaScript to create special effects. You can use JavaScript to make your HTML pages “smart” by using them to make decisions. And you can use JavaScript to enhance the HTML form. This last application is of particular importance. JavaScript may be wearing all hats, with its form processing features being the most sought after and used.
- There is nothing more fearful in the heart of a web publisher than these three letters: C-G-I. CGI (which stands for Common Gateway Interface), is a mechanism for securely transporting data from a client (browser) to a server. It is commonly used to transfer data from HTML form to server.
- With JavaScript on your side, you can process simple forms without invoking the server. And when form submission is required in a CGI program, you can have JavaScript take care of all the initial requirements, such as validating the input to make sure the user has completed each i. In this column, we’ll take a closer look at the JavaScript-form connection, including how to use JavaScript’s form objects, how to read and set form content, and how to trigger JavaScript events by manipulating form controls. We’ll also cover how to use JavaScript to validate form input and how to insert the form into a CGI program.
Introduction to JavaScript:
Learn javascript:
This article is part of the JavaWorld Technical Content Collection. You can learn a lot about JavaScript programming by reading the articles in the JavaScript series, just keep in mind that some of the information is likely to be out of date. See “Using JavaScript’s Built-in Objects” and “Debugging JavaScript Programs” for more information about programming with JavaScript.
- Text box to enter a line of text
- Push button to select an action
- Radio button to make a selection among a group of options
- Check boxes to select or deselect a single, independent option.
- I won’t bother to enumerate all the features of these controls (widgets) and how to use them in HTML. Any reference on HTML will provide you with the details. For use with JavaScript, you should always remember to provide a name for the form and each control you use. Names allow you to refer to objects in your JavaScript-enhanced page.
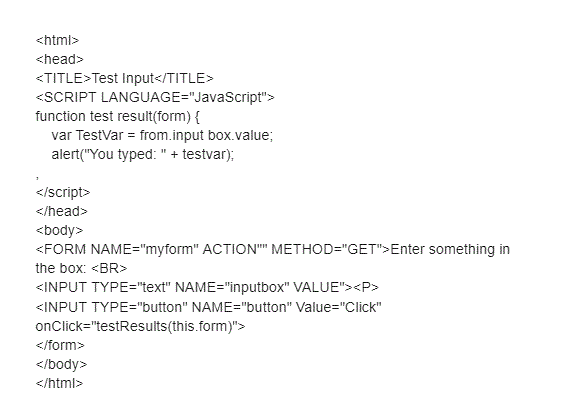
- <'form name="myform" action="" method="get">
- Enter something in the box:
- <'INPUT TYPE="text" NAME="inputbox" VALUE">
- <'INPUT TYPE="button" NAME="button" Value="Click" onClick="testResults(this.form)">
- <'/form>
- FORM NAME=”myform” Defines and names the form. Elsewhere in JavaScript you can refer to this form by the name myform. Name you give your form, but it must follow JavaScript’s standard variable/function naming rules (no spaces, no strange characters except underscores).
- ACTION=”” defines how you want the browser to handle when it is submitted to a CGI program running on the server. Since this example is not designed to submit anything, the URL of the CGI program is omitted.
- METHOD=”GET” defines that method data is passed to the server when the form is submitted. Attribute puffer in this case because the example form doesn’t submit anything.
- input type=”text” defines a text box object. This is standard HTML markup.
- Input type=”button” defines the button object. This is standard HTML markup except for the onclick handler.
- onClick=”testResults(this.form)” is an event handler – it handles an event, in this case a button click. When the button is clicked, JavaScript executes the expression within the quotes. The expression is to call the testResults function elsewhere on the page, and pass it the current form object.
Creating the form:
There are some differences between a straight HTML form and a JavaScript-enhanced form. The main thing is that a JavaScript form depends on one or more event handlers, such as onclick or onsubmit. These invoke a JavaScript action when the user does something in the form, such as clicking a button. Event handlers, which are placed in HTML form tags along with the rest of the attributes, are invisible to browsers that do not support JavaScript. Because of this feature, you can often use a form for both JavaScript and non-JavaScript browsers.
The typical look looks like this. Notice I have provided the NAME= attribute for all form controls, including the form:
Getting a value from a form object:
Let’s experiment with getting values from form objects. Load the page, then type something in the text box. Click the button, and what you type is shown in the alert box.
Listing 1. testform.html>
Here’s how the script works. JavaScript calls the testResults function when you click the button in the form. The testResults function is passed a Form object using the syntax this.form (this keyword refers to the Button control; Form is a property of the Button control and represents the Form object). I have named the Form object inside the TestResult function, but you can give it any name you like.
The testResults function is simple – it simply copies the contents of the text box into a variable called TestVar. Note how the contents of the text box were referenced. I defined the Form object I wanted to use (called Form), the object I wanted (called InputBox), and the property of the object I wanted (called the Value property).
Setting a value in a form object:
The Value property of the InputBox as shown in the above example is both readable and writable. i.e. you can read whatever is typed in the box, and you can write data back into it. The process of setting a value to a Form object is the exact opposite of reading it. Here’s a short example to demonstrate setting a value in a form text box. The process is the same as in the previous example, except this time there are two buttons. Click the “Read” button and the script reads what you type in the text box. Click the “Compose” button and the script writes a particularly ambiguous phrase into the text box.
Listing 2. set_formval.html
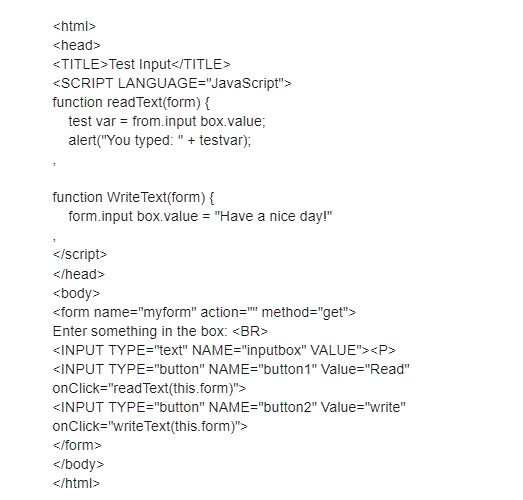
When you click the “Read” button, JavaScript calls the ReadText function, which reads and displays the value you entered in the text box. When you click the “Write” button, JavaScript calls the WriteText function, which says “Have a nice day!” in text box
- Hidden text box (TYPE=”hidden”).
- radio button (TYPE=”radio”)
- check box (TYPE=”checkbox”)
- textarea (<'textarea>)
- lists (<'select>)
Reading other form object values:
A text box is probably the most common form object you’ll read (or write to) using JavaScript. However, you can use JavaScript to read and write values to most other objects (note that JavaScript cannot currently be used to read or write data using the password text box). In addition to text boxes, JavaScript can be used with:
- <'INPUT TYPE="radio" NAME="rad" VALUE="radio_button1" onClick=0>
- <'INPUT TYPE="radio" NAME="rad" VALUE="radio_button2" onClick=0>
- <'INPUT TYPE="radio" NAME="rad" VALUE="radio_button3" onClick=0>
- <'INPUT TYPE="radio" NAME="rad" VALUE="radio_button4" onClick=0>
Using Hidden Text Boxes & Using Radio Buttons:
Hidden text box
From a JavaScript point of view, hidden text boxes behave just like regular text boxes, sharing the same properties and methods. From the user’s point of view, hidden text boxes “do not exist” because they do not appear in the form. Rather, hidden text boxes are the means by which specific information can be passed between the server and the client. They can also be used to hold temporary data that you may want to use later. Since hidden text boxes are used like standard text boxes, a separate example will not be provided here.
Using radio buttons
Radio buttons are used to allow the user to select one, and only one, item from a set of options. Radio buttons are always used in multiples; It doesn’t make any logical sense to have just one radio button on a form, because once you click on it, you can’t unclick it. If you want a simple click/unclick option use a check box instead (see below).
To define radio buttons for JavaScript, assign each object the same name. Javascript will create an array using the name you provide; Then you reference the button using the array index. The first button in the chain is numbered 0, the second is numbered 1, and so on. Note that the VALUE attribute is optional for JavaScript-only forms. However, if you submit the form to a CGI program running on the server you will want to provide a value.
The following is an example of testing which button is selected. The for loop in the TestButton works through all the buttons in the “Red” group. When it finds the selected button, it breaks out of the loop and displays the button number (remember: starting at 0).
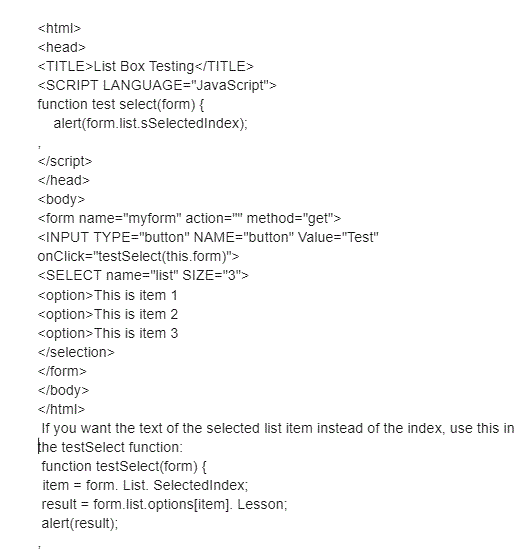
Using Selection Lists:
From the list boxes, you can select the item you want from the multiple choice boxes. The list box itself is created with the <'SELECT> tag, and the items inside it are created by one or more <;OPTION> tags. You can have any number of <'OPTION> tags in the list. The list is terminated with the <'/SELECT> tag.
The list may appear with multiple items showing at once, or it may appear in a drop-down box — usually you see one item at a time, but click to see more. The markup for the two styles is identical, except for the optional SIZE attribute. Leave SIZE to create a drop-down box; Use SIZE to make the list box the size you want.
Use the SelectedIndex property to test which option item is selected in the list, as shown in the following example. The item is returned as an index value, with 0 being the first option, 1 being the second, and so forth (the value is -1 if no items are selected).
Listing: form_select.html
Other events you can trigger in a form:
I’ve used the onclick event handler in all the examples because that’s what you’re most likely to deal with in your forms. Yet JavaScript supports many other event handlers as well. Use these when needed, and the mood fits. The event handlers used with the Form object in Navigator 2.x are:

Develop Your Skills with Advanced JavaScript Certification Training
Weekday / Weekend BatchesSee Batch Detailsonfocus – an event is triggered with a form object the input gets focus (the insertion point is clicked there).
onBlur – An event is triggered with a form object that loses input focus (the insertion point is clicked from there).
onchange – An event triggered when a new item is selected in a listbox. This event is also triggered when a text or text area box loses focus and the contents of the box change.
onSelect – An event triggered when text is selected in a text or text area box.
onsubmit – an event triggered when the form is submitted to the server (more about this important hander in a later column).
Submit form to server:
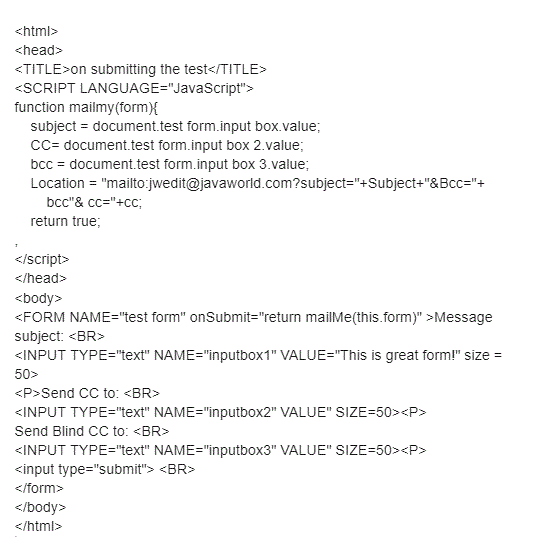
In the examples above I’ve restricted the form’s action to only within JavaScript. There are several forms designed to send data back to a CGI program running on a server. This is referred to as submitting the form, and is accomplished using either of two JavaScript directives: the onsubmit event handler or the submit method. In most cases, you use one or the other, not both! Place the onSubmit event handler in the <'FORM> tag. It tells JavaScript what to do when the user clicks the submit button (it’s a button defined as TYPE=”submit”). Put the submit directive somewhere in your JavaScript. It can be fired by any action, such as clicking a form button that is defined with an onclick event handler.
Use on submit
Here is an example of using the onsubmit event handler to send mail. The onsubmit event handler tells JavaScript what to do when the user clicks the submit button: Call the mailme() function, where additional mail fields are added to the mail to: url. The Navigator automatically opens a new mail window with the fields filled in. Compose the body of the message, and send the mail to the recipient.
Listing 7. onsubmit.html
Use submit:
In the next example the submit method is used instead. The script has changed a bit, except that the onsubmit handler has been removed, and an onclick handler for a named form button has been added in its place. The submit() method replaces the return true statement in the previous example. (Personally, I prefer the submit method because it offers a bit more flexibility. But any will work.)
Conclusion:
The traditional way to use forms on a web page is to send all of the user’s entries to a CGI script or program running on the server. The majority of any CGI program is verifying that the user has entered valid data. Access validation is something that JavaScript can do, and does very easily. By using JavaScript you can greatly reduce the complexity of writing and implementing CGI programs. And, in many cases, JavaScript can replace CGI programs altogether, taking the burden off the server and freeing it from mundane processing tasks.