
Last updated on 30th Oct 2025| 13420
- React Native Image Picker
- Why Use an Image Picker in React Native?
- Installing React Native Image Picker
- Configuring Permissions for Image Access
- Picking Images from Gallery and Camera
- Handling Image Uploads in React Native
- Resizing and Compressing Images
- Displaying Selected Images in UI
- Storing Images in State or Database
- Error Handling in Image Picking
- Best Practices for Using Image Pickers
- Conclusion
React Native Image Picker
Image picking is an essential feature in many mobile applications, especially those that rely on user-generated content. Whether it’s for setting a profile picture, uploading receipts, or sharing media, allowing users to select or capture images enhances interactivity and functionality. To understand how such features are implemented across both frontend interfaces and backend storage systems, explore Full Stack Training a practical program that covers image handling, user input workflows, and full stack integration for dynamic web applications. In React Native, developers can implement this capability using libraries such as react-native-image-picker, which bridges native device functionalities like the camera and photo gallery. The Image Picker module provides an easy-to-use interface for capturing or selecting images, retrieving file information, and processing them for display or upload.
Why Use an Image Picker in React Native?
The need for an image picker arises whenever an application requires visual input from users. Implementing image selection from scratch using native APIs for both Android and iOS can be complex and time-consuming. The React Native Image Picker simplifies this process by offering a cross-platform solution that works consistently across devices. It abstracts away platform-specific code and provides simple functions for accessing the camera or gallery. To understand how such modular tools align with component-driven architecture, explore Pure Components in React a developer-focused guide that explains how to build predictable, reusable components with optimized rendering and clean separation of concerns. Additionally, it supports options like cropping, resizing, compressing, and retrieving metadata such as file size and format. Using an image picker also enhances user experience by leveraging native UI components that users are already familiar with, ensuring smooth and intuitive interactions.
Are You Interested in Learning More About Full Stack Developer? Sign Up For Our Full Stack Developer Training Today!
Installing React Native Image Picker
To integrate React Native Image Picker into your project, the installation process is straightforward. You can use either npm or yarn to install the package. To understand how this setup fits into a beginner-friendly mobile development workflow, explore React Native Made Simple Beginner’s Guide a step-by-step resource that walks you through essential tools, component integration, and mobile UI logic for building cross-platform apps.
- npm install react-native-image-picker
Once installed, you should rebuild the application using npx react-native run-android or npx react-native run-ios. This ensures that the library is fully integrated into the native build environments of your app.
Would You Like to Know More About Full Stack Developer? Sign Up For Our Full Stack Developer Training Now!
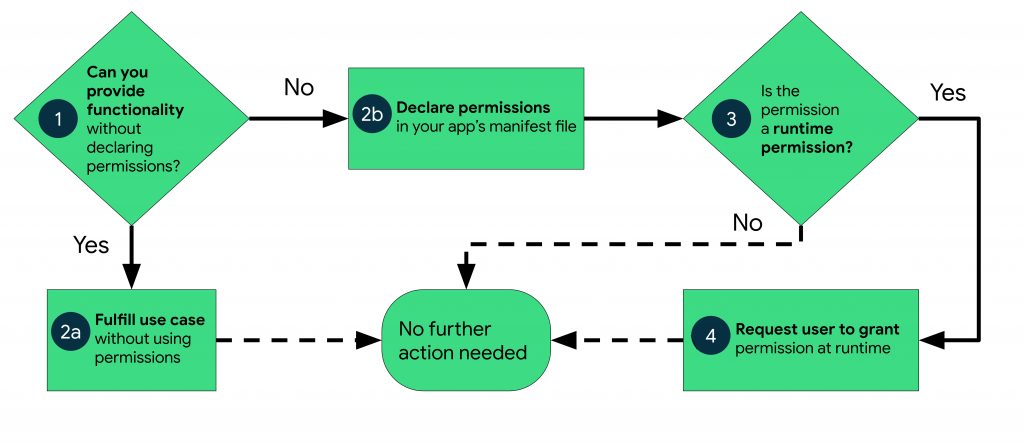
Configuring Permissions for Image Access
Before using the camera or accessing the gallery, your app must request permission from the user. On Android, you need to modify the AndroidManifest.xml file to include:
- const settings = {
- responsive: [
- {
- breakpoint: 768,
- settings: {
- slidesToShow: 1,
- }
- },
- {
- breakpoint: 1024,
- settings: {
- slidesToShow: 3,
- }
- }
- ]
- };
- // Android permissions (AndroidManifest.xml)
- <uses-permission android:name=”android.permission.CAMERA” />
- <uses-permission android:name=”android.permission.READ_EXTERNAL_STORAGE” />
- // iOS permissions (Info.plist)
- <key>NSCameraUsageDescription</key>
- <string>We need access to your camera</string>
- <key>NSPhotoLibraryUsageDescription</key>
- <string>We need access to your photo library</string>
React Native Image Picker also allows runtime permission requests using React Native’s PermissionsAndroid API. This ensures that your app remains compliant with the latest Android security models and provides a seamless user experience during permission prompts.

Develop Your Skills with Full Stack Developer Certification Training
Weekday / Weekend BatchesSee Batch DetailsPicking Images from Gallery and Camera
React Native Image Picker provides two main methods, one for opening the camera and another for selecting images from the gallery. Developers can specify configurations such as media type, quality, and maximum dimensions. To see how such mobile capabilities align with broader language choices in modern development, explore Best Web Development Languages a curated guide that highlights essential programming languages and their roles in building responsive, cross-platform applications.
- import {launchCamera, launchImageLibrary} from ‘react-native-image-picker’;
- const options = {
- mediaType: ‘photo’,
- quality: 0.8,
- };
- launchImageLibrary(options, (response) => {
- if (response.didCancel) {
- console.log(‘User cancelled image picker’);
- } else if (response.errorCode) {
- console.log(‘Error: ‘, response.errorMessage);
- } else {
- console.log(‘Selected image URI:’, response.assets[0].uri);
- }
- });
The function returns details about the selected image, including the URI, type, file size, and dimensions. You can then display or upload this image as required.
Handling Image Uploads in React Native
Once the image is selected, the next step is often uploading it to a server or cloud storage. The selected image can be uploaded using the Fetch API or Axios. Here’s a typical example using Fetch:
- const uploadImage = async (imageUri) => {
- const data = new FormData();
- data.append(‘file’, {
- uri: imageUri,
- type: ‘image/jpeg’,
- name: ‘upload.jpg’,
- });
- const response = await fetch(‘https://your-api-endpoint.com/upload’, {
- method: ‘POST’,
- body: data,
- headers: { ‘Content-Type’: ‘multipart/form-data’ },
- });
- const result = await response.json();
- console.log(‘Upload result:’, result);
- };
Handling uploads securely involves validating the file size, format, and compression before sending it to the server to avoid performance bottlenecks or security risks.
Preparing for Full Stack Development Job? Have a Look at Our Blog on Full Stack Development Interview Questions and Answers To Ace Your Interview!
Resizing and Compressing Images
To optimize performance and reduce upload time, it’s important to resize or compress images before uploading. The React Native Image Picker allows basic resizing through its configuration options, but for more advanced control, libraries like react-native-image-resizer or react-native-compressor can be integrated. To understand how these tools fit into a complete mobile-to-backend workflow, explore Full Stack Training a hands-on program that covers mobile integration, media processing, and backend coordination for building responsive, feature-rich applications. By adjusting quality or dimensions, you can significantly reduce the file size without noticeable loss in visual quality. This optimization is particularly useful for mobile devices with limited bandwidth or storage space.
Displaying Selected Images in UI
After an image is selected, you can easily display it using the built-in <Image> component. For example, you might render a preview before uploading or conditionally show the image based on user interaction. To understand where image rendering fits within a broader frontend-to-backend workflow, explore Web Development Roadmap a structured guide that outlines key stages in building modern web applications, from UI components to server-side integration.
- import {Image} from ‘react-native’;
- <Image
- source={{uri: selectedImageUri}}
- style={{width: 200, height: 200, borderRadius: 10}}
- />
Storing Images in State or Database
The selected image URI or base64 data can be stored in a component’s state using React’s useState hook for temporary use. This enables dynamic rendering, preview functionality, and conditional logic based on user input. To explore how such state-driven workflows are structured across modern libraries, check out React Frameworks a practical guide that compares leading frameworks, highlights component patterns, and shows how to build scalable, interactive web applications.
- const [selectedImage, setSelectedImage] = useState(null);
For long-term storage, the image or its metadata can be saved to a local database (e.g., Realm, SQLite) or remote cloud storage like Firebase or AWS S3. However, it’s generally not advisable to store large image data directly in databases; instead, store image URLs while keeping the files on dedicated storage servers. This improves performance and simplifies data management.
Error Handling in Image Picking
Error handling ensures that the app doesn’t crash or behave unexpectedly during image selection. Common errors include permission denials, unsupported formats, or user cancellations. The response object from Image Picker provides error codes and messages to help handle such cases gracefully. For example:
- if (response.errorCode === ‘camera_unavailable’) {
- Alert.alert(‘Error’, ‘Camera not available on this device’);
- }
Proper error handling improves user experience and makes the app more reliable across various device configurations.
Best Practices for Using Image Pickers
To ensure a seamless and efficient image selection experience, developers should follow several best practices: use native modules for camera and gallery access, handle permissions gracefully, and optimize image size before upload. To understand how these capabilities are enabled across platforms, explore What is React Native a foundational guide that explains how React Native bridges JavaScript and native APIs to build performant, cross-platform mobile applications.
- Request permissions proactively: Always handle user permissions gracefully, providing clear explanations for access.
- Optimize image size: Resize and compress images before uploading to minimize bandwidth usage.
- Provide feedback: Use loading indicators or previews when uploading or processing images.
- Handle all error cases: Always implement proper error checks for denied permissions, cancellations, and API failures.
- Secure uploads: Use HTTPS and authentication tokens to protect image data during transmission.
- Cross-platform testing: Test image picking features on multiple Android and iOS versions to ensure consistent performance.
Conclusion
The React Native Image Picker is a powerful and user-friendly tool for integrating image selection features in mobile applications. It bridges the gap between React Native and native device capabilities, simplifying complex tasks like camera access, image selection, and uploading. To understand how these mobile features integrate with backend services and full application workflows, explore Full Stack Training a hands-on program that covers mobile-to-server communication, media handling, and full stack coordination for building seamless cross-platform experiences. With support for customization, compression, and multiple formats, it caters to a wide range of app requirements from social networking to e-commerce. By following best practices for permissions, optimization, and security, developers can deliver smooth, efficient, and secure image-handling experiences to users.