
Last updated on 29th Oct 2025| 12222
- REST API with Node.js
- Setting Up Node.js for REST API Development
- Installing and Using Express.js
- Creating Routes in a REST API
- Handling GET, POST, PUT, DELETE Requests
- Connecting to a Database (MongoDB/MySQL)
- Authentication and Authorization in REST API
- Error Handling in REST API
- Testing REST API with Postman
- Deploying a Node.js REST API
REST API with Node.js
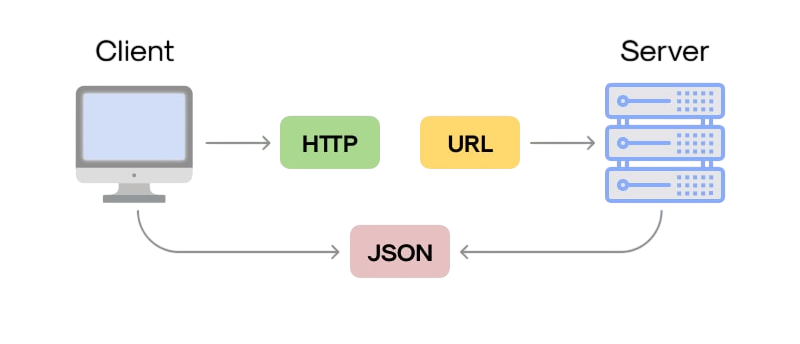
RESTful API, often known as REST (Representational State Transfer) API, is an architectural style used in network application design. Resources are specified, arranged, and accessed via the internet according to a set of rules and guidelines. Resources are the primary components that are exposed and altered in a REST API. A URL (Uniform Resource Locator) or URI (Uniform Resource Identifier) is uniquely assigned to each resource. Users, goods, posts, and other kinds of data can all be represented by these resources. To understand how RESTful architecture fits into end-to-end application development, explore Full Stack Training a comprehensive program that covers API design, resource modeling, and integration strategies across frontend and backend systems. The foundation of REST APIs is the client-server paradigm, in which the server communicates with the client (such as a mobile application or web browser) via standardized HTTP methods like GET, POST, PUT, DELETE, and others. Tasks including data retrieval, resource creation, updating existing resources, and resource deletion are made possible by these methods, which are essential for carrying out operations on the available resources.
Setting Up Node.js for REST API Development
Downloading npm (Node Package Manager) and Node.js is the very first phase to developing an API in Node.js. The package manager npm makes it easier to install and manage Node.js packages, while the JavaScript runtime Node.js allows you to run JavaScript code on the server side. You must go to the official Node.js website and download the operating system-specific installer in order to install Node.js. Run the installer after downloading, paying close attention to the on-screen directions. This setup is foundational for backend development and package management in full stack workflows. To explore the broader technical competencies required across both frontend and backend layers, check out Full Stack Developer Skills a detailed guide covering essential tools, frameworks, and integration strategies for building scalable web applications. You may check whether Node.js and npm (Node Package Manager) have been successfully installed on your machine by using the commands node -v and npm -v in a terminal or command prompt after the installation is finished. The successful installation is confirmed if the Node.js and npm versions are shown.
Starting a Project in Node.js
Once Node.js and npm have been installed, follow these steps to initialize a Node.js project.
- Pressing Enter will accept the default values, or you can enter the needed information.
- Your project directory will contain a file called “package.json” after you’ve entered the required information or accepted the defaults.
- Your project’s dependencies are listed in the “package.json” file, which also stores metadata about it.
These instructions make it simple to set up a Node.js project and use the “package.json” file to control its setup.
Are You Interested in Learning More About Full Stack Developer? Sign Up For Our Full Stack Developer Training Today!
Installing and Using Express.js
The popular Node.js web application framework Express.js makes the process simpler to build web apps and APIs. Enter the command `npm install express` in your project directory for including Express.js. By executing this command, the Express.js package can be quickly obtained from the npm registry and is immediately included as a dependency in your `package.json` file. In your project directory, it adds a node_modules subdirectory to host the installed packages. This structure is essential for managing dependencies and modularizing your codebase. To understand how such setups fit into broader frontend and backend workflows, explore Web Development a complete guide that covers tools, frameworks, and best practices for building scalable, responsive web applications. This information will help you simplify your web development workflow and utilize Express.js effectively. After installing Express.js, you may start using its robust features and functions to develop your application programming interface.
Would You Like to Know More About Full Stack Developer? Sign Up For Our Full Stack Developer Training Now!
Creating Routes in a REST API
Creating routes in a REST API with Node.js typically involves using a framework like Express.js due to its robust routing capabilities. The process can be broken down into these steps: defining endpoints, handling HTTP methods, and structuring middleware for validation and error handling. To understand how routing fits into broader architectural patterns, explore Web Development Frameworks a practical guide that compares popular frameworks, explains their strengths, and shows how they streamline full-stack development.
Set up your Express application:
- npm install express
- const express = require(‘express’);
- const app = express();
- const PORT = process.env.PORT || 3000;
- app.use(express.json());
- app.listen(PORT, () => {
- console.log(`Server running on port ${PORT}`);
- });
- app.get(‘/’, (req, res) => {
- res.send(‘Hello World!’);
- });
- app.post(‘/users’, (req, res) => {
- res.status(201).send(‘User created’);
- });
Implement Route Handlers (Controllers):
- // controllers/userController.js
- exports.getAllUsers = (req, res) => {
- res.json({ message: ‘Get all users from controller’ });
- };
- exports.getUserById = (req, res) => {
- const userId = req.params.id;
- res.json({ message: `Get user ${userId} from controller` });
- };
- // routes/userRoutes.js
- const express = require(‘express’);
- const router = express.Router();
- const userController = require(‘../controllers/userController’);
- router.get(‘/’, userController.getAllUsers);
- router.get(‘/:id’, userController.getUserById);
- module.exports = router;
This structured approach helps in creating maintainable and scalable REST APIs with Node.js and Express.js. It ensures consistent routing, modular controller logic, and clean separation of concerns across the application. To master these backend patterns and integrate them into full project workflows, explore Full Stack Training a comprehensive program that covers RESTful API design, Express.js architecture, and end-to-end development strategies for scalable web applications.

Develop Your Skills with Full Stack Developer Certification Training
Weekday / Weekend BatchesSee Batch DetailsHandling GET, POST, PUT, DELETE Requests
In Node.js, managing HTTP requests is a basic component of developing an API. Parsing request data, verifying request inputs, resolving errors and exceptions, and putting RESTful concepts into practice are all part of this. To master these backend fundamentals and build production-ready APIs, explore Become a Successful Web Developer a practical guide that outlines essential skills, tools, and workflows needed to thrive in modern full-stack development environments.
RESTful Principles in Practice:
- Stateless Architecture: REST emphasizes a stateless client-server communication model.
- Resource-Oriented Endpoints: Each endpoint should represent a specific resource.
- Standard HTTP Methods: Use GET, POST, PUT, and DELETE consistently for predictable interactions.
Parsing Request Information:
- Built-in Modules: Use querystring or URLSearchParams for parsing.
- Middleware: Apply body-parser to handle request bodies.
- Data Extraction: Retrieve URL parameters, query strings, and body content for processing.
Verifying Request Content:
- Validation Libraries: Use Joi, express-validator, or custom logic.
- Field Checks: Ensure required fields, types, and constraints are met.
- Sanitization: Clean inputs to prevent injection and ensure integrity.
Dealing with Exceptions and Errors:
- Try-Catch Blocks: Capture and handle runtime exceptions.
- Error Middleware: Centralize error handling in Express apps.
- Custom Responses: Return structured error messages with status codes and categories.
By applying RESTful principles, parsing request data, validating inputs, and managing errors effectively, developers can build robust and secure Node.js APIs that deliver a smooth experience for clients.
Connecting to a Database (MongoDB/MySQL)
A large number of API applications require data persistence as a basic requirement. Database tools like MongoDB or Object-Relational Mapping (ORM) libraries like Sequelize can be used to handle data models and persistence in Node.js. Also, using a database library provides you direct access to MongoDB’s features such as schema modeling, query building, and connection pooling. These libraries often integrate seamlessly with backend frameworks to streamline API development. To explore which frameworks offer the best support for database operations, routing, and scalability, check out Top Node.js Frameworks a curated guide that compares Express.js, NestJS, Koa, and other popular tools for building robust server-side applications. and functionalities, offering you greater flexibility in how you store and access data within Node.js applications. Installing an ORM library also makes it easier to manipulate and get data from the database.
Preparing for Full Stack Development Job? Have a Look at Our Blog on Full Stack Development Interview Questions and Answers To Ace Your Interview!
Authentication and Authorization in REST API
In order to secure APIs and guarantee that only authorized and authenticated users can access particular resources, authentication and authorization are essential. Here is a thorough breakdown of the important concepts surrounding permission and authentication in the context of developing a Node.js API. To understand how these security layers fit into broader server-side architecture, explore What Is Backend Development a foundational guide that covers API design, database integration, server logic, and best practices for building secure, scalable backend systems.
- Putting User Registration and Login into Practice: Users can create accounts and authenticate themselves through user registration and login features. Usually, this entails gathering user data, like login and password, and safely keeping it in a database. Users’ credentials are checked against the stored data when they try to log in in order to provide access.
- JSON Web Token Generation and Verification (JWT): One well-liked technique for online application authentication is JSON Web Tokens (JWT). A JWT is a digitally signed token that has user data encoded within it. A JWT is created and returned as a response after a user logs in successfully. In order to authenticate and gain access to protected routes, the client then incorporates this token into later requests. After confirming the token’s legitimacy, the server retrieves the user data.
- Authorization Based on Roles: Role-based authorization enables more precise control over the access that various users can have to an API. A position (such as administrator, moderator, or user) is allocated to each user, and each role has particular permissions. When a request reaches a protected route, the server determines if the role of the authenticated user is authorized to carry out the requested action.
Error Handling in REST API
When building an API, good error handling is important for users and developers. Use standard HTTP status codes like 403, 401, 400, 404, and 500 to classify errors, helping users understand what went wrong. Send specific messages in the response body to assist developers in finding solutions. These messages often include status codes, error descriptions, or success confirmations that help debug and guide frontend behavior. To understand how such responses integrate with client-side navigation, explore What is Routing in ReactJS a practical guide that explains route configuration, dynamic paths, and how React Router handles navigation and rendering based on URL changes. Keep error responses consistent by following the RFC 7807 standard using formats like application/problem+json. Include details like type, title, detail, status, and instance for clarity. Clearly mark server-side errors (internal failures) and client-side errors (bad input) to guide users correctly. To stay secure, don’t show sensitive data in error responses in live environments and log detailed error info internally, including request context and user data, for debugging. Document all possible error codes to give developers the resources to deal with errors well.
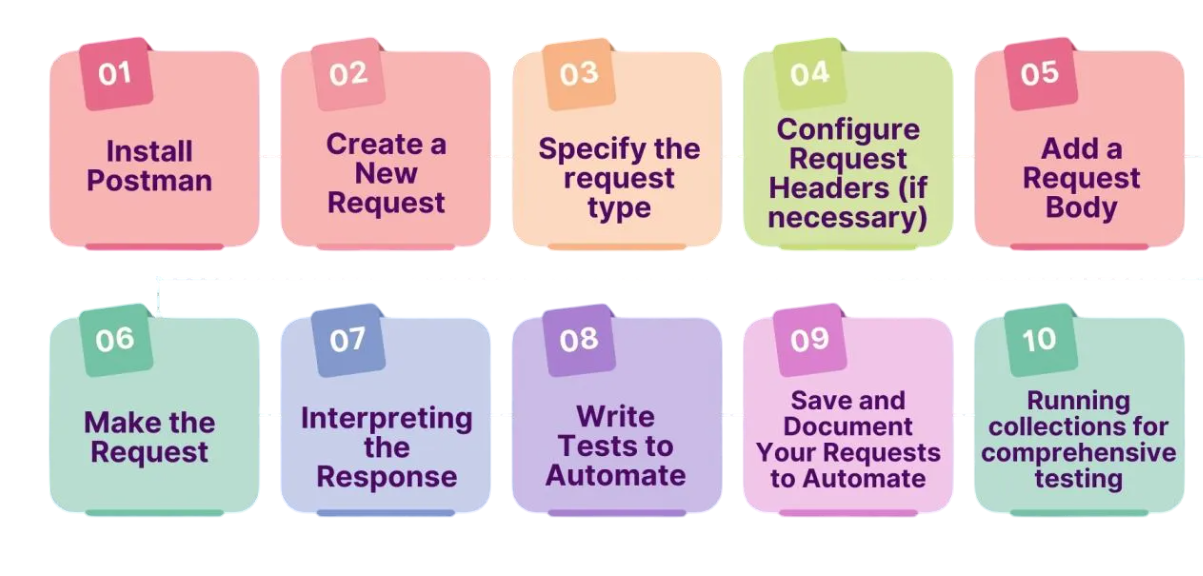
Testing REST API with Postman
- Create a fresh request: Enter the URL of the API endpoint in a new tab that opens in Postman.
- Pick the HTTP approach: Select the proper HTTP method for the request (e.g., GET, POST, PUT, DELETE).
- Configure the body of the request, if any: Under the “Body” tab for methods like POST or PUT, enter the request body in the format of your choice (such as JSON or XML).
- If necessary, include headers: Add any headers that are required under the “Headers” tab.
- Enter the request: The API call will be performed when you click the “Send” button.
- Go over the response: Check the response body, headers, and response status code for information on how well the API works.
Deploying a Node.js REST API
Ascertain that your Node.js application is prepared for production, taking into account appropriate error management, logging, and security protocols. Include a start script (such as node server.js) in your package.json file that outlines how to launch your application. Use yarn or npm to manage dependencies, and make sure package.json has the necessary dependencies listed. For sensitive data, such as database passwords or API keys, consider using environment variables instead of hardcoding them. To understand how these practices contribute to secure and scalable application development, explore Full Stack Training a practical program that covers dependency management, environment configuration, and backend security essentials for modern web projects. Get the application ready. Ascertain that your Node.js application is prepared for production, taking into account appropriate error management, logging, and security protocols. Include a start script (such as node server.js) in your package.json file that outlines how to launch your application.Use yarn or npm to manage dependencies, and make sure package.json has the necessary dependencies listed. For sensitive data, like as database passwords or API keys, think about use environment variables instead of hardcoding them.