
Last updated on 01st Nov 2025| 12634
- React Router Basics
- Setting Up React Router in a Project
- Creating Routes in React
- Dynamic Routing in React Router
- Route Parameters and Query Strings
- Navigating Between Routes
- Using useNavigate and useLocation Hooks
- Nested Routes in React Router
- Redirects and 404 Pages
- Lazy Loading Routes for Optimization
- Protected Routes and Authentication
- Best Practices for React Router
React Router Basics
A popular and strong JavaScript package called React Router was created to manage client-side routeing in React apps. It makes it possible to move between views or components of a Single-Page Application (SPA) without having to reload the entire page. React Router improves user experience, boosts performance, and enables developers enrolled in Full Stack Training to create dynamic, responsive, and user-friendly web interfaces by effectively managing routes. It is a crucial tool for creating cutting-edge, scalable front-end apps because of its declarative routeing technique, which blends seamlessly with React’s component-based architecture. To put it simply, React Router is essential to turning a static React project into a fully working SPA that provides a seamless and interesting user experience while preserving code reuse and optimal speed.
Setting Up React Router in a Project
You must install the necessary package and set up routeing in your React application before you can use React Router in your project. You can specify how users move between various elements or pages during the simple setup procedure What is React. React Router is a popular library for handling client-side routing in React applications. It allows you to create single-page applications (SPAs) where navigation between pages doesn’t trigger a full browser reload only the components change.
Installing React RouterDownloading the react-router-dom package is the first step, as it includes the components required for routing. Enter the following command in the root directory of the project:
- # Using npm
- npm install react-router-dom
- # Using yarn
- yarn add react-router-dom
Once installed, you need to wrap your main application component with the BrowserRouter component, which enables routing capabilities throughout your app.
Example setup in index.js or main.jsx:
- import React from “react”;
- import ReactDOM from “react-dom/client”;
- import { BrowserRouter } from “react-router-dom”;
- import App from “./App”;
- const root = ReactDOM.createRoot(document.getElementById(“root”));
- root.render(
- BrowserRouter
- App
- BrowserRouter
- );
Inside your App.js file, you can define routes using the Routes and Route components provided by React Router. Each route corresponds to a specific component or page.
- import React from “react”;
- import { Routes, Route } from “react-router-dom”;
- import Home from “./pages/Home”;
- import About from “./pages/About”;
- import Contact from “./pages/Contact”;
- function App() {
- return (
- Routes
- Route path=”/” element={
} - Route path=”/about” element={
} - Route path=”/contact” element={
} - Routes
- );
- }
- export default App;
Creating Routes in React
Routes in React specify which component should be displayed for a certain URL path. You can design a hierarchical navigation system for your application with React Router that enables users to switch between views or pages without having to reload the entire page.
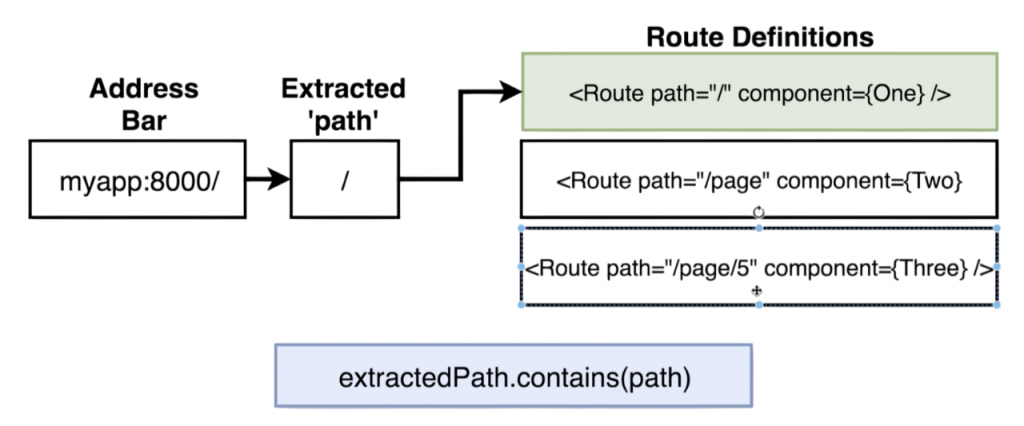
You may specify which components should be shown for particular URL paths by creating routes in React, which makes it possible for single-page applications (SPAs) to navigate fluidly. You may configure a Routes container with React Router and add several Route components, each of which specifies a path and the element to be rendered. As a React js Developer , you can use this configuration to dynamically display various views or pages without requiring a page reload. You may create interactive and scalable React apps with a well-organized navigation system by merging static and dynamic routes.
Importing Required ComponentsTo create routes, you first need to import the necessary components from react-router-dom:
- import { Routes, Route } from “react-router-dom”;
Within your primary app component, you can establish a basic route:
- import React from “react”;
- import { Routes, Route } from “react-router-dom”;
- import Home from “./pages/Home”;
- import About from “./pages/About”;
- function App() {
- return (
- Routes
- Route path=”/” element={
} -
} - Routes
- );
- }
- export default App;
Defining Route components inside a Routes container which supports both static and dynamic paths is the first step in creating routes in React. React Router enables you to create intricate, scalable, and intuitive single-page applications using nested routes and catch-all routes.
Are You Interested in Learning More About Full Stack Developer? Sign Up For Our Full Stack Developer Training Today!
Dynamic Routing in React Router
React Router enables dynamic routes through URL parameters. You define a route with a parameter using a colon (:) in the path:
- import { Routes, Route } from “react-router-dom”;
- import Product from “./pages/Product”;
- function App() {
- return (
- Routes
- Route path=”/product/:productId” element={
} - Routes
- );
- }
- export default App;
With React Router’s dynamic routing, developers can use layered routes, URL parameters, the React Useeffect Hook and API connections to build adaptable, data-driven applications. This method is essential for creating cutting-edge, scalable, and highly interactive online apps.
Route Parameters and Query Strings
To transport dynamic data across URLs in React Router, query strings and route parameters are crucial components. They enable programmers to design adaptable, data-driven apps that react to input from users or outside data sources.
Route ParametersRoute parameters are dynamic segments of a URL that are defined with a colon (:) in the route path. In more advanced applications, they can be combined with React DND to manage dynamic, drag-and-drop elements tied to specific resources such as user profiles, products, or blog posts.
- import { Routes, Route } from “react-router-dom”;
- import UserProfile from “./pages/UserProfile”;
- function App() {
- return (
- Routes
- Route path=”/user/:userId” element={
} - );
- }
- export default App;
Route parameters and query strings in React Router are key for creating dynamic, data-driven applications. While route parameters define specific resource identifiers, query strings allow flexible filtering and customization, enabling developers to build scalable and interactive Single-Page Applications (SPAs).
Would You Like to Know More About Full Stack Developer? Sign Up For Our Full Stack Developer Training Now!
Navigating Between Routes
One essential element for creating Single-Page Applications (SPAs) in React applications is the ability to navigate between various routes. With its multiple navigation options, React Router ensures seamless transitions without requiring a page reload.
Navigating with Query Strings or ParametersReact Router allows you to navigate while including route parameters or query strings:
- navigate(`/user/${userId}?ref=homepage`);
- Combines dynamic routing with query-based data passing.
- Useful for redirecting to filtered pages or user-specific content.
Navigating between routes in React Router can be achieved through declarative methods (Link, NavLink) or programmatic methods (useNavigate). This flexibility allows developers in Full Stack Training to build seamless, interactive, and user-friendly SPAs, ensuring that transitions between pages are fast, smooth, and state-aware.
Using useNavigate and useLocation Hooks
React Router provides hooks that make navigation and route handling in functional components more flexible and dynamic. Two of the most important hooks are useNavigate and useLocation.
useNavigate HookThe useNavigate hook allows you to navigate programmatically within your application, making it useful for redirecting users after actions like form submissions, login, or conditional routing. In a React Native Environment , similar navigation logic can be achieved using navigation libraries such as React Navigation.
Basic Example:- import { useNavigate } from “react-router-dom”;
- function Login() {
- const navigate = useNavigate();
- const handleLogin = () => {
- // Perform authentication logic
- navigate(“/dashboard”); // Navigate to dashboard page
- };
- }
The useNavigate and useLocation hooks in React Router provide developers with powerful tools for dynamic navigation and state-aware routing. useNavigate is ideal for programmatic route changes, while useLocation provides detailed information about the current route, enabling context-sensitive rendering and redirection. Together, they make SPAs more interactive, responsive, and user-friendly.

Develop Your Skills with Full Stack Developer Certification Training
Weekday / Weekend BatchesSee Batch DetailsNested Routes in React Router
React Router’s nested routes feature lets you build a hierarchical route structure in which a parent route can have child routes. When creating dashboards, admin panels, or multi-section sites, where the layout stays the same but the content varies according to the nested route, this is quite helpful.
React Router’s nested routes feature lets you build a hierarchical route structure in which a parent route might have several child routes. Applications with intricate layouts, such as dashboards, admin panels, or multi-section websites, where the parent structure stays the same while the content varies according to the nested route, will find this particularly helpful. This also highlights a key difference in React vs Node , as React manages the UI structure while Node handles the server-side logic. React Router understands where to render the child components by leveraging the component in the parent.
Understanding Nested RoutesA nested route is defined inside a parent route. The parent component typically renders an
- import { Routes, Route } from “react-router-dom”;
- import Dashboard from “./pages/Dashboard”;
- import Profile from “./pages/Profile”;
- import Settings from “./pages/Settings”;
- function App() {
- return (
- Routes
}> -
} /> -
} /> - );
- }
- export default App;
Nested routes in React Router enable hierarchical and modular routing structures. By combining parent layouts with
Preparing for Full Stack Development Job? Have a Look at Our Blog on Full Stack Development Interview Questions and Answers To Ace Your Interview!
Redirects and 404 Pages
Building reliable Single-Page Applications (SPAs) requires handling redirection and 404 (Not Found) pages. React Router offers features for programmatic user navigation and the presentation of fallback sites in the event that a route is unavailable.
Redirecting UsersWhen you want to automatically transfer users to an alternative route for example, after logging in, submitting a form, or browsing an old URL redirects might be helpful, especially when integrating a Node js App with your React frontend.
In React Router v6+, Navigate replaces the old Redirect component.
Example: Redirect after login
- import { Navigate } from “react-router-dom”;
- function Login({ isAuthenticated }) {
- if (isAuthenticated) {
- return
; - }
- Please login;
- }
- to specifies the route to redirect to.
- replace prevents the redirect from adding a new entry in the browser’s history.
Implementing redirects and 404 pages is made simple using React Router’s Navigate component and wildcard routes (*). Redirects send users to the right places, and 404 pages enhance user experience by gently processing invalid URLs. A clean and expert Single-Page Application is guaranteed when these aspects are implemented correctly.
Lazy Loading Routes for Optimization
Performance may suffer if all components are loaded at once in applications that get larger. Lazy loading routes enhance initial load times and overall performance by enabling React applications to load components only when required.
Slow LoadingCode splitting, another name for lazy loading, is a technique that loads portions of an application concurrently rather than all at once. When combined with Redux in React , it helps optimize large applications by loading only the components and state needed at a given time. This speeds up the app’s initial rendering and lowers the bundle size.
A Simple Illustration of Lazy Route LoadingInstead of importing a component directly, use React.lazy():
- import React, { Suspense } from “react”;
- import { Routes, Route } from “react-router-dom”;
- const Home = React.lazy(() => import(“./pages/Home”));
- const About = React.lazy(() => import(“./pages/About”));
- const Contact = React.lazy(() => import(“./pages/Contact”));
- function App() {
- return (
-
Loading…
React Router’s lazy loading routes enhance performance and user experience by optimising your application by loading components only when needed. Code splitting for both regular and nested routes can be implemented with ease by combining React.lazy() with Suspense, guaranteeing that your React application scales effectively.
Protected Routes and Authentication
Certain routes, including dashboards, user profiles, or admin panels, must be limited to authenticated users exclusively in contemporary web applications. Sensitive pages are protected from unwanted access by protected routes. A versatile approach to implementing this feature is offered by React Router.
The idea behind protected routesBefore rendering the targeted component, a protected route verifies if the user is authenticated. The user is usually taken to a login page or an access-denied page if they are not authenticated, while authenticated users can then access features such as a React Carousel or other dynamic UI components.
Creating a Protected Route ComponentYou can create a reusable ProtectedRoute component to wrap any route that requires authentication.
- import { Navigate } from “react-router-dom”;
- function ProtectedRoute({ isAuthenticated, children }) {
- if (!isAuthenticated) {
- return
; // Redirect to login if not authenticated - }
- return children; // Render the protected component if authenticated
- }
- export default ProtectedRoute;
Authentication-based access control may be implemented quickly and easily with React Router’s protected routes. Developers may safeguard their SPAs without sacrificing a seamless user experience by enclosing sensitive components in a ProtectedRoute and redirecting them using the Navigate component. Scalable and sustainable authentication throughout the application is ensured by combining context or state management with protected routes.
Best Practices for React Router
- Structure and Organization: Web programs are typically organized using BrowserRouter, which makes use of the HTML5 History API to provide clean URLs. Use HashRouter exclusively for server setups or legacy browser support.Employ Nested Routing: To give your application a logical, hierarchical structure that reflects the UI layout, use nested routes.
- User Experience and Navigation: Make Use of Link and NavLink: To avoid full page reloads and take advantage of React Router’s features, such as active styling with NavLink, developers in Full Stack Training should use these components for navigation within your application rather than the more common tags.
- Put 404 Pages into Practice: By adding a catch-all route (such as *) to the end of your route definitions to display a 404 “Not Found” page, you can handle unknown routes in a gentle manner.
- Efficiency and Enhancement: Use Suspense and Lazy Loading: To speed up initial load times, use React.lazy() to dynamically import components and wrap them with Suspense to show a loading indicator as the component loads. Optimize Route Parameters: To develop dynamic and reusable routes, make good use of route parameters. However, to prevent unexpected overrides in the params object, make sure dynamic segments are unique inside a particular path.