Last updated on 18th Sep 2025| 12756
- Introduction to React Native
- System Requirements
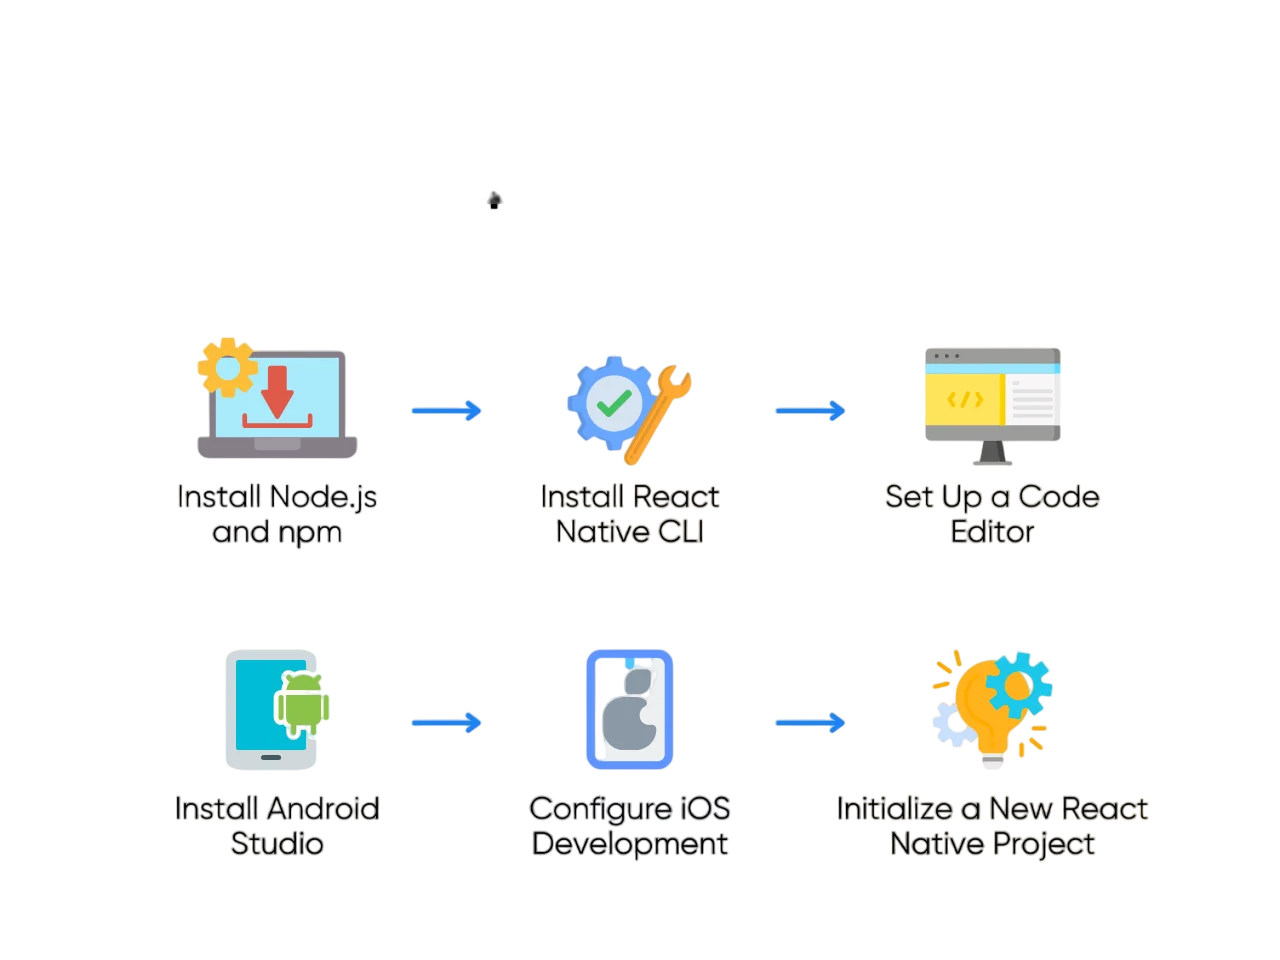
- Installing Node.js and npm
- Installing Expo CLI or React Native CLI
- Setting Up Android Studio / Xcode
- Creating a New React Native Project
- Running App on Emulator or Device
- Directory Structure Overview
- Conclusion
Introduction to React Native
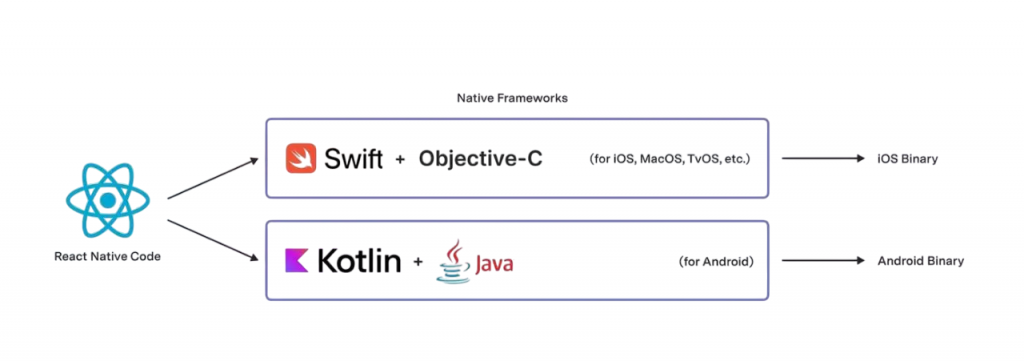
React Native is an open-source framework developed by Facebook that enables developers to create high-performance mobile applications using JavaScript and the React library. It allows for the creation of mobile applications for both iOS and Android platforms from a single codebase, significantly reducing development time and cost. With React Native, developers write the core logic of an application once and deploy it across platforms, which enhances code reusability and streamlines the development workflow. Its component-based architecture allows for modular, maintainable, and scalable applications, making it popular among startups and large enterprises alike. React Native bridges the gap between web and mobile development by allowing developers with JavaScript experience to build native mobile apps. The framework utilizes native components under the hood, resulting in applications that perform and feel like those built with native tools. Furthermore, its active community, rich ecosystem, and support from major companies contribute to its continuous improvement and relevance in the mobile app development landscape. React Native is an open-source framework developed by Meta (formerly Facebook) that allows developers to build mobile applications using JavaScript and React. Unlike traditional mobile development platforms that require separate codebases for iOS (Swift/Objective-C) and Android (Java/Kotlin), React Native enables developers to write one codebase that runs on both platforms. At its core, React Native uses React for building UI components, but instead of rendering to the browser’s DOM, it renders to native mobile components. This means the apps look and perform like native apps, with smooth animations and access to native device features like the camera, GPS, and sensors. One of React Native’s biggest advantages is faster development and deployment. With tools like Hot Reloading, developers can see changes in real-time without recompiling the entire app. Plus, a rich ecosystem of third-party libraries and community support makes it easier to build powerful mobile apps quickly. React Native is used by companies like Instagram, Facebook, Tesla, Airbnb (formerly), and Shopify, proving its capability for building high-quality apps at scale.
To Earn Your Web Developer Certification, Gain Insights From Leading Data Science Experts And Advance Your Career With ACTE’s Web Developer Courses Today!
System Requirements
Before setting up your React Native environment, it’s important to ensure your system meets the required specifications. These requirements differ slightly depending on whether you plan to develop for Android IT Engineer Salary in India , iOS, or both.
Minimum Hardware Requirements:
- A system with at least 8 GB RAM (16 GB recommended for Android Studio and Xcode).
- A quad-core processor.
- 10–20 GB of free disk space for Android Studio, SDKs, and dependencies.
- Windows (Windows 10 or later) – Android development only.
- macOS (macOS 10.14 Mojave or later) – Required for both Android and iOS development.
- Linux – Android development only.
- Node.js (version 14 or later recommended).
- npm or Yarn (Yarn is an alternative package manager).
- Java Development Kit (JDK) – Preferably version 11 or later.
- Git for version control.
- Android Studio (for Android development).
- Xcode (for iOS development – macOS only).
Operating System:
Software Requirements:
Having a properly configured development environment ensures smoother project setup and faster development.
Installing Node.js and npm
Node.js provides the runtime environment to execute JavaScript code outside the browser, while npm is used to manage packages and dependencies Best Software Development Courses .
- Visit https://nodejs.org and download the latest stable version.
- Run the installer and follow the on-screen instructions.
Verify installation by running:
- node -v
- npm -v
These commands should return the version numbers if installed correctly.
Would You Like to Know More About Web Developer? Sign Up For Our Web Developer Courses Now!
Installing Expo CLI or React Native CLI
There are two major ways to develop with React Native:
Expo CLI is ideal for beginners and those who need a fast, managed workflow without worrying about native code.
- npm install -g expo-cli
- Use expo init to create a new project.
React Native CLI is for developers who need direct access to native code and want more control.
- npm install -g react-native-cli
- Use npx react-native init to create a project.
- Download from https://developer.android.com/studio.
- Install SDK tools, Emulator, and system images.
- export ANDROID_HOME=$HOME/Android/Sdk
- export PATH=$PATH:$ANDROID_HOME/emulator:$ANDROID_HOME/tools:$ANDROID_HOME/platform-tools
- Open Android Studio > AVD Manager > Create virtual device.
- Download from the App Store.
- xcode-select –install
- sudo xcodebuild -license
- Install iOS simulators in Xcode Preferences.
- Setting up emulators is essential for testing your applications without a physical device Become an IT Engineer.
- expo init MyNewProject
- cd MyNewProject
- expo start
- npx react-native init MyNewProject
- cd MyNewProject
- npx react-native run-android # or run-ios
- Open Android Studio > AVD Manager > Launch Emulator.
- Use npx react-native run-android to run the app.
- Open Xcode > Open Developer Tools > Simulator.
- Use npx react-native run-ios.
- Enable Developer Mode.
- Connect via USB.
- Run your app using the same commands.
- node_modules/ – Contains all npm dependencies.
- package.json – Lists project dependencies, scripts, and metadata.
- App.js – Main component where your app starts (entry point).
- index.js – Registers the root component with the app (entry point for the native platform) What is Software Engineering.
- babel.config.js – Babel configuration for transpiling modern JavaScript.
- metro.config.js – (Optional) Configuration for the Metro bundler.
- android/ – Native Android project code (Java/Kotlin, Gradle files).
- ios/ – Native iOS project code (Swift/Objective-C, Xcode config).
- .gitignore – Lists files/folders to ignore in version control.
- src/ – Your app’s source code.
- components/ – Reusable UI components.
- screens/ – Screen or page-level components.
- assets/ – Images, fonts, icons, etc.
- navigation/ – React Navigation setup (if used).
- utils/ – Helper functions or constants.
- services/ – API calls or backend integrations.
- store/ – Redux or context state management.
Each has pros and cons. Expo simplifies setup and deployment, while the React Native CLI offers flexibility and native module integration. Choose based on your project requirements.

Develop Your Skills with Web Developer Certification Course
Weekday / Weekend BatchesSee Batch DetailsSetting Up Android Studio / Xcode
Android Studio:
Set environment variables (Linux/macOS example):
Xcode (macOS only):
Install Command Line Tools:
Accept license:
Are You Interested in Learning More About Web Developer? Sign Up For Our Web Developer Courses Today!
Creating a New React Native Project
Using Expo CLI:
This opens the Metro Bundler interface in your browser Complete Guide on System Software.
Using React Native CLI:
This command compiles your app and runs it on the emulator or connected device.
Running App on Emulator or Device
Android Emulator:
iOS Simulator:
On a Physical Device:
With Expo, Software Engineering Prototype scan the QR code with the Expo Go app to preview your project.
Directory Structure Overview
Root-Level Files & Folders
Common Custom Folders (You may create these)
Conclusion
Getting started with React Native involves several key steps, from understanding its core benefits to setting up the development environment. Ensuring your system meets the requirements and installing essential tools like Node.js, npm, and either Expo CLI or React Native CLI lays the foundation for smooth development. Properly configuring Android Studio and Xcode enables you to build and test apps on emulators or real devices. Creating a new project and familiarizing yourself with its directory structure helps you write organized and maintainable code. Mastering these initial steps prepares you to efficiently build powerful cross-platform mobile applications using React Native. Getting started with React Native requires setting up the right development environment. This includes meeting system requirements and installing essential tools like Node.js, npm, and either Expo CLI or React Native CLI. Configuring Android Studio and Xcode allows you to run your apps on emulators or real devices. Creating a new React Native project and understanding its directory structure helps maintain organized and scalable code. By following these initial steps, you build a solid foundation for developing efficient, cross-platform mobile applications. Proper setup and organization are key to a smooth development experience with React Native.