
Last updated on 29th Oct 2025| 12627
- React Drag and Drop
- Why Use Drag and Drop in React?
- Setting Up React DnD
- Creating a Draggable Component
- Handling Drag-and-Drop Events
- Using React DnD with Lists and Tables
- Implementing Drag-and-Drop Sorting
- Performance Optimization in React DnD
- Best Practices for React DnD
React Drag and Drop
A well-known JavaScript framework called React Drag and Drop was created to enable drag-and-drop capabilities in React apps. It offers a collection of higher-order hooks and components that abstract away the difficulties of controlling drop targets (areas where pieces can be dropped) and drag sources (elements that can be dragged). These abstractions simplify complex UI interactions and improve code modularity. To learn how drag-and-drop logic integrates with full stack workflows, explore Full Stack Training a hands-on program that covers advanced frontend patterns, component architecture, and seamless backend coordination for interactive web applications. Developers may simply manage the associated events and data flow by defining the drag sources and drop targets using React DnD.
Why Use Drag and Drop in React?
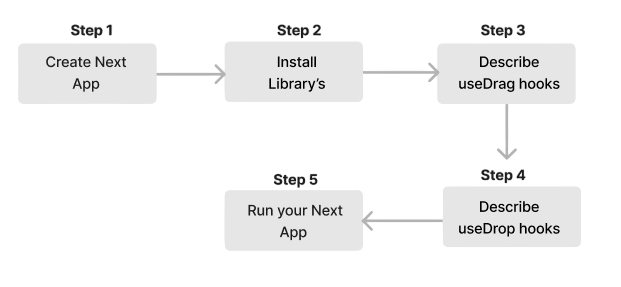
- Step 1: Installing React DnD as a dependency in your project is the first step. Go to the directory of your project, launch your command line interface, and type the following command: Install react-dnd using npm.
- Step 2: Import the required React DnD components into your React component file to enable drag-and-drop functionality. This modular approach reflects the core principles of modern frontend development component reusability, declarative logic, and event-driven architecture. To build a strong foundation in these concepts, explore Front End Developer Guide a comprehensive resource that covers essential tools, frameworks, and best practices for building responsive, interactive web interfaces.
- Step 3: Determine which parts need to be droppable or draggable. Use the higher-order components DropSource and DropTarget to wrap the draggable and droppable components, respectively. As necessary, alter these components’ look and function.
- Step 4: Define the functions and event handlers required to manage the drag and drop events inside the DragSource and DropTarget components. The behavior of the draggable and droppable components throughout the interaction will be dictated by these functions.
- Step 5: Use the higher-order components to link the droppable and draggable elements to the React DnD environment. This makes it possible for the components to interact and communicate while dragging and dropping.
- Step 6: Render your application’s components last. The drag-and-drop feature should now be visible to you.
Are You Interested in Learning More About Full Stack Developer? Sign Up For Our Full Stack Developer Training Today!
Setting Up React DnD
Installing npm install react-dnd react-dnd-html5-backend is the first step in enabling drag-and-drop functionality within a React application. This setup reflects the modular and declarative nature of React’s component-driven design. To understand how such integrations align with core design principles, explore React JS Architecture a comprehensive guide that explains component hierarchy, state management, and how libraries like React DnD fit into scalable UI patterns.
- import React from ‘react’;
- import { DndProvider, useDrag, useDrop } from ‘react-dnd’;
- import { HTML5Backend } from ‘react-dnd-html5-backend’;
- const DraggableItem = () => {
- const [{ isDragging }, drag] = useDrag(() => ({
- type: ‘BOX’,
- collect: (monitor) => ({
- isDragging: monitor.isDragging(),
- }),
- }));
- return (
- <div >
- ref={drag}
- style={{
- opacity: isDragging ? 0.5 : 1,
- backgroundColor: ‘lightblue’,
- padding: ‘1rem’,
- margin: ‘1rem’,
- cursor: ‘move’,
- }}
- Drag me
- </div>
- );
- };
- const DropZone = () => {
- const [{ isOver }, drop] = useDrop(() => ({
- accept: ‘BOX’,
- drop: () => console.log(‘Dropped!’),
- collect: (monitor) => ({
- isOver: monitor.isOver(),
- }),
- }));
- return (
- <div
- ref={drop}
- style={{
- height: ‘200px’,
- backgroundColor: isOver ? ‘#e0ffe0’ : ‘#f0f0f0’,
- padding: ‘2rem’,
- textAlign: ‘center’,
- }}
- >
- Drop here
- </div>
- );
- };
- const DragAndDropDemo = () => (
- <DndProvider backend={HTML5Backend}>
- <DraggableItem />
- <DropZone />
- </DndProvider>
- );
- export default DragAndDropDemo;
Every time the component is being dragged, the onDrag event handler is called. We can utilize it to monitor our component’s whereabouts.
Would You Like to Know More About Full Stack Developer? Sign Up For Our Full Stack Developer Training Now!
Creating a Draggable Component
The first step in enhancing your React application is to install the necessary npm package. After you have successfully created your React application using the command npx create-react-app my-app, you will need to install the react-draggable package with npm. Once this installation is complete, the next step involves incorporating the Draggable component into your application. To do this, simply import the Draggable component into your App.js file by specifying from react-draggable. To understand how such implementation tasks differ across roles, explore Web Developer vs Software Developer a practical comparison that highlights the distinctions in responsibilities, skill sets, and project scopes between these two career paths. After the import, you can easily enable drag-and-drop functionality by wrapping the element you want to be draggable within the Draggable component. This simple yet effective approach allows for seamless integration of interactive features in your application.
- const Draggable = () => {
- const [{ isDragging }, drag] = useDrag(() => ({
- type: ‘BOX’,
- collect: (monitor) => ({
- isDragging: monitor.isDragging(),
- }),
- }));
- return (
- <div>
- ref={drag}
- style={{
- opacity: isDragging ? 0.5 : 1,
- backgroundColor: ‘lightblue’,
- padding: ‘1rem’,
- margin: ‘1rem’,
- cursor: ‘move’,
- }}
- Get me moving!
- </div>
- );
- };

Develop Your Skills with Full Stack Developer Certification Training
Weekday / Weekend BatchesSee Batch DetailsHandling Drag-and-Drop Events
Use the draggable=”true” attribute to enable dragging and identify the source element in order to manage drag-and-drop events. Next, include event listeners for events such as drop to the source and target elements, dragstart, and dragover. These interactions rely on precise styling to ensure visual feedback and user experience. To understand how styling can be embedded directly within HTML documents for such use cases, explore Explain Internal CSS in HTML a practical guide that covers syntax, use cases, and how internal styles enhance modularity in small-scale web applications. To save data, use event.dataTransfer.setData() in dragstart to allow the drop during dragover and drop, use event.preventDefault() and to get the stored data, use event.dataTransfer.getData() during the drop event.
- Make the components movable (Source): Give the element or elements you wish to be allowed to drag the draggable=”true” property. The draggable element should have a dragstart event listener added.
- Get the Drop Target ready: Add event listeners for dragover and drop to the element or elements that will accept the dragged object.
- Manage the Target Drop: In the handler for the drop event is Use to make the drop possible. The data recorded during the dragstart event can be retrieved using event.dataTransfer.getData(“text/plain”).
An example in JavaScript is:
- // Draggable component
- const draggableItem = document.getElementById(‘my-draggable’);
- draggableItem.setAttribute(‘draggable’, true);
- draggableItem.addEventListener(‘dragstart’, (event) => {
- event.dataTransfer.setData(‘text/plain’, event.target.id);
- });
- // Drop target
- const dropTarget = document.getElementById(‘my-drop-target’);
- dropTarget.addEventListener(‘dragover’, (event) => {
- event.preventDefault();
- });
- dropTarget.addEventListener(‘drop’, (event) => {
- event.preventDefault();
- const data = event.dataTransfer.getData(‘text/plain’);
- const sourceElement = document.getElementById(data);
- event.target.appendChild(sourceElement);
- });
Using React DnD with Lists and Tables
I wanted to try learning how to use a new React component and incorporating it into my EffectiveDonate website this week. I concentrated on the Profile page as I started to consider what areas of the website can benefit from a great new feature to enhance user experience. In the past, users could examine the charitable projects they have starred on the Profile page and choose the default themes (Health, Education, etc.). To learn how such personalized features are designed and implemented across the frontend and backend, explore Full Stack Training a project-based program that covers user-centric design, dynamic data rendering, and full-stack personalization strategies. Users could examine important details about the projects, donate to the projects, or remove the projects from their stars thanks to the Semantic UI Table that arranged the list of projects. The user’s most recent starred projects, however, were at the very bottom of the table due to the table’s chronological sorting not the best user experience! I wanted to give the user greater control, even though I could have quickly fixed the problem by sorting the table in reverse chronological order. I therefore began to come up with a few React ideas to add more dynamic elements to the table.
Preparing for Full Stack Development Job? Have a Look at Our Blog on Full Stack Development Interview Questions and Answers To Ace Your Interview!
Implementing Drag-and-Drop Sorting
- Indicate which items can be moved: The HTML elements you wish to move should have the draggable=”true” attribute added.
- Configure listeners for events: Include event listeners in both the list container and the draggable items.
- Handle the drag start: Save the dragged item’s index or ID when dragging starts (onDragStart). The dragged item can also have visual styling applied to it.
- Handle the drag over: To enable the drop, onDragOver should be set to prevent the default behavior. This ensures that the target element can accept draggable items and respond appropriately.
- To understand how drag-and-drop and other UI interactions differ across mobile frameworks, explore Flutter vs React Native a side-by-side comparison that highlights architectural differences, performance trade-offs, and developer experience across these two leading cross-platform technologies.
- Handle the drag enter: Identify the element being hovered over to provide visual feedback or determine the insertion location.
- Take care of the drag end: Upon the user’s mouse release (onDragEnd): Rearrange your data model’s items (for example, by updating the array of things). Eliminate any styles that were used during the drag. To re-render the list in the updated order, update the state of your application.
- Use libraries for efficiency: With directives and built-in capabilities, libraries such as SortableJS or Angular Material’s CDK may streamline the process by automatically managing data model modifications and visual feedback.
Performance Optimization in React DnD
- PureComponent: Use React.memo to wrap functional components that don’t require re-rendering unless their props change. If the props for the component don’t change between renders, this avoids re-rendering.
- Unchangeability: React can effectively detect changes and optimize re-renders if you use immutable data structures or frameworks like Immer to guarantee that state changes always result in new objects.
- Distinct InnerList Elements: When working with lists, make a distinct InnerList component that only gets the properties required to render the list items. When only a few items are impacted, this enables you to apply React.memo or PureComponent to the InnerList, avoiding the need to re-render the full list.
- Performance Profiling Tools: To find performance bottlenecks, comprehend component rendering durations, and identify opportunities for optimization in your DnD solution, use the integrated React Profiler.
- Regarding React Projects: According to a Puck Editor blog, Dnd-kit is a strong substitute for react-beautiful-dnd and offers a great degree of customization.
- Draggable: A Shopify Open Source modular library that offers swappable elements, sortable DOM nodes, and simple drag-and-drop functionality.
- Interact.js: A flexible library for notes, motions, resizing, and drag & drop Theme Selection.
- Sortable.js: A little library that supports touch, mouse, and keyboard for sorting DOM items.
According to the DEV Community, DFlex is a special library that directly modifies DOM elements without rebuilding the DOM and has its own scheduler and reconciler.
Best Practices for React Drag and Drop
To create an effective React Drag and Drop interface, start by keeping your components simple and dividing the drag-and-drop logic into smaller, reusable pieces. Use React’s useState or useReducer, or a state management solution like Redux or Zustand, to manage the state of your draggable elements. Avoid directly changing the DOM; instead, update the interface using React’s state and props. For increased performance, use React.memo or useMemo to prevent unneeded re-renders. To understand how these optimization techniques fit into scalable application architecture, explore Full Stack Training a practical program that covers React performance strategies, component lifecycle management, and full stack integration for high-efficiency web development. If you’re working with extensive lists, think about virtualization libraries like react-window to only render what’s visible. When possible, collect state updates to reduce render cycles. Make sure your drag-and-drop interface is easy to use and accessible. Offer clear feedback during interactions, such as by highlighting drop areas or changing the cursor style.