- Introduction to Data Validation
- Why Data Validation is Important
- Setting Up Basic Data Validation Rules
- Creating Drop-Down Lists in Excel
- Using Custom Formulas for Data Validation
- Restricting Data Entry with Data Validation
- Error Alerts and Input Messages
- Applying Data Validation Across Multiple Cells
- Removing Data Validation in Excel
- Common Data Validation Errors and Fixes
- Advanced-Data Validation Techniques
- Best Practices for Data Validation in Excel
Introduction to Data Validation
Data validation is a crucial feature in Excel that helps ensure the accuracy and consistency of data entered into a spreadsheet. It allows users to define rules or restrictions for data entry, preventing errors such as invalid, incomplete, or inconsistent information. Data Science Course Training allows you to control the type, range, and format of data input into specific cells or ranges, making it easier to maintain data integrity. In this guide, we will explore the importance of data validation in Excel, how to set up various validation rules, and some advanced techniques for ensuring that your data is accurate and consistent.
Why Data Validation is Important
Data validation plays a vital role in ensuring that the data entered into an Excel worksheet meets specific requirements, helping to achieve the following benefits:
- Error Prevention: Data validation reduces the risk of users entering incorrect or inappropriate data into cells, such as non-numeric values in a numeric field or text in a date field. Enforcing predefined rules prevents mistakes that can affect calculations, reports, or analysis.
- Data Integrity: Data integrity is essential for ensuring that the data is accurate and reliable. Data validation ensures that the data input conforms to the expected formats and types, maintaining the quality and consistency of the Basics of Data Science across the entire workbook.
- Improved User Experience: Proper data validation guides users to enter data correctly. This reduces confusion and helps users quickly fill in the correct information, especially when unfamiliar with the requirements for a given field.
- Streamlining Data Entry: Data validation can simplify data entry by limiting choices and providing instructions on how to fill in the cells. For example, users can enter valid data without thinking about it by creating drop-down lists or setting up pre-approved ranges.
- Consistency Across the Worksheet: Validation rules help ensure that data entered across multiple sheets or columns follow the same standards, which is crucial when consolidating or analyzing data.
Learn how to manage and deploy cloud services by joining this Data Science Online Course today.
Setting Up Basic Data Validation Rules
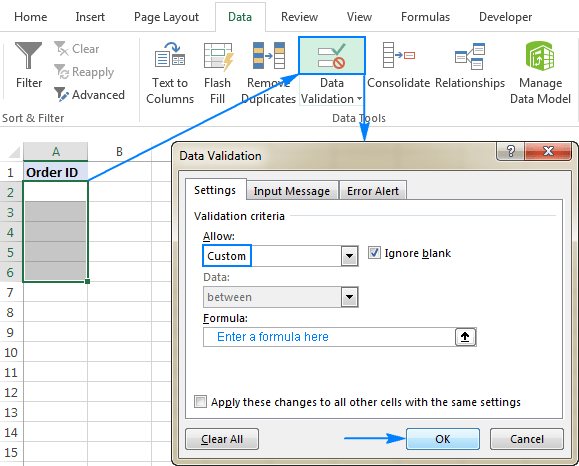
Setting up basic data validation in Excel is a simple process that helps ensure data accuracy and consistency. First, select the cell or range where you want to apply data validation. Then, navigate to the Data tab in the Excel ribbon and click on Data Validation in the Data Tools group to open the dialog box. In the Settings tab, you can choose the type of validation rule you want to apply. Options include restricting input to whole numbers, decimals, dates, Data Science Career Path , or text lengths, as well as creating a drop-down list of predefined options. You can also use the Custom option to apply more advanced validation with formulas. After selecting the appropriate validation rule, define the conditions, such as setting a numeric range or specifying a list of allowed values. Once done, click OK to apply the validation rules, and Excel will restrict users from entering invalid data based on the criteria you’ve set. This ensures that the data entered into your worksheet meets the required standards.

Creating Drop-Down Lists in Excel
One of the most common data validation uses is creating drop-down lists, which restrict the user’s input to a predefined list of values. Here’s how to make a drop-down list:
- Select the Cell (s): Highlight the cells where you want the drop-down List to appear.
- Open Data Validation: Go to the Data tab and click Data Validation in the Data Tools group.
- Select List: In the Data Validation dialog box, under the Settings tab, choose List from the drop-down menu.
- Enter the List Values: In the Source field, either type the list values separated by commas (e.g., Yes, No, Maybe) or select a range of cells that contain the List of values.
- Click OK: After setting up the List, apply the drop-down List to the selected cells.
- When the user selects the Cell, an input message appears. It provides instructions on what type of data should be entered.
- Go to the Data Validation dialog.
- Under the Input Message tab, check the Show input message when Cell is selected.
- Enter a title and message to provide instructions.
- An error alert appears when invalid data is entered. You can customize the error alert to display a message that guides the user.
- Go to the Data Validation dialog.
- Under the Error Alert tab, check the Show error alert after invalid data enters the box.
- Choose a style (Stop, Warning, or Information) and Data Scientist Salary in India a message that will be displayed if invalid data is entered.
- Select the Range: Highlight the range of cells where you want the data validation rule to apply.
- Open Data Validation: Go to the Data tab and click Data Validation.
- Apply Validation: Set up the validation rule as desired (such as a drop-down list or custom formula), and click OK.
- Select the Cells: Highlight the cells or range where you want to remove the data validation.
- Open Data Validation: Go to the Data tab and click Data Validation.
- Clear Validation: In the Data Validation dialog box, click the Clear All button. This will remove any Restricting Data rules Data Collection to the selected cells.
- Click OK: After clearing the validation, click OK to exit.
- Dependent Drop-Down Lists: You can create cascading or dependent drop-down lists where the options in one List depend on the selection in another.
- Dynamic Data Validation: Create dynamic data validation using named ranges or Excel tables, where the List of valid values can grow or change over time.
- Keep It Simple: Avoid overly complex validation rules that may confuse users.
- Use Clear Input Messages: Provide clear instructions to help users understand the required data.
- Test Validation Rules: Before applying Data Science Course Training across a large dataset, test the rules on a small sample to ensure they work as expected.
- Document the Validation Rules: Document the validation rules in a separate sheet for transparency when sharing workbooks.
Now, users can choose from the options in the drop-down List when entering data into the cells, reducing the chances of errors.
Unlock your potential in Data Science with this Data Science Online Course .
Using Custom Formulas for Data Validation
Using custom formulas for data validation in Excel allows you to create more complex and flexible validation rules beyond the predefined options. To start, select the cell or range where you want to apply the custom validation. Next, go to the Data tab and click on Data Validation. In the Data Science Course Training dialog box, under the Settings tab, choose Custom from the Allow drop-down menu. Then, in the Formula field, enter a formula that returns TRUE for valid data and FALSE for invalid data. For instance, if you want to restrict input to numbers between 1 and 100, you can use the formula `=AND(A1>=1, A1<=100)`. Once you've entered your custom formula, click OK to apply the rule. Custom formulas enhance the flexibility of data validation by allowing you to set up sophisticated rules based on logical conditions, ensuring that data entered meets your specific requirements.
Restricting Data Entry with Data Validation
Data validation can restrict data entry in various ways, such as preventing users from entering invalid values or forcing specific formats. Some examples include, Restricting Numerical Ranges Set a A Day in the Life of a Data Scientist rule that restricts data entry to a specified range of values, such as limiting a cell to enter only values between 0 and 10. Restricting Data Text Length Limit the number of characters entered into a cell to ensure that the data fits the required format (e.g., a 10-character phone number). Restricting Dates Set up rules to ensure that dates entered into a cell fall within a specific range or are later than today’s date.
Aspiring to lead in Data Science? Enroll in ACTE’s Data Science Master Program Training Course and start your path to success!
Error Alerts and Input Messages
Excel allows you to display error messages and input messages when invalid data is entered or when users select a cell to enhance the user experience and provide guidance on valid data input.
Input Message:
Error Alert:
Applying Data Validation Across Multiple Cells
To apply the same data validation rules to multiple cells or ranges:
The validation rules will be applied to all selected cells, ensuring consistent data entry across the worksheet.

Removing Data Validation in Excel
If you no longer need data validation for a cell or range, you can easily remove it:
Preparing for Data Science interviews? Visit our blog for the best Data Science Interview Questions and Answers!
Common Data Validation Errors and Fixes
While working with data restriction in Excel, you may encounter some common errors. One such issue is invalid data entry, where the data entered doesn’t meet the specified validation rules. In this case, review the validation settings to ensure they are correctly applied and update the rules if needed. Another common problem is the error alert not displaying, which may occur if the error alert feature is not enabled. To resolve this, check the Error Alert settings in the Data Validation dialog box and make sure they are turned on. Finally, if the validation formula is not working, the issue could be an incorrect formula. In this case, carefully double-check the formula’s syntax, ensuring it references the correct cells and logical conditions. By addressing these issues, you can ensure that data validation in your Excel worksheet functions as intended, helping to maintain accurate and consistent data.
Advanced-Data Validation Techniques
For more advanced data validation, you can combine multiple rules or use dynamic ranges:


