Last updated on 22nd Apr 2025| 9465
- Introduction to Duplicates in Excel
- Why Removing Duplicates is Important
- Using Excel’s Built-in Remove Duplicates Tool
- Removing Duplicates with Conditional Formatting
- Using Formulas to Identify Duplicates
- Removing Duplicates with Excel Filters
- Using VBA to Remove Duplicates
- Handling Case-Sensitive Duplicates
- Removing Duplicates Across Multiple Sheets
- Avoiding Data Loss When Removing Duplicates
- Common Issues When Removing Duplicates
- Best Practices for Data Cleaning in Excel
Introduction to Duplicates in Excel
“In Excel, duplicates are identical entries or rows that appear multiple times in a dataset. These duplicates can occur for various reasons, such as data entry mistakes, merging different datasets, or simply repeating information. Although duplicates might appear harmless at first glance, they can lead to inaccurate analysis, incorrect calculations, and unnecessarily large data files. For a detailed guide on managing duplicates in Excel, you can check out this Excel Tutorial.
Managing duplicates effectively is essential for data analysts, accountants, and anyone working with large datasets. Excel provides various tools and techniques to identify, manage, and remove duplicates, ensuring that data remains accurate, consistent, and easy to analyze.
In this article, we will explore why removing duplicates is essential, the built-in features of Excel for handling duplicates, and how to use formulas, filters, and VBA to remove duplicates efficiently. Additionally, you can enhance your skills by exploring Data science training.
Why Removing Duplicates is Important
Removing duplicates is crucial for several reasons:
- Accuracy of Analysis: Duplicates can skew analysis results. For example, if you are calculating the sum, average, or any other aggregate function, duplicates can distort the output, leading to incorrect conclusions.
- Data Integrity: Having duplicate entries may create inconsistencies in your dataset. This can lead to misinterpretation of the data, especially when performing tasks such as merging or joining data from different sources.
- Efficiency: Large datasets with unnecessary duplicate entries can slow down Excel performance. Removing duplicates helps to reduce file size and improve computational speed.
- Data Quality: Keeping a clean dataset without duplicates ensures that your data is more reliable and that the insights you derive from it are valid.
Using Excel’s Built-In Remove Duplicates Tool
Excel has a built-in “Remove Duplicates” tool for easily identifying and removing duplicate entries from a single or multiple columns.
Steps:- Select the Data Range: Highlight the cells or columns you want to check for duplicates.
- Go to the Data Tab: Navigate to the “Data” tab in the ribbon.
- Click Remove Duplicates: In the “Data Tools” group, click “Remove Duplicates.”
- Select Columns to Check: A dialog box will appear, asking you to select which columns to check for duplicates. Depending on the data, you can choose one or multiple columns.
- Remove Duplicates: Click “OK.” Excel will remove the duplicates and summarize the number of duplicates removed. Example:
If you have a list of customer names in column A and email addresses in column B, and want to remove rows where the customer name and email are the same, simply select both columns during the “Remove Duplicates” process.

Removing Duplicates with Conditional Formatting
While Excel’s “Remove Duplicates” tool is effective, it does not highlight duplicates before removing them. Using Conditional Formatting, you can visually identify duplicates, making it easier to decide whether to delete them.
Steps:- Select the Data Range: Highlight the range of cells that you want to check for duplicates.
- Go to the Home Tab: Click on the “Home” tab in the ribbon.
- Conditional Formatting: In the “Styles” group, click “Conditional Formatting,” then choose “Highlight Cells Rules” and select “Duplicate Values.”
- Choose Highlighting Style: Select the format for highlighting duplicates (you can change the color or style).
- Review Duplicates: Excel will now highlight duplicate values within your selected range. After reviewing, you can manually delete the duplicates or use the “Remove Duplicates” tool to remove them. Example:
If you’re working with a column of email addresses and want to spot duplicates quickly, conditional formatting will highlight the repeated email addresses, making it easier to address them.

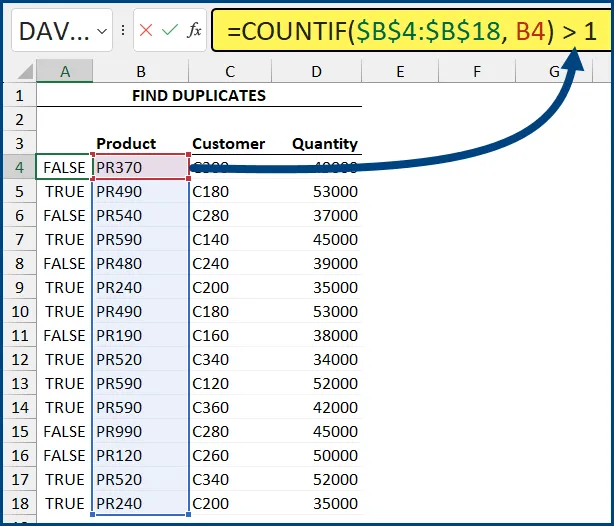
Using Formulas to Identify Duplicates
Formulas can be helpful when you need more control over identifying duplicates or when you want to perform a custom check for duplicates.You can also explore Data science training to enhance your skills in data analysis and manipulation.
=COUNTIF(range, cell_reference) > 1 This formula counts the number of times a value appears in the specified range. If the result is greater than 1, the value is duplicated.
Steps:If you have a list of product IDs in column A, you can use the formula =COUNTIF(A: A, A2) > 1 in column B to flag duplicate product IDs.
Removing Duplicates with Excel Filters
Excel’s Filter feature temporarily displays only unique values, making it easy to identify and delete duplicates.
Steps:- Select the Data Range: Highlight the range of cells or entire columns you want to filter.
- Apply a Filter: Go to the “Data” tab and click the “Filter” button.
- Filter for Unique Values: Click the drop-down arrow in the column header and uncheck “Select All.” Then, check only the unique values you want to keep.
- Delete Duplicates: Once you filter out the duplicates, select and delete the rows that contain the duplicates. Example:
If you have a list of employee names and IDs in columns A and B, using the filter tool will allow you to isolate the unique entries before removing duplicates.
Using VBA to Remove Duplicates
Suppose you frequently work with large datasets or need to automate removing duplicates. In that case, you can use VBA (Visual Basic for Applications) to create a macro that removes duplicates programmatically.You can also use the ROUNDUP Formula to round numbers up in your calculations.
Example Code:Sub RemoveDuplicates() Dim was As Worksheet Set ws = ThisWorkbook.Sheets(“Sheet1”) ‘ Specify the sheet ws.Range(“A1:B100”).RemoveDuplicates Columns:=Array(1, 2), Header:=xlYes End Sub This VBA code removes duplicates from columns A and B in the specified range (A1:B100) on “Sheet 1,” keeping the header row intact.
Steps:- Open VBA Editor: Press Alt + F11 to open the VBA editor.
- Insert a Module: Go to “Insert” > “Module” and paste the VBA code.
- Run the Macro: Close the editor and run the macro to remove duplicates from the selected range automatically.
Handling Case-Sensitive Duplicates
Excel’s default behavior is case-insensitive when identifying duplicates. However, you might encounter situations where case-sensitive duplicates should be treated differently.
To handle this, you can use the EXACT function and other formulas. You can also explore Data science training to enhance your skills and learn more about data handling techniques.
Example Formula:=EXACT(A2, A3) This formula compares two text strings in a case-sensitive manner. If the result is TRUE, the values, including the case, are identical.
Steps:Insert a Helper Column: Add a new column to check if the values are identical based on the case.
Removing Duplicates Across Multiple Sheets
Removing duplicates across multiple sheets in Excel requires a slightly different approach, as the built-in “Remove Duplicates” tool only works within a single sheet.
You can either consolidate the data into one sheet and remove duplicates or use formulas to identify duplicates across multiple sheets.
Method 1: Consolidate Data Into One Sheet- Copy data from each sheet into a single sheet.
- Use the “Remove Duplicates” tool to eliminate duplicates. Method 2: Using Formulas to Identify Across Sheets
- Backup Your Data: Always make a backup of your worksheet before removing duplicates.
- Use Helper Columns: If using formulas, keep a backup of the original data in another column or sheet.
- Preview Results: Use conditional formatting or filters to visually inspect duplicates before deleting them.
Use the COUNTIF function to check for duplicates across sheets. For example:
=COUNTIF(Sheet1!A:A, A2) + COUNTIF(Sheet2!A:A, A2) This will count occurrences of a value across both sheets.
Avoiding Data Loss When Removing Duplicates
When removing duplicates, avoiding data loss is crucial, especially if you mistakenly delete rows you want to keep. To avoid this:
Common Issues When Removing Duplicates
- Accidental Deletion: Sometimes, you may inadvertently remove data that is important. This can happen if you don’t carefully select which columns or ranges to check for duplicates.
- Partial Matches: Duplicates might not be removed correctly if the data in columns is formatted differently or contains extra spaces. Use TRIM() to remove extra spaces before checking for duplicates.
- Inconsistent Case: As mentioned, Excel ignores cases when identifying duplicates. If case sensitivity is essential, use the EXACT() function.
Best Practices for Data Cleaning in Excel
- Consistency: Before removing duplicates, ensure that your data is consistent. Use functions like TRIM(), UPPER(), and LOWER() to standardize data.
- Use Helper Columns: Always use helper columns when working with formulas to prevent accidental deletion of critical data.
- Perform Incremental Checks: Remove duplicates and validate your results after each step.
- Regular Backups: Frequently back up your workbook before performing major data cleaning tasks like removing duplicates.
By following these best practices and leveraging Excel’s built-in features, you can maintain clean and accurate datasets while avoiding common pitfalls. For more details, refer to the Business Analytics with Excel Tutorial.