
Last updated on 22nd Apr 2025| 9394
- Introduction to Excel Sheet Protection
- Why Protect an Excel Sheet?
- Different Types of Protection in Excel
- How to Lock Cells in Excel
- How to Protect an Entire Worksheet
- How to Protect a Workbook
- How to Use Password Protection in Excel
- Restricting Editing and Formatting in Excel
- Allowing Specific Users to Edit Certain Cells
- Common Issues with Protected Sheets and Solutions
- Best Practices for Securing Excel Data
Introduction to Excel Sheet Protection
Excel sheet protection is a valuable feature that helps safeguard the integrity and confidentiality of your data. Data Science Course Training allows users to restrict access to specific cells, ranges, or worksheets, ensuring unauthorized individuals cannot modify sensitive information. Whether it’s preventing accidental data deletion, prohibiting users from altering formulas or securing personal information, Excel provides several tools to customize the level of protection you need. This guide explores the key aspects of Excel sheet protection and how to implement it effectively.
Why Protect an Excel Sheet?
Protecting an Excel sheet is essential for several reasons Prevent Accidental Changes Unintended edits or deletions can lead to data loss or errors. Protection ensures that only authorized users can make changes to crucial data. Maintaining Data Integrity Protecting worksheets containing complex formulas, graphs, or financial data can help ensure that these elements are not tampered with. Control Access By applying protection, you can limit who can edit specific sections of a workbook or worksheet. This is especially useful when Python Career Opportunities users are collaborating on a file. Confidentiality Protecting sensitive or personal information is critical in professional settings to comply with privacy standards and data security regulations. By utilizing Excel’s built-in protection features, you can control the editing rights, maintain data integrity, and ensure that only authorized users can interact with specific Sheet elements.
Master Data Science skills by enrolling in this Data Science Online Course today.
Different Types of Protection in Excel
Excel offers several types of protection mechanisms, each serving a different purpose. These are:
- Sheet Protection: This prevents users from making changes to a worksheet’s content unless they have permission. Users can restrict editing to particular cells while leaving others unlocked.
- Workbook Protection: This protects the entire workbook and prevents changes to its structure, such as adding, moving, or deleting sheets.
- Cell Protection: While you cannot directly protect individual cells, you can lock or unlock specific cells within a worksheet to control which areas are Python Generators after applying sheet protection.
- Password Protection: You can set a password to control access to certain workbook parts, preventing unauthorized users from making changes or accessing confidential information.
How to Lock Cells in Excel
By default, all cells in an Excel worksheet are locked, but this lock doesn’t take effect until you protect the Sheet. To lock specific cells, you need to follow these steps:
Steps to Lock Cells:
- Select the cells you want to lock or leave unlocked.
- Right-click on the selected cells and choose Format Cells.
- Go to the Protection tab and check the box next to Locked (it’s checked by default).
- Click OK to apply the changes.
- Now, go to the Review tab and click on Protect Sheet.
- Set a password (optional) and specify what actions users can or cannot do (like selecting locked cells, formatting cells, etc.).
- Once the Sheet is protected, the locked cells can’t be edited without first unprotecting the Sheet.
- Select the Review tab on the ribbon.
- Click on Protect Sheet.
- Enter a password (optional but recommended) in the Protect Sheet dialog box.
- You can specify what users can do (for example, allow them to format cells, sort data, or insert rows).
- Press OK to apply the protection. If you’ve set a password, confirm it by entering it again.
- Once applied, no one can change the Sheet unless they unprotect it using the password (if provided).
- Seplect the Review tab.
- Click on Protect Workbook.
- A dialog box will appear where you can enter a password.
- You can also choose to allow users to select or format specific sheets.
- Click OK to activate workbook protection once the password is set and confirmed.
- Protected workbooks prevent structural changes but allow users to view and interact with the data within the sheets.
- Go to the Review tab and click Protect Sheet.
- Enter a password (optional) and choose the Data Science for other users.
- Confirm the password and click OK.
- Go to the Review tab and click Protect Workbook.
- Enter a password and set the specific protection preferences.
- Confirm the password and click OK.
- Remember your passwords, as losing them can make it difficult to unprotect the Sheet or workbook.
- Lock Specific Cells: Select the cells you want to lock (refer to “How to Lock Cells in Excel”). Go to Review > Protect Sheet and set the permissions.
- Allow Specific Editing Rights: Under Allow Users to Edit Ranges, click New to define the range of cells users can edit. Specify any range and set a password for that specific range if needed.
- Restrict Formatting: In the Protect Sheet dialog box, check the options you wish to restrict (such as formatting rows and columns or changing the formatting of locked cells). By applying these options, you can ensure that users cannot edit specific data or modify the worksheet’s structure.
- Unlock Cells: Unlock the cells you want specific users to edit. Select the cells, right-click, choose Format Cells, go to the Protection tab, and uncheck Locked.
- Define Editable Ranges: Go to the Review tab and click on Allow Users to Edit Ranges. Click New to define the range of cells and set a password (if necessary).
- Set Permissions: In the Allow Users to Edit Ranges dialog box, click Permissions and assign specific users who will have editing rights.
- Use Strong Passwords: Always set a strong sheet and workbook protection password to prevent unauthorized access.
- Backup Your Files: Regularly back up your Excel files to ensure that data is not lost due to accidental changes or corruption.
- Limit Access: Only provide the password to trusted individuals and restrict editing permissions to prevent unauthorized modifications.
- Use Permissions: When collaborating, use Excel’s permissions feature to limit who can edit specific cells or ranges.
- Avoid Over-Protecting: Protecting every aspect of a sheet may hinder usability. Use protection selectively and only where necessary to maintain both security and functionality.
Enhance your knowledge in Data Science. Join this Data Science Online Course now.
How to Protect an Entire Worksheet
One of the most common uses for Excel sheet protection is to protect an entire worksheet. This prevents unauthorized changes to the contents of the whole Sheet, including formulas, Big Data vs Data Science .
Steps to Protect a Worksheet:

How to Protect a Workbook
Workbook protection ensures that the structure of the workbook is secure. Without permission, no one can add, delete, or move worksheets within the workbook.
Steps to Protect a Workbook:
Want to lead in Data Science? Enroll in ACTE’s Data Science Master Program Training Course and start your journey today!
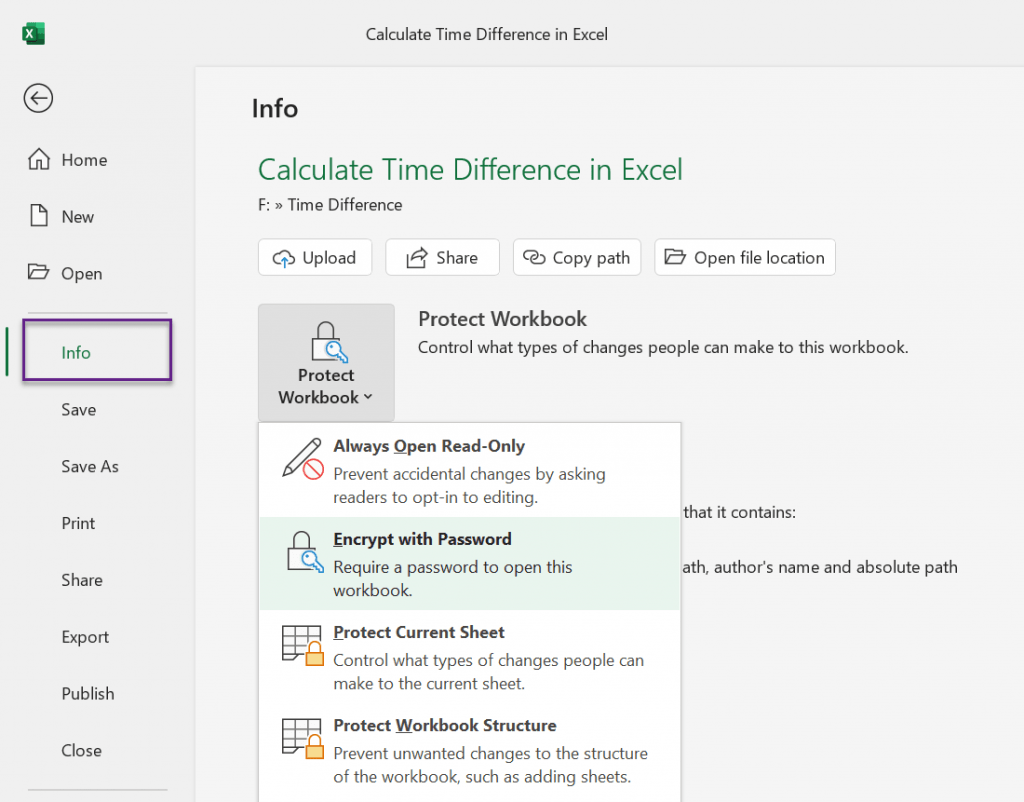
How to Use Password Protection in Excel
Password protection in Excel is one of the most effective ways to prevent unauthorized access and ensure that sensitive information remains secure. You can apply passwords to either individual worksheets or entire workbooks.
Steps to Set Password Protection:
Protecting a Worksheet:
Protecting a Workbook:

Restricting Editing and Formatting in Excel
Excel allows you to restrict editing and Data Science Course Training. You can lock specific cells to prevent users from altering their values or formatting while allowing them to edit other cells.
Steps to Restrict Editing and Formatting:
Preparing for a job interview? Explore our blog on Data Science Interview Questions and Answers!
Allowing Specific Users to Edit Certain Cells
In a collaborative environment, you should allow specific users to edit certain cells while protecting others. Excel provides a feature to grant permissions to particular ranges.
Steps to Allow Specific Users to Edit:
This feature is especially useful in multi-user Python Keywords where you want to allow specific individuals to make changes while preventing others from modifying critical information.
Common Issues with Protected Sheets and Solutions
While Excel sheet protection is an excellent tool, users may encounter some common issues. Here are a few solutions to those problems, Forgotten Password If you forget the password for a protected sheet or workbook, you cannot easily recover it without third-party software. Always store passwords securely. Unable to Edit Locked Cells Ensure you’ve unlocked the cells you wish to edit before applying sheet protection. Partial Protection Sometimes, users may inadvertently select the wrong cells to lock or unlock, leading to partial protection. Double-check the selected cells before applying protection.
Common Issues with Protected Sheets and Solutions
While Excel sheet protection is an excellent tool, users may encounter some common issues. Here are a few solutions to those problems, Forgotten Password If you forget the password for a protected sheet or workbook, you cannot easily recover Data Science Course Training without third-party software. Always store passwords securely. Unable to Edit Locked Cells Ensure you’ve unlocked the cells you wish to edit before applying sheet protection. Partial Protection Sometimes, users may inadvertently select the wrong cells to lock or unlock, leading to partial protection. Double-check the selected cells before applying protection.
Best Practices for Securing Excel Data
To ensure your Excel data remains secure, follow these best practices: