
Last updated on 22nd Apr 2025| 9195
- Introduction to Locking and Unlocking Cells in Excel
- Why Locking Cells in Excel is Important
- Understanding the Default Behavior of Cells in Excel
- How to Lock Cells in Excel: Step-by-Step Guide
- How to Unlock Cells in Excel: Step-by-Step Process
- Using Cell Protection Features to Enhance Security in Excel
- Best Practices for Locking and Unlocking Cells in Excel
- Conclusion
Introduction to Locking and Unlocking Cells in Excel
One of the key aspects of managing data in Excel is protecting certain parts of a worksheet from unintended changes. Locking and unlocking cells are essential techniques for ensuring that only the designated areas of a sheet can be modified while others remain secure. This is especially important when sharing Excel files with multiple users, as it helps control access to sensitive or critical information. By default, all cells in an Excel worksheet are locked, but this protection does not take effect until the sheet is actually protected a detail often covered in Data Science Training. To allow users to edit specific areas, you need to manually unlock the cells you want to be accessible. This guide provides step-by-step instructions on how to lock and unlock cells in Excel, ensuring that you can safeguard the parts of your sheet that require protection, such as formulas, headers, or other vital data. Whether you’re managing a personal project or collaborating with others, mastering these techniques will help you maintain control over your Excel workbooks and prevent accidental changes or unauthorized modifications.
To Explore Data Science in Depth, Check Out Our Comprehensive Data Science Course Training To Gain Insights From Our Experts!
Why Locking Cells in Excel is Important
- Preventing Accidental Changes: Locking specific cells prevents users from accidentally altering essential formulas or data fields.
- Data Security: Locking cells ensure that sensitive data, such as financial numbers or customer information, cannot be altered and stays secure.
- Controlled Data Entry: Locking specific cells and keeping others open, you have the control to specify where data can be entered while avoiding unauthorized modifications in particular regions, which aligns with the emphasis on data integrity when exploring What is the Future scope of Data Science.
- Efficiency during Collaboration: When collaborating with several other collaborators, locking cells enables you to mark specific cells as editable, limiting the occurrence of errors due to unauthorized modifications.
- Consistency in Data Structure: Locking cells ensures that the overall structure of the spreadsheet remains intact, preventing changes to key elements like headers, formulas, or reference points that could disrupt calculations or data flow.
- Improved Workflow Management: By locking cells, you can guide users to focus only on specific areas of the document that require their attention, thus enhancing workflow efficiency and reducing the chance of making mistakes in unnecessary sections.
- Step 1: Select the Cells to Lock- All cells are locked by default, but you can selectively choose which cells to lock. First, highlight the cells you want to lock a level of control that mirrors the variable selection process in Stepwise Regression.
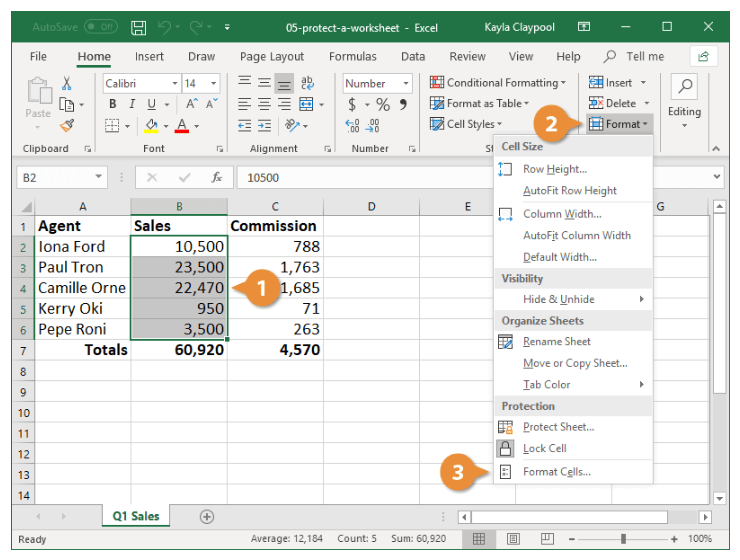
- Step 2: Format Cells to Lock- Right-click on the selected cells and choose Format Cells. In the Format Cells dialog box, navigate to the Protection tab and check the box next to Locked. This ensures the selected cells will be locked once the worksheet is protected.
- Step 3: Protect the Sheet- After locking the necessary cells, go to the Review tab in the Excel ribbon and click on Protect Sheet. You can set a password in the dialog box to prevent unauthorized users from unprotecting the sheet. Click OK to apply protection.
- Step 1: Select the Cells to Unlock- Start by choosing the cells you need to unlock. You can select them by holding your mouse button and clicking on the row of cells.
- Step 2: Format Cells to Unlock- Right-click within the chosen cells and select Format Cells. Uncheck the Locked option in the Protection tab of the dialog box, a step commonly demonstrated in Data Science Training. This will make the cells unlockable so users can edit them even when the sheet is protected.
- Step 3: Protect the Sheet- Now that you’ve unlocked the necessary cells go to the Review tab and select Protect Sheet. You can again enter a password to discourage unauthorized changes to the protection options. Click OK to lock the sheet. Once the sheet is protected, only the cells you unlocked will remain editable, while all other cells will be locked and protected.
- Only Lock What You Need: Locking unnecessary cells can confuse users and make it difficult for them to edit the document as needed. Only lock the cells that require protection.
- Use Passwords Wisely: If you use a password to protect your sheet, ensure it’s secure and memorable. Store it safely to avoid losing access to your document, just as you would manage credentials when working with the Most Popular Data Science Tools.
- Test Protection Settings: After locking and unlocking cells, test the sheet to ensure the protection works as intended. Then, try editing both locked and unlocked cells to confirm that only the unlocked cells are editable.
- Unlock Input Areas: If you’re using Excel for data entry, unlock the cells where users must input data. This will prevent them from accidentally modifying other vital cells.
- Use Conditional Formatting: In addition to locking and unlocking cells, you can also use conditional formatting to distinguish editable cells from protected ones visually. This can help users identify where they can make changes.
Understanding the Default Behavior of Cells in Excel
In Excel, all cells are locked by default, but this lock does not take effect until the worksheet is protected. This means that you can still freely edit any cell in the worksheet until the protection is applied. The locking feature is applied individually to each cell, but it is only enforced when the sheet is protected. Once the worksheet is protected, users can only edit cells that have been unlocked, ensuring that critical data or formulas remain secure. It’s important to remember that simply locking cells won’t prevent users from editing them until the sheet is protected, similar to how understanding data distribution nuances like Skewness vs Kurtosis is essential for accurate analysis. Without protecting the Excel sheet, locked cells remain editable. The protection step is crucial in ensuring that the locked cells are effectively safeguarded. By locking specific cells and protecting the sheet, you can allow users to enter data in designated areas while preventing them from making changes to sensitive or essential information. Always ensure that you protect the sheet after locking the cells for full functionality.
Are You Interested in Learning More About Data Science? Sign Up For Our Data Science Course Training Today!
How to Lock Cells in Excel: Step-by-Step Guide
Locking cells in Excel is straightforward. However, before locking cells, you first need to unlock the ones you want users to be able to edit, as all cells are locked by default. Here’s how to lock specific cells:


How to Unlock Cells in Excel: Step-by-Step Process
While protecting cells against unauthorized modification with the lock command, unlocking cells enables users to make changes within particular worksheet sections. To unlock cells in Excel:
Looking to Master Data Science? Discover the Data Science Masters Course Available at ACTE Now!
Using Cell Protection Features to Enhance Security in Excel
Excel provides several powerful features to enhance the security and protection of your worksheets. One such feature is password protection, which allows you to safeguard a sheet or workbook by requiring a password to access or make changes to the data. This is particularly useful for securing sensitive information and preventing unauthorized modifications. Another important feature is the ability to allow users to edit specific ranges of cells while keeping the rest of the sheet locked. This is helpful when you need to give others access to certain areas for data entry without compromising the integrity of the entire worksheet, much like how What is Seaborn in Python explains tools for maintaining clarity and structure in data visualization. To use this feature, go to the “Review” tab and select “Allow Users to Edit Ranges.” You can then define the specific range of cells that should be editable, even when the rest of the sheet is locked. Optionally, you can set a password for these editable ranges to ensure that only authorized users can make changes. This flexibility allows you to protect critical data while still enabling collaboration and controlled input in specific areas of your worksheet.
Best Practices for Locking and Unlocking Cells in Excel
To ensure the protection of your Excel worksheets and improve the overall functionality, it’s essential to follow these best practices:
Are You Preparing for Data Science Jobs? Check Out ACTE’s Data Science Interview Questions & Answer to Boost Your Preparation!
Conclusion
Locking and unlocking cells in Excel is essential for both protecting and managing data within your worksheets. Whether you’re working solo or collaborating with a team, these features ensure that sensitive information remains secure while allowing specific areas for data entry. Locking cells prevents accidental modifications to formulas, headers, or other important data, which helps maintain data integrity. On the other hand, unlocking specific cells gives users the flexibility to input data where necessary, without compromising the security of other sections. Following step-by-step guides to lock and unlock cells allows you to control access and prevent unauthorized changes, a useful skill often emphasized in Data Science Training. Additionally, it helps in reducing errors and ensures consistency, especially when working in shared or collaborative environments. By implementing these practices, you can streamline your workflow, enhance collaboration, and protect crucial information, making your Excel workbooks more secure and efficient. Whether for personal use or larger team projects, understanding how to lock and unlock cells is a valuable skill for maintaining data accuracy and protecting your work.