Last updated on 21st Apr 2025| 9678
- In Excel, what is a checkbox, and why is it used?
- How to Add a Checkbox to Excel?
- How to Connect a Cell to a Checkbox
- How to Set Up an Excel Checkbox
- How to Remove an Excel Checkbox
- Best practices for adding checkboxes in Excel
- Conclusion
Adding a checkbox in Excel is a simple yet powerful feature that allows you to create interactive forms, track tasks, or manage data in a more organized way. Checkboxes are typically used to represent binary choices, such as “Yes/No” or “Completed/Not Completed,” making them ideal for to-do lists, surveys, and data validation tasks. To add a checkbox, you can use the “Developer” tab in Excel, which Data Science Course Training you access to form controls, including checkboxes. Once inserted, these checkboxes can be customized in terms of size, color, and alignment. Additionally, you can link checkboxes to specific cells, allowing Excel to display a TRUE or FALSE value based on whether the checkbox is checked or unchecked. This functionality helps automate tasks, perform calculations, or simply track progress within your spreadsheet.
In Excel, What Is a Checkbox and Why Is It Used?
In Excel, a checkbox is an interactive control element that allows users to select or deselect an option. Checkboxes are employed as part of forms or to create interactive worksheets. They are a convenient and intuitive means of enabling users to make binary choices, i.e., “yes or no,” “on or off,” or “selected or not selected.” Every checkbox usually represents a Boolean value: TRUE for marked and FALSE for blank. They are commonly used in task lists, dashboards, and data input forms. By linking a checkbox to a specific cell, users can create dynamic and responsive spreadsheets that react based on selections. Ansible Playbooks Explained Guide is particularly useful for tracking progress or filtering data based on user input. Checkboxes help simplify data entry and reduce the chance of manual errors. Users can also combine checkboxes with formulas to trigger calculations or display results based on selections. Formatting and layout customization options make it easy to align checkboxes with the rest of the content. You can add multiple checkboxes to a sheet for different choices or conditions. Overall, checkboxes increase interactivity, enhance usability, and improve workflow efficiency in Excel-based projects.
Checkboxes in Excel are usually employed for:
- Monitoring Tasks: Checkboxes can indicate whether tasks are complete on to-do lists or project management worksheets.
- Interactive Forms: Users can enter information and make choices by checking or unchecking boxes, simplifying the process.
- Data Validation: Checkboxes can be e Seamless Cloud Migration Guide in situations where one choice out of a list of options should be selected or to get users to enter the correct data.
- Conditional Formatting: Checkboxes can trigger certain actions, like formatting or calculations, when ticked or unticked, making them effective in dynamic reporting.
- Click on the File tab and choose Options.
- In the Excel Options window, click on Customize Ribbon.
- Under the Main Tabs section, select the Developer checkbox.
- Click OK to close the window. The Developer tab on the ribbon should now be visible.
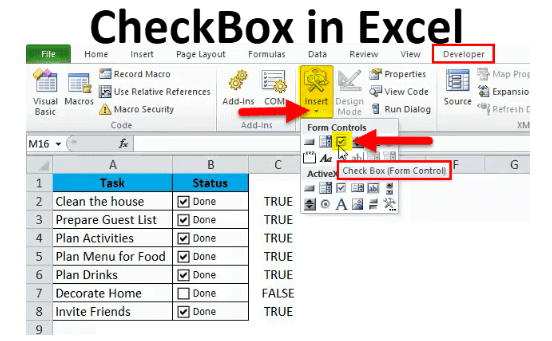
- Go to the Developer tab and locate the Controls group.
- Click on the Insert button, then click on the Checkbox icon under the Form Controls.
- Click anywhere on the worksheet where you’d like to place the checkbox. A checkbox will appear that you can drag and resize to The Importance of Machine Learning for Data Scientists your needs.
- You can insert several checkboxes by clicking and dragging them to new places or by copying and pasting current checkboxes.
- Right-click the checkbox and choose Edit Text.
- You can replace the text with your label, such as “Task Completed” or “Yes.”
- If you need only the checkbox for your project, you can eliminate the text by right-clicking the checkbox and removing the text.
- Insert the Checkbox: Use the steps in the above section.
- Right-click the Checkbox: Right-click on the inserted checkbox and choose Format Control.
- Go to the Control Tab: In the Format Control dialog box, go to the Role of Citizen Data Scientists in Todays Business.
- Link the Cell: In the Cell link box, type the reference for the cell you’d like to link the checkbox to (e.g., A1), or click on the cell you’d like to use.
- Click OK: Click OK to close the dialog box once you’ve chosen the cell.
- Checkboxes can be used to manage data input and output in Customize Ribbon.
- For instance, you may use a checkbox to specify whether a specific row of data should be added to a calculation or if a Data Science vs Data Analytics vs Machine Learning is fulfilled.
- You can include checkboxes together with IF or SUMIF functions and devise dynamic calculations
- Example: To get the total of only sales for products with the “active” checkbox marked, you would apply a formula such as =IF(A1=TRUE, SUM(B1:B10), 0), where A1 is tied to a checkbox.
- Checkboxes are often employed to initiate conditional formatting. For instance, suppose you have an array of tasks and wish for the row to become green after a checkbox has been marked (which signifies that the task has been completed); you can implement conditional formatting rules based on the cell referencing the checkbox.How to do this:
- Right-click on the cell with the checkbox.
- Select Conditional Formatting from the Home menu.
- Go to Options > New Rule, select Use a formula to determine which cells to format.
- Enter a formula such as =A1=TRUE (if A1 is the source cell that contains the linked value).
- Select the format, e.g., green fill, and click OK.
- Checkboxes can also be combined with data validation to input only the checked options. For instance, you might have a list of categories from a drop-down where a checkbox controls which categories will be chosen.
- You can utilize data validation with formulas linked to checkboxes to build advanced forms and controls.
- After you have selected the checkbox, press the Basics of Data Science key on your keyboard. The checkbox will be deleted from the worksheet.
- ple checkboxes, press the Ctrl key (or Cmd on Mac) while clicking on the checkboxes you want to erase. After that, press the Delete key.
- If a checkbox is associated with a cell, its deletion won’t impact the content of the related cell. Still, you can remove or clear the associated cell’s formula if you no longer need it.
- Enable the Developer Tab: Before adding a checkbox, ensure the Developer tab is enabled. It provides access to form controls, including checkboxes. You can enable it via the Excel options under “Customize Ribbon.”
- Use Form Controls for Simplicity: When adding checkboxes, use the Form Controls option instead of ActiveX controls. Form controls are simpler and more versatile for most basic tasks, making Chi Square Test the preferred choice.
- Align and Size Checkboxes Consistently: Ensure that all checkboxes are the same size and aligned neatly within the cells. This improves the visual appearance of your spreadsheet and makes it easier for users to interact with.
- Link Checkboxes to Cells: Link each checkbox to a specific cell to capture its TRUE (checked) or FALSE (unchecked) status. This is useful for performing calculations or tracking progress based on whether a checkbox is selected.
- Use Checkboxes for Binary Choices: Checkboxes are best suited for binary choices (yes/no, true/false). Use them for tasks like to-do lists, project tracking, or task completion status.
- Group Related Checkboxes: If you have multiple checkboxes, group related checkboxes together in a way that makes sense, like under a common header. This improves organization and readability.
- Consider Conditional Formatting: Use conditional formatting to highlight cells based on the checkbox status (checked or unchecked). For example, you can apply color changes or add icons to provide a visual cue of completion.
- Avoid Overuse of Checkboxes: While checkboxes are helpful, don’t overuse them in large datasets or complex tasks, as they can make the spreadsheet difficult to navigate. Use them sparingly to maintain clarity.
- Add Descriptive Labels: Provide clear, descriptive labels next to checkboxes so users understand what each checkbox represents. This is especially important in larger forms or tracking lists.
- Test Functionality: After adding checkboxes, always test the functionality, especially if they are linked to formulas or conditional formatting. Make sure the checkbox interaction behaves as expected across different cells.
Placing a checkbox in Excel makes it possible to include an interactive feature that can turn a spreadsheet into a software-like application, enabling people to visualize and interact with data more structured and purposefully.
Start your journey in Data Science by enrolling in this Data Science Online Course .
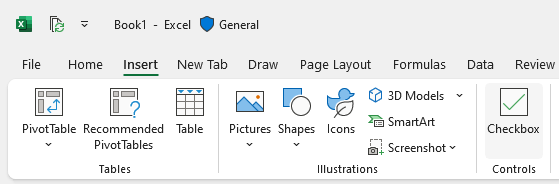
How to Add a Checkbox to Excel?
Adding a checkbox to an Excel worksheet is easy. To add a checkbox to any worksheet, follow these steps:
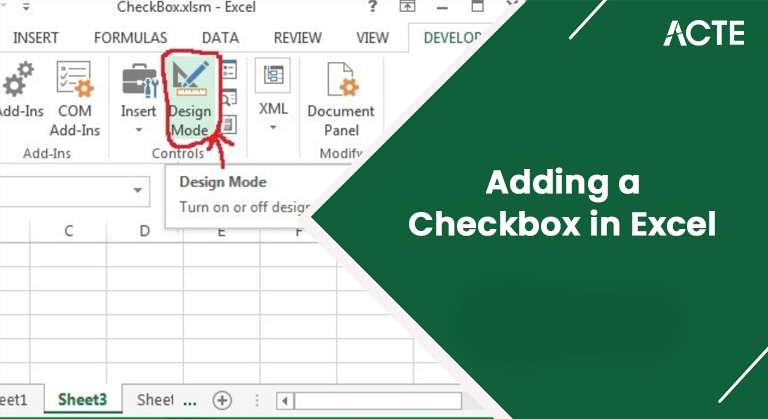
Step 1: Enable the Developer Tab
By default, the Developer tab with the checkbox control is not enabled in Excel’s ribbon. To make it visible:
Step 2: Insert a Checkbox
Now that the Developer tab is turned on, you can add a checkbox:
Step 3: Edit the Text
All the checkboxes will show default text like “Checkbox 1.” You can edit the text so that it becomes more meaningful to your data:
Learn how to manage and deploy cloud services by joining this Data Science Online Course today.
How to Connect a Cell to a Checkbox
Excel has a strong capability for tying a checkbox to a cell. When the checkbox is marked or cleared, the cell tied to it will show TRUE (marked) or FALSE (cleared). The connection can be employed for a wide range of functions, such as activating conditional formatting or performing calculations depending on the checkbox’s status. Following are the steps to tie a checkbox to a cell:
Now, whenever the checkbox is marked, the associated cell shows TRUE; when it is not marked, it shows FALSE. This association can form formulas that rely on whether the checkbox is marked.

How to Set Up an Excel Checkbox
Creating a checkbox in Excel is more than just placing it in a worksheet. You can set the checkbox to do many things and make Data Science Course Training work with other components of your worksheet. Below are some ways to create a checkbox in Excel, Start by enabling the Developer tab, which gives access to form controls, including checkboxes. Use the Insert option under the Developer tab and choose the Form Controls Checkbox to place it on your sheet. Once added, you can move and resize the checkbox to fit your layout neatly. Right-click on the checkbox and select Edit Text to label it clearly, helping users understand its purpose. You can link the checkbox to a cell, so that it returns TRUE when checked and FALSE when unchecked. This linked cell can be used in formulas, conditional formatting, or dashboards to automate actions based on the checkbox status. You can copy and paste the checkbox to create multiple identical options across your sheet. To ensure visual consistency, use alignment tools to position checkboxes precisely within your columns or rows. Combine checkboxes with features like data validation or charts to create interactive Excel tools. Overall, a checkbox is not just a click feature—it’s a flexible component that can enhance user input and data analysis.
Set Checkbox as a Control for Data Input
Conditional Formatting Using Checkboxes
Create Checkboxes for Data Validation
Ready to excel in Data Science? Enroll in ACTE’s Data Science Master Program Training Course and begin your journey today!
How to Remove an Excel Checkbox
It is easy to delete a checkbox in Customize Ribbon. If you no longer require a checkbox or need to tidy up your worksheet, you can delete it quickly. Here’s how: Click on the Checkbox: Choose the checkbox you wish to delete.
Preparing for a job interview? Explore our blog on Data Science Interview Questions and Answers!
Best practices for adding checkboxes in Excel
Conclusion
Checkboxes in Excel are convenient and practical tools that can greatly improve interactivity, analysis, and organization in a worksheet. By presenting a friendly interface for binary decisions, checkboxes enable users to comfortably monitor tasks, facilitate conditional formatting, and connect data for dynamic calculation. They also come in handy when developing interactive forms, monitoring project progress, and enhancing data validation. Data Science Course Training guide walks you through inserting a checkbox, tying it to a cell, establishing conditional formatting, and eliminating unwanted checkboxes. Checkboxes’ versatility in Excel makes them an indispensable tool for enhancing the usability of your spreadsheets, both for personal chores and professional procedures. Mastering checkboxes can enable you to create more interactive and user-friendly Excel documents, maximizing your workflow and automating procedures to a great degree.